18.5 Administering Subcutaneous Medications
Subcutaneous injections are administered into the adipose tissue layer called “subcutis” below the dermis. See an image of the subcutis (hypodermis) layer in Figure 18.20.[1] Medications injected into the subcutaneous layer are absorbed at a slow and steady rate.

Anatomic Sites
Sites for subcutaneous injections include the outer lateral aspect of the upper arm, the abdomen (from below the costal margin to the iliac crest and more than two inches from the umbilicus), the anterior upper thighs, the upper back, and the upper ventral gluteal area.[2] See Figure 18.21[3] for an illustration of commonly used subcutaneous injection sites. These areas have large surface areas that allow for rotation of subcutaneous injections within the same site when applicable.
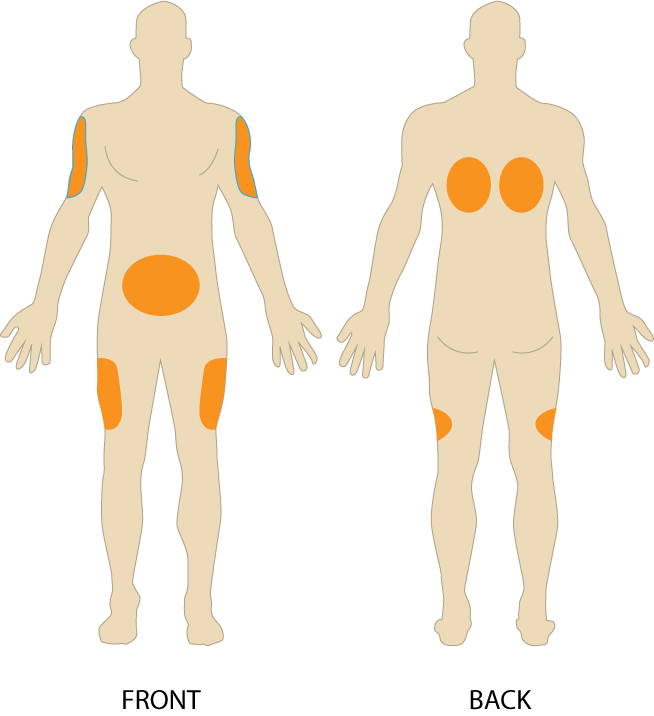
Prior to injecting the medication, inspect the skin area. Avoid skin areas that are bruised, open, scarred, or over bony prominences. Medical conditions that impair the blood flow to a tissue area contraindicate the use of subcutaneous injections in that area. For example, if a patient has an infection in an area of their skin called “cellulitis,” then subcutaneous injections should not be given in that area.
Description of Procedure
Nurses select the appropriate needle size for subcutaneous injection based on patient size. Subcutaneous needles range in gauge from 25-31 and in length from ½ inch to ⅝ inch. Prior to administering the injection, determine the amount of subcutaneous tissue present and use this information to select the needle length. A 45- or 90-degree angle is used for a subcutaneous injection. A 90-degree angle is used for normal-sized adult patients or obese patients, and a 45-degree angle is used for patients who are thin or have less adipose tissue at the injection site. The volume of solution in a subcutaneous injection should be no more than 1 mL for adults and 0.5 mL for children. Larger amounts may not be absorbed appropriately and may cause increased discomfort for the patient.[4]
When administering a subcutaneous injection, assess the patient for any contraindications for receiving the medication. Apply nonsterile gloves after performing hand hygiene to reduce your risk of exposure to blood. Position the patient in a comfortable position and select an appropriate site for injection. Cleanse the site with an alcohol swab or antiseptic swab for 30 seconds using a firm, circular motion, and then allow the site to dry. Allowing the skin to dry prevents introducing alcohol into the tissue, which can be irritating and uncomfortable. Remove the needle cap with the nondominant hand, pulling it straight off to avoid needlestick injury. Grasp and pinch the area selected as an injection site.[5] See Figure 18.22[6] for an image of a nurse grasping the back of a patient’s upper arm with the nondominant hand in preparation of a subcutaneous injection at the anatomical site indicted with an “X.”

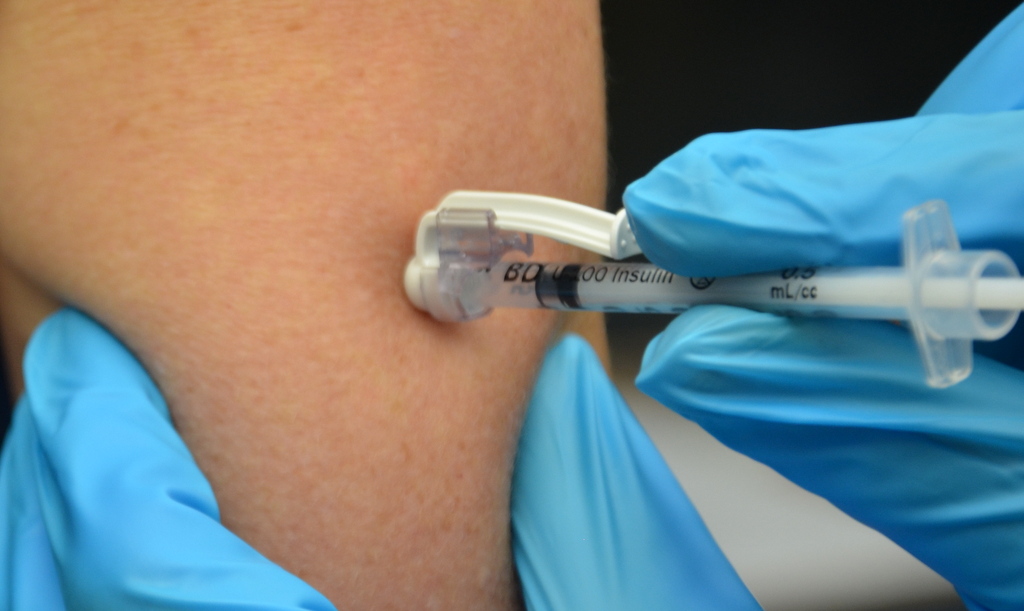
Hold the syringe in the dominant hand between the thumb and forefinger like a dart. Insert the needle quickly at a 45- to 90-degree angle, depending on the size of the patient and the amount of adipose tissue. After the needle is in place, release the tissue with your nondominant hand. With your dominant hand, inject the medication. Avoid moving the syringe. Wait 10 seconds before removing the needle.[7] See Figure 18.23[8] for an image of a subcutaneous injection.
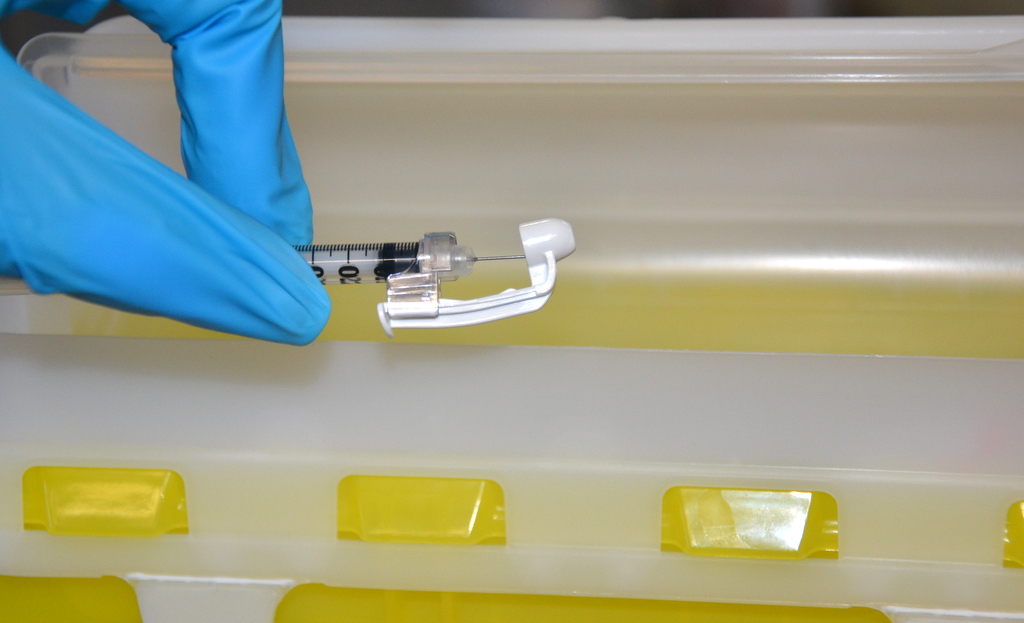
Withdraw the needle quickly at the same angle at which it was inserted. Using a sterile gauze, apply gentle pressure at the site after the needle is withdrawn. Do not massage the site. Massaging after a heparin injection can contribute to the formation of a hematoma. Do not recap the needle to avoid puncturing oneself. Apply the safety shield and dispose of the syringe/needle in a sharps container. See Figure 18.24[9] for an image of a needle after the safety shield has been applied. Remove gloves and perform hand hygiene.[10]
Examples of common medications administered via subcutaneous injection include insulin and heparin. Special considerations for each of these medications are discussed below.
Insulin Injections
Insulin is considered a high-alert medication requiring special care to prevent medication errors. Care must be taken to ensure the correct type and amount of insulin are administered at the correct time. It is highly recommended to have insulin dosages double-checked by another nurse before administration because of the potential for life-threatening adverse effects that can occur due to medication errors. Some agencies require this second safety check.
Only insulin syringes should be used to administer insulin injections. Insulin syringes are supplied in 30-, 50-, 100-, or 500-unit measurements, so read the barrel increments (calibration) carefully. Insulin is always ordered and administered in unit dosage. Insulin dosage may be based on the patient’s pre-meal blood sugar reading and a sliding scale protocol that indicates the number of units administered based on the blood sugar reading.[11],[12]
There are rapid-, short-, intermediate-, and long-acting insulins. Insulin vials and pens commonly have a concentration of 100 units in 1 mL (100 units/mL), which is called U-100. However, some insulin products come in a higher concentration. U-200 means that there are 200 units of insulin in 1 mL (200 units/mL), U-300 means that there are 300 units of insulin in 1 mL (300 units/mL), and U-500 means that there are 500 units of insulin in 1 mL (500 units/mL). Given that a brand of insulin may come in different concentrations, it is important to look at the insulin pen or vial for the concentration. When using insulin via a vial and syringe, make sure the insulin concentration on the vial and syringe match (such as when using a vial with an insulin concentration of U-100, only use syringes that are for U-100 insulin). There is currently one concentrated insulin available in a vial (HUMULIN R U-500 vial), and there is a corresponding U-500 syringe. For each type of insulin, it is important to know the onset, peak, and duration of the insulin so that it can be timed appropriately with the patient’s food intake. It is essential to time the administration of insulin with food intake to avoid hypoglycemia. When administering insulin before a meal, always ensure the patient is not nauseated and is able to eat. Short- or rapid-acting insulin may be administered up to 15-30 minutes before meals. Intermediate insulin is typically administered twice daily, at breakfast and dinner, and long-acting insulin is typically administered in the evening.[13],[14]
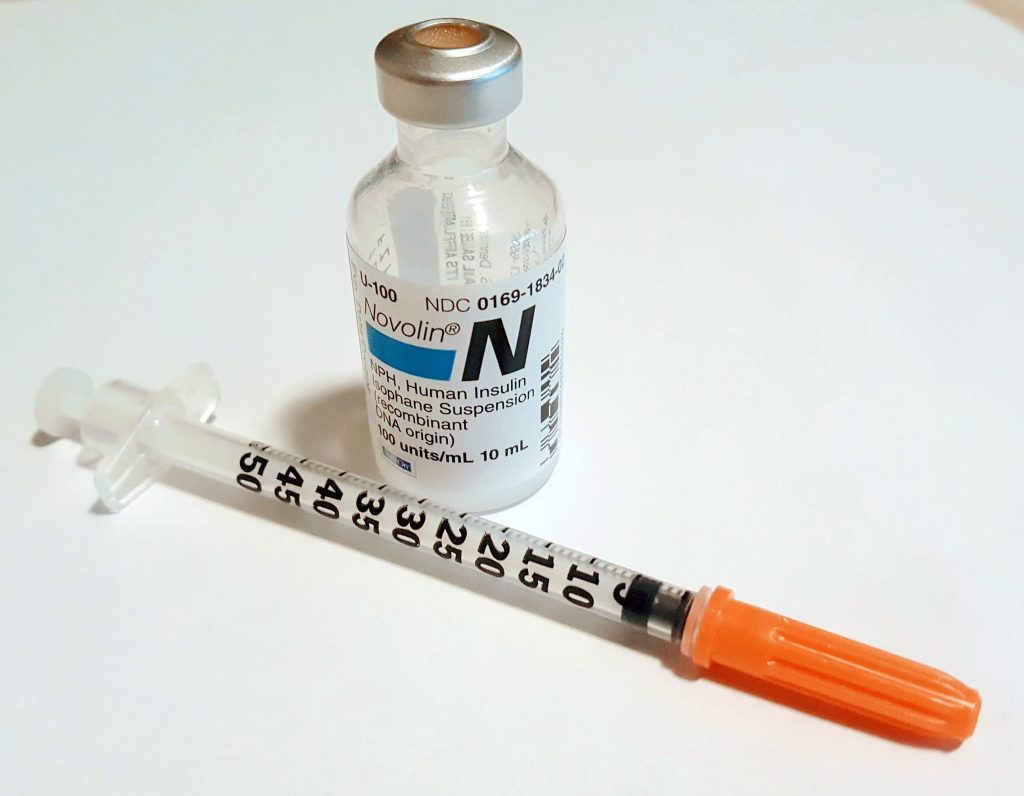
When administering cloudy insulin preparations such as NPH insulin (Humulin-N), gently roll the vial between the palms of your hands to resuspend the medication before withdrawing it from the vial.[15],[16] See Figure 18.25[17] for an image of NPH insulin that is cloudy in color.
Preparing Insulin in a Syringe
When withdrawing insulin from a vial, check the insulin vial to make sure it is the right kind of insulin and that there are no clumps or particles in it. Also, make sure the insulin is not past its expiration date. Clean the top of the vial by scrubbing with an alcohol wipe and allow to dry. Pull air into the syringe to match the amount of insulin you plan to remove. Hold the syringe like a pencil and insert the needle into the rubber stopper on the top of the vial. Push the plunger down until all of the air is in the bottle. This helps to keep the right amount of pressure in the bottle and makes it easier to draw up the insulin. With the needle still in the vial, turn the bottle and syringe upside down (vial above syringe). Pull the plunger to fill the syringe to the desired amount. Check the syringe for air bubbles. If you see any large bubbles, push the plunger until the air is purged out of the syringe. Pull the plunger back down to the desired dose. Remove the needle from the bottle. Be careful to not let the needle touch anything until you are ready to inject.[18]
Mixing Two Types of Insulin
If a patient is ordered two types of insulin, some insulins may be mixed together in one syringe. For example, NPH insulin (Novolin-N) can be mixed with regular insulin (Humulin-R), aspart insulin (Novolog), or lispro insulin (Humalog). However, some types of insulin cannot be mixed with other insulin, such as glargine insulin (Lantus) or detemir insulin (Levemir).[19],[20]
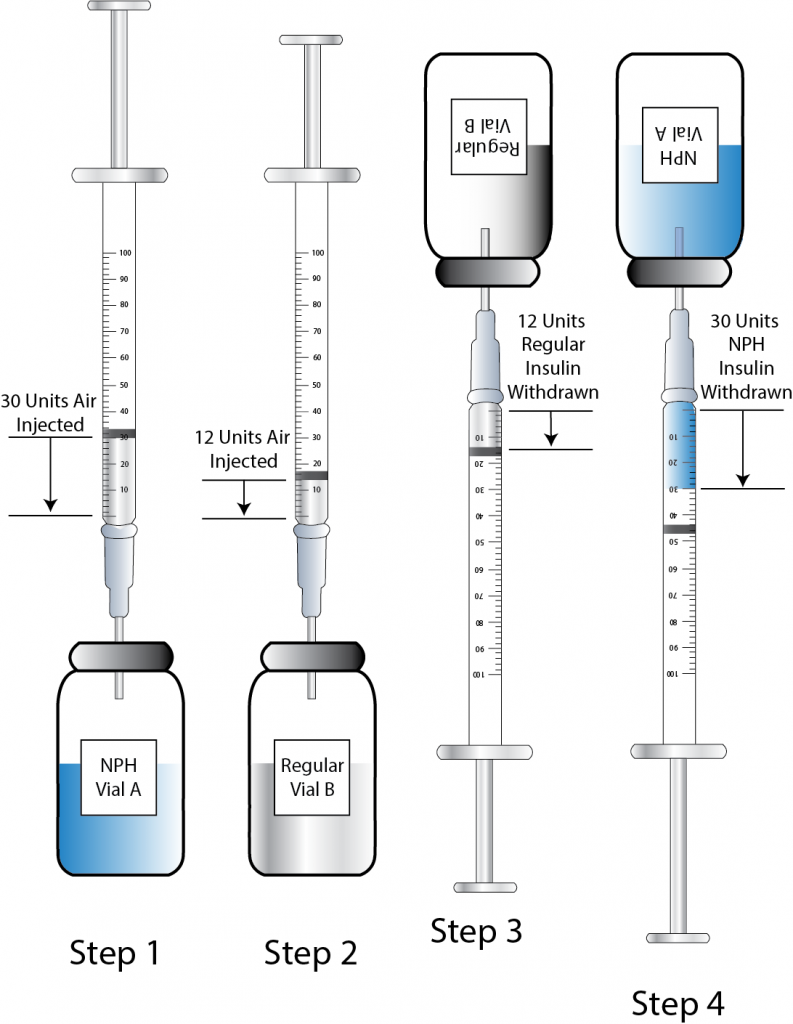
When mixing insulin, gather your insulin supplies. Check the insulin vials to make sure they are the right kinds of insulin, there are no clumps or particles in them, and the expiration dates have not passed. Gently mix intermediate or premixed insulin by turning the vial on its side and rolling it between the palms of your hands. Clean the top of each vial with a separate alcohol wipe for 30 seconds and allow to dry. Remove the cap from the needle. Holding the vial of intermediate insulin below the syringe, insert the needle and inject an amount of air equal to the dose of intermediate insulin ordered. Do not draw out the insulin into the syringe yet. Remove the needle from the vial. Inject air into the rapid-acting insulin vial equal to the rapid-acting insulin dose.[21]
When mixing insulin, it is important to always draw up the short-acting insulin first to prevent it from being contaminated with the long-acting insulin. See Figure 18.26[22] for an illustration of the order to follow when mixing insulin.
One anatomic region should be selected for a patient’s insulin injections to maintain consistent absorption, and then sites should be rotated within that region. The abdomen absorbs insulin the fastest, followed by the arms, thighs, and buttocks. It is appropriate to stay in the same anatomical region for injections, but specific sites should be alternated.[23],[24]
View an instructor demonstration of Mixing Insulin [25]:
Insulin Pens
Insulin pens are a newer technology designed to be used multiple times for a single person, using a new needle for each injection. See Figure 18.27[26] for an image of an insulin pen. Insulin pens must never be used for more than one person. Regurgitation of blood into the insulin cartridge can occur after injection, creating a risk of blood-borne pathogen transmission if the pen is used for more than one person, even when the needle is changed.[27] Prefilled insulin pens consist of a prefilled cartridge of insulin to which a special, single-use needle is attached. When using an insulin pen for subcutaneous insulin administration, a few additional steps must be taken according to manufacturer guidelines. The needle should be primed with two units of insulin, and then the dosage should be dialed in the dose window. The pen should be held with the hand using four fingers so that the thumb can be used to fully depress the plunger button. The pen should be left in place for ten seconds after the insulin is injected to aid in absorption.[28]
Insulin pens are often prescribed for home use because of their ease of use. Patients and family members must be educated on how to correctly use an insulin pen before discharge. To evaluate a patient’s knowledge of how to correctly administer insulin, ask them to “return demonstrate” the procedure to you.[29],[30]

Special Considerations for Insulin
- Insulin vials are stored in the refrigerator until they are opened. When removed, it should be labelled with an open date and expiration date according to agency policy. When a vial is in use, it should be at room temperature. Do not inject cold insulin because this can cause discomfort.
- Patients who take insulin should monitor their blood sugar (glucose) levels as prescribed by their health care provider.
- Vials of insulin should be inspected prior to use. Any change in appearance may indicate a change in potency. Check the expiration date and do not use it if it has expired.
- All health care workers should be aware of the signs and symptoms of hypoglycemia. Signs and symptoms of hypoglycemia are as follows:
- Shakiness
- Feeling nervous or anxious
- Sweating, chills, and clamminess
- Irritability or impatience
- Confusion
- Fast heartbeat
- Feeling light-headed or dizzy
- Hunger
- Nausea
- Color draining from the skin (pallor)
- Feeling sleepy
- Feeling weak or having no energy
- Blurred/impaired vision
- Tingling or numbness in the lips, tongue, or cheeks
- Headaches
- Coordination problems or clumsiness
- Nightmares or crying out during sleep
- Seizures
- Follow agency policy regarding hypoglycemic reactions.[31]
For more information about injecting insulin, read the following American Association of Diabetes Educators PDF: Insulin Injection Know-How.
For additional details about different types of insulin, hypoglycemia, and safety considerations when administering insulin, visit the “Antidiabetics” section of the “Endocrine” chapter in Open RN Nursing Pharmacology.
View a supplementary YouTube video on Mixing Insulin[32]
Heparin Injections
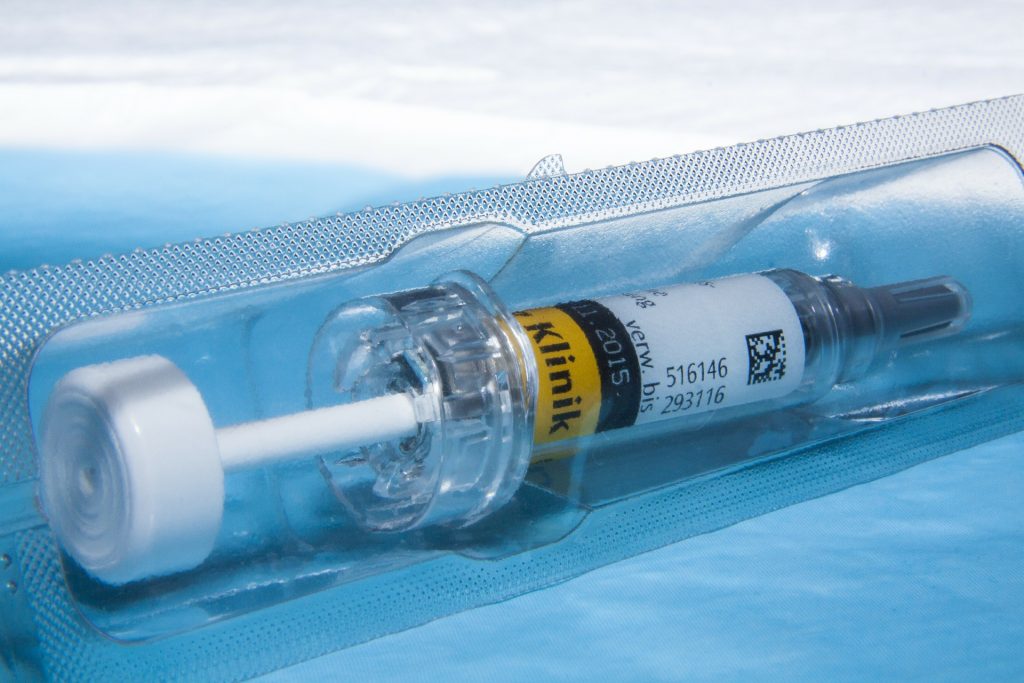
Heparin is an anticoagulant medication used to treat or prevent blood clots. It comes in various strengths and can be administered subcutaneously or intravenously. Heparin is also considered a high-alert medication because of the potential life-threatening harm that can result from a medication error. See Figure 18.28[33] for an image of a prefilled syringe of enoxaparin (Lovenox), a low-molecular weight heparin, that is typically dispensed in prefilled syringes. Review specific guidelines regarding heparin administration in Table 18.5.[34]
For more information about heparin, visit the “Blood Coagulation Modifiers” section of the “Cardiovascular and Renal System” chapter in Open RN Nursing Pharmacology.
Table 18.5 Specific Guidelines for Administering Heparin[35]
| Guidelines | Additional Information |
|---|---|
| Remember that heparin is considered a high-alert medication. | Heparin is available in vials and prefilled syringes in a variety of concentrations. Because of the dangerous adverse effects of the medication, it is considered a high-alert medication. Always follow agency policy regarding the preparation and administration of heparin. |
| Rotate heparin injection sites. | It is important to rotate heparin sites to avoid bruising in one location. Heparin is absorbed best in the abdominal area, at least 2 inches (5 cm) away from the umbilicus. |
| Know the risks associated with heparin. | There are many risks associated with the administration of heparin, including bleeding, hematuria, hematemesis, bleeding gums, and melena. Monitor, document, and report these side effects when a patient is receiving heparin. |
| Review lab values. | Review lab values (PTT and aPTT) before and after heparin administration. If injecting low-molecular weight heparin (enoxaparin), review platelet count because heparin can cause thrombocytopenia. |
| Follow administration standards for prepackaged heparin and enoxaparin syringes. | Many agencies use prepackaged heparin and enoxaparin syringes. Always follow the standards for safe medication administration when using prefilled syringes. |
| Assess patient conditions prior to administration. | Some medical conditions increase the patient’s risk for hemorrhage (severe bleeding), such as recent childbirth, severe kidney and liver disease, cerebral or aortic aneurysm, and cerebral vascular accidents (CVA). |
| Assess other medications and diet. | Over-the-counter (OTC) herbal medications, such as garlic, ginger, and horse chestnut, may interact with heparin. Additional medications that may interact or cause increased risk of bleeding include aspirin, NSAIDs, cephalosporins, antithyroid agents, thrombolytics, and probenecids. Foods like green leafy vegetables can alter the therapeutic effect of heparin. |
Device Technology
A jet injector is a medical device used for vaccinations and other subcutaneous injections that uses a high-pressure, narrow stream of fluid to penetrate the skin instead of a hypodermic needle. An example of a flu vaccine approved for administration to adults aged 18-64 is AFLURIA© Quadrivalent. The most common injection-site adverse reactions of the jet injector flu vaccine up to seven days post-vaccination were tenderness, swelling, pain, redness, itching, and bruising.[36] Insulin can also be successfully administered via a jet injector, with research demonstrating improved glucose control because the insulin is spread out over a larger area of tissue and enters the bloodstream faster than when administered by an insulin pen or needle. Patients have indicated preference for insulin delivered by the jet injector compared to the insulin pen or syringe because it is needle-free with less tissue injury and pain as compared to the needle injection.[37] See Figure 18.29[38] for an image comparing insulin delivery devices.

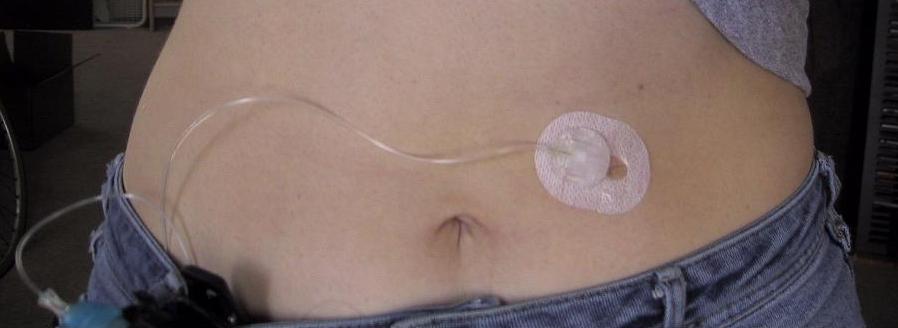
Another type of new technology used to continuously deliver subcutaneous insulin is the insulin pump. Pumps are a computerized device attached to the body, either with tubing or attached to the skin. They are programmed to release small doses of insulin (continuously or as a surge bolus dose) close to mealtime to control the rise in blood sugar after a meal. They work by closely mimicking the body’s normal release of insulin. Insulin doses are delivered through a flexible plastic tube called a catheter. With the aid of a small needle, the catheter is inserted through the skin into the fatty tissue and is taped in place.[39] See Figure 18.30[40] for an image of an insulin pump infusion set attached to a patient.
- “HumanSkinDiagram.jpg” by Daniel de Souza Telles is licensed under CC BY-SA 3.0 ↵
- This work is a derivative of Clinical Procedures for Safer Patient Care by British Columbia Institute of Technology and is licensed under CC BY 4.0 ↵
- “Subcutaneous-injection-sites-274x300.png” by British Columbia Institute of Technology is licensed under CC BY 4.0. Access for free at https://opentextbc.ca/clinicalskills/chapter/6-7-intradermal-subcutaneous-and-intramuscular-injections/ ↵
- This work is a derivative of Clinical Procedures for Safer Patient Care by British Columbia Institute of Technology and is licensed under CC BY 4.0 ↵
- This work is a derivative of Clinical Procedures for Safer Patient Care by British Columbia Institute of Technology and is licensed under CC BY 4.0 ↵
- “Upper Posterior Arm” by Meredith Pomietlo for Chippewa Valley Technical College is licensed under CC BY 4.0 ↵
- This work is a derivative of Clinical Procedures for Safer Patient Care by British Columbia Institute of Technology and is licensed under CC BY 4.0 ↵
- “Book-pictures-2015-650.jpg” by British Columbia Institute of Technology is licensed under CC BY 4.0. Access for free at https://opentextbc.ca/clinicalskills/chapter/6-7-intradermal-subcutaneous-and-intramuscular-injections/ ↵
- “Sept-22-2015-040.jpg” by British Columbia Institute of Technology is licensed under CC BY 4.0. Access for free at https://opentextbc.ca/clinicalskills/chapter/6-7-intradermal-subcutaneous-and-intramuscular-injections/ ↵
- This work is a derivative of Clinical Procedures for Safer Patient Care by British Columbia Institute of Technology and is licensed under CC BY 4.0 ↵
- This work is a derivative of Clinical Procedures for Safer Patient Care by British Columbia Institute of Technology and is licensed under CC BY 4.0 ↵
- American Diabetes Association. (n.d.). Insulin basics. https://www.diabetes.org/diabetes/medication-management/insulin-other-injectables/insulin-basics ↵
- "insulin-syringe” by biologycorner is licensed under CC BY-NC 2.0 ↵
- American Association of Diabetes Educators. (n.d.). Insulin injection know-how. https://www.diabeteseducator.org/docs/default-source/legacy-docs/_resources/pdf/general/Insulin_Injection_How_To_AADE.pdf ↵
- This work is a derivative of Clinical Procedures for Safer Patient Care by British Columbia Institute of Technology and is licensed under CC BY 4.0 ↵
- American Diabetes Association. (n.d.). Insulin basics. https://www.diabetes.org/diabetes/medication-management/insulin-other-injectables/insulin-basics ↵
- American Association of Diabetes Educators. (n.d.). Insulin injection know-how. https://www.diabeteseducator.org/docs/default-source/legacy-docs/_resources/pdf/general/Insulin_Injection_How_To_AADE.pdf ↵
- “Mixing Insulin” by Meredith Pomietlo for Chippewa Valley Technical College is licensed under CC BY 4.0 ↵
- This work is a derivative of Clinical Procedures for Safer Patient Care by British Columbia Institute of Technology and is licensed under CC BY 4.0 ↵
- American Diabetes Association. (n.d.). Insulin basics. https://www.diabetes.org/diabetes/medication-management/insulin-other-injectables/insulin-basics ↵
- Open RN Project. (2021, November 11). Mixing insulin [Video]. YouTube. Video licensed under CC-BY-4.0. https://youtu.be/EsY2F2hHfdg ↵
- “Insulin_pen_(labeled).jpg” by User:Wesalius is licensed under CC BY 4.0 ↵
- Centers for Disease Control and Prevention. (2012, January 4). CDC clinical reminder: Insulin pens must never be used for more than one person. https://www.cdc.gov/injectionsafety/clinical-reminders/insulin-pens.html ↵
- American Association of Diabetes Educators. (n.d.). Insulin injection know-how. https://www.diabeteseducator.org/docs/default-source/legacy-docs/_resources/pdf/general/Insulin_Injection_How_To_AADE.pdf ↵
- This work is a derivative of Clinical Procedures for Safer Patient Care by British Columbia Institute of Technology and is licensed under CC BY 4.0 ↵
- American Diabetes Association. (n.d.). Insulin basics. https://www.diabetes.org/diabetes/medication-management/insulin-other-injectables/insulin-basics ↵
- American Diabetes Association. (n.d.). Insulin basics. https://www.diabetes.org/diabetes/medication-management/insulin-other-injectables/insulin-basics ↵
- RegisteredNurseRN. (2016, July 15). How to mix insulin NPH and regular insulin nursing | Mixing insulin clear to cloudy [Video]. YouTube. All rights reserved. Video used with permission. https://youtu.be/O_kXOnrYYRA ↵
- “syringe-103060_1920.jpg” by Stux from Pixabay is licensed under CC0 ↵
- This work is a derivative of Clinical Procedures for Safer Patient Care by British Columbia Institute of Technology and is licensed under CC BY 4.0 ↵
- This work is a derivative of Clinical Procedures for Safer Patient Care by British Columbia Institute of Technology and is licensed under CC BY 4.0 ↵
- Centers for Disease Control and Prevention. (2020, August 20). Flu vaccination by jet injector. https://www.cdc.gov/flu/prevent/jet-injector.htm ↵
- Guo, L., Xiao, X., Sun, X., & Qi, C. (2017). Comparison of jet injector and insulin pen in controlling plasma glucose and insulin concentrations in type 2 diabetic patients. Medicine, 96(1), e5482. https://doi.org/10.1097/MD.0000000000005482 ↵
- “Insulin_Delivery_Devices.png” by BruceBlaus is licensed under CC BY-SA 4.0 ↵
- American Diabetes Association. (n.d.). Device technology. https://www.diabetes.org/diabetes/device-technology ↵
- “insulin pump day 1” by Erin Stevenson O’Connor is licensed under CC BY-SA 2.0 ↵

