1.3 Vital Signs
Vital signs are typically obtained prior to performing a physical assessment. Vital signs include temperature recorded in Celsius or Fahrenheit, pulse, respiratory rate, blood pressure, and oxygen saturation using a pulse oximeter. See Figure 1.8[1] for an image of a nurse obtaining vital signs. Obtaining vital signs may be delegated to unlicensed assistive personnel (UAP) for stable patients, depending on the state’s Nurse Practice Act, agency policy, and appropriate training. However, the nurse is always accountable for analyzing the vital signs and instituting appropriate follow-up for out-of-range findings. See Appendix A to review a checklist for obtaining vital signs.
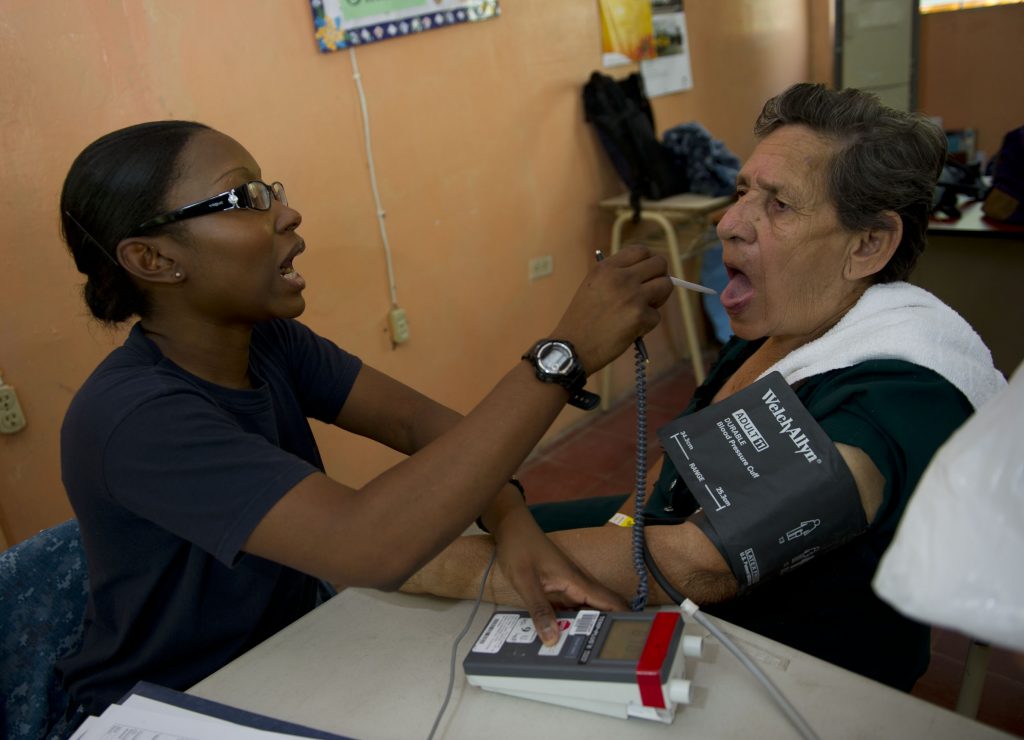
The order of obtaining vital signs is based on the patient and their situation. Health care professionals often place the pulse oximeter probe on the patient while proceeding to obtain their pulse, respirations, blood pressure, and temperature. However, in some situations this order is modified based on the urgency of their condition. For example, if a person loses consciousness, the assessment begins with checking their carotid pulse to determine if cardiopulmonary resuscitation (CPR) is required.[2]
Temperature
Accurate temperature measurements provide information about a patient’s health status and guide clinical decisions. Methods of measuring body temperature vary based on the patient’s developmental age, cognitive functioning, level of consciousness, and health status, as well as agency policy. Common methods of temperature measurement include oral, tympanic, axillary, temporal, no touch, and rectal routes. It is important to document the route used to obtain a patient’s temperature because of normal variations in temperature in different locations of the body. Body temperature is typically measured and documented in health care agencies in degrees Celsius (ºC).[3]
Oral Temperature
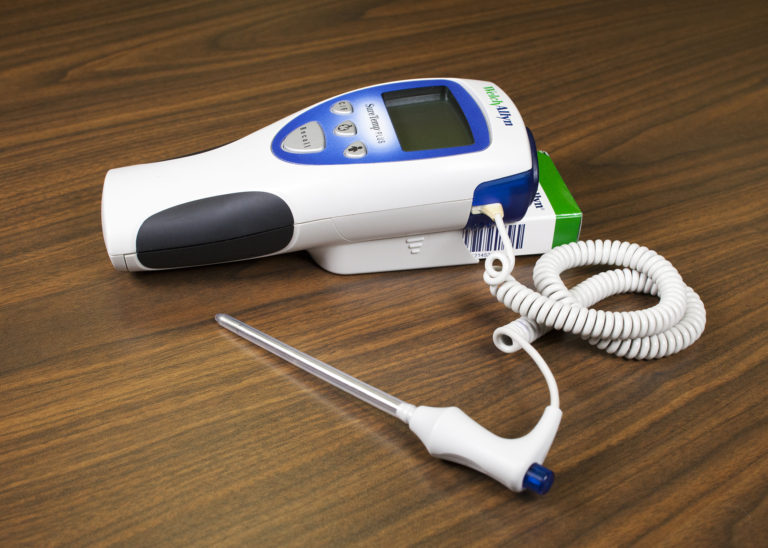
Normal oral temperature is 35.8 – 37.3ºC (96.4 – 99.1ºF). An oral thermometer is shown in Figure 1.9.[4] The device has blue coloring, indicating it is an oral or axillary thermometer, as opposed to a rectal thermometer that has red coloring. Oral temperature is reliable when it is obtained close to the sublingual artery.[5]
Technique
Remove the probe from the device and slide a probe cover (from the attached box) onto the oral thermometer without touching the probe cover with your hands. Place the thermometer in the posterior sublingual pocket under the tongue, slightly off-center. Instruct the patient to keep their mouth closed but not bite on the thermometer. Leave the thermometer in place for as long as is indicated by the device manufacturer. The thermometer typically beeps within a few seconds when the temperature has been taken. Read the digital display of the results. Discard the probe cover in the garbage (without touching the cover) and place the probe back into the device.[6] See Figure 1.10[7] of an oral temperature being taken.
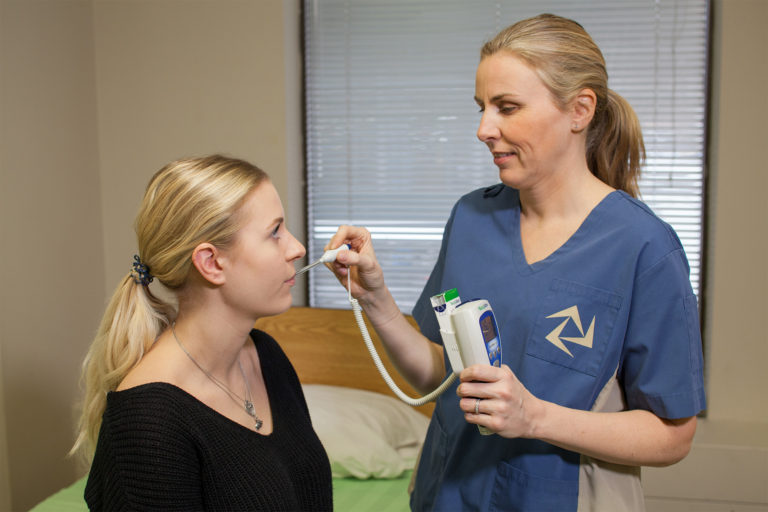
Some factors can cause an inaccurate measurement using the oral route. For example, if the patient recently consumed a hot or cold food or beverage, chewed gum, or smoked prior to measurement, a falsely elevated or decreased reading may be obtained. Oral temperature should be taken 15 to 25 minutes following consumption of a hot or cold beverage or food or 5 minutes after chewing gum or smoking.[8]
Tympanic Temperature
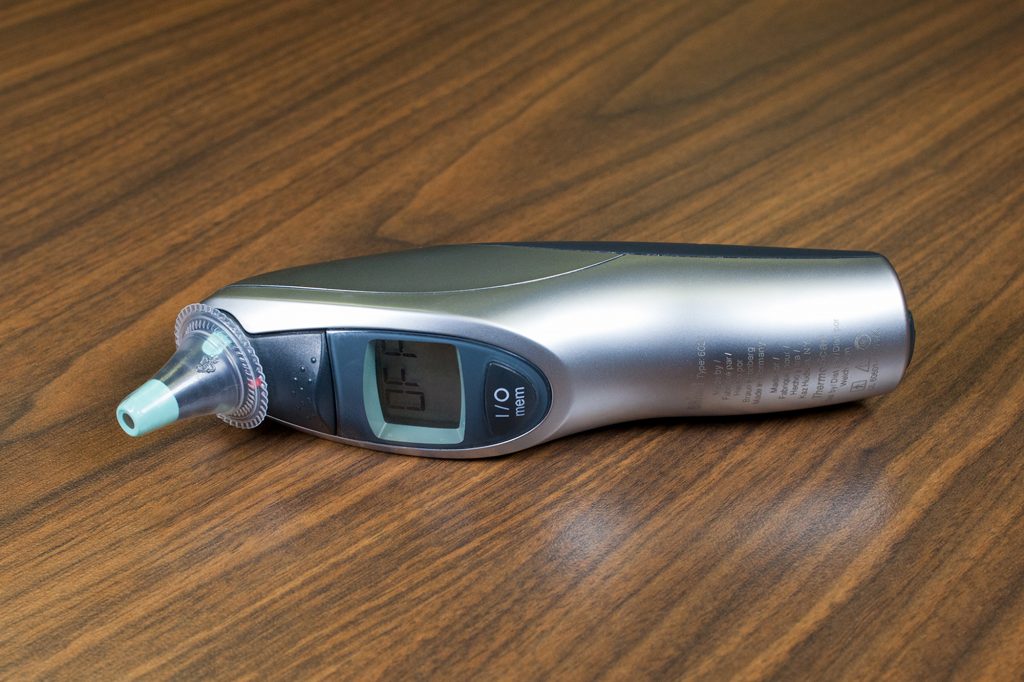
The tympanic temperature is typically 0.3 – 0.6°C or 0.5 – 1°F higher than an oral temperature. It is an accurate measurement because the tympanic membrane shares the same vascular artery that perfuses the hypothalamus (the part of the brain that regulates the body’s temperature). See Figure 1.11[9] of a tympanic thermometer. The tympanic method should not be used if the patient has a suspected ear infection.[10] Accumulation of cerumen, earwax, may also reduce the accuracy of tympanic readings.
Technique
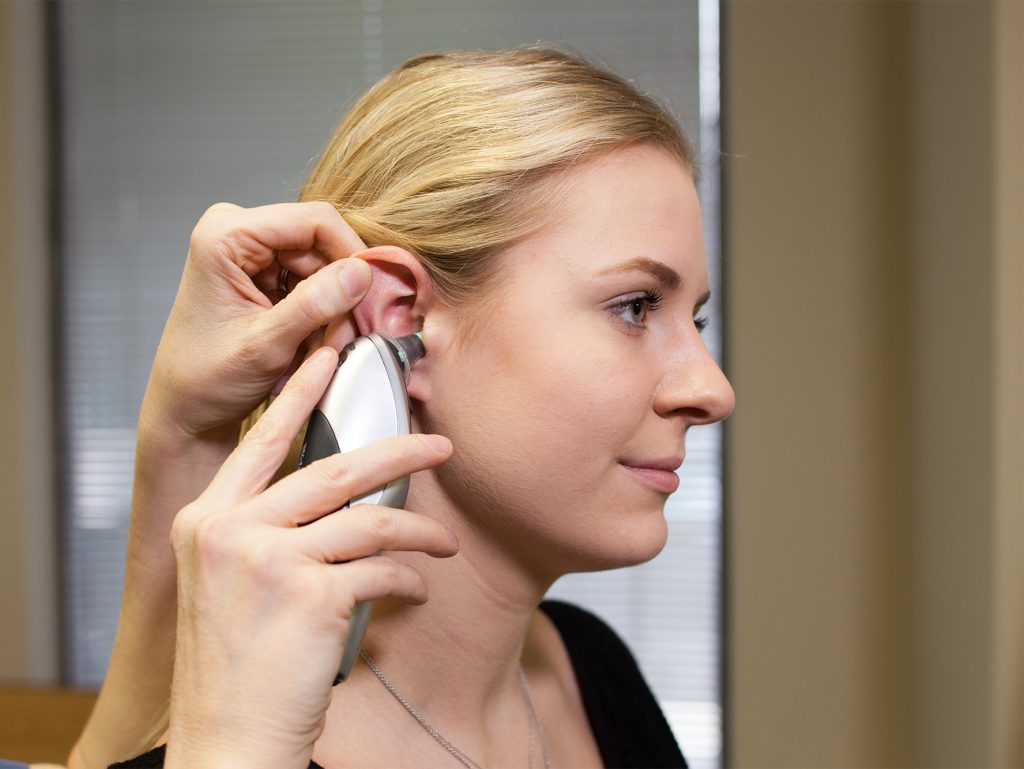
Remove the tympanic thermometer from its holder and place a probe cover on the thermometer tip without touching the probe cover with your hands. Turn the device on. Ask the patient to keep their head still. For an adult or older child, gently pull the helix (outer ear) up and back to visualize the ear canal. For an infant or child under age 3, gently pull the helix down. Insert the probe just inside the ear canal but never force the thermometer into the ear. The device will beep within a few seconds after the temperature is measured. Read the results displayed, discard the probe cover in the garbage (without touching the cover), and then place the device back into the holder.[11] See Figure 1.12[12] for an image of a tympanic temperature being taken.
Axillary Temperature
The axillary method is a minimally invasive way to measure temperature and is commonly used in children. It uses the same electronic device as an oral thermometer (with blue coloring). However, the axillary temperature can be as much as 1ºC lower than the oral temperature.[13] An armpit (axillary) temperature is usually 0.3⁰ C (0.5⁰ F) to 0.6⁰ C (1⁰ F) lower than an oral temperature.
Technique
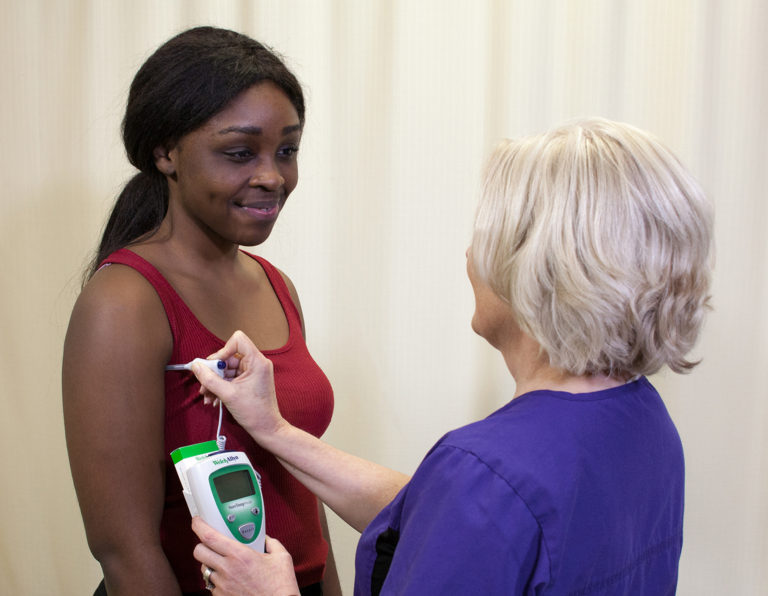
Remove the probe from the device and place a probe cover (from the attached box) on the thermometer without touching the cover with your hands. Ask the patient to raise their arm and place the thermometer probe in their armpit on bare skin as high up into the axilla as possible. The probe should be facing behind the patient. Ask the patient to lower their arm and leave the device in place until it beeps, usually about 10–20 seconds. Read the displayed results, discard the probe cover in the garbage (without touching the cover), and then place the probe back into the device. See Figure 1.13[14] for an image of an axillary temperature.[15]
Rectal Temperature
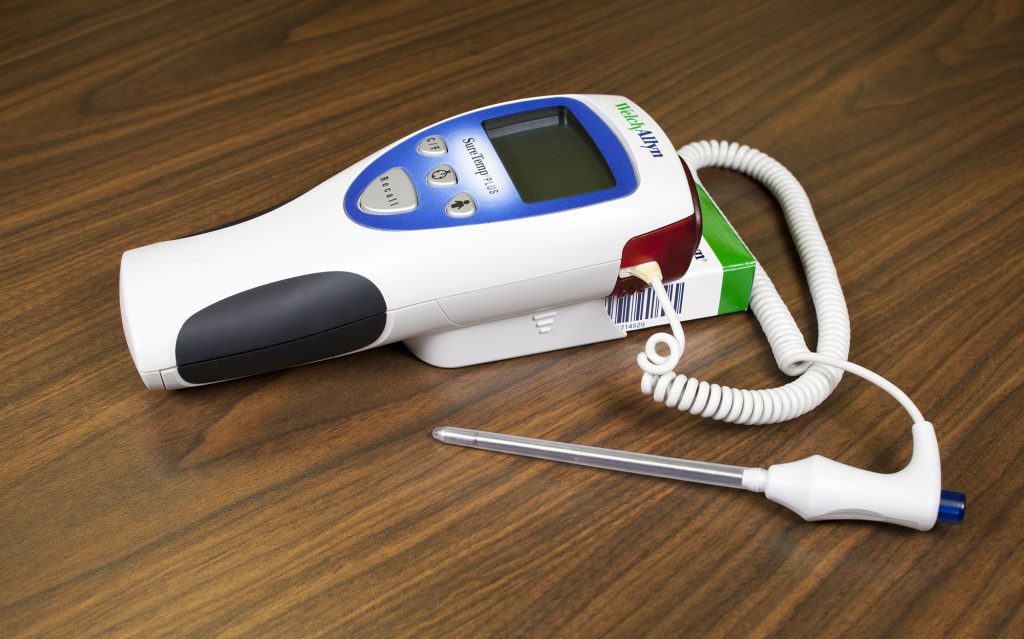
Measuring rectal temperature is an invasive method. Some sources suggest its use only when other methods are not appropriate. However, when measuring infant temperature, it is considered a gold standard because of its accuracy. A rectal temperature is 0.5°F (0.3°C) to 1°F (0.6°C) higher than an oral temperature.[16] See Figure 1.14[17] for an image of a rectal thermometer.
Technique
Before taking a rectal temperature, ensure the patient’s privacy. Wash your hands and put on gloves. For infants, place them in a supine position and raise their legs upwards toward their chest. Parents may be encouraged to hold the infant to decrease movement and provide a sense of safety. When taking a rectal temperature in older children and adults, assist them into a side lying position and explain the procedure. Remove the probe from the device and place a probe cover (from the attached box) on the thermometer. Lubricate the cover with a water-based lubricant, and then gently insert the probe 2–3 cm (approximately 0.5 in for babies less than 6 months old to 1 inch) into the anus or less, depending on the patient’s size.[18] Remove the probe when the device beeps. Read the result and then discard the probe cover in the trash can without touching it. Cleanse the device as indicated by agency policy. Remove gloves and perform hand hygiene.
Temporal Temperature
Temporal temperature is taken by using a device placed on the forehead. Temporal thermometers contain an infrared scanner that measures the heat on the surface of the skin resulting from blood moving through the temporal artery in the forehead. Temporal temperature is typically 0.5°F (0.3°C) to 1°F (0.6°C) lower than an oral temperature. It is a quick, noninvasive method, but accurate measurement is dependent on good contact with the skin and good placement on the forehead.
See Table 1.3a for normal temperature ranges for various routes.
Table 1.3 Normal Temperature Ranges[19]
| Method | Normal Range |
|---|---|
| Oral | 35.8 – 37.3ºC (96.4 -99.1ºF) |
| Axillary | 34.8 – 36.3ºC (96.4 -97.3ºF) |
| Tympanic | 36.1 – 37.9ºC (97.0 -100.2ºF) |
| Rectal | 36.8 – 38.2ºC (98.2 -100.8ºF) |
| Temporal | 35.2 – 37.0ºC (95.4 – 98.6ºF) |
Pulse
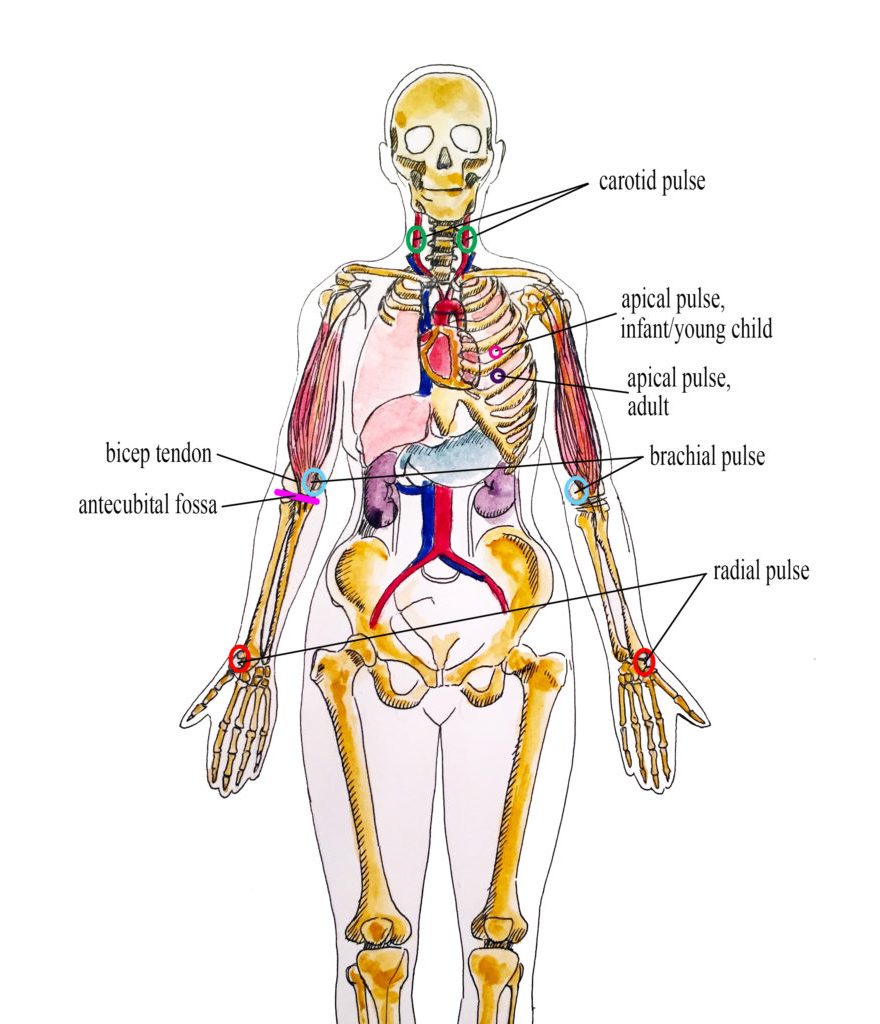
Pulse refers to the pressure wave that expands and recoils arteries when the left ventricle of the heart contracts. It is palpated at many points throughout the body. The most common locations to palpate pulses as part of vital sign measurement include radial, brachial, carotid, and apical areas as indicated in Figure 1.15.[20]
Pulse is measured in beats per minute wherever a pulse can be palpated. The normal adult pulse rate (heart rate) at rest is 60–100 beats per minute with different ranges according to age. The pulse rate is a measurement of the number of times the heart beats per minute. The pulse rate may differ from the heart rate if the force of the heart contraction is not strong enough to generate a pulse because the pulse is palpated whereas the heart rate is typically auscultated. See Table 1.3b for normal heart rate ranges by age. It is important to consider each patient situation when analyzing if their heart rate is within normal range. Begin by reviewing their documented baseline heart rate. Consider other factors if the pulse is elevated, such as the presence of pain or crying in an infant. It is best to complete the assessment when a patient is resting and comfortable, but if this is not feasible, document the circumstances surrounding the assessment and reassess as needed.[21] For example, pulse rate may be artificially elevated when individuals experience physical or mental stress. Therefore, it is best to collect a pulse rate assessment when the patient is resting.
Table 1.3b Normal Heart Rate by Age
| Age Group | Heart Rate |
|---|---|
| Preterm | 120 – 180 |
| Newborn (0 to 1 month) | 100 – 160 |
| Infant (1 to 12 months) | 80 – 140 |
| Toddler (1 to 3 years) | 80 – 130 |
| Preschool (3 to 5 years) | 80 – 110 |
| School Age (6 to 12 years) | 70 – 100 |
| Adolescents (13 to 18 years) and Adults | 60 – 100 |
Pulse Characteristics
When assessing pulses, the characteristics of rhythm, rate, force, and equality are included in the documentation.
Pulse Rhythm
A normal pulse has a regular rhythm, meaning the frequency of the pulsation felt by your fingers is an even tempo with equal intervals between pulsations. For example, if you compare the palpation of pulses to listening to music, it follows a constant beat at the same tempo that does not speed up or slow down. Some cardiovascular conditions, such as atrial fibrillation, cause an irregular heart rhythm. If a pulse has an irregular rhythm, document if it is “regularly irregular” (e.g., three regular beats are followed by one missed and this pattern is repeated) or if it is “irregularly irregular” (e.g., there is no rhythm to the irregularity).[22]
Pulse Rate
The pulse rate is counted with the first beat felt by your fingers as “One.” It is considered best practice to assess a patient’s pulse for a full 60 seconds, especially if there is an irregularity to the rhythm.[23]
Pulse Force
The pulse force is the strength of the pulsation felt on palpation. Pulse force can range from absent to bounding. The volume of blood, the heart’s functioning, and the arteries’ elastic properties affect a person’s pulse force.[24] Pulse force is documented using a four-point scale:
- 3+: Full, bounding
- 2+: Normal/strong
- 1+: Weak, diminished, thready
- 0: Absent/nonpalpable
If a pulse is absent, a Doppler ultrasound device is typically used to verify perfusion of the limbs. The Doppler is a handheld device that allows the examiner to hear the whooshing sound of the pulse. This device is also commonly used when assessing peripheral pulses in the lower extremities, such as the dorsalis pedis pulse or the posterior tibial pulse. See the following video demonstrating the use of a Doppler device.
Pulse Equality
Pulse equality refers to a comparison of the pulse forces on both sides of the body. For example, a nurse often palpates the radial pulse on a patient’s right and left wrists at the same time and compares if the pulse forces are equal. However, the carotid pulses should never be palpated at the same time because this can decrease blood flow to the brain. Pulse equality provides data about medical conditions such as peripheral vascular disease and arterial obstruction.[26]
Radial Pulse
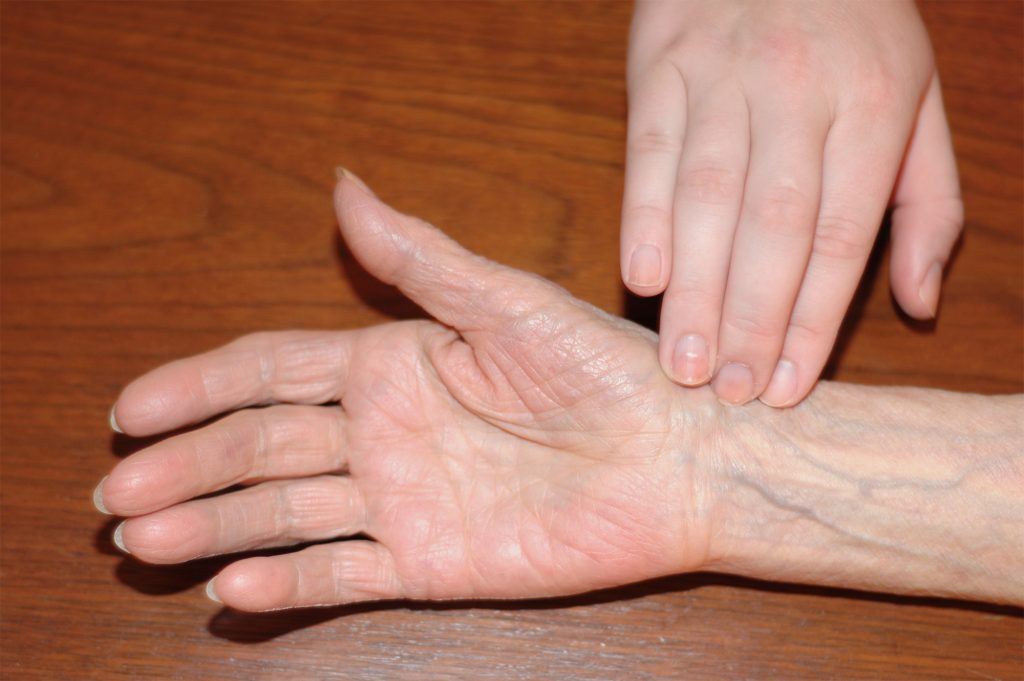
Use the pads of your first three fingers to gently palpate the radial pulse. The pads of the fingers are placed along the radius bone on the lateral side of the wrist (i.e., the thumb side). Fingertips are placed close to the flexor aspect of the wrist (i.e., where the wrist meets the hand and bends). See Figure 1.16[27] for correct placement of fingers in obtaining a radial pulse. Press down with your fingers until you can feel the pulsation, but not so forcefully that you are obliterating the wave of the force passing through the artery. Note that radial pulses are difficult to palpate on newborns and children under the age of five, so the brachial or apical pulses are typically obtained in these populations.[28]
Carotid Pulse
The carotid pulse is typically palpated during medical emergencies because it is the last pulse to disappear when the heart is not pumping an adequate amount of blood.[29]
Technique
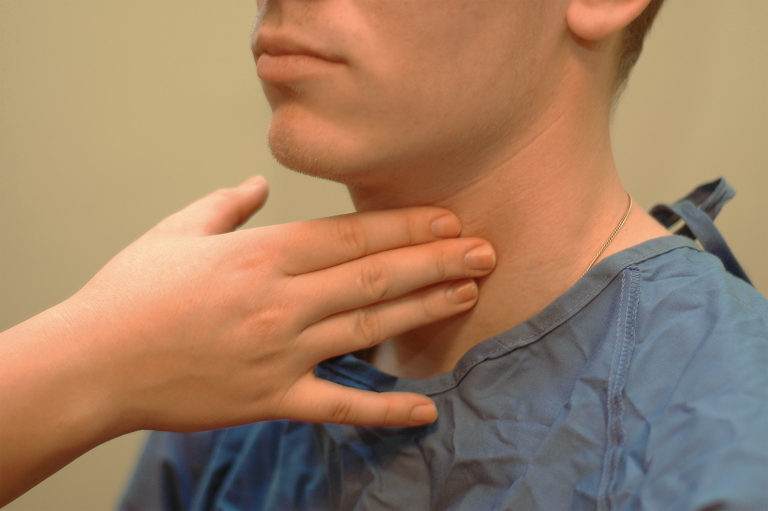
Locate the carotid artery medial to the sternomastoid muscle, between the muscle and the trachea, in the middle third of the neck. In order to palpate the carotid, place the index and middle fingers on the patient’s neck to the side of individual’s trachea. With the pads of your three fingers, gently palpate one carotid artery at a time so as not to compromise blood flow to the brain. See Figure 1.17[30] for correct placement of fingers in a seated patient.[31]
Brachial Pulse
A brachial pulse is typically assessed in infants and children because it can be difficult to feel the radial pulse in these populations. If needed, a Doppler ultrasound device can be used to obtain the pulse.
Technique
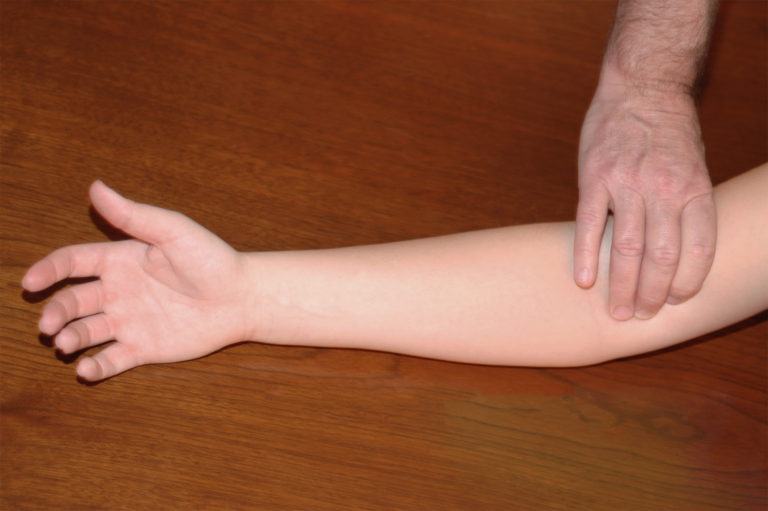
The brachial pulse is located by feeling the bicep tendon in the area of the antecubital fossa. Move the pads of your three fingers medially from the tendon about 1 inch (2 cm) just above the antecubital fossa. It can be helpful to hyperextend the patient’s arm to accentuate the brachial pulse so that you can better feel it. You may need to move your fingers around slightly to locate the best place to accurately feel the pulse. You typically need to press fairly firmly to palpate the brachial pulse.[32] See Figure 1.18[33] for correct placement of fingers along the brachial artery.
Apical Pulse
The apical pulse rate is considered the most accurate pulse and is indicated when obtaining assessments prior to administering cardiac medications. It is obtained by listening with a stethoscope over a specific position on the patient’s chest wall. Read more about listening to the apical pulse and other heart sounds in the “Cardiovascular Assessment” section.
Respiratory Rate
Respiration refers to a person’s breathing and the movement of air into and out of the lungs. Inspiration refers to the process causing air to enter the lungs, and expiration refers to the process causing air to leave the lungs. A respiratory cycle (i.e., one breath while measuring respiratory rate) is one sequence of inspiration and expiration.[34]
When obtaining a respiratory rate, the respirations are also assessed for quality, rhythm, and rate. The quality of a person’s breathing is normally relaxed and silent. However, loud breathing, nasal flaring, or the use of accessory muscles in the neck, chest, or intercostal spaces indicate respiratory distress. People experiencing respiratory distress also often move into a tripod position, meaning they are leaning forward and placing their arms or elbows on their knees or on a bedside table. If a patient is demonstrating new signs of respiratory distress as you are obtaining their vital signs, it is vital to immediately notify the health care provider or follow agency protocol.
Respirations normally have a regular rhythm in children and adults who are awake. A regular rhythm means that the frequency of the respiration follows an even tempo with equal intervals between each respiration. However, newborns and infants commonly exhibit an irregular respiratory rhythm.
Normal respiratory rates vary based on age. The normal resting respiratory rate for adults is 10–20 breaths per minute, whereas infants younger than one year old normally have a respiratory rate of 30–60 breaths per minute. See Table 1.3c for ranges of normal respiratory rates by age. It is also important to consider factors such as sleep cycle, presence of pain, and crying when assessing a patient’s respiratory rate.[35]
Read more about assessing a patient’s respiratory status in the “Respiratory Assessment” section.
Table 1.3c Normal Respiratory Rate by Age[36]
| Age | Normal Range |
|---|---|
| Newborn to one month | 30 – 60 |
| One month to one year | 26 – 60 |
| 1-10 years of age | 14 – 50 |
| 11-18 years of age | 12 – 22 |
| Adult (ages 18 and older) | 10 – 20 |
Oxygen Saturation
A patient’s oxygenation status is routinely assessed using pulse oximetry, referred to as SpO2. SpO2 is an estimated oxygenation level based on the saturation of hemoglobin measured by a pulse oximeter. Because the majority of oxygen carried in the blood is attached to hemoglobin within the red blood cells, SpO2 estimates how much hemoglobin is “saturated” with oxygen. The target range of SpO2 for an adult is 94-100%. For patients with chronic respiratory conditions, such as chronic obstructive pulmonary disease (COPD), the target range for SpO2 is often lower at 88% to 92%. Although SpO2 is an efficient, noninvasive method to assess a patient’s oxygenation status, it is an estimate and not always accurate. For example, if a patient is severely anemic and has a decreased level of hemoglobin in the blood, the SpO2 reading is affected. Decreased peripheral circulation can also cause a misleading low SpO2 level.
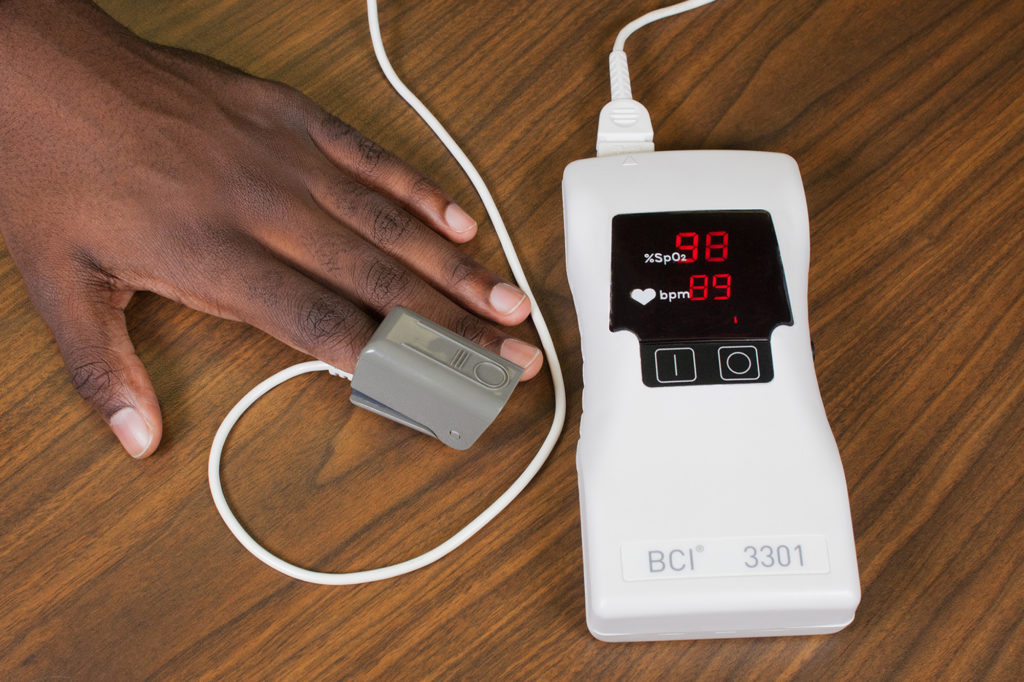
A pulse oximeter includes a sensor that measures light absorption of hemoglobin. See Figure 1.19[37] for an image of a pulse oximeter. The sensor can be attached to the patient using a variety of devices. For intermittent measurement of oxygen saturation, a spring-loaded clip is attached to a patient’s finger or toe. However, this clip is too large for use on newborns and young children; therefore, for this population, the sensor is typically taped to a finger or toe. An earlobe clip is another alternative for patients who cannot tolerate the finger or toe clip or have a condition, such as vasoconstriction or poor peripheral perfusion, that could affect the results.
Read more about pulse oximetry in the “Oxygen Therapy” chapter.
Technique
Nail polish or artificial nails can affect the absorption of light waves from the pulse oximeter and decrease the accuracy of the SpO2 measurement when using a probe clipped on the finger. An alternative sensor that does not use the finger should be used for these patients or the nail polish should be removed. If a patient’s hands or feet are cold, it is helpful to clip the sensor to the earlobe or tape it to the forehead.
Blood Pressure
Read information about how to accurately obtain blood pressure measurement in the “Blood Pressure” chapter.
Interpreting Results
After obtaining a patient’s vital signs, it is important to immediately analyze the results, recognize deviations from expected normal ranges, and report deviations appropriately. As a nursing student, it is vital to immediately notify your instructor and/or collaborating nurse caring for the patient of any vital sign measurement out of normal range.
- “US Navy 110714-N-RM525-060 Hospitalman Seckisiesha Isaac, from New York, prepares to take a woman's temperature at a pre-screening vital signs stat.jpg” by U.S. Navy photo by Mass Communication Specialist 2nd Class Jonathen E. Davis is licensed under CC0 ↵
- Vital Sign Measurement Across the Lifespan by Ryerson University is licensed under CC BY-SA 4.0 ↵
- Vital Sign Measurement Across the Lifespan by Ryerson University is licensed under CC BY-SA 4.0 ↵
- “Thermometer-oral-768x548.jpg” by British Columbia Institute of Technology is licensed under CC BY 4.0. Access for free at https://med.libretexts.org/Bookshelves/Nursing/Book%3A_Vital_Sign_Measurement_Across_the_Lifespan_(Lapum_et_al.)/02%3A_Temperature/2.17%3A_Oral_Temperature ↵
- Vital Sign Measurement Across the Lifespan by Ryerson University is licensed under CC BY-SA 4.0 ↵
- Vital Sign Measurement Across the Lifespan by Ryerson University is licensed under CC BY-SA 4.0 ↵
- “Oral-Temperature-Wide-768x512.jpg" by British Columbia Institute of Technology is licensed under CC BY 4.0. Access for free at https://med.libretexts.org/Bookshelves/Nursing/Book%3A_Vital_Sign_Measurement_Across_the_Lifespan_(Lapum_et_al.)/02%3A_Temperature/2.17%3A_Oral_Temperature ↵
- Vital Sign Measurement Across the Lifespan by Ryerson University is licensed under CC BY-SA 4.0 ↵
- “Tympanic-Thermometer.jpg” by British Columbia Institute of Technology is licensed under CC BY 4.0. Access for free at https://med.libretexts.org/Bookshelves/Nursing/Book%3A_Vital_Sign_Measurement_Across_the_Lifespan_(Lapum_et_al.)/02%3A_Temperature/2.18%3A_Tympanic_Temperature ↵
- Vital Sign Measurement Across the Lifespan by Ryerson University is licensed under CC BY-SA 4.0 ↵
- Vital Sign Measurement Across the Lifespan by Ryerson University is licensed under CC BY-SA 4.0 ↵
- “Tympanic-Temperature-Correct-2.jpg” by British Columbia Institute of Technology is licensed under CC BY 4.0. Access for free at https://med.libretexts.org/Bookshelves/Nursing/Book%3A_Vital_Sign_Measurement_Across_the_Lifespan_(Lapum_et_al.)/02%3A_Temperature/2.18%3A_Tympanic_Temperature ↵
- Vital Sign Measurement Across the Lifespan by Ryerson University is licensed under CC BY-SA 4.0 ↵
- “Axilla-Temperature-1-768x596.jpg” by British Columbia Institute of Technology is licensed under CC BY 4.0. Access for free at https://med.libretexts.org/Bookshelves/Nursing/Book%3A_Vital_Sign_Measurement_Across_the_Lifespan_(Lapum_et_al.)/02%3A_Temperature/2.19%3A_Axillary_Temperature ↵
- Vital Sign Measurement Across the Lifespan by Ryerson University is licensed under CC BY-SA 4.0 ↵
- Vital Sign Measurement Across the Lifespan by Ryerson University is licensed under CC BY-SA 4.0 ↵
- “Thermometer-rectal-768x479.jpg” by British Columbia Institute of Technology is licensed under CC BY 4.0. Access for free at https://med.libretexts.org/Bookshelves/Nursing/Book%3A_Vital_Sign_Measurement_Across_the_Lifespan_(Lapum_et_al.)/02%3A_Temperature/2.20%3A_Rectal_Temperature ↵
- Vital Sign Measurement Across the Lifespan by Ryerson University is licensed under CC BY-SA 4.0 ↵
- Vital Sign Measurement Across the Lifespan by Ryerson University is licensed under CC BY-SA 4.0 ↵
- “Radial-brachial-carotid-and-apical-pulse-final-930x1024.jpg” by British Columbia Institute of Technology is licensed under CC BY 4.0. Access for free at https://med.libretexts.org/Bookshelves/Nursing/Book%3A_Vital_Sign_Measurement_Across_the_Lifespan_(Lapum_et_al.)/03%3A_Pulse_and_Respiration/3.15%3A_What_is_Pulse%3F ↵
- Vital Sign Measurement Across the Lifespan by Ryerson University is licensed under CC BY-SA 4.0 ↵
- Vital Sign Measurement Across the Lifespan by Ryerson University is licensed under CC BY-SA 4.0 ↵
- Vital Sign Measurement Across the Lifespan by Ryerson University is licensed under CC BY-SA 4.0 ↵
- Vital Sign Measurement Across the Lifespan by Ryerson University is licensed under CC BY-SA 4.0 ↵
- Ryerson University. (2018, March 21). Doppler device - How to [Video]. YouTube. All rights reserved. https://youtu.be/cn3aA0G1mgc ↵
- Vital Sign Measurement Across the Lifespan by Ryerson University is licensed under CC BY-SA 4.0 ↵
- “Radial-pulse-correct.jpg” by British Columbia Institute of Technology is licensed under CC BY 4.0. Access for free at https://med.libretexts.org/Bookshelves/Nursing/Book%3A_Vital_Sign_Measurement_Across_the_Lifespan_(Lapum_et_al.)/03%3A_Pulse_and_Respiration/3.18%3A_Radial_Pulse ↵
- Vital Sign Measurement Across the Lifespan by Ryerson University is licensed under CC BY-SA 4.0 ↵
- Vital Sign Measurement Across the Lifespan by Ryerson University is licensed under CC BY-SA 4.0 ↵
- “Carotid-pulse-768x511.jpg” by British Columbia Institute of Technology is licensed under CC BY 4.0. Access for free at https://med.libretexts.org/Bookshelves/Nursing/Book%3A_Vital_Sign_Measurement_Across_the_Lifespan_(Lapum_et_al.)/03%3A_Pulse_and_Respiration/3.19%3A_Carotid_Pulse ↵
- Vital Sign Measurement Across the Lifespan by Ryerson University is licensed under CC BY-SA 4.0 ↵
- Vital Sign Measurement Across the Lifespan by Ryerson University is licensed under CC BY-SA 4.0 ↵
- “Brachial-pulse.jpg” by British Columbia Institute of Technology is licensed under CC BY 4.0. Access for free at https://med.libretexts.org/Bookshelves/Nursing/Book%3A_Vital_Sign_Measurement_Across_the_Lifespan_(Lapum_et_al.)/03%3A_Pulse_and_Respiration/3.20%3A_Brachial_Pulse ↵
- Vital Sign Measurement Across the Lifespan by Ryerson University is licensed under CC BY-SA 4.0 ↵
- Vital Sign Measurement Across the Lifespan by Ryerson University is licensed under CC BY-SA 4.0 ↵
- Vital Sign Measurement Across the Lifespan by Ryerson University is licensed under CC BY-SA 4.0 ↵
- “02-Sat-Apparatus-1-1-1024x682.jpg” by British Columbia Institute of Technology is licensed under CC BY 4.0. Access for free at https://med.libretexts.org/Bookshelves/Nursing/Book%3A_Vital_Sign_Measurement_Across_the_Lifespan_(Lapum_et_al.)/04%3A_Oxygen_Saturation/4.09%3A_How_is_Oxygen_Saturation_Measured%3F ↵

