20.11 Checklist for Staple Removal
Staples are made of stainless-steel wire and provide strength for wound closure. Staples are strong, quick to insert, and simple to remove, but may cause more scarring than sutures.
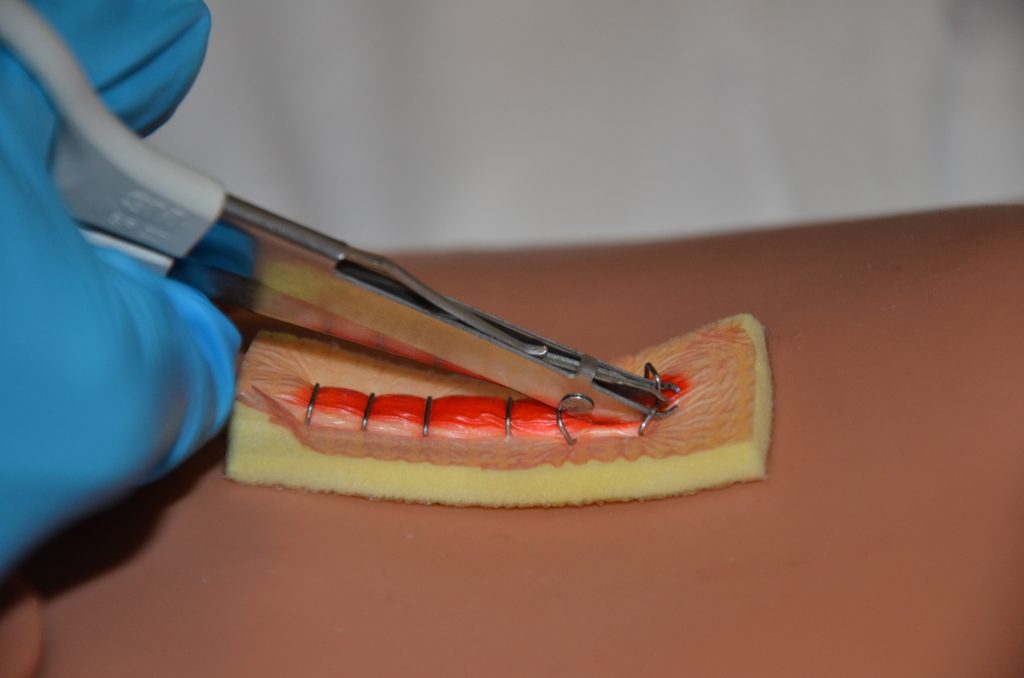
Removal of staples is similar to the removal of sutures but requires a sterile staple extractor instead of forceps and suture scissors. Typically, every second staple is initially removed, and then the remaining staples are removed at a later time. In general, staples are removed within 7 to 14 days. See Figure 20.34[1] for an example of staple removal.
Checklist for Staple Removal
Please follow the checklist below to review the steps for completion of “Staple Removal.”
Steps
Disclaimer: Always review and follow agency policy regarding this specific skill.
- Gather supplies: sterile staple extractors, sterile dressing tray, nonsterile gloves, normal saline, Steri-Strips, and sterile outer dressing.
- Perform safety steps:
- Perform hand hygiene.
- Check room for transmission-based precautions.
- Introduce yourself, your role, the purpose of your visit, and an estimate of the time it will take.
- Confirm patient ID using two patient identifiers (e.g., name and date of birth).
- Be organized and systematic.
- Use appropriate listening and questioning skills.
- Listen and attend to patient cues.
- Ensure the patient’s privacy and dignity.
- Assess ABCs.
- Confirm the provider order and explain the procedure to patient. Explanation helps prevent anxiety and increases compliance with the procedure. Inform the patient the procedure is not painful but they may feel some pulling or pinching of the skin during staple removal.
- Prepare the environment, position the patient, adjust the height of the bed, and turn on the lights. Ensuring proper lighting allows for good visibility to assess the wound. Ensure proper body mechanics for yourself and create a comfortable position for the patient.
- Place a clean, dry barrier on the bedside tables and add necessary supplies.
- Perform hand hygiene and apply nonsterile gloves.
- Remove the dressing and inspect the wound. Visually assess the wound for uniform closure of the wound edges, absence of drainage, redness, and swelling. After assessing the wound, decide if the wound is sufficiently healed to have the staples removed. If there are concerns, discuss the status of the wound before proceeding with the health care provider. For safety purposes, count the number of staples before beginning the procedure.
- Irrigate the wound with sterile normal saline solution to remove surface debris or exudate to reduce risk of infection from microorganisms on the wound site or surrounding skin and to help loosen and remove any dried blood or crusted exudate from the sutures and wound bed.
- Remove gloves, perform hand hygiene, and apply nonsterile gloves.
- Place a sterile 2″ x 2″ next to the wound to collect the staples.
- Remove the staples (start with every second staple).
- Place the lower tip of the staple extractor beneath the staple. Do not pull up while depressing the handle on the staple remover or change the angle of your wrist or hand. Close the handle, and then gently move the staple side to side to remove. The closed handle depresses the middle of the staple causing the two ends to bend outward and out of the top layer of skin.
- When both ends of the staple are visible, move the staple extractor away from the skin and place the staple on a sterile piece of gauze by releasing the handles on the staple extractor. This avoids pulling the staple out prematurely and avoids putting pressure on the wound. It also prevents scratching the skin with the sharp staple.
- Using the principles of no-touch technique, place Steri-Strips on the location of every removed staple along the incision line. Steri-Strips are supplied in pre-cut lengths. Cut the Steri-Strips to allow them to extend 1.5 to 2 cm on each side of the incision. Steri-Strips support wound tension across wounds and eliminate scarring. This allows wounds to heal by primary intention.
- Remove the remaining staples as indicated, followed by applying Steri-Strips along the incision line. Count the number of removed staples and compare to the pre-count to ensure safety.
- Apply a dry, sterile dressing on the incision site or leave it exposed to the air according to provider orders.
- Discard the supplies according to agency policies for sharps disposal and biohazard waste:
- The staple extractor may be disposed of or sent for sterilization according to agency policy.
- Perform hand hygiene.
- Complete patient teaching regarding Steri-Strips, bathing, and inspecting wound for separation. Instruct the patient to:
- Take showers rather than bathe in a tub.
- Avoid pulling off Steri-Strips but allow them to fall off naturally and gradually (usually takes one to three weeks).
- Receive adequate rest, fluids, nutrition, and ambulation for optional wound healing
- Assist the patient to a comfortable position, ask if they have any questions, and thank them for their time.
- Ensure safety measures when leaving the room:
- CALL LIGHT: Within reach
- BED: Low and locked (in lowest position and brakes on)
- SIDE RAILS: Secured
- TABLE: Within reach
- ROOM: Risk-free for falls (scan room and clear any obstacles)
- Document the procedure and assessment findings regarding the appearance of the incision. Report any concerns according to agency policy.
- "DSC_02191.jpg" by British Columbia Institute of Technology is licensed under CC BY 4.0. Access for free at https://opentextbc.ca/clinicalskills/chapter/4-4-suture-care-and-removal/ ↵
