22.2 Basic Concepts Related to Suctioning
Respiratory System Anatomy
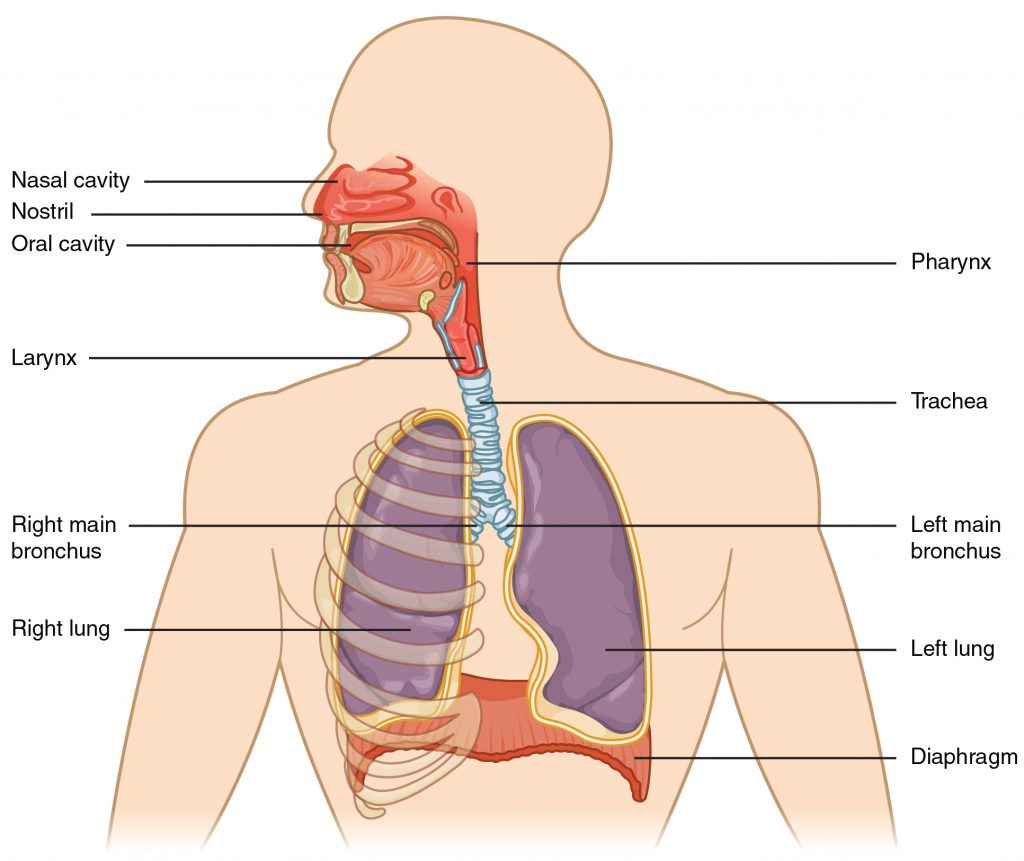
It is important for the nurse to have an understanding of the underlying structures of the respiratory system before performing suctioning to ensure that care is given to protect sensitive tissues and that airways are appropriately assessed during the suctioning procedure. See Figure 22.1[1] for an illustration of the anatomy of the respiratory system.

Maintaining a patent airway is a top priority and one of the “ABCs” of patient care (i.e., Airway, Breathing, and Circulation). Suctioning is often required in acute care settings for patients who cannot maintain their own airway due to a variety of medical conditions such as respiratory failure, stroke, unconsciousness, or postoperative care. The suctioning procedure is useful for removing mucus that may obstruct the airway and compromise the patient’s breathing ability.
To read more details about the respiratory system, see the “Respiratory Assessment” chapter.
Respiratory Failure and Respiratory Arrest
Respiratory failure and respiratory arrest often require emergency suctioning. Respiratory failure is a life-threatening condition that is caused when the respiratory system cannot get enough oxygen from the lungs into the blood to oxygenate the tissues, or there are high levels of carbon dioxide in the blood that the body cannot effectively eliminate via the lungs. Acute respiratory failure can happen quickly without much warning. It is often caused by a disease or injury that affects breathing, such as pneumonia, opioid overdose, stroke, or a lung or spinal cord injury. Acute respiratory failure requires emergency treatment. Untreated respiratory failure can lead to respiratory arrest.
Signs and symptoms of respiratory failure include shortness of breath (dyspnea), rapid breathing (tachypnea), rapid heart rate (tachycardia), unusual sweating (diaphoresis), decreasing pulse oximetry readings below 90%, and air hunger (a feeling as if you can’t breathe in enough air). In severe cases, signs and symptoms may include cyanosis (a bluish color of the skin, lips, and fingernails), confusion, and sleepiness.
The main goal of treating respiratory failure is to ensure that sufficient oxygen reaches the lungs and is transported to the other organs while carbon dioxide is cleared from the body.[2] Treatment measures may include suctioning to clear the airway while also providing supplemental oxygen using various oxygenation devices. Severe respiratory distress may require intubation and mechanical ventilation, or the emergency placement of a tracheostomy may be performed if the airway is obstructed. For additional details about oxygenation and various oxygenation devices, go to the “Oxygen Therapy” chapter.
Tracheostomy
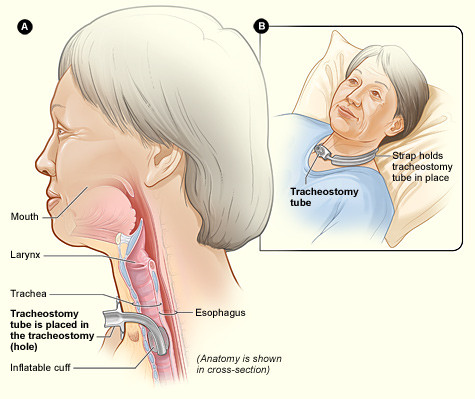
A tracheostomy is a surgically created opening called a stoma that goes from the front of the patient’s neck into the trachea. A tracheostomy tube is placed through the stoma and directly into the trachea to maintain an open (patent) airway. See Figure 22.2[3] for an illustration of a patient with a tracheostomy tube in place.

Placement of a tracheostomy tube may be performed emergently or as a planned procedure due to the following:
- A large object blocking the airway
- Respiratory failure or arrest
- Severe neck or mouth injuries
- A swollen or blocked airway due to inhalation of harmful material such as smoke, steam, or other toxic gases
- Cancer of the throat or neck, which can affect breathing by pressing on the airway
- Paralysis of the muscles that affect swallowing
- Surgery around the larynx that prevents normal breathing and swallowing
- Long-term oxygen therapy via a mechanical ventilator[4]
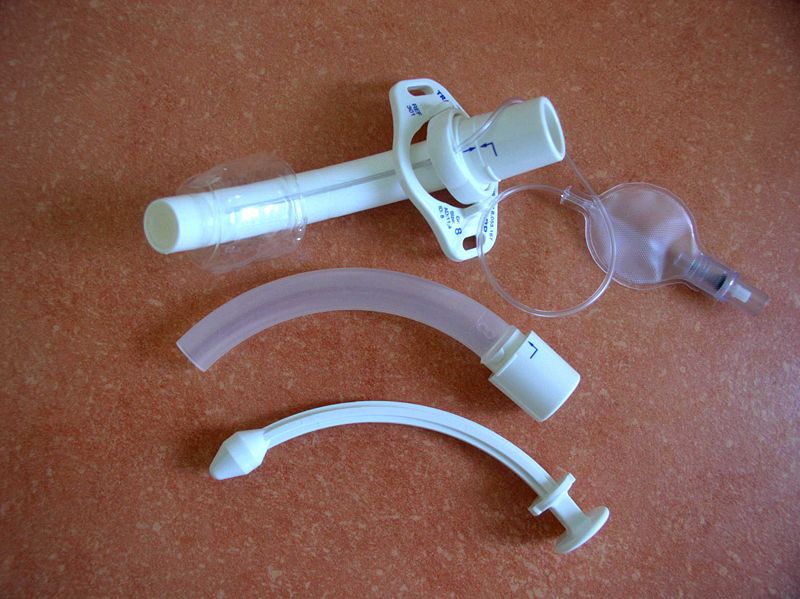
See Figure 22.3[5] for an image of the parts of a tracheostomy tube. The outside end of the outer cannula has a flange that is placed against the patient’s neck. The flange is secured around the patient’s neck with tie straps, and a split 4″ x 4″ tracheostomy dressing is placed under the flange to absorb secretions. A cuff is typically present on the distal end of the outer cannula to make a tight seal in the airway. (See the top image in Figure 22.3.) The cuff is inflated and deflated with a syringe attached to the pilot balloon. Most tracheostomy tubes have a hollow inner cannula inside the outer cannula that is either disposable or removed for cleaning as part of the tracheostomy care procedure. (See the middle image of Figure 22.3.) A solid obturator is used during the initial tracheostomy insertion procedure to help guide the outer cannula through the tracheostomy and into the airway. (See the bottom image of Figure 22.3.) It is removed after insertion and the inner cannula is slid into place.

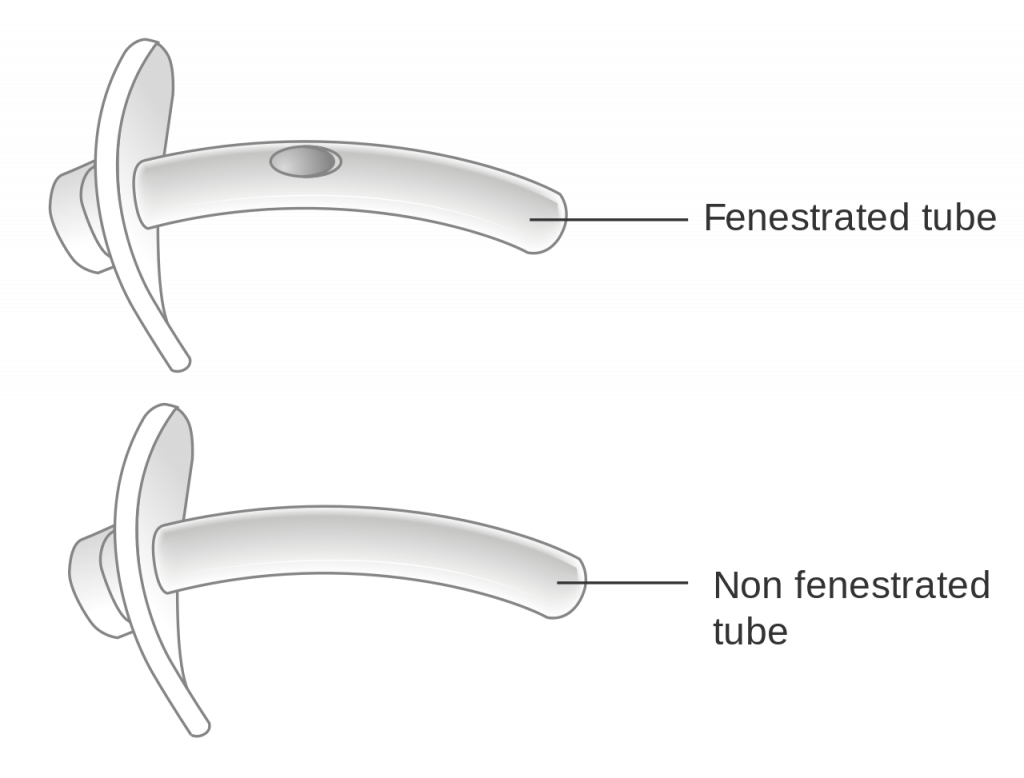
When a tracheostomy is placed, the provider determines if a fenestrated or unfenestrated outer cannula is needed based on the patient’s condition. A fenestrated tube is used for patients who can speak with their tracheostomy tube in place. Under the guidance of a speech pathologist and respiratory therapist, the inner cannula is eventually removed from a fenestrated tube and the cuff deflated so the patient is able to speak. Otherwise, a patient with a tracheostomy tube is unable to speak because there is no airflow over the vocal cords, and alternative communication measures, such as a whiteboard, pen and paper, or computer device with note-taking ability, must be put into place by the nurse. Suctioning should never be performed through a fenestrated tube without first inserting a nonfenestrated inner cannula, or severe tracheal damage can occur. See Figure 22.4[6] for images of a fenestrated and nonfenestrated outer cannula.

Caring for a patient with a tracheostomy tube includes providing routine tracheostomy care and suctioning. Tracheostomy care is a procedure performed routinely to keep the flange, tracheostomy dressing, ties or straps, and surrounding area clean to reduce the introduction of bacteria into the trachea and lungs. The inner cannula becomes occluded with secretions and must be cleaned or replaced frequently according to agency policy to maintain an open airway. Suctioning through the tracheostomy tube is also performed to remove mucus and to maintain a patent airway.
- “2301 Major Respiratory Organs.jpg” by OpenStax is licensed under CC BY 3.0 ↵
- National Heart, Lung, and Blood Institute. (n.d.). Respiratory failure. https://www.nhlbi.nih.gov/health-topics/respiratory-failure ↵
- “Tracheostomy NIH.jpg” by National Heart Lung and Blood Institute is in the Public Domain. ↵
- A.D.A.M. Medical Encyclopedia [Internet]. Atlanta (GA): A.D.A.M., Inc.; c1997-2020. Nail abnormalities; [updated 2020, June 2] https://medlineplus.gov/ency/article/002955.htm ↵
- “Tracheostomy tube.jpg” by Kaluse D Peter, Wiehl, Germany is licensed under CC BY 2.0 DE ↵
- “Diagram showing a fenestrated and a non fenestrated tracheostomy tube CRUK 066.svg” by Cancer Research UK is licensed under CC BY-SA 4.0 ↵
A surgically created opening that goes from the front of the neck into the trachea.
The end of the tracheostomy tube that is placed securely against the patient’s neck.
The cannula inside the outer cannula that is removed during trach care by the nurse. Inner cannulas can be disposable or reusable with appropriate cleaning.
The outer cannula placed by the provider through the tracheostomy hole and continuously remains in place.
Type of tracheostomy tube that contains holes so the patient can speak if the cuff is deflated and the inner cannula is removed.

