13.2 Basic Concepts
Open Resources for Nursing (Open RN)
Musculoskeletal Anatomy, Physiology, and Assessment
Before discussing the concept of mobility, it is important to understand the anatomy of the musculoskeletal system, common musculoskeletal conditions, and the components of a musculoskeletal system assessment. Read more about these topics in the “Musculoskeletal Assessment” chapter in Open RN Nursing Skills, 2e.
Mobility and Immobility
Mobility is the ability of a client to change and control their body position. Physical mobility requires sufficient muscle strength and energy, along with adequate skeletal stability, joint function, and neuromuscular synchronization. Anything that disrupts this integrated process can lead to impaired mobility or immobility.[1] Mobility exists on a continuum, ranging from no impairment (i.e., the client can make major and frequent changes in position without assistance) to being completely immobile (i.e., the client is unable to make even slight changes in body or extremity position without assistance). See Figure 13.1[2] for an image of a client with impaired physical mobility requiring assistance with a wheelchair.

Functional mobility is the ability of a person to move around in their environment, including walking, standing up from a chair, sitting down from standing, and moving around in bed. The three main areas of functional mobility are the following:
- Bed Mobility: The ability of a client to move around in bed, including moving from lying to sitting and sitting to lying.
- Transferring: The action of a client moving from one surface to another. This includes moving from a bed into a chair or moving from one chair to another.
- Ambulation: The ability to walk. This includes walking independently but with assistance from another person or an assistive device, such as a cane, walker, or crutches.
Immobility can be caused by several physical and psychological factors, including acute and chronic diseases, traumatic injuries, and chronic pain. Several neurological and musculoskeletal disorders can adversely affect mobility, including osteoarthritis, rheumatoid arthritis, muscular dystrophy, cerebral palsy, multiple sclerosis, and Parkinson’s disease. Traumatic injuries, such as skeletal fractures, head injuries, or spinal injuries, also impair mobility. Diseases that cause fatigue, such as heart failure, chronic obstructive pulmonary disease, and depression, or conditions that cause pain also affect the client’s desire or ability to move.
Effects of Immobility
Clients who spend an extended period of time in bed as they recover from surgery, injury, or illness can develop a variety of complications due to loss of muscle strength (estimated at a rate of 20% per week of immobility). Regardless of the cause, immobility can cause degradation of cardiovascular, respiratory, gastrointestinal, and musculoskeletal functioning. Promoting mobility can prevent these complications from occurring. Findings from a literature review demonstrated several benefits of mobilization, including less delirium, pain, urinary discomfort, urinary tract infection, fatigue, deep vein thrombosis (DVT), and pneumonia, as well as an improved ability to void. Mobilization also decreased depression, anxiety, and symptom distress, while enhancing comfort, satisfaction, quality of life, and independence.[3] See Table 13.2a for a summary of the effects of immobility on these body systems.[4],[5],[6] Decreased mobility is also a major risk factor for skin breakdown, as indicated on the Braden Scale. See Figure 13.2[7] for an image of a client with impaired mobility who developed a DVT.
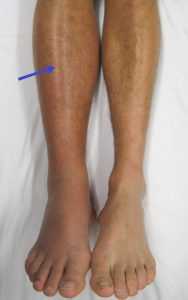
Table 13.2a Effects of Immobility on Body Systems[8]
| Body System | Immobility Effects | Potential Complications |
|---|---|---|
| Psychological | Depression
Anxiety Distress |
Decreased quality of life
|
| Cardiovascular | Decreased systemic vascular resistance causing venous pooling in extremities
Decreased cardiac output |
Orthostatic hypotension
Thrombus formation |
| Respiratory | Decreased strength of respiratory muscles
Diminished lung expansion Hypoventilation Impaired gas exchange Decreased cough reflex Pulmonary secretion pooling Blood redistribution and fluid shifts within the lung tissues |
Atelectasis
Hypoxia Pneumonia Pulmonary edema Pulmonary embolism |
| Integumentary | Decreased delivery of oxygen and nutrients to tissues
Tissue ischemia Inflammation over bony prominences Friction and shear |
Skin breakdown
Pressure injuries Infection Abrasions |
| Musculoskeletal | Reduced muscle mass
Decreased muscle strength Decreased endurance Shortening of connective tissue Impaired joint mobility Impaired calcium metabolism |
Fatigue
Decreased stability and balance Muscle atrophy Joint contractures Foot drop Osteoporosis Falls Fractures |
| Gastrointestinal | Decreased peristalsis
Anorexia Decreased fluid intake Increased intestinal gas Altered swallowing |
Constipation
Fecal impaction Ileus Flatulence Abdominal distention Nausea and vomiting Heartburn Aspiration Malnutrition |
| Genitourinary | Urinary discomfort
Urinary retention |
Urinary tract infection |
Read additional information pertaining to the content in Table 13.2a using the information in the following box.
Read additional details about assessing the cardiovascular system and assessing for deep vein thrombosis (DVT) in the “Cardiovascular Assessment” chapter in Open RN Nursing Skills, 2e.
Read additional details about performing a “Respiratory Assessment” in Open RN Nursing Skills, 2e.
Read more about treating hypoxia in the “Oxygenation” chapter of this textbook.
Read about preventing pressure injuries in the “Integumentary” chapter of this textbook.
Read details about performing a “Musculoskeletal Assessment” in Open RN Nursing Skills, 2e.
Read more about constipation, impaction, ileus, urinary retention, and urinary tract infection in the “Elimination” chapter of this textbook.
Review how to perform an “Abdominal Assessment” in Open RN Nursing Skills, 2e.
Strategies to promote client mobility can be divided into two categories: those used when the client is in bed and those used when the client is able to get out of bed. In-bed interventions to enhance mobility include performing repositioning activities, completing range-of-motion exercises, and assisting the client to dangle on the edge of a bed. Out-of-bed interventions to enhance mobility include transferring the client from bed to chair and assisting with ambulation.[9] Unfortunately, ambulation of clients has been identified as the most frequently missed element of inpatient nursing care with rates as high as 76–88% of the time.[10] Before discussing these interventions to promote mobility, let’s review the assessments that a nurse must perform prior to safely implementing mobilization interventions.
Assessing Mobility Status and the Need for Assistance
A client’s mobility status and their need for assistance affect nursing care decisions, such as handling and transferring procedures, ambulation, and implementation of fall precautions. Initial mobility assessments are typically performed on admission to a facility by a physical therapist (PT). See Table 13.2b for an example of common types of assistance required.
Table 13.2b Common Types of Assistance Required[11]
| Type of Assistance Required | Description |
|---|---|
| Dependent | The client is unable to help at all. A mechanical lift and assistance by other personnel are required to perform tasks. |
| Maximum Assistance | The client can perform 25% of the mobility task while the caregiver assists with 75%. |
| Moderate Assistance | The client can perform 50% of the mobility task while the caregiver assists with 50%. |
| Minimal Assistance | The client can perform 75% of the mobility task while the caregiver assists with 25%. |
| Contact Guard Assist | The caregiver places one or two hands on the client’s body to help with balance but provides no other assistance to perform the functional mobility task. |
| Stand By Assist | The caregiver does not touch the client or provide assistance but remains close to the client for safety in case they lose their balance or need help to maintain safety during the task being performed. |
| Independent | The client can safely perform the functional task on their own without assistance. |
In addition to the amount of assistance required, health care providers or physical therapists may determine a client’s weight-bearing status. For example, clients with lower extremity fractures or those recovering from knee or hip replacement often progress through stages of weight-bearing activity. See Table 13.2c for common weight-bearing prescriptions.
Table 13.2c Weight-Bearing Prescriptions
| Type of Weight-Bearing | Description |
|---|---|
| Nonweight-bearing (NWB) | The leg must not touch the floor and is not permitted to support any weight at all. Crutches or other devices are used for mobility. |
| Toe-touch weight-bearing (TTWB) | The foot or toes may touch the floor to maintain balance, but no weight should be placed on the affected leg. |
| Partial weight-bearing | A small amount of weight may be supported on the affected leg. Weight may be gradually increased to 50% of body weight, which permits the person to stand with body weight evenly supported by both feet (but not walking). |
| Weight-bearing as tolerated | The client can support 50% to 100% of weight on the affected leg and can independently choose the weight supported by the extremity based on their tolerance and the circumstances. |
| Full weight-bearing | The leg can support 100% of a person’s body weight, which permits walking. |
In addition to reviewing orders regarding weight-bearing and assistance required, all staff should assess client mobility before and during interventions, such as transferring from surface to surface or during ambulation. Staff may frequently rely on the client’s or a family member’s report on the client’s ability to stand, transfer, and ambulate, but this information can be unreliable. For example, the client may have unrecognized physical deconditioning from the disease or injury that necessitated hospitalization, or they may have developed new cognitive impairments related to the admitting diagnosis or their current medications.[12]
Several objective screening tests, such as the Timed Get Up and Go Test, have traditionally been used by nurses to assess a client’s mobility status. The Timed Get Up and Go Test begins by having the client stand up from an armchair, walk three yards, turn around, walk back to the chair, and sit down. As the client performs these maneuvers, their posture, body alignment, balance, and gait are analyzed. However, this test and other tests do not provide guidance on what the nurse should do if the client can’t maintain seated balance, bear weight, or stand and walk. The Banner Mobility Assessment Tool (BMAT) was developed to provide guidance regarding safe client handling and mobility (SPHM). It is used as a nurse-driven bedside assessment of client mobility and walks the client through a four-step functional task list and identifies the mobility level the client can achieve. It then provides guidance regarding the SPHM technology needed to safely lift, transfer, and mobilize the client.[13] Read additional information about the Banner Mobility Assessment Tool (BMAT) in the following box.
See the following box for an example of a nurse using the BMAT.
Example of Banner Mobility Assessment Tool In Action[15]
A 65-year-old male was admitted to the hospital late in the evening. He was 6’2” tall and weighed 350 lbs. (158 kg). He needed to have a bowel movement but stated he didn’t want to use a bedpan. The nurse wasn’t comfortable getting him up to use the bathroom because he hadn’t yet been evaluated by physical therapy, and a physical therapist wasn’t available until the following morning. Per agency policy, the nurse assessed the client using the BMAT and found he was able to raise his buttocks off the bed using a bed rail and hold for a count of five. but stated he used a walker at home to ambulate. He was rated at Mobility Level 3, and the nurse transferred him to the toilet using a nonpowered stand aid. Both the client and nurse were relieved and satisfied with the outcome.
Safe Client Handling
Assisting clients with decreased immobility poses an increased risk of injury to health care workers. A focus on safe client handling and mobility in acute and long-term care settings over the past decade has resulted in decreased staff lifting injuries for the first time in 30 years. Nonetheless, nurses still suffer more musculoskeletal disorders from lifting than other employees in the manufacturing and construction industries. Many employers and nurses previously believed that lifting injuries could be prevented by using proper body mechanics, but evidence contradicts this assumption. Body mechanics involves the coordinated effort of muscles, bones, and one’s nervous system to maintain balance, posture, and alignment when moving, transferring, and positioning clients.[16] The National Institute of Occupational Safety and Health (NIOSH) calculates maximum loads for lifting, pushing, pulling, and carrying for all types of employees. For example, a maximum load for employees lifting a box with handles is 50 pounds (23 kg), but this weight is decreased when the lifter has to reach, lift from near the floor, or assume a twisted or awkward position. Because clients don’t come in simple shapes and may sit or lie in awkward positions, move unexpectedly, or have wounds or devices that interfere with lifting, the safe lifting load for clients is less than this maximum 50-pound load. Although using proper body mechanics and good lifting techniques are important, they don’t prevent lifting injuries in these client circumstances[17],[18],[19] Factors that increase risk for lifting injuries in nurses are exertion, frequency, posture, and duration of exposure. Combinations of these factors, such as high exertion while in an awkward posture (for example, holding a client’s leg while bent over and twisted), unpredictable client movements, and extended reaching, intensify the risk.[20]
In 2013 the American Nurses Association (ANA) published Safe Patient Handling and Mobility (SPHM) standards. See the standards in the box below. See other information about safe client handling in the following box.
View ANA videos on safe client handling: Preventing Nurse Injuries and ANA Presents Safe Patient Handling and Mobility.
Read an ANA article on Safe Patient Handling – The Journey Continues.
ANA Standards for Safe Patient Handling and Mobility[21]
Standard 1: Establish a culture of safety. This standard calls for the employer to establish a commitment to a culture of safety. This means prioritizing safety over competing goals in a blame-free environment where individuals can report errors or incidents without fear. The employer is compelled to evaluate systemic issues that contribute to incidents or accidents. The standard also calls for safe staffing levels and improved communication and collaboration. Every organization should have a procedure for nurses to report safety concerns or refuse an assignment due to concern about patients’ or their own safety.
Standard 2: Implement and sustain an SPHM program. This standard outlines SPHM program components, including patient assessment and written guidelines for safe patient handling by staff.
Standard 3: Incorporate ergonomic design principles to provide a safe care environment. This standard is based on the concept of prevention of injuries through ergonomic design that considers the physical layout, work-process flow, and use of technology to reduce exposure to injury or illness.
Standard 4: Select, install, and maintain SPHM technology. This standard provides guidance in selecting, installing, and maintaining SPHM technology.
Standard 5: Establish a system for education, training, and maintaining competence. This standard outlines SPHM training for employees, including the demonstration of competency before using SPHM technology with patients.
Standard 6: Integrate patient-centered SPHM assessment, plan of care, and use of SPHM technology. This standard focuses on the patient’s needs by establishing assessment guidelines and developing an individual plan of care. It outlines the importance of using SPHM technology in a therapeutic manner with the goal of promoting patients’ independence. For example, a patient may need full-body lift technology immediately after surgery, then progress to a sit-to-stand lift for transfers, and then progress to a technology that supports ambulation.
Standard 7: Include SPHM in reasonable accommodation and post-injury return to work. This standard promotes an employee’s return to work after an injury.
Standard 8: Establish a comprehensive evaluation system. The final standard calls for evaluation of outcomes related to an agency’s implementation of a SPHM program with remediation of deficiencies.
Assistive Devices
There are several types of assistive devices that a nurse may incorporate during safe client handling and mobility. An assistive device is an object or piece of equipment designed to help a client with activities of daily living, such as a walker, cane, gait belt, or mechanical lift.[22] Assistive devices include other items described below.
Gait Belts
Gait belts should be used to ensure stability when assisting clients to stand, ambulate, or transfer from bed to chair. A gait belt is a 2-inch-wide (5 mm) belt, with or without handles, that is placed around a client’s waist and fastened with a buckle. The gait belt should be applied on top of clothing or a gown to protect the client’s skin. See Figure 13.3[23] for an image of a gait belt.

Slider Boards
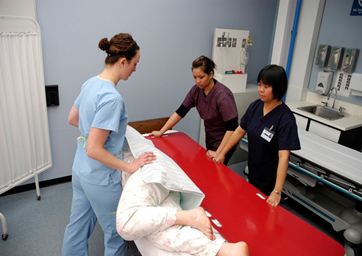
A slider board (also called a transfer board) is used to transfer an immobile client from one surface to another while the client is lying supine (e.g., from a stretcher to hospital bed).[24] See Figure 13.4[25] for an image of a client being transferred by logrolling off a slider board with several assistants.
Sit to Stand Lifts
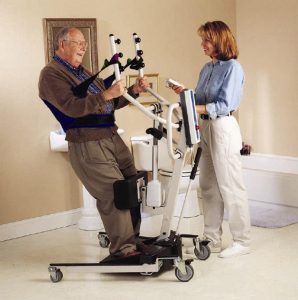
Sit to stand lifts (also referred to as Sara lifts, lift ups, stand assist, or stand-up lifts) are mobility devices that assist weight-bearing clients who are unable to transition from a sitting position to a standing position using their own strength. They are used to safely transfer clients who have some muscular strength but not enough strength to safely change positions by themselves. Some sit to stand lifts use a mechanized lift whereas others are nonmechanized. See Figure 13.5[26] for an image of a nurse assisting a client to stand with a sit to stand lift.
Mechanical Lifts
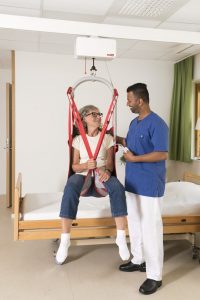
A mechanical lift is a hydraulic lift with a sling used to move clients who cannot bear weight or have a medical condition that does not allow them to stand or assist with moving. It can be a portable device or permanently attached to the ceiling. See Figure 13.6[27] for an image of a mechanical lift.
Early Mobility Protocols
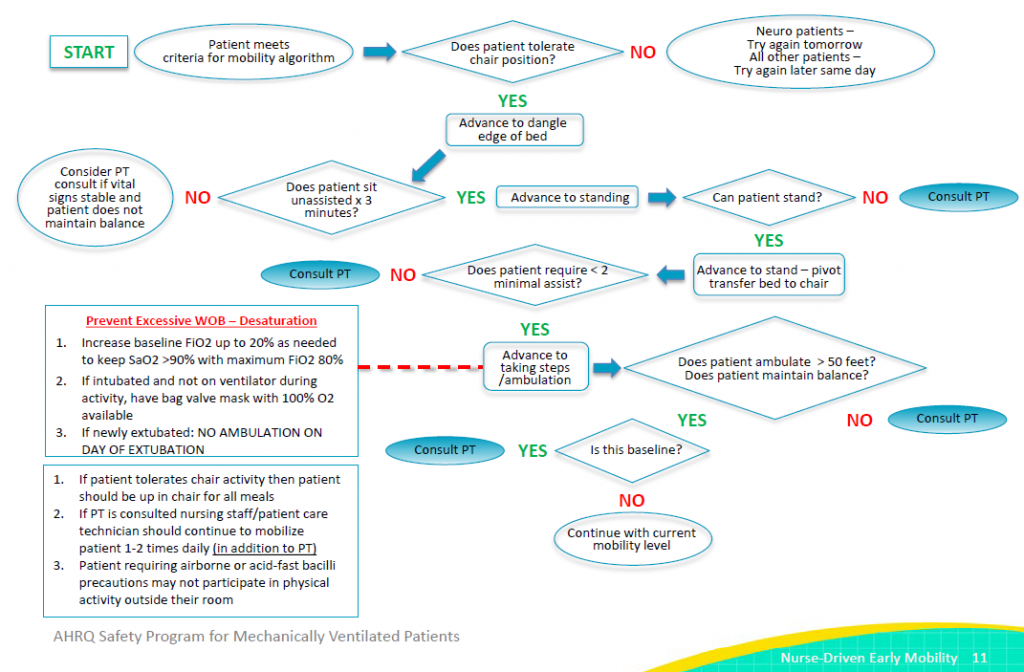
Many hospitals use nurse-driven mobility protocols to encourage early mobility of clients in intensive care units and after surgery. The purpose of early mobility protocols is to maintain the client’s baseline mobility and functional capacity, decrease the incidence of delirium, and decrease hospital length of stay. Protocols include a coordinated approach by the multidisciplinary team and may include respiratory therapists, physical therapists, pharmacists, occupational therapists, and the health care provider who focus on getting the client out of bed faster.[28]
When early mobility protocols are in place, nurses use a screening tool to determine whether a client is clinically ready to attempt the protocol. This algorithm begins by reviewing the client’s neurological criteria, such as, does the client open his or her eyes in response to verbal stimulation? If the client meets neurological criteria, they are assessed against additional criteria for respiratory, circulatory, neurological, and other considerations. If the client meets these criteria, a registered nurse may carefully initiate an early mobilization protocol in collaboration with a physical therapist. See Figure 13.7[29] for an example of an early mobilization protocol used for clients in an ICU.[30]
See the following box for an example of a mobilization protocol in an intermediate care unit.
Example of Early Mobilization Protocol[31]
Here is an example of using an early mobilization protocol in an intermediate care unit with patient care technicians (PCT). Three PCTs collaborate with nurses from 7 a.m. to 7 p.m. Each PCT has eight clients and is responsible for mobilizing client during each 12-hour shift. Each patient care technician discusses each client’s level of activity with the RN at the beginning of the shift and determines how many times each client will be mobilized throughout the day. Any concerns that arise during mobilization are shared with the nurse for appropriate follow-up.
Range-of-Motion Exercises
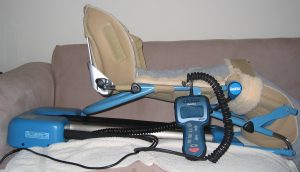
When clients are unable to ambulate or have an injury to specific extremities, range-of-motion (ROM) exercises are often prescribed. ROM exercises facilitate movement of specific joints and promote mobility of the extremities. Because changes in joints can occur after three days of immobility, ROM exercises should be started as soon as possible. There are three types of ROM exercises: passive, active, and active assist. Passive range of motion is movement applied to a joint solely by another person or by a passive motion machine. When passive range of motion is applied, the joint of an individual receiving exercise is completely relaxed while the outside force moves the body part while they are lying in bed. For example, clients who undergo knee replacement surgery may be prescribed a passive motion machine that continuously flexes and extends the client’s knee while lying in bed. See Figure 13.8[32] for an image of a passive motion machine. Active range of motion is movement of a joint by the individual performing the exercise with no outside force aiding in the movement. Active assist range of motion is joint movement with partial assistance from an outside force. For example, during the recovery period after shoulder surgery, a client attends physical therapy and receives 50% assistance in moving the arm with the help of a physical therapy assistant.
View an infographic demonstrating range-of-motion exercises.
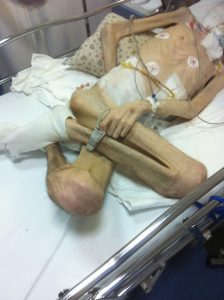
Clients may receive temporary ROM exercises due to injury, surgery, or other temporary conditions. These clients are expected to make a full recovery and over time will no longer need ROM to ensure the proper functioning of their joint. Other clients require long-term ROM exercises to prevent contractures that can occur in conditions such as spinal cord injury, stroke, neuromuscular diseases, or traumatic brain injury. A contracture is the lack of full passive range of motion due to joint, muscle, or soft tissue limitations.[33] See Figure 13.9[34] for an image of a severe leg contracture in a client with a terminal neurological condition.
Range-of-motion exercises are prescribed by a physical therapist and can be performed by physical therapy assistants (PTAs), nursing assistants (NAs), patient care technicians (PCTs), and nurses based on agency policy. Guidelines for performing range-of-motion exercises include the following:
- A program of passive stretching should be started as early as possible in the course of neuromuscular disease to prevent contractures and become part of a regular morning and evening routine.
- Proper technique is essential for passive stretching to be effective. With each stretch, the position should be held for a count of 15, and each exercise should be repeated 10 to 15 times during a session (or as prescribed). Stretching should be performed slowly and gently. An overly strenuous stretch may cause discomfort and reduce cooperation.
- Written instructional materials should be provided to the client and family as a supplement to verbal instructions and demonstrations by the physical therapist.
Watch a YouTube video demonstration of passive motion exercises.[35]
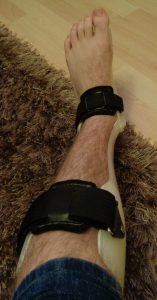
Limb positioning with assistive devices can also be used to prevent contracture formation. The limb should be placed in a resting position that opposes or minimizes flexion.[36] Positioning aids include pillows, foot boots, handrolls, hand-wrist splints, heel or elbow protectors, abduction pillows, or a trapeze bar. See Figure 13.10[37] for an image of a brace used to prevent foot drop in a client with multiple sclerosis. Foot drop is a complication of immobility that results in plantar flexion of the foot, interfering with the ability to complete weight-bearing activities.
Read additional information about range-of-motion exercises, preventing contractures, and physical therapy in the following box.
Review how to perform Active Range-of-Motion Exercises.
Read how to Prevent and Manage Contractures.
Read more details about Physical Therapy.
Repositioning Clients
Repositioning a bedridden client maintains body alignment and prevents pressure injuries, foot drop, and contractures. Proper positioning also provides comfort for clients who have decreased mobility related to a medical condition or treatment. When repositioning a client in bed, supportive devices such as pillows, rolls, and blankets can aid in providing comfort and safety. There are several potential positions that are determined based on the client’s medical condition, preferences, or treatment related to an illness.[38] ] It is important to reposition clients appropriately to prevent neurological injuries that can occur, such as if a client is inadvertently positioned on their arm.
Supine Position
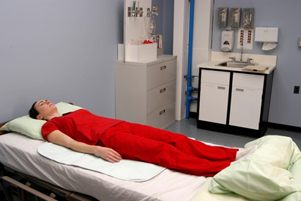
In supine positioning, the client lies flat on their back. Pillows or other devices may be used to prevent foot drop. Additional supportive devices, such as pillows under the arms, may be added for comfort. See Figure 13.11[39] for an image of a client in the supine position.[40]
Prone Position
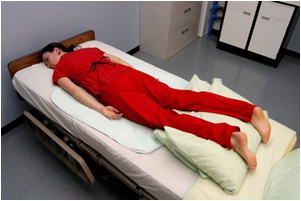
In prone positioning, the client lies on their stomach with their head turned to the side.[41] Pillows may be placed under the lower legs to align the feet. See Figure 13.12[42] for an image of a client in the prone position. Placing clients in the prone position may improve their oxygenation status in certain types of medical disorders, such as COVID-19.[43]
Lateral Position
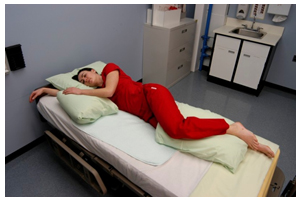
In lateral positioning, the client lies on one side of their body with the top leg flexed over the bottom leg. This position helps relieve pressure on the coccyx.[44] A pillow may be placed under the top arm for comfort. See Figure 13.13[45] for an image of a client in the lateral position. The lateral position is often used for pregnant women to prevent inferior vena cava compression and enhance blood flow to the fetus.
Sim’s Position
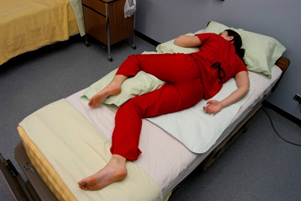
In Sim's positioning, the client is positioned halfway between the supine and prone positions with their legs flexed. A pillow is placed under the top leg. Their arms should be comfortably placed beside them, not underneath.[46] See Figure 13.14[47] for an image of a client in Sim’s position. The Sim’s position is used during some procedures, such as the administration of an enema.
Fowler’s Position
In Fowler’s positioning, the head of bed is placed at a 45- to 90-degree angle. The bed can be positioned to slightly flex the hips to help prevent the client from migrating downwards in bed.[48] See Figure 13.15[49] for an image of a client in Fowler’s position. High Fowler’s position refers to the bed being at a 90-degree angle. The Fowler’s position is used to promote lung expansion and improve a client’s oxygenation. It is also used to prevent aspiration in clients while eating or receiving tube feeding.
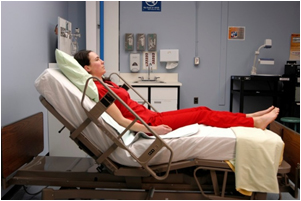
Semi-Fowler’s Position
In Semi-Fowler’s positioning, the head of bed is placed at a 30- to 45-degree angle. The client’s hips may or may not be flexed. See Figure 13.16[50] for an image of a client in Semi-Fowler’s position. Semi-Fowler’s position is used for the same purposes as Fowler’s position but is generally better tolerated over long periods of time because there is less pressure on the coccyx area than with Fowler’s and High-Fowler’s position.
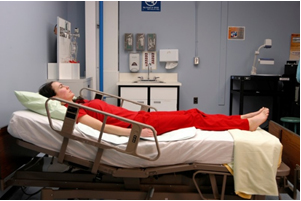
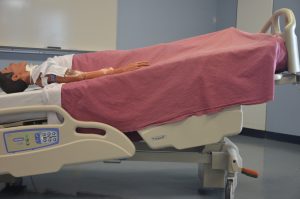
Trendelenburg Position
In Trendelenburg positioning, the head of the bed is placed lower than the client’s feet. This position may be used in certain situations to promote venous return to the head and heart, such as during severe hypotension and medical emergencies.[51] See Figure 13.17[52] for an image of Trendelenburg position.
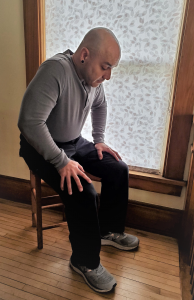
Tripod Position
Clients who are feeling short of breath often naturally assume the tripod position. In the tripod position, the client leans forward while sitting with their elbows on their knees or resting on a table. Clients experiencing breathing difficulties can be placed in this position to enhance lung expansion and air exchange. See Figure 13.18[53] for images of an individual demonstrating breathing difficulty who has assumed the tripod position.
Moving a Client Up in Bed
When moving a client up in bed, first determine the level of assistance needed to provide optimal client care. It is vital to prevent friction and shear when moving a client up in bed to prevent pressure injuries. If a client is unable to assist with repositioning in bed, follow agency policy regarding using lifting devices and mechanical lifts. If the client is able to assist with repositioning and minimal lifting by staff is required, use the following guidelines with assistance from another health care professional to help with the move and prevent injury.[54] See Figure 13.19[55] for an image of moving a client up in bed.
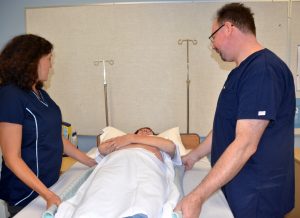
When moving a client up in bed, nurses generally follow these steps[56]:
- Explain to the client what will happen and how the client can help.
- Raise the bed to a safe working height and ensure that the brakes are applied.
- Position the client in the supine position with the bed flat. Place a pillow at the head of the bed and against the headboard to prevent accidentally bumping the client’s head on the headboard.
- Two health care professionals should stand with feet shoulder width apart between the shoulders and hips of the client at the bedside. This keeps the heaviest part of the client closest to the center of gravity of the health care providers. Weight will be shifted from back foot to front foot.
- Fan-fold the draw sheet toward the client with palms facing up. This provides a strong grip to move the client up with the draw sheet.
- Ask the client to tilt their head toward their chest, fold arms across their chest, and bend their knees to assist with the movement. Let the client know when the move will happen. This step prevents injury from occurring to the client and prepares them for the move.
- Tighten your gluteal and abdominal muscles, bend your knees, and keep your back straight and neutral. Face the direction of movement. Proper body mechanics can help prevent back injury when used in appropriate client care situations.
- On the count of three by the lead person, gently slide (not lift) the client up the bed, shifting your weight from the back foot to the front, keeping your back straight and knees slightly bent.
- Replace the pillow under the client’s head, reposition the client in the bed, and cover them with a sheet or blanket to provide comfort.
- Lower the bed, raise the side rails as indicated, and ensure the call light is within reach. Perform hand hygiene.
Assisting Clients to Seated Position
Prior to ambulating, repositioning, or transferring a client from one surface to another (e.g., a bed to a wheelchair), it often necessary to move the client to the side of the bed to avoid straining or excessive reaching by the health care professional. Positioning the client to the side of the bed also allows the health care provider to have the client as close as possible to their center of gravity for optimal balance during client handling.[57]
Clients who have been lying in bed may experience vertigo, a sensation of dizziness as if the room is spinning, or orthostatic hypotension, low blood pressure that occurs when a client changes position from lying to sitting or sitting to standing and causes the client to feel dizzy, faint, or light-headed. Orthostatic hypotension is defined as a drop in systolic blood pressure of 20 mm Hg or more or a drop of diastolic blood pressure of 10 mm Hg or more within three minutes of sitting or standing. For this reason, always begin a transfer or ambulation process by sitting the client on the side of the bed for a few minutes with their legs dangling.[58]
Begin by explaining to the client what will happen and how they can help. Determine if additional assistance or a mechanical lift is needed.[59] See Figure 13.20[60] for images of a nurse assisting a client to a seated position.
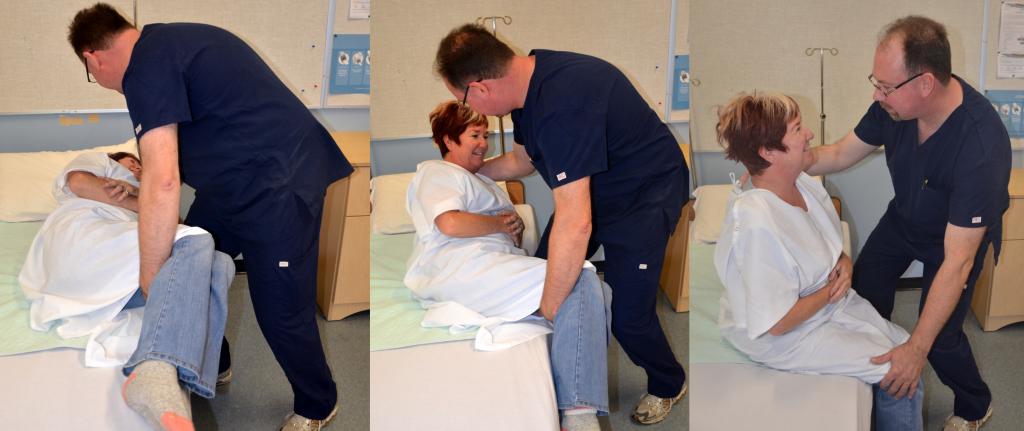
When moving a client to a seated position, nurses generally follow these steps[61] :
- Ensure the bed is in a low and locked position.
- Stand facing the head of the bed at a 45-degree angle with your feet apart, with one foot in front of the other. Stand next to the waist of the client.
- Ask the client to turn onto their side, facing you, as they move closer to the edge of the bed.
- Place one hand behind the client’s shoulders, supporting the neck and vertebrae.
- On the count of three, instruct the client to use their elbows to push up against the bed and then grasp the side rail as you support their shoulders as they sit. Shift your weight from the front foot to the back foot as you assist them to sit. Do not allow the client to place their arms around your shoulders because this can lead to serious back or neck injuries.
- As you shift your weight, gently grasp the client’s outer thighs with your other hand and help them slide their feet off the bed to dangle or touch the floor. This step helps the client sit and move their legs off the bed at the same time. As you perform this action, bend your knees and keep your back straight and neutral.
- Assess the client for symptoms of orthostatic hypotension or vertigo. If they are experiencing any dizziness, request them to sit and dangle on the edge of the bed and determine if the symptoms resolve before transferring or ambulating.
Ambulating a Client
Ambulation is the ability of a client to safely walk independently, with assistance from another person, or with an assistive device, such as a cane, walker, or crutches. After a client has been assessed and determined safe to ambulate, determine if assistive devices or the assistance of a second staff member is required. Apply a gait belt snugly over their clothing and around their waist per agency policy if assistance is required. See Figure 13.21[62] for an image of applying a gait belt. The client should be cooperative, able to bear weight on their own, have good trunk control, and be able to transition to a standing position on their own. If these criteria are not met, then mechanical devices, such as a sit to stand lift, should be used to assist a weight-bearing client from a sitting position to a standing position. If a client uses a walker or cane, these assistive devices should be placed near the bed before beginning this procedure.

Nurses generally follow these steps when assisting a seated client to ambulate[63] :
- Assist the client to sit on the side of the bed and assess for symptoms of vertigo or orthostatic hypotension before proceeding. Ensure the client is wearing proper footwear, such as shoes or nonslip socks.
- Stand in front of the client, with your legs on the outside of their legs.
- Grasp each side of the gait belt, while keeping your back straight and knees bent, and then rock your weight backwards while gently steadying the client into a standing position.
- After the client is standing and feels stable, move to their unaffected side and grasp the gait belt in the middle of their back. If needed for stability, place one arm under the client’s arm, gently grasp their forearm, and lock your arm firmly under the client’s axilla. In this position, if the client starts to fall, you can provide support at the client’s shoulder.[64]
- If the client uses a walker or cane, ensure the client is using this device before beginning ambulation.
- Before stepping away from the bed, ask the client if they feel dizzy or light-headed. If they do, sit the client back down on the bed until the symptoms resolve. If the client feels stable, begin walking by matching your steps to the client’s.
- Instruct the client to look ahead and lift each foot off the ground. Walk only as far as the client can tolerate without feeling dizzy or weak.
- Periodically ask them how they are feeling to check for dizziness or weakness.
- In some situations of early ambulation, it is helpful for a second staff member to follow behind the client with a wheeled walker or wheelchair in case the client needs to sit while walking. See Figure 13.22[65] for an image of a nurse assisting the client to stand.
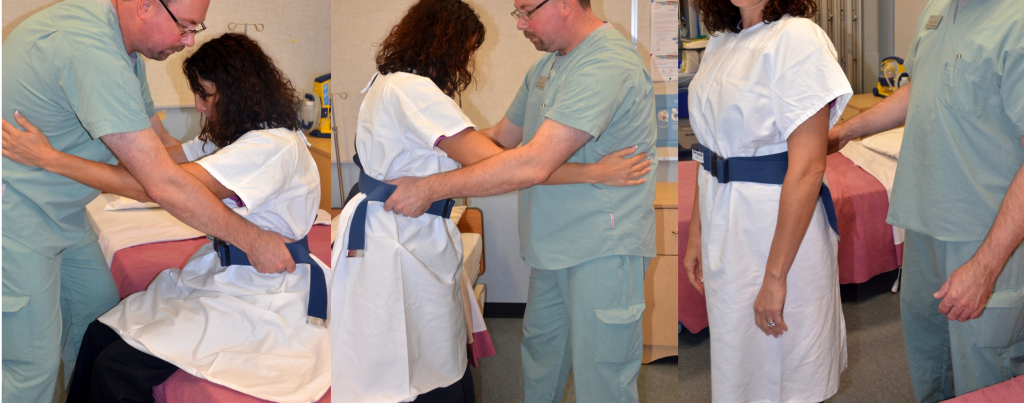
To assist the client back into the bed or a chair, have them stand with the back of their knees touching the bed or chair. Grasp the gait belt and assist them as they lower into a sitting position, keeping your back straight and knees bent. Remove the gait belt. If the client is returning to bed, place the bed in the lowest position, raise the side rails as indicated, and ensure the call light is within reach. Cover the client with a sheet or blanket to provide comfort. Document the distance of ambulation and the client’s tolerance of ambulation.
Transfer From Bed to Chair or Wheelchair
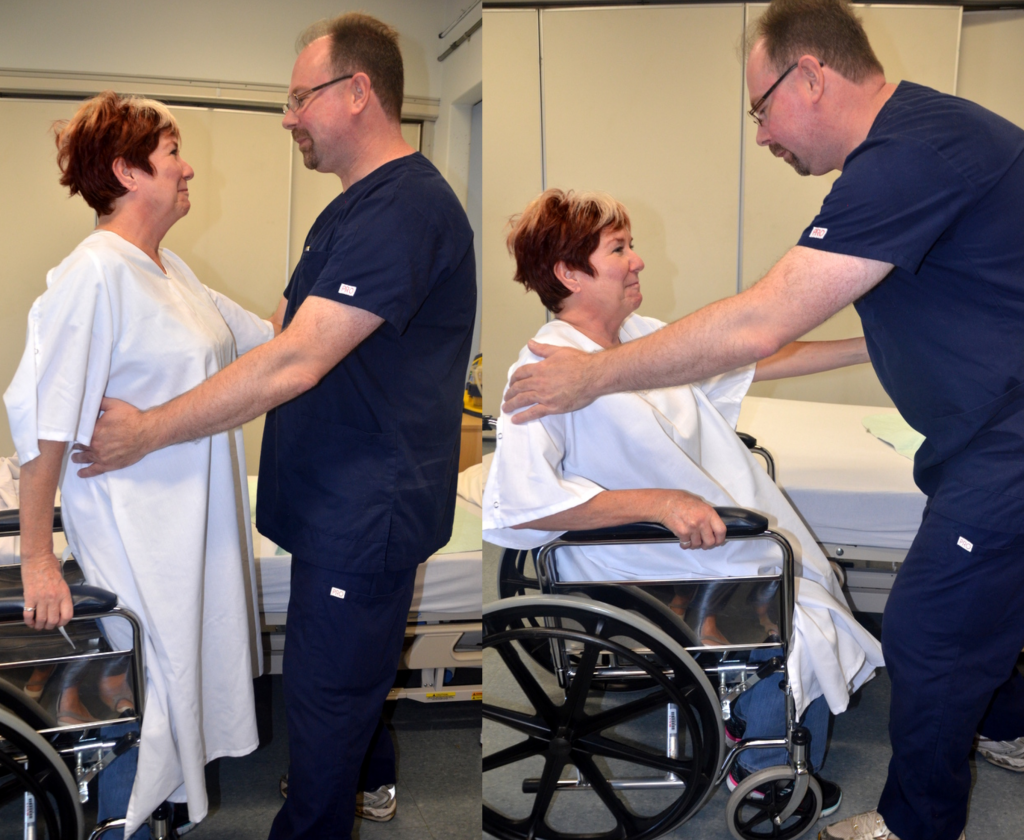
Clients often require assistance when moving from a bed to a chair or wheelchair. A client must be cooperative and predictable, able to bear weight on both legs, and able to take small steps and pivot to safely transfer with a one-person assist. If any of these criteria are not met, a two-person transfer, or mechanical lift is recommended. Always complete a mobility assessment and check the provider’s or physical therapist’s orders prior to transferring clients.[66]
Nurses generally follow these steps when moving a client from a bed or chair to a wheelchair[67] :
- Begin by explaining to the client what will happen during the transfer and how they can help. Be sure proper footwear is in place. Lower the bed to a 45-degree angle. Place the wheelchair next to the bed and apply the wheelchair brakes. If the client has weakness on one side, place the wheelchair on their strong side.
- Assist the client to a seated position on the side of the bed with their feet on the floor. (See the previous section on how to assist a client to a seated position.)
- Apply the gait belt snugly around their waist.
- Place your legs on the outside of their legs. Ask them to place their hands on your waist as they raise themselves into a standing position. Do not lift the client. If additional assistance is required, obtain a mechanical lift, such as a sit to stand device. Do not allow them to put their arms around your neck because this can cause neck or back injury.
- Stay close to the client during the transfer to keep the client’s weight close to your center of gravity.
- Once standing, ask the client to pivot and then take a few steps back until they can feel the wheelchair on the back of their legs.
- Have the client grasp the arm of the wheelchair and lean forward slightly.
- Assist the client to lower themselves, while shifting your weight from your back leg to the front leg with your knees bent, trunk straight, and elbows slightly bent. Allow the client to slowly lower themselves into the wheelchair using the armrests for support.
See Figure 13.23[68]for an image of a staff member assisting a client to a wheelchair.
Reflective Question: What could be improved during this transfer?
Lowering A Client to the Floor
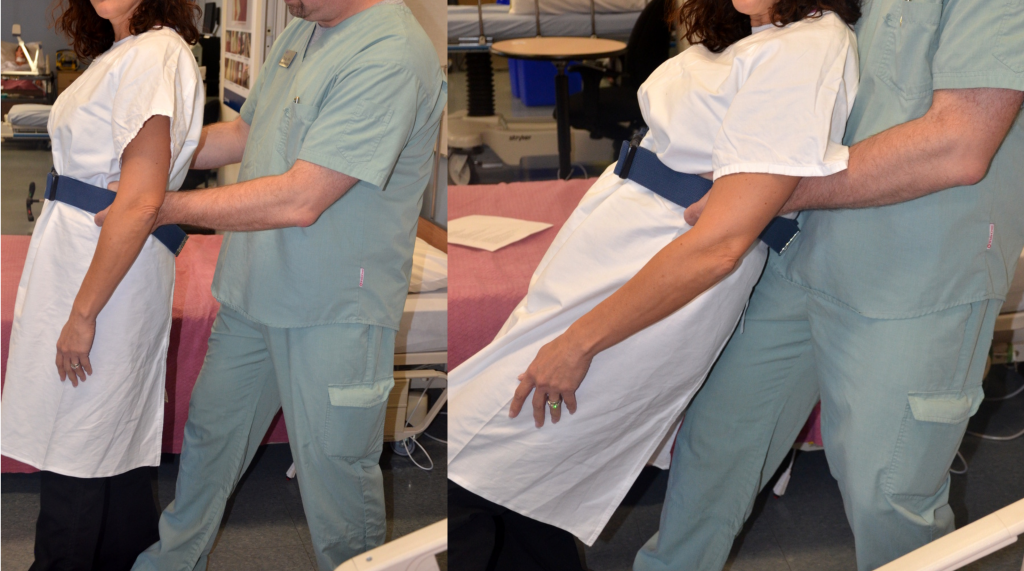
A client may begin to fall while ambulating or while being transferred from one surface to another. If a client begins to fall from a standing position, do not attempt to stop the fall or catch the client because this can cause back injury. Instead, try to control their fall by lowering them to the floor.[70]
If a client starts to fall and you are close by, move behind the client and take one step back. Support the client around the waist or hip area or grab the gait belt. Bend one leg and place it between the clients legs. Slowly slide the client down your leg, lowering yourself to the floor at the same time. Always protect their head first. Once the client is on the floor, assess the client for injuries prior to moving them. Assess the client’s need for assistance to get off the floor. If the client is unable to get up off the floor, use a mechanical lift. Complete an incident report and follow up according to the client’s condition and agency policy. See Figure 13.24[71] for images of lowering a client to the floor.
Preventing Falls
Falls are a major safety concern in health care. Nurses are responsible for identifying, managing, and eliminating potential fall hazards for clients. All client-handling activities (positioning, transfers, and ambulation) pose a risk to both clients and health care professionals. Older adults are often at increased risk for falls due to impaired mental status, decreased strength, impaired balance and mobility, and decreased sensory perception. Clients may also be at risk for falls due to gait problems, cognitive ability, visual problems, urinary frequency, generalized weakness, cognitive impairments, or medications that may cause hypotension or drowsiness.[72] Falls can cause head injuries, fractures, lacerations, and other injuries.
Fall prevention is key. If a client begins to feel dizzy while ambulating or transferring, assist them to sit on a chair or on the floor to avoid a fall. The head is the most important part of the body, so protect it as much as possible. In the event of a fall, seek help and stay with the client until assistance arrives. Follow agency policy for reporting, assessing, and documenting. After a fall, always assess a client for injuries prior to moving them. If the client remains weak or dizzy, do not attempt to ambulate them, but instead, ask for assistance to transfer them to a chair or bed.[73]
All clients should be assessed for risk factors for falls and necessary fall precautions implemented per agency policy. Read more information about preventing falls in the “Safety” chapter.
- Skalsky, A. J., & McDonald, C. M. (2012). Prevention and management of limb contractures in neuromuscular diseases. Physical Medicine and Rehabilitation Clinics of North America, 23(3), 675–687. https://doi.org/10.1016/j.pmr.2012.06.009 ↵
- “hospice-1821429_960_720.jpg” by truthseeker08 is licensed under CC0 ↵
- Kalisch, B., Lee, S., & Dabney, B. (2013). Outcomes of inpatient mobilisation: A literature review. Journal of Clinical Nursing, 23(11-12), 1486-1501. https://doi.org/10.1111/jocn.12315 ↵
- Javed, M. J. (2023). Assisting patients with mobility. StatPearls [Internet]. https://www.ncbi.nlm.nih.gov/books/NBK559100/ ↵
- American Nurses Association. (2014). Current topics in safe patient handling and mobility. American Nurse Today (supplement). https://www.myamericannurse.com/wp-content/uploads/2014/07/ant9-Patient-Handling-Supplement-821a_LOW.pdf ↵
- Skalsky, A. J., & McDonald, C. M. (2012). Prevention and management of limb contractures in neuromuscular diseases. Physical Medicine and Rehabilitation Clinics of North America, 23(3), 675–687. https://doi.org/10.1016/j.pmr.2012.06.009 ↵
- “Deep_vein_thrombosis_of_the_right_leg.jpg” by James Heilman, MD is licensed under CC BY-SA 3.0 ↵
- Skalsky, A. J., & McDonald, C. M. (2012). Prevention and management of limb contractures in neuromuscular diseases. Physical Medicine and Rehabilitation Clinics of North America, 23(3), 675–687. https://doi.org/10.1016/j.pmr.2012.06.009 ↵
- American Nurses Association. (2014). Current topics in safe patient handling and mobility. American Nurse Today (supplement). https://www.myamericannurse.com/wp-content/uploads/2014/07/ant9-Patient-Handling-Supplement-821a_LOW.pdf ↵
- Kalisch, B., Lee, S., & Dabney, B. (2013). Outcomes of inpatient mobilisation: A literature review. Journal of Clinical Nursing 23(11-12), 1486-1501. https://doi.org/10.1111/jocn.12315 ↵
- Miller, B. (n.d.). Functional mobility and physical therapy. Capital Area Physical Therapy and Wellness. https://www.capitalareapt.com/functional-mobility-and-physical-therapy/ ↵
- American Nurses Association. (2014). Current topics in safe patient handling and mobility. American Nurse Today (supplement). https://www.myamericannurse.com/wp-content/uploads/2014/07/ant9-Patient-Handling-Supplement-821a_LOW.pdf ↵
- American Nurses Association. (2014). Current topics in safe patient handling and mobility. American Nurse Today (supplement). https://www.myamericannurse.com/wp-content/uploads/2014/07/ant9-Patient-Handling-Supplement-821a_LOW.pdf ↵
- Boynton, T., Kelly, L., Perez, A., Miller, M., An, Y., & Trudgen, C. (2014). Banner mobility assessment tool for nurses: Instrument validation. American Journal of Safe Patient Handling & Movement, 4(3). https://www.safety.duke.edu/sites/default/files/BMAT%20for%20Nurses.pdf ↵
- American Nurses Association. (2014). Current topics in safe patient handling and mobility. American Nurse Today (supplement). https://www.myamericannurse.com/wp-content/uploads/2014/07/ant9-Patient-Handling-Supplement-821a_LOW.pdf ↵
- Doyle, G. R., & McCutcheon, J. A. (2015). Clinical Procedures for Safer Patient Care. BC Campus. https://opentextbc.ca/clinicalskills/front-matter/introduction/ ↵
- Doyle, G. R., & McCutcheon, J. A. (2015). Clinical Procedures for Safer Patient Care. BC Campus. https://opentextbc.ca/clinicalskills/front-matter/introduction/ ↵
- American Nurses Association. (2014). Current topics in safe patient handling and mobility. American Nurse Today (supplement). https://www.myamericannurse.com/wp-content/uploads/2014/07/ant9-Patient-Handling-Supplement-821a_LOW.pdf ↵
- National Institute for Occupational Safety and Health. (2013, August 2). Safe patient handling and mobility (SPHM). Centers for Disease Control and Prevention. https://www.cdc.gov/niosh/topics/safepatient/default.html ↵
- Francis, R., & Dawson, M. (2016). Safe patient handling and mobility: The journey continues. American Nurse Today, 11(5). https://www.myamericannurse.com/wp-content/uploads/2016/05/Patient-Handling-Safety-426b.pdf ↵
- American Nurses Association. (2014). Current topics in safe patient handling and mobility. American Nurse Today (supplement). https://www.myamericannurse.com/wp-content/uploads/2014/07/ant9-Patient-Handling-Supplement-821a_LOW.pdf ↵
- Agency for Healthcare Research and Quality. (2019). Never events. Patient Safety Network. https://psnet.ahrq.gov/primer/never-events ↵
- “GaitBelt.jpg” by unknown author is licensed under CC BY 4.0. Access for free at https://opentextbc.ca/clinicalskills/chapter/3-2-body-mechanics/ ↵
- Doyle, G. R., & McCutcheon, J. A. (2015). Clinical Procedures for Safer Patient Care. BC Campus. https://opentextbc.ca/clinicalskills/front-matter/introduction/ ↵
- “SliderBoard2-1.jpg” by unknown author is licensed under CC BY 4.0. Access for free at https://opentextbc.ca/clinicalskills/chapter/3-7-transfers-and-ambulation/ ↵
- “invacare-reliant-350-electric-sit-to-stand-lift-3.jpg” by Invacare. This image is included on the basis of Fair Use. ↵
- “molift_air_200_rgosling_mb_env_585707.jpg” by unknown author, courtesy of etac. This image is included on the basis of Fair Use. ↵
- Agency for Healthcare Research and Quality. (2017). Nurse-driven early mobility protocols: Facilitator guide. https://www.ahrq.gov/hai/tools/mvp/modules/technical/nurse-early-mobility-protocols-fac-guide.html ↵
- U.S. Department of Health & Human Services. (n.d.). Nurse-driven early mobility protocols: Facilitator Guide | Agency for Healthcare Research and Quality. Agency for Healthcare Research and Quality. https://www.ahrq.gov/hai/tools/mvp/modules/technical/nurse-early-mobility-protocols-fac-guide.html ↵
- Agency for Healthcare Research and Quality. (2017). Nurse-driven early mobility protocols: Facilitator guide. https://www.ahrq.gov/hai/tools/mvp/modules/technical/nurse-early-mobility-protocols-fac-guide.html ↵
- Agency for Healthcare Research and Quality. (2017). Nurse-driven early mobility protocols: Facilitator guide. https://www.ahrq.gov/hai/tools/mvp/modules/technical/nurse-early-mobility-protocols-fac-guide.html ↵
- “Continuous_Passive_Motion_Machine.jpg” by User:Ravedave is licensed under CC BY-SA 3.0 ↵
- Skalsky, A. J., & McDonald, C. M. (2012). Prevention management of limb contractures in neuromuscular diseases. Physical Medicine and Rehabilitation Clinics of North America, 23(3), 675-687. https://dx.doi.org/10.1016%2Fj.pmr.2012.06.009 ↵
- “Muscle_contractures_of_young_man.jpg” by Maria Sieglinda von Nudeldorf is licensed under CC BY-SA 4.0 ↵
- Mayo Clinic. (2020, March 30). Passive motion exercises. [Video]. YouTube. All rights reserved. https://youtu.be/EjJ5nX_jM-w ↵
- Skalsky, A. J., & McDonald, C. M. (2012). Prevention management of limb contractures in neuromuscular diseases. Physical Medicine and Rehabilitation Clinics of North America, 23(3), 675-687. https://dx.doi.org/10.1016%2Fj.pmr.2012.06.009 ↵
- “AFO_Ankle_Foot_Orthosis_Orthotic_Brace.JPG” by Pagemaker787 is licensed under CC BY-SA 4.0 ↵
- Doyle, G. R., & McCutcheon, J. A. (2015). Clinical Procedures for Safer Patient Care. BC Campus. https://opentextbc.ca/clinicalskills/front-matter/introduction/ ↵
- “supine.jpg” by unknown author is licensed under CC BY 4.0. Access for free at https://opentextbc.ca/clinicalskills/chapter/3-4-positioning-a-patient-in-bed/ ↵
- Doyle, G. R., & McCutcheon, J. A. (2015). Clinical Procedures for Safer Patient Care. BC Campus. https://opentextbc.ca/clinicalskills/front-matter/introduction/ ↵
- Doyle, G. R., & McCutcheon, J. A. (2015). Clinical Procedures for Safer Patient Care. BC Campus. https://opentextbc.ca/clinicalskills/front-matter/introduction/ ↵
- “prone.jpg” by unknown author is licensed under CC BY 4.0. Access for free at https://opentextbc.ca/clinicalskills/chapter/3-4-positioning-a-patient-in-bed/ ↵
- Shelhamer, M., Wesson, P., Solari, I. L., Jensen, D. L., Steele, W. A., Dimitrov, V. G., Kelly, J. D., Aziz, S., Gutierrez, V. P., Vittinghoff, E., Chung, K. K., Menon, V. P., Ambris, H. A., & Baxi, S. M. (2021). Prone positioning in moderate to severe acute respiratory distress syndrome due to COVID-19: A cohort study and analysis of physiology. Journal of Intensive Care Medicine, 36(2), 241-252. https://doi.org/10.1177%2F0885066620980399 ↵
- Doyle, G. R., & McCutcheon, J. A. (2015). Clinical Procedures for Safer Patient Care. BC Campus. https://opentextbc.ca/clinicalskills/front-matter/introduction/ ↵
- “lateral.jpg” by unknown author is licensed under CC BY 4.0. Access for free at https://opentextbc.ca/clinicalskills/chapter/3-4-positioning-a-patient-in-bed/ ↵
- Doyle, G. R., & McCutcheon, J. A. (2015). Clinical Procedures for Safer Patient Care. BC Campus. https://opentextbc.ca/clinicalskills/front-matter/introduction/ ↵
- “sims.jpg” by unknown author is licensed under CC BY 4.0. Access for free at https://opentextbc.ca/clinicalskills/chapter/3-4-positioning-a-patient-in-bed/ ↵
- Doyle, G. R., & McCutcheon, J. A. (2015). Clinical Procedures for Safer Patient Care. BC Campus. https://opentextbc.ca/clinicalskills/front-matter/introduction/ ↵
- “degreeLow.jpg” by unknown author is licensed under CC BY 4.0. Access for free at https://opentextbc.ca/clinicalskills/chapter/3-4-positioning-a-patient-in-bed/ ↵
- “degreeSemi.jpg” by unknown author is licensed under CC BY 4.0. Access for free at https://opentextbc.ca/clinicalskills/chapter/3-4-positioning-a-patient-in-bed/ ↵
- Doyle, G. R., & McCutcheon, J. A. (2015). Clinical Procedures for Safer Patient Care. BC Campus. https://opentextbc.ca/clinicalskills/front-matter/introduction/ ↵
- “Sept-22-2015-097.jpg” by unknown author is licensed under CC BY 4.0. Access for free at https://opentextbc.ca/clinicalskills/chapter/3-4-positioning-a-patient-in-bed/ ↵
- “Tripod_position.png” by Nic Ashman, Chippewa Valley Technical College is licensed under CC BY 4.0 ↵
- Doyle, G. R., & McCutcheon, J. A. (2015). Clinical Procedures for Safer Patient Care. BC Campus. https://opentextbc.ca/clinicalskills/front-matter/introduction/ ↵
- “Book-pictures-2015-572.jpg” by unknown author is licensed under CC BY 4.0. Access for free at https://opentextbc.ca/clinicalskills/chapter/3-5-positioning-a-patient-on-the-side-of-a-bed/ ↵
- Doyle, G. R., & McCutcheon, J. A. (2015). Clinical Procedures for Safer Patient Care. BC Campus Pressbooks. https://opentextbc.ca/clinicalskills/front-matter/introduction/ ↵
- Doyle, G. R., & McCutcheon, J. A. (2015). Clinical Procedures for Safer Patient Care. BC Campus. https://opentextbc.ca/clinicalskills/front-matter/introduction/ ↵
- Doyle, G. R., & McCutcheon, J. A. (2015). Clinical Procedures for Safer Patient Care. BC Campus. https://opentextbc.ca/clinicalskills/front-matter/introduction/ ↵
- Doyle, G. R., & McCutcheon, J. A. (2015). Clinical Procedures for Safer Patient Care. BC Campus. https://opentextbc.ca/clinicalskills/front-matter/introduction/ ↵
- “Book-pictures-2015-5851.jpg,” “Book-pictures-2015-587.jpg,” and “Book-pictures-2015-588.jpg” by unknown authors are licensed under CC BY 4.0. Access for free at https://opentextbc.ca/clinicalskills/chapter/3-5-positioning-a-patient-on-the-side-of-a-bed/ ↵
- Doyle, G. R., & McCutcheon, J. A. (2015). Clinical Procedures for Safer Patient Care. BC Campus. https://opentextbc.ca/clinicalskills/front-matter/introduction/ ↵
- “Sept-22-2015-119.jpg” and “Sept-22-2015-121-001.jpg” by unknown authors are licensed under CC BY 4.0. Access for free at https://opentextbc.ca/clinicalskills/chapter/3-5-positioning-a-patient-on-the-side-of-a-bed/ ↵
- Doyle, G. R., & McCutcheon, J. A. (2015). Clinical Procedures for Safer Patient Care. BC Campus. https://opentextbc.ca/clinicalskills/front-matter/introduction/ ↵
- Moroz, A. (2017). Physical therapy (PT). Merck Manual Professional Version. https://www.merckmanuals.com/professional/special-subjects/rehabilitation/physical-therapy-pt ↵
- “Sept-22-2015-122-e1443986200821.jpg,” “Sept-22-2015-124.jpg,” and “Sept-22-2015-128.jpg” by unknown authors are licensed under CC BY 4.0. Access for free at https://opentextbc.ca/clinicalskills/chapter/3-5-positioning-a-patient-on-the-side-of-a-bed/ ↵
- Doyle, G. R., & McCutcheon, J. A. (2015). Clinical Procedures for Safer Patient Care. BC Campus. https://opentextbc.ca/clinicalskills/front-matter/introduction/ ↵
- Doyle, G. R., & McCutcheon, J. A. (2015). Clinical Procedures for Safer Patient Care. BC Campus. https://opentextbc.ca/clinicalskills/front-matter/introduction/ ↵
- “Book-pictures-2015-603.jpg” and “Book-pictures-2015-6041” by unknown authors are licensed under CC BY 4.0. Access for free at https://opentextbc.ca/clinicalskills/chapter/3-7-transfers-and-ambulation/ ↵
- Thompson Rivers University. (n.d.). Nursing | Assisting from bed to chair with a gait belt or transfer belt [Video]. All rights reserved. https://barabus.tru.ca/nursing/assisting_from_bed.html ↵
- Doyle, G. R., & McCutcheon, J. A. (2015). Clinical Procedures for Safer Patient Care. BC Campus. https://opentextbc.ca/clinicalskills/front-matter/introduction/ ↵
- “Sept-22-2015-132-001.jpg” and “Sept-22-2015-133.jpg” by unknown authors are licensed under CC BY 4.0. Access for free at https://opentextbc.ca/clinicalskills/chapter/3-7-fall-prevention/ ↵
- Doyle, G. R., & McCutcheon, J. A. (2015). Clinical Procedures for Safer Patient Care. BC Campus. https://opentextbc.ca/clinicalskills/front-matter/introduction/ ↵
- Doyle, G. R., & McCutcheon, J. A. (2015). Clinical Procedures for Safer Patient Care. BC Campus. https://opentextbc.ca/clinicalskills/front-matter/introduction/ ↵
The ability of a patient to change and control body position.
The ability of a person to move around in their environment, including walking, standing up from a chair, sitting down from standing, and moving around in bed.
The ability of a patient to move around in bed, including moving from lying to sitting and sitting to lying.
The action of a patient moving from one surface to another.
The ability of a patient to safely walk independently, with assistance from another person, or with an assistive device, such as a cane, walker, or crutches.
A mobility assessment by nurses that begins by having the patient stand up from an armchair, walk three yards, turn, walk back to the chair, and sit down.
The coordinated effort of muscles, bones, and the nervous system to maintain balance, posture, and alignment during moving, transferring, and repositioning patients.
An object or piece of equipment designed to help a patient with activities of daily living, such as a walker, cane, gait belt, or mechanical lift.
A 2-inch-wide (5 mm) belt, with or without handles, that is fastened around a patient’s waist used to ensure stability when assisting patients to stand, ambulate, or to transfer from bed to chair.
A board (also called a transfer board) used to transfer an immobile patient from one surface to another while the patient is lying supine (e.g., from a stretcher to hospital bed).
Mobility devices that assist weight-bearing patients who are unable to transition from a sitting position to a standing position by using their own strength.
A hydraulic lift with a sling used to move patients who cannot bear weight or have a medical condition that does not allow them to stand or assist with moving.
Activities aimed to facilitate movement of specific joints and promote mobility of extremities.
Movement applied to a joint solely by another person or a passive motion machine.
Movement of a joint by the individual performing the exercise.
A patient’s joint receiving partial assistance in movement from an outside force.
A contracture is the lack of full passive range of motion due to joint, muscle, or soft tissue limitations.
A position where the patient lies flat on their back.
A position where the patient lies on their stomach with their head turned to the side.
A position where the client lies on one side of the body with the top leg over the bottom leg.
A position where the patient is positioned halfway between the supine and prone positions with their legs flexed.
A position where the patient is supine with the head of bed placed at a 45- to 90-degree angle.
A position where the head of the bed is placed at a 30- to 45-degree angle.
A position where the head of the bed is placed lower than the patient’s feet.
A position that enhances air exchange when a patient sits up and leans over by resting their arms on their legs or on a bedside table, also referred to as a three-point position.
A sensation of dizziness as if the room is spinning.
Low blood pressure that occurs when a patient changes position from lying to sitting or sitting to standing that causes symptoms of dizziness or light-headedness.

