8.4 Assisting Clients to Transfer
It is important to note that most injuries that happen to clients and staff occur when clients are being transferred. Safety is an integral component of moving clients and should receive the highest priority. Special consideration should be given to these items to prevent injury from occurring:
- Gait belt fit and placement
- Brakes on the bed
- Brakes on the wheelchair
- Brakes released on the lift
- Placement of nonskid footwear
- Resident’s proximity to the lift
- Objects in the room that may be a hazard during the movement
Nursing assistants should always review a client’s care plan for their current transfer status before moving them. Transfer status refers to how a resident moves from one place to the other, such as from a bed to wheelchair or wheelchair to toilet. Physical therapists (i.e., health specialists who evaluate and treat movement disorders) assess clients and make recommendations for how clients should be safely transferred. Transfer status orders are determined by how much body weight a client can independently bear and how much weight an assistant is required to support. Transfer status orders include these types of orders:
- Independent: The client requires no assistance to move from one place to another.
- Contact-Guard-Assist (CGA): One assistant must have their hand on the client at all times to steady their balance.
- 1 assist (1A): One assistant is required to help the resident transfer (with a gait belt in place).
- 2 assist (2A): Two assistants are required to help the resident transfer (with a gait belt in place).
- Sit-to-Stand: A sit-to-stand mechanical lift is required to help a resident transfer. A sit-to-stand mechanical lift provides support as the client stands while allowing them to bear some body weight and maintain joint mobility and leg strength. (Using a gait belt would require extensive assistance and could cause injury to the client or the staff.) Sit-to-stands may be completed with one or two assistants, as determined by the physical therapist and agency policy.
- Full-Body Mechanical Lift: A full-body mechanical lift is required when the resident cannot bear any of their weight when transferred from bed to chair and back. (“Full-body mechanical lift” is a generic term. The facility or organization may refer to this type of lift by the manufacturer of the lift, such as a “Hoyer lift” or “PAL lift.”) Full-body mechanical lifts may be portable or attached to the ceiling. Two assistants are always required for transfer with full-body mechanical lifts for safety purposes. Due to federal liability laws, the health care professional moving the lift must be 18 years of age or older.
Assisting to Seated Position or Dangling
When transferring a client using a 1A, 2A, or sit-to-stand transfer method, first assist the resident to move to a seated position on the side of their bed. Residents who can transfer with one of these methods are able to bear some or most of their weight and should be able to move partially on their own. Use your hands on the person’s limbs to direct the movement, and use the lift sheet (similar to when boosting a client up in bed).
Due to heart and circulation changes that occur with age, orthostatic hypotension can occur when a person moves suddenly from a lying to sitting position or from a sitting to standing position. Orthostatic hypotension is a sudden drop in blood pressure that can cause clients to feel dizzy and increase their risk for falls with position changes. Some clients may experience vertigo, a sensation that the room is spinning. To prevent orthostatic hypotension and these symptoms, tell the person to dangle (i.e., sit up on the edge of the bed) for a few moments before continuing with the transfer. Dangling gives the cardiovascular system time to regulate blood pressure and blood flow to the brain, thus preventing dizziness and falls. Ask the client if they are feeling dizzy before you proceed with transferring. See Figure 8.11[1] for illustration of the steps to safely assist a client to a seated position[2]:
- Lock the brakes on the bed.
- Raise the bed to a working height.
- Stand facing the head of the bed at a 45-degree angle with your feet apart, with one foot in front of the other. Stand next to the waist of the resident.
- Ask the resident to turn onto their side, facing you, as they move closer to the edge of the bed. Use the lift sheet to assist the resident if needed.
- Place one hand behind the resident’s shoulders, supporting their neck and vertebrae.
- Place the other hand around the resident’s knees.
- On the count of three, instruct the resident to use their elbows to push up against the bed and then grasp the side rail. Support their shoulders as they move to a seated position. Shift your weight from the front foot to the back foot as you assist them to sit. Do not allow the resident to place their arms around your shoulders because this can cause serious back injuries.
- As you shift your weight, gently grasp the resident’s outer thighs with your other hand and help them slide their feet off the bed to dangle or touch the floor. This step helps the resident sit and move their legs off the bed at the same time. As you perform this action, bend your knees and keep your back straight and neutral. Move the resident as one entire unit (rather than the upper body followed by the lower body).
- Lower the bed so the resident’s feet touch the floor.
- Observe the resident for symptoms of orthostatic hypotension or vertigo. Ask if they are feeling dizzy before attempting any further movement.
- Check that the resident is wearing nonskid footwear before transferring.
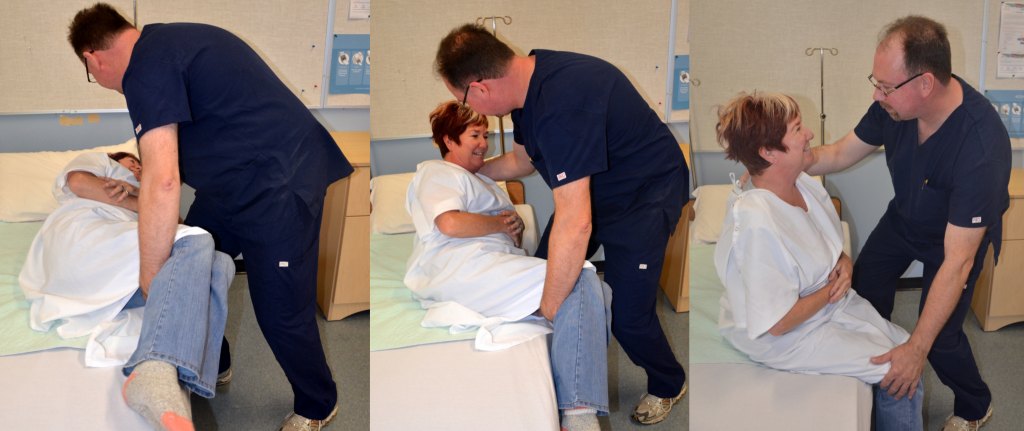
If the resident is having difficulty moving during this procedure, use the lift sheet to pull them closer to you or to assist them from a lying to a seated position. The head of the bed can be raised before they turn on their side to support their core strength and to reduce the weight the assistant must bear. During this entire process, do not use the resident’s limbs to move them but rather move them with the trunk of their body to prevent shear and injury to their limbs and skin.
After the person is sitting upright and states they are not experiencing dizziness, apply a gait belt for a 1A or 2A transfer. The gait belt should be placed around their waist while considering the location of their breasts and abdominal folds. See Figure 8.12[3] for an image of applying a gait belt. The fit of the gait belt should be snug, but you should be able to put your fingers underneath the gait belt for support. As the resident stands and their core muscles contract, the gait belt can loosen and tend to slide up, so it is important for it to be snug. If the belt is too long, it can get caught in the patient’s legs during transfer, so tuck the excess length back into the belt. Gait belts should not be used for clients with abdominal wounds or some types of heart conditions; a different transfer method should be in the care plan. Contact the nurse if you have concerns about using a gait belt based on the client’s condition.
Place nonskid footwear on the resident before transferring them from the bed to the chair. These preparations should be done before the wheelchair or sit-to-stand is brought closer to the bed to reduce the risk of injury from the resident inadvertently hitting the lift or chair while moving.
The steps to complete a one person assist (1A) are listed in the “Transfer From Bed to Chair With a Gait Belt” Skills Checklist. If a two-person assist (2A) is required, the same steps are used, but the assistants stand on each side of the resident to provide additional support during the transfer.

View the following video showing a transfer of a patient from a bed to a regular chair[4]: Assisting From Bed to Chair With a Gait Belt or Transfer Belt.
Transferring with Mechanical Lifts
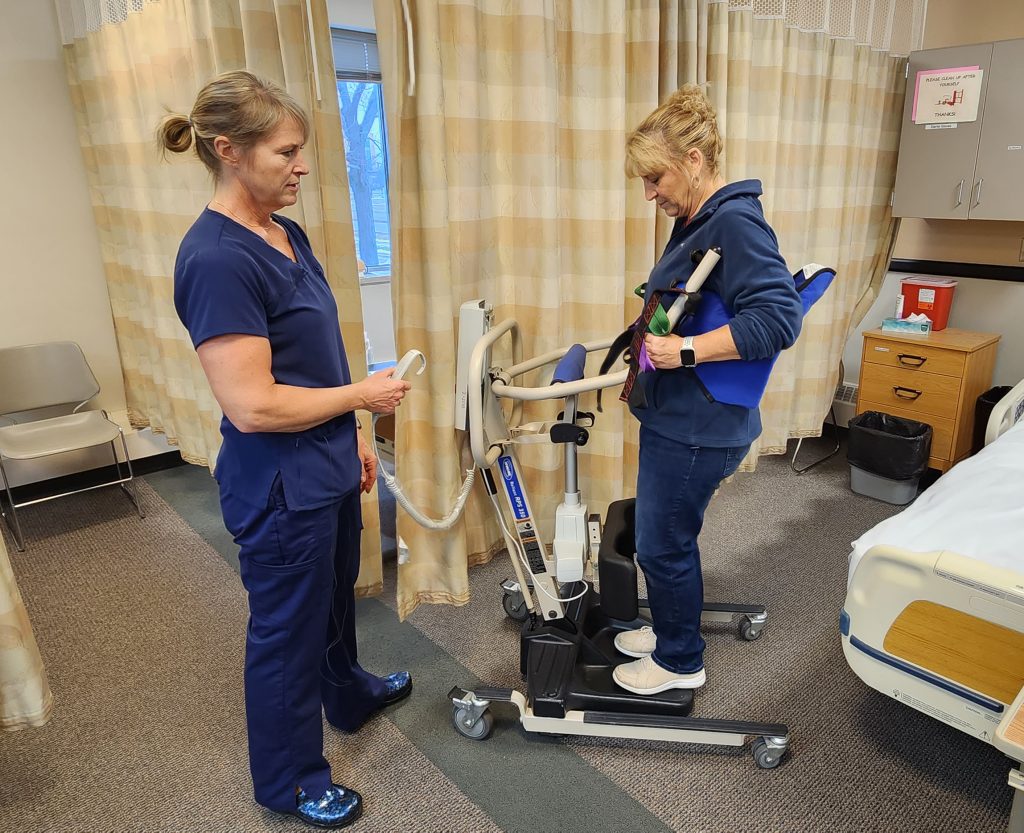
Mechanical lifts include sit-to-stand lifts and full-body lifts. Some facilities have full-body mechanical lifts that are attached to the ceiling of the room. See Figure 8.13[5] of an image of a sit-to-stand lift and Figure 8.14[6] of an image of a full-body mechanical lift and mechanical swing. NAs should be aware of agency policy regarding transferring clients using mechanical lifts; for safety purposes, most agencies require two NAs or a nurse and an NA to transfer clients using a mechanical lift.

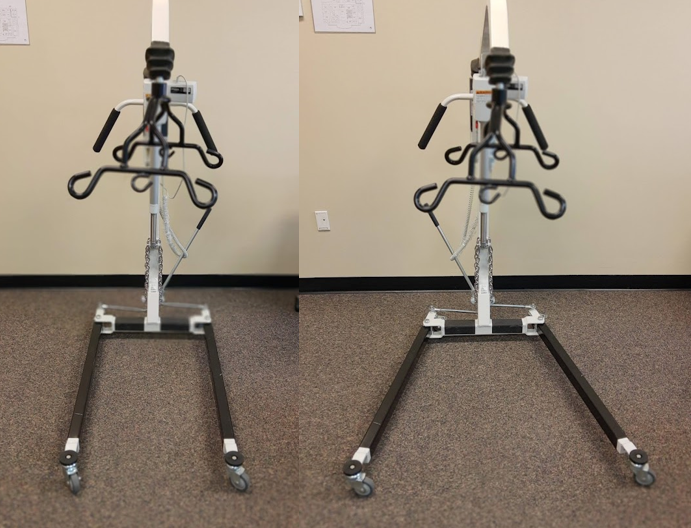
The legs of portable full-body mechanical lifts can be placed in a closed or open position. The open position provides the greatest stability due to a wide base of support. See Figure 8.15[7] for an image comparing the legs of a portable full-body mechanical lift in a closed and open position.
When transferring a client from their bed to wheelchair using a sit-to-stand or portable full-body mechanical lift, the wheelchair should be positioned near the bed while also allowing enough room for the lift to rotate towards the chair. Because the lift will have to slide underneath the bed, check for any cords or equipment under the bed that can cause the lift to get tangled. Raising the bed height just before placing the lift under the bed should also alleviate potential problems.
The lift has greatest stability when its legs are open with a wide base of support, but some beds do not have enough space underneath to allow the legs to be open. If this is the case, open the legs as soon as possible when moving the lift from under the bed to provide a stable base.
Sit-to-stand and full-body lifts have brakes, but brakes should not be applied when the resident is standing in the sit-to-stand or raised off the bed in a full-body lift. (If the client’s weight shifts while the brakes are on, it can cause the lift to tip and endanger the resident, as well as the assistants.)
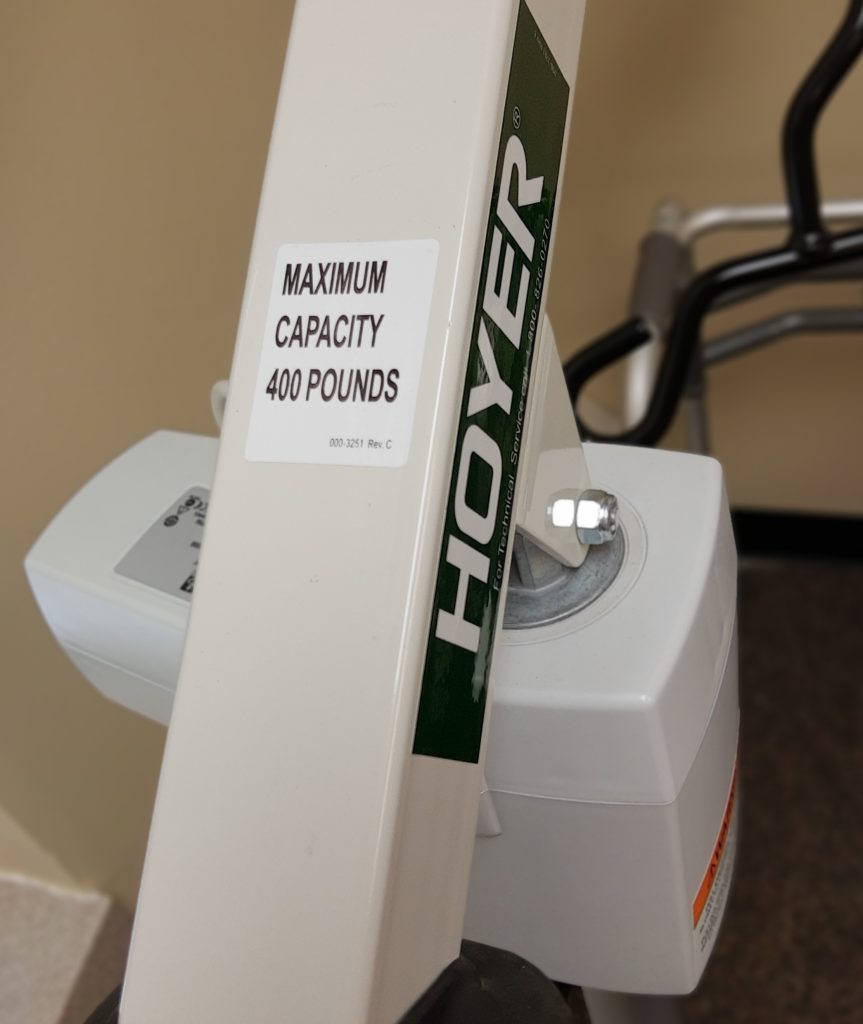
Before initiating a transfer, verify that the lift will support the weight of the resident. Most mechanical lifts have a weight capacity of 400 pounds. Bariatric lifts are used to support a client weighing 600 or more pounds. See Figure 8.16[8] for locating the weight capacity on a lift.
Full-body mechanical lifts have different types of slings used to lift the client. Slings may be full-body or split-leg (butterfly). The type of sling used is determined by the physical therapist, based on the client’s strength and mobility, and should be noted in the resident’s care plan. A sling has various loops to connect it to the lift and are often color-coded to ensure the resident’s body is in proper position for transferring. See Figure 8.17[9] for images of a full-body sling and Figure 8.18[10] for images of a split-leg (butterfly) sling.
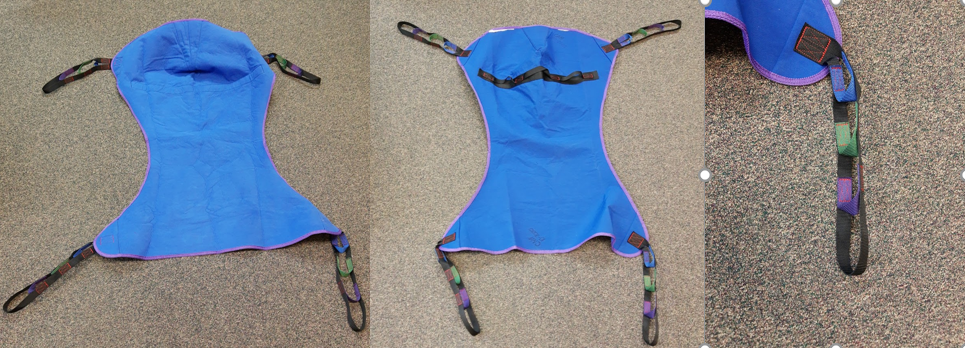
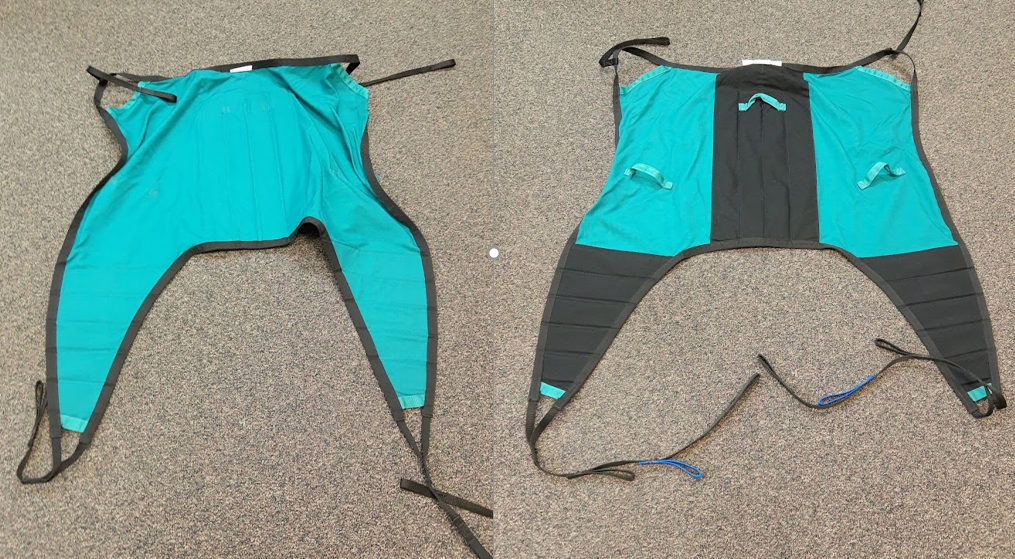
The top of a full-body sling should be placed above the resident’s head and should end just above the knee joint to avoid hyperextending the knees when they are suspended in the lift. The top of a split-leg (butterfly) sling should be placed at shoulder height, and the bottom of the sling should be around the buttocks. Depending on hip mobility, the split-leg sling may be crossed between the client’s legs or placed around their legs (often referred to as a “basket”). See Figure 8.19[11] for an image of a mannequin prepared to transfer using a crossed sling and Figure 8.20[12] for an image of transferring a mannequin with the sling wrapped around their legs (i.e., a “basket” approach).
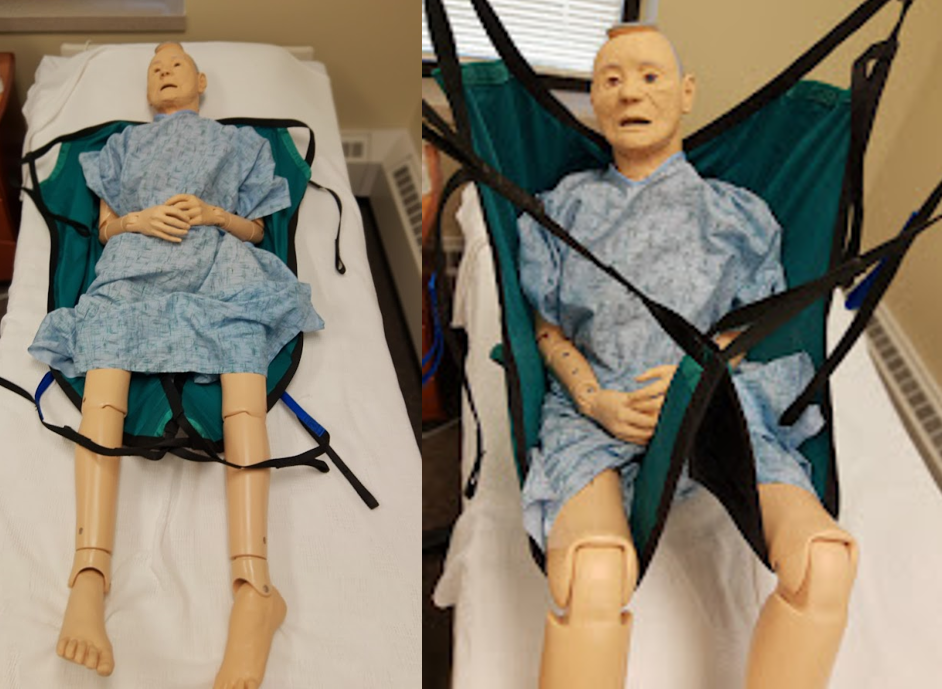
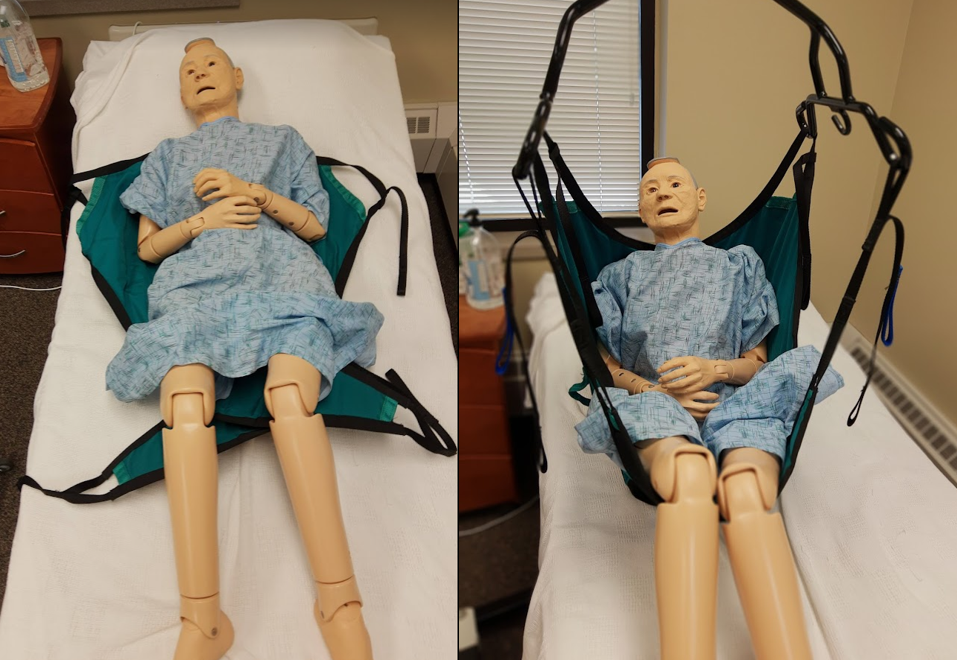
The handles of the sling should face away from the client, allowing the assistants to position the client in their chair or bed. (Do not move clients by directly contacting their limbs because this can cause injury.)
After transferring a client from a bed to a chair using a full-body sling, the sling should remain under the resident while they are seated in a wheelchair or other chair. When placing the resident back in bed, the sling is then removed. However, when transferring a client using a split-leg (butterfly) sling, it can be removed from underneath the client in the chair and replaced before they are transferred again.
See the Skills Checklists “Transfer From Bed to Chair With Sit-to-Stand” and “Transfer From Bed to Chair With Mechanical Lift” for steps for providing safe transfers with both types of lifts. Each brand of sit-to-stand and mechanical lift has some variances; the facility where you work will provide specific training on their lifts.
Watch the following YouTube video for a demonstration of moving a resident with a sit-to-stand[13]: Aidacare Training Video – Manual Handling – Sit To Stand.
Explore the following YouTube video[14] on a mechanical lift completed with a butterfly or split-leg sling: Aidacare Training Video – Manual Handling – Lie To Sit
- “Book-pictures-2015-5851.jpg,” “Book-pictures-2015-587.jpg,” and “Book-pictures-2015-588.jpg” by unknown authors are licensed under CC BY 4.0. Access for free at https://opentextbc.ca/clinicalskills/chapter/3-5-positioning-a-patient-on-the-side-of-a-bed/ ↵
- This work is a derivative of Nursing Fundamentals by Chippewa Valley Technical College and is licensed under CC BY 4.0 ↵
- “Sept-22-2015-119.jpg” and “Sept-22-2015-121-001.jpg” by unknown authors are licensed under CC BY 4.0. Access for free at https://opentextbc.ca/clinicalskills/chapter/3-5-positioning-a-patient-on-the-side-of-a-bed/ ↵
- Thompson Rivers University Open Learning. (n.d.). Assisting from bed to chair with a gait belt or transfer belt [Video]. Thompson Rivers University Open Learning. All rights reserved. https://barabus.tru.ca/nursing/assisting_from_bed.html ↵
- "Transferring Client Using a Sit to Stand" by Landon Cerny is licensed under CC BY 4.0 ↵
- "Transferring a Client Using a Mechanical Lift and a Full Body Sling", "Transferring a Client Using a Mechanical Lift and a Split Leg Sling", and "Transferring a Client Using a Mechanical Lift and Split Leg Sling in a Basket Approach" by Landon Cerny are licensed under CC BY 4.0 ↵
- “Portable Full-Body Mechanical Lift With Legs in Closed Position” and “Portable Full-Body Mechanical Lift With Legs in Open Position” by Myra Reuter for Chippewa Valley Technical College are licensed under CC BY 4.0 ↵
- “Weight Capacity of a Mechanical Lift” by Myra Reuter for Chippewa Valley Technical College is licensed under CC BY 4.0 ↵
- “Front of Full-Body Sling,” “Back of Full-Body Sling,” and “Loops” by Myra Reuter for Chippewa Valley Technical College are licensed under CC BY 4.0 ↵
- “Front of Full-Body Sling,” “Back of Full-Body Sling,” and “Loops” by Myra Reuter for Chippewa Valley Technical College are licensed under CC BY 4.0 ↵
- “Preparing to Transfer With Crossed Sling” and “Suspended in a Crossed Sling” by Myra Reuter for Chippewa Valley Technical College are licensed under CC BY 4.0 ↵
- “Preparing to Transfer With a ‘Basket’ Approach” and “Suspended in a Sling With a ‘Basket’ Approach” by Myra Reuter for Chippewa Valley Technical College are licensed under CC BY 4.0 ↵
- Aidacare. (2017, July 5). Aidacare training video - Manual handling - Sit To stand [Video]. YouTube. All rights reserved. https://youtu.be/L914lkoub6E ↵
- Aidacare. (2017, July 5). Aidacare training video – Manual handling – Lie to sit [Video]. YouTube. All rights reserved. https://youtu.be/3GOgp_HX4JQ ↵
The assistance the patient requires to be moved from one location to another, such as from the bed to a chair.
Health specialists who evaluate and treat movement disorders.
A sudden drop in blood pressure that can cause clients to feel dizzy and increase their risk for falls.
A sensation that the room is spinning.
Sitting up on the edge of bed for a few minutes before standing to prevent orthostatic hypotension and dizziness.
Lifts used to support a client weighing 600 or more pounds.

