8.2 Moving and Positioning Clients
When a resident is admitted to a facility or begins receiving home health care, assessments are completed by health care staff (including nurses, physical therapists, and occupational therapists) to determine their care needs. Examples of assessments include their ability to complete hygiene and grooming needs, as well as the amount and type of assistance required to safely reposition themselves in bed, move in and out of bed into a chair, and walk (if they are able). The findings from these assessments are implemented into the client’s care plan that the nurse and NA carry out. Roles of various therapists will be further discussed in Chapter 9.
Repositioning in Bed
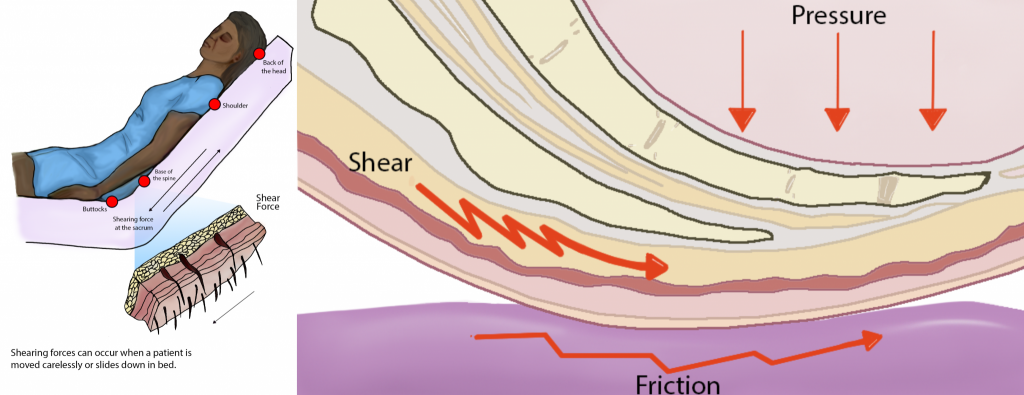
As discussed in the “Skin Care” section in Chapter 5, clients who are immobile must be repositioned every two hours to prevent pressure injuries and other complications of immobility that will be further discussed in Chapter 9. Moving residents must be done carefully because their skin can easily be damaged by improper handling. Due to the effects of aging on the integumentary system, older adults can develop pressure injuries from friction and shear when repositioned or from lying in one position for long periods of time in bed. Pressure injuries (formerly called pressure ulcers or bedsores) are localized damage to the skin or underlying soft tissue, usually over a bony prominence, as a result of intense and prolonged pressure and/or shear.[1]
Shear happens when skin moves one way but the underlying bone and muscle stay fixed or move the opposite direction. Shear can occur when an individual sits up in a bed, chair, or wheelchair, and gravity causes the bone and muscle to slide down while the skin is pulled in the opposite direction by the sheets or clothing. Friction is caused when skin is rubbed by clothing, linens, or another body part and can cause chafing. Chafing typically occurs when the skin has inadequate moisture. See an illustration of sheer and friction in Figure 8.1.[2]
For additional information on friction and shear, visit the Wound Care Education Institute’s Friction vs. Shearing in Wound Care web page.
To prevent friction and shear, residents should be moved in bed with a lift sheet. The lift sheet, also called a draw sheet, is placed between the resident and the bottom or fitted sheet. (Review types of linens in “Making an Unoccupied Bed Checklist” in Chapter 3.) The lift sheet protects the client’s skin by creating a barrier when the client is moved so the friction that occurs happens between the lift sheet and fitted sheet rather than the resident’s skin and the fitted sheet. Lift sheets also protect the client’s skin from bruising and skin tears that can occur when moving the client by assistants putting their hands directly on a client’s limbs. A skin tear is a separation of skin layers caused by shear, friction, and/or blunt force. Lift sheets should always be used to reposition a client who requires assistance, and failing to do so is considered neglectful due to the high probability of skin injury. See Figure 8.2[3] for an image of boosting a resident in bed with a lift sheet.
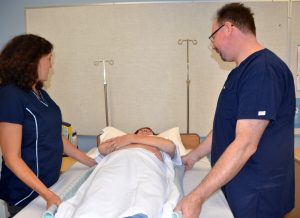
The steps for boosting a client up in bed include the following components[4]:
- Explain to the patient what will happen and how the patient can help.
- Perform hand hygiene.
- Raise the bed to a safe working height and ensure that the brakes are applied.
- Position the patient in the supine position with the bed flat. Place a pillow at the head of the bed and against the headboard to prevent accidentally bumping the patient’s head on the headboard.
- Stand with your feet shoulder width apart at the bedside between the client’s shoulders and hips with a second assistant in a similar position on the other side of the bed. This position keeps the heaviest part of the client closest to the center of gravity of the assistants.
- Fan-fold the lift sheet toward the patient with your palms facing upwards. This provides a strong grip to move the client up with the lift sheet.
- Ask the patient to tilt their head toward their chest, fold their arms across their chest, and bend their knees to assist with the movement. Let the patient know the move will happen on the count of three. This step prevents injury from occurring to the patient and prepares them for the move.
- Tighten your gluteal and abdominal muscles, bend your knees, and keep your back straight and neutral. Face toward the direction of movement. Using proper body mechanics can help prevent back injury when used appropriately in patient-care situations.
- On the count of three by the lead person, gently slide (not lift) the patient toward the head of the bed, shifting your weight from the foot closest to the end of the bed to the foot closest to the head of the bed, while keeping your back straight and knees slightly bent.
- Replace the pillow under the patient’s head, move them into a different position as indicated, and cover them with a sheet or blanket per their preference.
- Check the patent’s comfort and for proper alignment.
- Ensure the patient remains in the middle of the bed.
- Lower the bed, check that the brakes are locked, and ensure the call light is within reach. Perform hand hygiene.
- Document or report any skin issues or other observed changes with the patient.
Pressure injuries are preventable by repositioning clients at least every two hours and reporting any skin redness or other changes to the nurse for additional interventions. There are several positions that can be used to relieve pressure points and keep residents safe from pressure injuries. Repositioning also promotes improved circulation through movement. Positions are described in the various “Positions” subsections below.
When a resident has an existing pressure injury or a susceptible area, an hourly repositioning schedule is typically implemented (rather than the standard two-hour repositioning schedule considered routine care for all residents requiring assistance with their mobility). Repositioning a client every hour should be documented, indicating the time and the positions the resident was moved from and placed into. An example of documentation is, “At 1400, the resident was repositioned from a right side-lying position to a supine position.”
Body Alignment for Positioning Residents
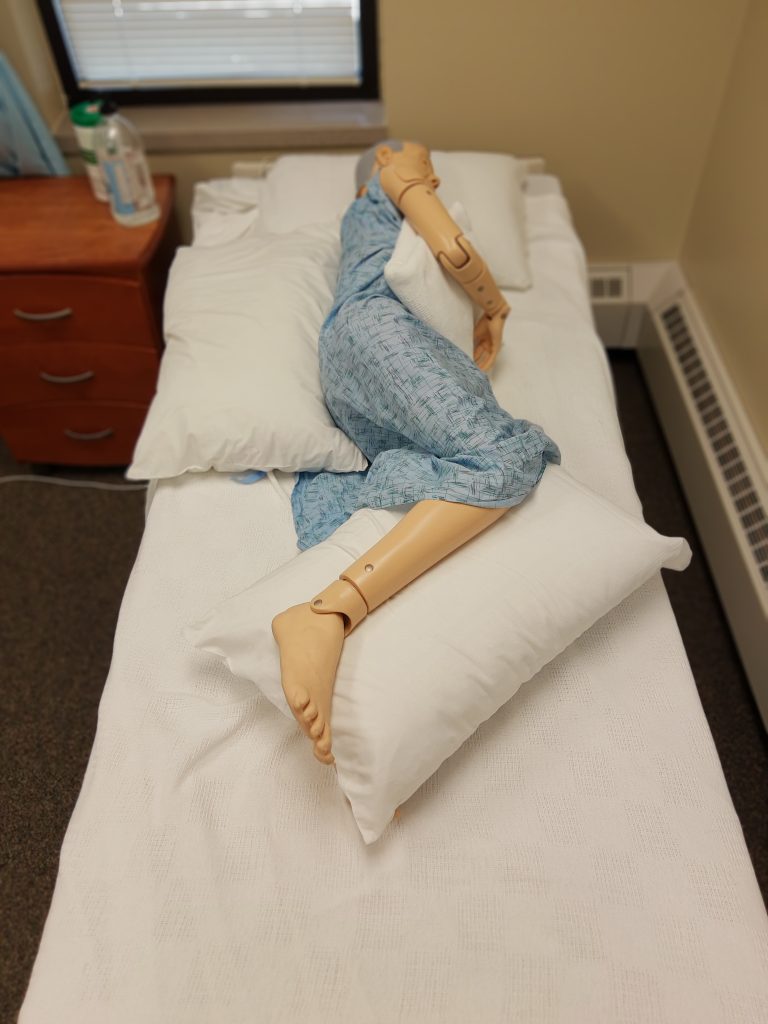
Similar to how nursing assistants use good body alignment (i.e., good posture) to prevent musculoskeletal injuries to themselves, the same principle should also be applied to residents. Good body alignment not only prevents injury, but also promotes comfort for residents. After repositioning a resident, the NA should stand at the foot of the bed and verify that the resident’s spinal column is straight and parallel to the sides of the bed, as well as ensuring the resident is lying in the middle of the bed (to reduce the risk of accidentally rolling out of bed). See Figure 8.3[5] of an image of a properly aligned mannequin in the lateral position.
Pressure Relieving Devices
In addition to being caused by friction and shear, pressure injuries can occur in high-risk areas such as bony prominences or where a bone is lying directly on top of another bone. Bony prominences are the areas of the body where a bone lies close to the skin’s surface, such as the back of the head, shoulders, elbows, heels, ankles, tops of the toes, hips, and coccyx (i.e., tailbone). These areas are most susceptible to developing pressure injuries because they have the least amount of cushioning. Placing pillows or other specialized equipment reduces the pressure in these areas and also helps to prevent the resident from rolling out of position.
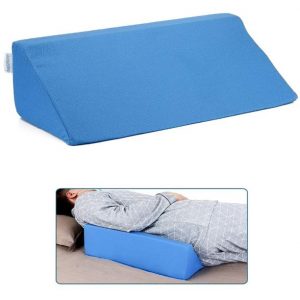
There are different sizes of pillows and equipment available in facilities to relieve pressure, prevent rolling, and increase client comfort. For example, foam wedges are placed behind a patient’s back to prevent them from returning to the supine position or rolling close to the edge of the bed. See Figure 8.4[6] for images of a wedge cushion and a client positioned using a wedge cushion.
Positions
Common positions used for repositioning patients are supine, Fowler’s, lateral, Sims’, and prone positions.
Supine Position
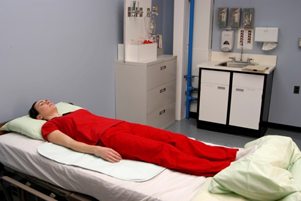
The most common sleeping position is the supine position, where the client is lying flat on their back as demonstrated in Figure 8.5.[7] Pillows or wedges can be placed on each side of the resident to promote comfort or to support a limb that is immobile or has impaired function. A pillow should also be placed underneath their calves to keep their heels off the bed and prevent pressure that can cause pressure injuries. (This pillow placement under the calves is often referred to as “floating the heels.”) After repositioning the client, the NA should be able to place their hand underneath the client’s heels to verify there is no contact by the heels on the mattress.
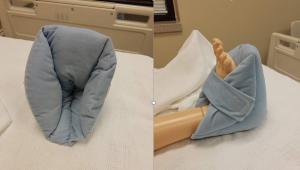
If a resident is highly susceptible to pressure injuries of the heels, they may have specialized soft foam boots, as illustrated in Figure 8.6,[8] that support the ankles and keep the heels floated off the bed. A foot cradle may also be used to keep sheets and blankets off the tops of the toes if the resident has a history of skin injury in that area.
Fowler’s Position
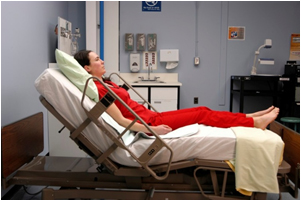
In Fowler’s position, the client is lying on their back with their head elevated between 30 and 90 degrees, as illustrated in Figure 8.7.[9] Residents should be placed in Fowler’s position any time they are eating or drinking or when oral care is provided. Fowler’s position is also used to increase lung expansion for those with breathing difficulties, such as those that occur with heart failure. It may also be used for comfort during leisure activities such as watching television or reading. Additionally, residents receiving tube feeding should never have their head placed below a 30-degree angle because this can cause aspiration of the fluids.
However, Fowler’s position increases the risk of friction and shear on the coccyx and gluteal muscles as the client slides down in bed. This risk can be reduced by concurrently raising the lower portion of the bed or by putting multiple pillows below the lower legs. These actions bend the knees and reduce the pull of gravity that causes the resident to slide down in bed. A pillow can also be placed below the feet to prevent them from contacting the foot of the bed.
Lateral or Side-Lying Position
Lateral (side-lying) position places the resident on their left or right side as shown in Figure 8.8.[10] This position relieves pressure on the coccyx and can increase blood flow to the fetus in pregnant women. The top arm and leg can be placed in a flexed position in any range that is comfortable to the resident. Supports should be placed behind the back to keep the resident from rolling to the supine position. Additionally, supports should be placed between the top knee and the bed or other knee and between the top elbow and rib cage or the bed, depending on the location of the elbow joint. These supports will alleviate pressure between the bony prominences in these areas. The pillow underneath the resident’s head should also be adjusted for comfort and alignment checked from the foot of the bed.
The most common rotation of positions for repositioning residents is to rotate them from supine position to lateral position, to supine position, to lateral position on the opposite side. See the “Positioning Supine to Lateral (Side-Lying) Skills Checklist” for the steps to move a resident from the supine to lateral (side-lying) position.
Sims’ Position
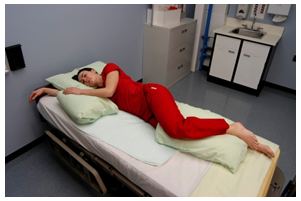
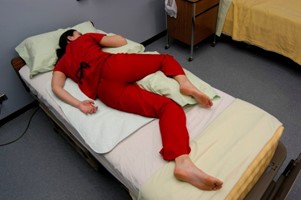
Sims' position is very similar to the lateral position, but the client is always placed on their left side and their left arm is placed behind the body (rather than in front of the body). Sims’ position is commonly used for administration of a suppository or an enema. Depending on your state’s scope of practice, you may be delegated to give an enema, or the nurse may ask you to prepare the patient for an enema by placing them in the Sims’ position as pictured in Figure 8.9.[11]
Prone Position
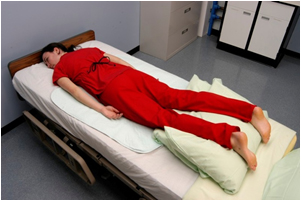
In the prone position, the client is placed on their stomach with their head turned to one side, as seen in Figure 8.10.[12] Pillows should be placed underneath the shins to relieve pressure. Pillows (or wedges) can also be placed on both sides of the patient, and the head pillow should be readjusted for comfort.
Prone is the least commonly used position, especially in older adults due to their neck immobility. This position may be used for a client with a surgical wound on the back side of their body or to improve respiratory status in clients with respiratory conditions like COVID-19.
- Edsberg, L. E., Black, J. M., Goldberg, M., McNichol, L., Moore, L., & Sieggreen, M. (2016). Revised national pressure ulcer advisory panel pressure injury staging system: Revised pressure injury staging system. Journal of Wound, Ostomy, and Continence Nursing: Official Publication of The Wound, Ostomy and Continence Nurses Society, 43(6), 585–597. https://doi.org/10.1097/WON.0000000000000281 ↵
- “Shear Force” and “Shear Force Closeup” by Meredith Pomietlo at Chippewa Valley Technical College are licensed under CC BY 4.0 ↵
- “Book-pictures-2015-572.jpg” by unknown author is licensed under CC BY 4.0. Access for free at https://opentextbc.ca/clinicalskills/chapter/3-5-positioning-a-patient-on-the-side-of-a-bed/ ↵
- This work is a derivative of Nursing Fundamentals by Chippewa Valley Technical College and is licensed under CC BY 4.0 ↵
- “Lateral Position.jpg” by Myra Reuter for Chippewa Valley Technical College is licensed under CC BY 4.0 ↵
- “6105kmeOsGL._AC_SL1000_.jpg” by unknown author is used on the basis of Fair Use. ↵
- “supine.jpg” by unknown author is licensed under CC BY 4.0. Access for free at https://opentextbc.ca/clinicalskills/chapter/3-4-positioning-a-patient-in-bed/ ↵
- “Foam Boot” and “Foam Boot Supporting a Heel” by Myra Reuter for Chippewa Valley Technical College is licensed under CC BY 4.0 ↵
- “degreeLow.jpg” by unknown author is licensed under CC BY 4.0. Access for free at https://opentextbc.ca/clinicalskills/chapter/3-4-positioning-a-patient-in-bed/ ↵
- “lateral.jpg” by unknown author is licensed under CC BY 4.0. Access for free at https://opentextbc.ca/clinicalskills/chapter/3-4-positioning-a-patient-in-bed/ ↵
- “sims.jpg” by unknown author is licensed under CC BY 4.0. Access for free at https://opentextbc.ca/clinicalskills/chapter/3-4-positioning-a-patient-in-bed/ ↵
- “prone.jpg” by unknown author is licensed under CC BY 4.0. Access for free at https://opentextbc.ca/clinicalskills/chapter/3-4-positioning-a-patient-in-bed/ ↵
Localized damage to the skin or underlying soft tissue, usually over a bony prominence, as a result of intense and prolonged pressure in combination with shear.
Injury to skin that occurs when skin moves one way but the underlying bone and muscle stay fixed or move the opposite direction.
Injury caused to skin when it is rubbed by clothing, linens, or another body part.
A draw sheet placed between the resident and the bottom flat sheet in order to help move the patient and prevent friction or shear.
A separation of skin layers caused by shear, friction, and/or blunt force.
Good posture principles that prevent musculoskeletal injuries.
Areas of the body where a bone lies close to the skin’s surface, such as the back of the head, shoulders, elbows, heels, ankles, tops of the toes, hips, and coccyx.
Tailbone.
A position where the client is lying flat on their back.
Specialized soft boots used to support the ankles and keep the heels floated off the bed.
A device used to keep the sheets and blankets off the tops of a client’s toes.
A position where the client is lying on their back with their head elevated between 30 and 90 degrees.
A position that places the client on their left or right side to relieve pressure on the coccyx or increase blood flow to the fetus in pregnant women.
A position similar to the lateral position, but the client is always placed on their left side and their left arm is placed behind their body.
A position where the client is placed on their stomach with their head turned to one side.

