9.4 Complications of Immobility
Movement, activity, and mobility positively affect one’s overall health. When someone is recovering from a severe illness or injury, their mobility is often reduced, and they may be unable to perform ADLs. Health care team members play a vital role in preventing the physical and mental decline in functioning that can occur from immobility by proactively implementing interventions.
Risks of immobility are well-known, and complications are viewed as avoidable. In fact, many insurance companies do not reimburse health care agencies for complications resulting from immobility, like pressure injuries, because they are viewed as avoidable with the proper care. Therefore, nursing assistants must be diligent in their actions and observations to maintain their client’s health and prevent complications.
See Table 9.4 for potential complications of immobility by body system and additional preventative measures that will keep clients as healthy as possible. Promoting clients’ independence in completing their ADLs and encouraging activity as tolerated can help prevent all these complications of immobility. “Encouraging activity as tolerated” means involving the resident in movement while also adhering to mobility restrictions noted in the care plan and observing for respiratory changes that indicate the resident may be lacking endurance to maintain the activity. Sometimes a client’s lack of endurance in completing activities requires the nursing assistant to segment their ADLs. Segmenting ADLs refers to breaking up tasks to accommodate the client’s activity intolerance. An example of segmenting ADLs would be assisting a person to bathe in bed as independently as possible, letting them rest after bathing, and then returning later to assist them with dressing and grooming to get them ready for the day.
Table 9.4 Potential Complications of Immobility and Preventative Measures
| Body System | Potential Complication(s) | Preventative Measures |
|---|---|---|
| Integumentary (Skin) | Pressure Injuries |
|
| Musculoskeletal | Muscle atrophy
Contracture |
|
| Digestive | Constipation
Incontinence |
|
| Respiratory | Decreased lung function |
|
| Circulatory | Deep vein thrombosis (DVT)
Decreased cardiac function Increased fluid retention |
|
| Psychological | Depression |
|
Devices to Prevent Contracture
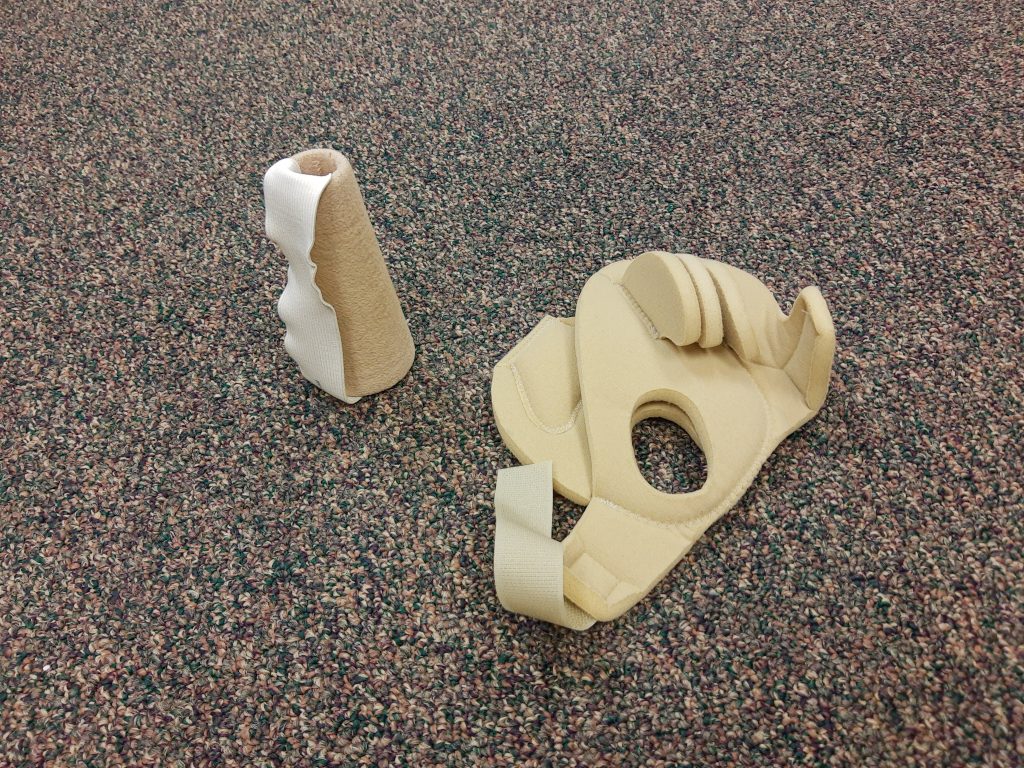
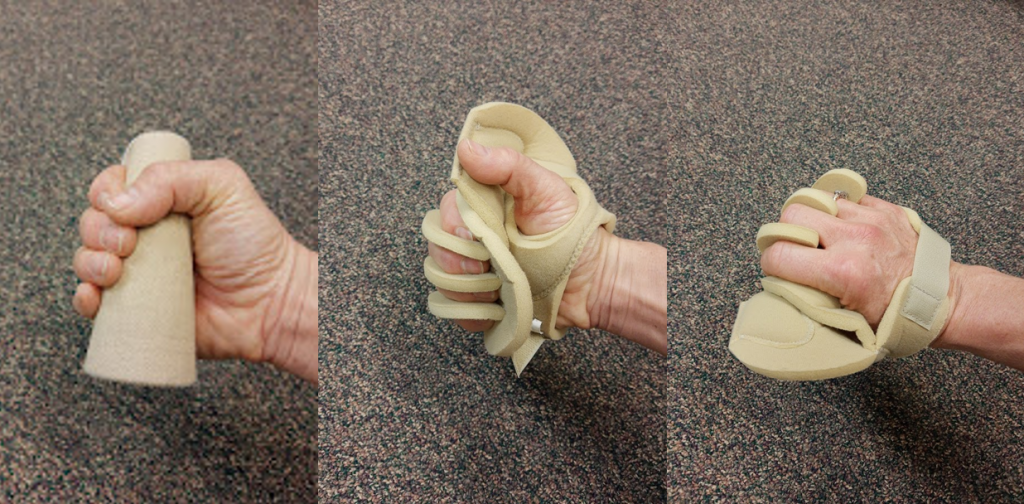
The “Applying Prosthetics and Orthotics” section in Chapter 8 describes devices such as a foot split to prevent musculoskeletal contracture. There are additional devices that can prevent a client’s hand contracture, as well as prevent their fingernails from creating open skin areas in their palm. The first type of hand device is a cone that slides into the palm of the hand and is kept in place with a soft elastic band. The cone should not be forced into the fingers but placed gently. A second type of device is a palm protector that is softer than the cone and separates the fingers from one another. If neither of these devices is available, a washcloth can be rolled and placed underneath the fingers. See Figure 9.1[1] for an image of a cone and palm protector, and Figure 9.2[2] for images showing application of these devices.
Range of Motion (ROM)
Active and passive range of motion (ROM) exercises prevent complications of immobility in the musculoskeletal system. ROM exercises facilitate movement of specific joints and promote mobility of the extremities. Because changes in joints can occur after just three days of immobility, ROM exercises should be started by the nursing assistant as soon as they are directed by the nurse as safe to do so.
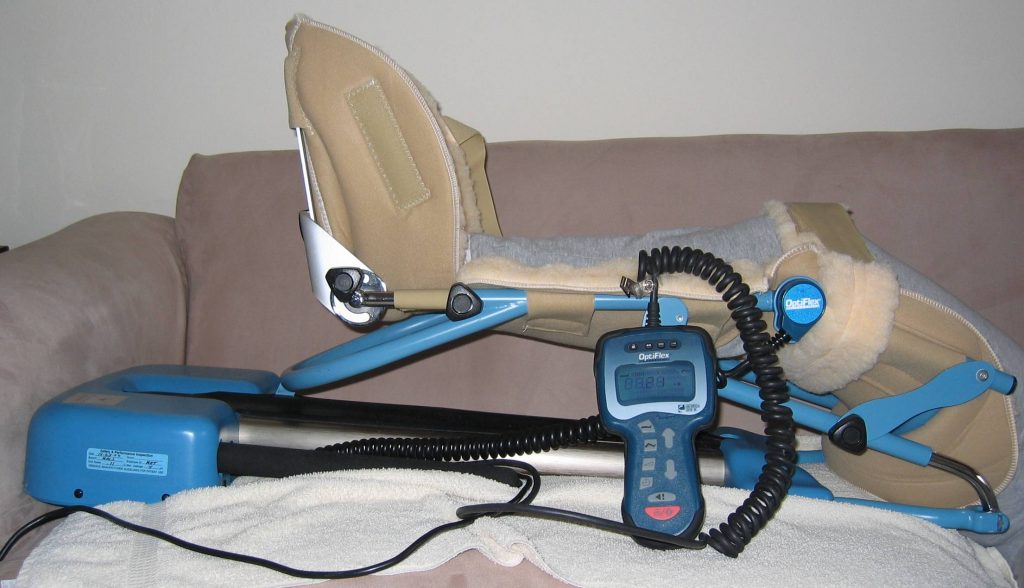
There are three types of ROM exercises: passive, active, and active assist. Passive range of motion is movement applied to an individual’s joint by another person or by a passive motion machine. When passive range of motion is applied, the joint of an individual receiving the exercise is completely relaxed while the outside force moves the body part. For example, clients who undergo knee replacement surgery may be prescribed a passive range of motion machine that continuously flexes and extends the patient’s knee while they are lying in bed. See Figure 9.3[3] for an image of a passive motion machine.
Active range of motion is movement of a joint by the individual with no outside force aiding in the movement. A staff member may provide verbal cues to complete the action, but the movement is done independently by the client.
Active assist range of motion is joint movement by an individual with partial assistance from an outside force. For example, during the recovery period after shoulder surgery, a client attends physical therapy and receives 50% assistance in moving their arm with the help of a physical therapy assistant.
Several terms are used to refer to certain body movements during range of motion exercises, such as abduction, adduction, flexion, and extension. Abduction refers to the movement of a limb away from the body’s midline. For example, hip abduction is the movement of the leg away from the midline of the body. We use this action every day when we step to the side, get out of bed, and get out of the car. Adduction refers to moving a limb towards the midline. For example, if a person has their fingers spread wide apart, bringing them back together is adduction. Flexion is movement that decreases the angle between two bones and extension is movement that increases the angle between two bones. For example, a bicep curl during weight lifting demonstrates both flexion and extension. Flexion occurs when the bicep muscle contracts and the elbow joint bends, lifting the weight. Extension occurs when the arm is straightened back to starting position, increasing the angle between the elbow joint.
When assisting a client with ROM activities, the nursing assistant must follow the plan of care established by the licensed therapist. The plan is tailored to the needs of the individual and will include the specific joints to move. Typically, larger joints such as shoulders, elbows, hips, knees, and ankles are included in ROM exercises, but ROM can be also applied to smaller joints such as the fingers and wrists.
When assisting with ROM exercises, the nursing assistant must support any joints below the joint being exercised to prevent injury. For instance, if the shoulder is being exercised, the nursing assistant places their hands underneath the elbow and wrist to support them. The joint should be moved gently and only to the point to where there is slight resistance. A joint should never be forced to achieve full ROM if there is resistance. For example, a client who has had limited mobility for several years may have a joint that can only be moved a few inches, but it is important to maintain that mobility, no matter how small.
While providing ROM, the nursing assistant must observe for objective and subjective signs of pain. The resident should be asked if they are experiencing any pain during the movement, and the assistant should watch for nonverbal signs of pain like grimacing, clenching the teeth, groaning, or labored breathing. Refer to the “Objective and Subjective Signs of Pain” subsection in Chapter 6.3 to review observations to make and report. See the steps for providing ROM for the shoulder and hip joints in the “ROM Exercises for the Shoulder” and “ROM Exercises for the Hip and Knee” Skills Checklists later in this chapter.
Incentive Spirometry
When a client experiences immobility, normally healthy alveoli can collapse and cause decreased lung function. Decreased lung function can reduce a person’s stamina and their ability to perform activities, referred to as activity intolerance. To prevent a decrease in lung function, reduce the build-up of fluids in the airways, and prevent pneumonia, clients are often prescribed incentive spirometry to keep their bronchioles open. The incentive spirometer encourages a client to complete slow, deep breathing to keep their bronchioles open. See Figure 9.4[4] for an image of a client using an incentive spirometer. Nursing assistants are often expected to encourage clients to use their incentive spirometer hourly.
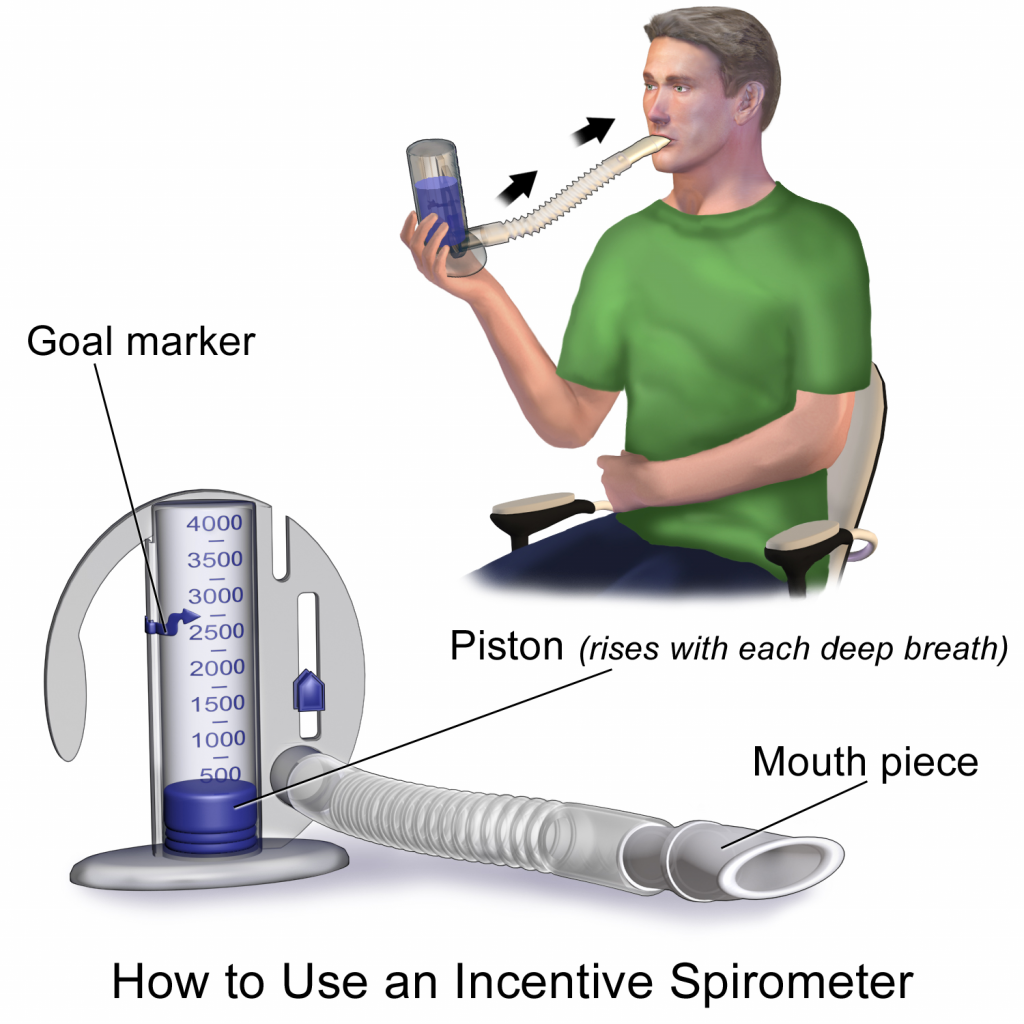
The nurse or respiratory therapist initially teaches the client how to use the incentive spirometer but encouraging and observing clients complete this action every hour is commonly delegated to a nursing assistant. The client should sit upright (if possible), place the mouthpiece in their mouth, and create a tight seal with their lips around it. They should breathe in slowly and as deeply as possible through the tubing, with the goal of raising the piston to their prescribed level. The resistance indicator on the right side should be monitored to ensure they are not breathing in too quickly. The client should attempt to hold their breath for as long as possible (at least five seconds) and then exhale and rest for a few seconds. Coughing is expected, and clients should be encouraged to expel any mucus (not swallow it). This technique should be repeated by the client ten times every hour while they are awake. Report completion of the activity to the nurse who documents frequency and effectiveness of this intervention.[5]
Compression Stockings
Deep-vein thrombosis (DVT) is a common complication for clients experiencing immobility. When blood is not moving much due to client inactivity, it can coagulate (i.e, form a clot). This blockage reduces blood flow to the affected area. A deep-vein thrombosis (DVT) is a blood clot that forms within the deep veins, usually of the lower leg, but can occur anywhere within the cardiovascular system. If the clot breaks free, it can travel to the lungs and become fatal.
The best way for nursing assistants to prevent DVT is to assist clients to ambulate or otherwise complete as much activity as they can tolerate. Some clients are prescribed compression stockings, also referred to as thrombo-embolic-deterrent hose (TED hose). Compression stockings promote the return of fluid back into circulation by gently providing pressure on veins. They are commonly used for clients with swelling of their extremities (edema) caused by cardiac conditions that cause fluid retention.
Compression stockings require a physician’s order and should be applied in the morning and taken off at night. They should be applied upon awakening because edema is usually at its lowest point after lying in bed overnight. However, as the client sits or stands upright during the day, blood tends to pool in the lower legs. The pressure from compression stockings helps return fluid into the cardiovascular system and may reduce the risk for DVT.
When removed at night, the compression stockings should be washed by hand in the sink with soap and water and then hung to air dry. Do not send them to the laundry or put them on a heater to dry because this can cause shrinking and ruin the hose. Clients often have two or more pairs of compression stockings to ensure they dry completely before wearing them again in the morning.
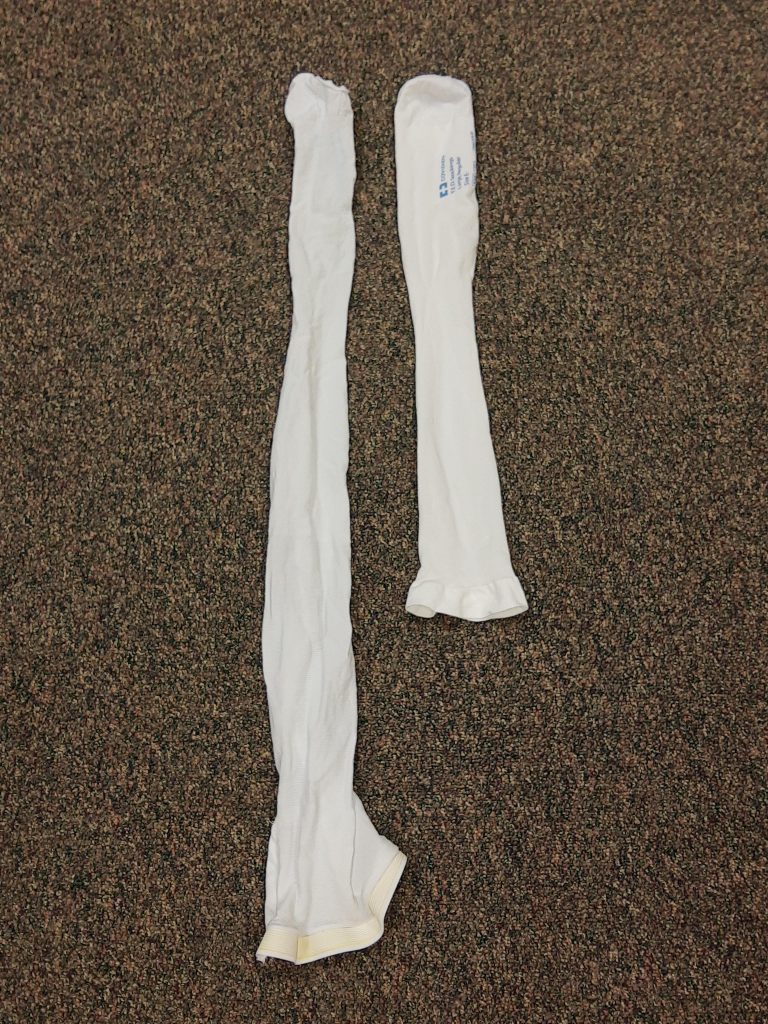
Compression stockings may be knee length or hip length. See Figure 9.5[6] for an image comparing both lengths. The amount of pressure the hose applies to the legs is prescribed. For example, some compression stockings may seem like slightly tight socks, whereas other stockings for clients with severe edema are custom-made to fit very tightly and may have a zipper for ease of application.
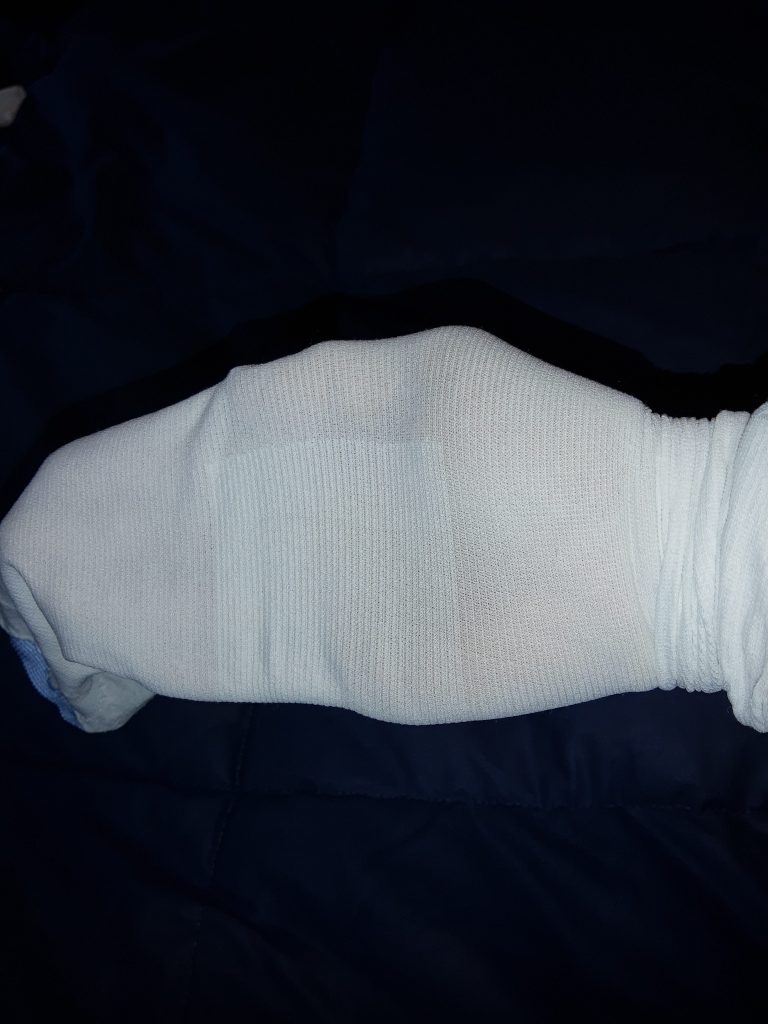
When applying stockings, proper placement on the heel is important. The stockings have a square marker around the heel to guide correct placement on the heel. It can be difficult to see this square but stretching the fabric around the heel area should make it more visible. See Figure 9.6[7] for an image of locating the heel marker. If there is writing on the stocking, it should be on the outside and facing away from the skin when worn.
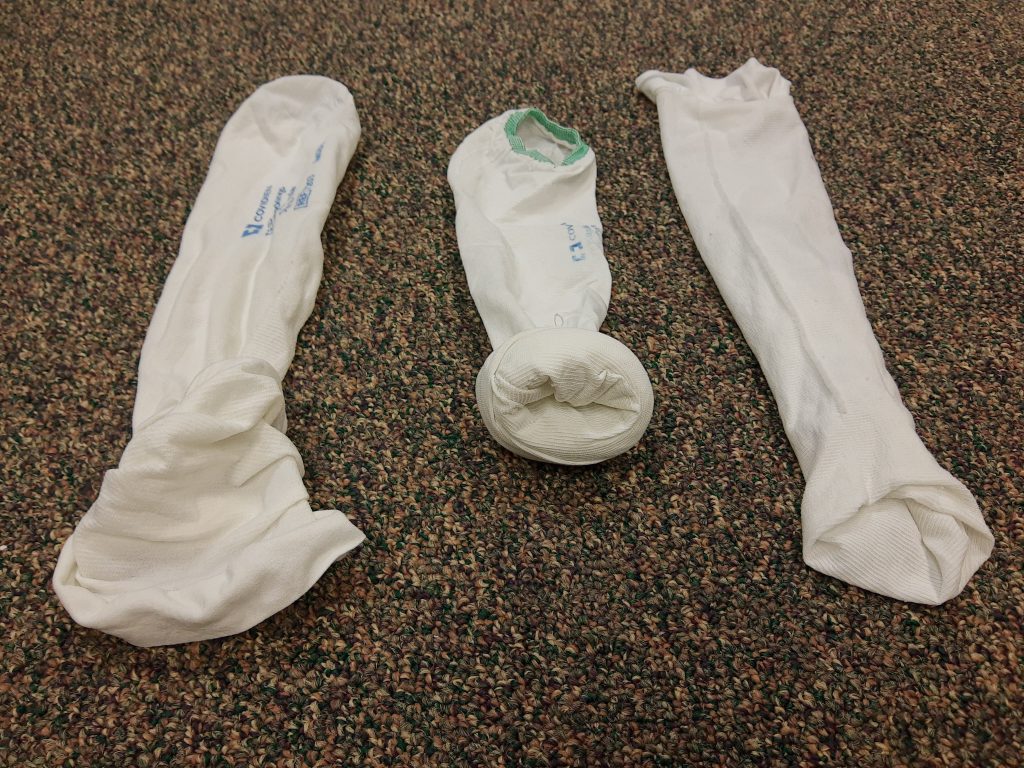
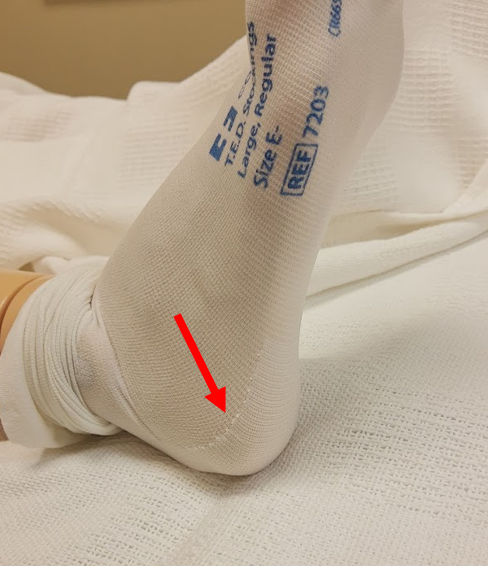
When applying TED hose, find the heel marker first. You can gather or roll the sides of the hose down to the heel or choose to turn the stocking inside out to the heel marker. If turned inside out, put your hand inside the hose, hold at the top of the heel marker with your thumb and forefinger, and then pull the top of the stocking down to the heel marker. See Figure 9.7[8] for a demonstration of these techniques. Use any of these techniques to place the stocking on the heel, and then check for proper placement of the heel marker before applying the rest of the stocking. See Figure 9.8[9] for heel placement.
After the heel of the stocking is placed properly on the client’s heel, check that the hose is not twisted. Make any adjustments before proceeding because the hose will be very difficult to adjust after it is pulled up the leg. When you have the hose positioned correctly, pull the remainder of the stocking up to the knee or hip, depending upon the length of the hose. Check that there are no wrinkles in the hose and that the client has no discomfort.
The toe of the stocking is typically open to allow for easy assessment of the client’s circulation. The fabric should be completely over the toes, or completely at the base of the toes, to prevent skin breakdown or blockage of circulation to the toes. See Figure 9.9[10] for images of both types of applications of the toe opening of the stocking.
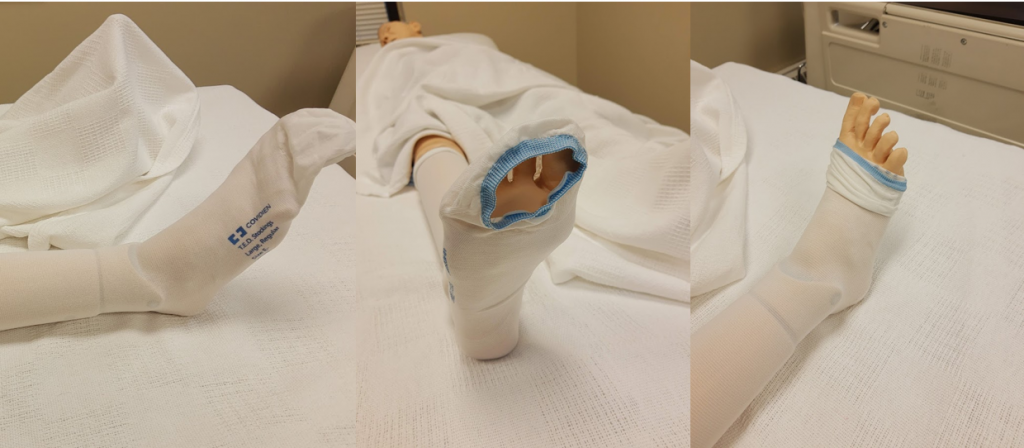
Regular socks or slippers can be placed over the TEDs for warmth if desired. For specific steps in applying TED hose, see the “Application of Compression Stockings (TED Hose)” Skills Checklist at the end of the chapter.
- “Cone to Prevent Hand Contracture (left) and a Palm Protector (right)” by Myra Reuter for Chippewa Valley Technical College are licensed under CC BY 4.0 ↵
- “Cone and Palm Protectors on Client" by Myra Reuter for Chippewa Valley Technical College is licensed under CC BY 4.0 ↵
- “Continuous_Passive_Motion_Machine.jpg” by User:Ravedave is licensed under CC BY-SA 3.0 ↵
- “Incentive Spirometer.png” by BruceBlaus is licensed under CC BY-SA 4.0 ↵
- This work is a derivative of Nursing Fundamentals by Chippewa Valley Technical College and is licensed under CC BY 4.0 ↵
- “TED Hose Lengths.jpg" by Myra Reuter for Chippewa Valley Technical College is licensed under CC BY 4.0 ↵
- “TED Hose Heel Marker.jpg" by Myra Reuter for Chippewa Valley Technical College is licensed under CC BY 4.0 ↵
- “TED Hose Application Methods.jpg" by Myra Reuter for Chippewa Valley Technical College is licensed under CC BY 4.0 ↵
- “Heel Marker on TED Hose.jpg” by Myra Reuter for Chippewa Valley Technical College is licensed under CC BY 4.0 ↵
- “Toes of TED Hose.jpg” by Myra Reuter for Chippewa Valley Technical College is licensed under CC BY 4.0 ↵
Breaking up activities of daily living (ADLs) to accommodate a client’s activity intolerance.
Movement applied to an individual’s joint by another person or by a passive motion machine.
Movement of a joint by the individual with no outside force aiding in the movement.
Joint movement by an individual with partial assistance from an outside force.
The movement of a limb away from the body's midline.
Moving a limb towards the midline.
Movement that decreases the angle between two bones.
Movement that increases the angle between two bones.
The reduction of a person’s stamina and their ability to perform activities.
Form a clot.
A blood clot that forms within the deep veins, usually of the lower leg, but can occur anywhere within the cardiovascular system.
Stockings that apply gentle pressure to a limb to reduce edema; also referred to as thrombo-embolic-deterrent (TED) hose.
Swelling.

