7.7 Checklist: Obtain a 12-Lead ECG
*Disclaimer: Always follow agency policy and manufacturer recommendations
Checklist: Obtain a 12-Lead ECG[1],[2]
- Verify the provider’s order.
- Obtain data related to age, gender, cardiac medications, recent blood pressure, and pain level.
- Introduce self and your role.
- Perform hand hygiene.
- Verify the client with two identifiers and check allergies.
- Explain the procedure to the client.
- Provide privacy.
- Enter demographic data as required.
- Remove oil, moisture, and/or excess hair at lead placement points.
- Open the electrode package. Check the expiration date to ensure electrodes are not expired.
- Attach four electrodes to the extremities as indicated on the electrodes.
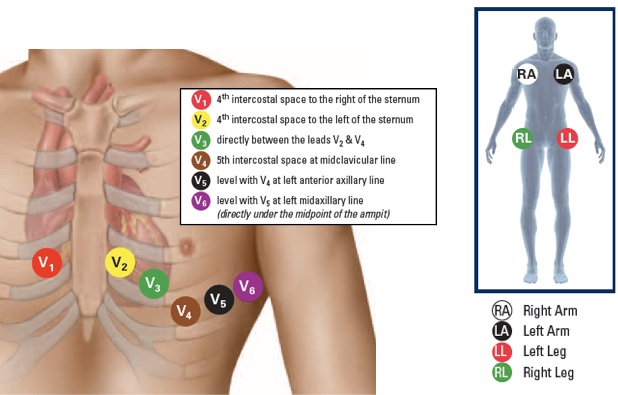
- Attach the six chest leads in the locations described below.[3] View Figure 7.35[4] for an illustration of ECG lead placement.
- V1 – Fourth intercostal space on the right sternal border
- V2 – Fourth intercostal space at the left sternal border
- V3 – Midway between placement of V2 and V4
- V4 – Fifth intercostal space at the midclavicular line
- V5 – Left anterior axillary line on the same horizontal level as V4
- V6 – Mid-axillary line on the same horizontal level as V4 and V5
- Press the auto button and record the ECG. Ask the client to hold still while the machine is capturing the electrical activity of the heart to ensure a clear and accurate depiction of the heart’s electrical pattern.
- Inspect the tracing printout for quality. The ECG machine will provide an interpretation of the electrical activity, but a health care provider will evaluate the findings.
- If the client has an abnormal cardiac pattern, assess their level of consciousness, carotid pulse, and for complaints of chest pain or shortness of breath. Request emergency assistance if indicated.
- Remove the electrodes and clean the skin. Assess the area for redness and irritation.
- Perform hand hygiene.
- Provide for client comfort and safety.
- Notify the health care provider of abnormalities.

View a YouTube video[5] showing an instructor demonstration of this skill:
Sample Documentation:
11/25/20XX 1030
Obtained a routine 12-lead ECG for a client scheduled for surgery in the morning. Explained the procedure to the client. Performed the 12-lead ECG and assessed the quality of the tracing. Removed the electrodes and no signs of redness or irritation present on skin. The client tolerated the procedure well. ECG results were provided to the health care provider.
Michael Jones, RN
- Clinical skills: Essentials collection (1st ed.). (2021). Elsevier. ↵
- Lippincott procedures. http://procedures.lww.com ↵
- Drew, B. J., Califf, R. M., Funk, M., Kaufman, E. S., Krucoff, M. W., Laks, M. M., Macfarlane, P. W., Sommargren, C., Swiryn, S., & Van Hare, G. F. (2004). Practice standards for electrocardiographic monitoring in hospital settings. Circulation, 110(17), 2721-2746. https://www.ahajournals.org/doi/10.1161/01.cir.0000145144.56673.59 ↵
- “Ecg-lead-placement.jpg” by unknown author is used under Fair Use. Access the original at https://nurseyourownway.com/2016/04/20/demystifying-the-12-lead-ecg/ ↵
- Chippewa Valley Technical College. (2023, January 5). Obtaining a 12-lead ECG [Video]. YouTube. Video licensed under CC BY 4.0. https://youtu.be/Ud6nr-hxA80 ↵

