Chapter 4 Working With Windows
Vocabulary
Application software: May also be called application program, app, or application. May consist of one or several programs that allow the user to perform certain tasks or activities. Requires the system software to run it. All apps are programs, but not all programs are apps.
Click: Describes the action of pressing on the left or right mouse button; can be one or more clicks.
Default: The preset selection of an option offered by a system and will always be used unless the user changes it.
Desktop: The main screen display of a personal computer where icons, windows, and other items appear.
File: A named collection of information, in the form of text, programs, graphics, etc., held on a permanent storage device such as a C drive or flash drive.
Folder: A place on a drive for holding and organizing multiple subfolders or files.
Icon: A small picture or image that represents an application, file, or folder. The user can click or double-click the icon to open the application software, file, or folder.
Pin: Describes the action of placing a shortcut on the taskbar, which allows the user to quickly access the application software.
Shortcut: Placed on the desktop or within a folder and creates a link to a file or folder. Double-clicking on the shortcut will open the file or folder.
Start button: Located on the bottom left or center of the taskbar. Clicking this will display the start menu.
Start menu: Opens a list of application software (apps), shortcuts to settings, and files that can be selected.
Taskbar: Found at the bottom of the computer screen by the default setting. Contains selectable buttons and icons of opened and pinned application software, along with the date and time.
Wallpaper: A picture or design that is displayed in the background on a computer screen or mobile device screen.
Window: A rectangular area on a screen in which a document or application can be viewed. Most windows allow the user to minimize, maximize, and close them.
Navigating Windows
Microsoft Windows (also known as “Windows”) was created by the Microsoft Corporation and is one of the three most common operating systems for personal computers. An operating system manages the computer’s memory and the processes. It coordinates the activities of the installed hardware and software. Windows uses graphical user interface (GUI), which means the user can interact with the computer through graphical icons, menus, and buttons.
If you have used computers in the past, you may be familiar with navigating Windows. This section will review some basics and cover some tips and tricks when working with various windows. This chapter is based on Windows 10, though some Windows 11 content is added. If you are using a different Windows version, there may be some differences in how you accomplish different tasks.
The first time you log onto Windows, you will need to create an account. Each time you log into Windows, you will need to sign in with your password.
Parts of the Window
After signing into Windows, you will see the desktop, which is the main workspace for your computer. Icons of application software (i.e., application, app), documents, and/or folders may be seen on the desktop. Double click an icon to open it. The picture in the background is called the wallpaper.
Left Versus Right Click
A left click is referred to as regular or normal click. A left click is used when working with tools and options on the screen, links, and files. It allows the user to perform an action, such as selecting an item or opening an item, as well as using the click and drag function. Most click actions with windows are done with the left click. The left click action can be either double or single. A double-click is used when opening files. A single-click is used for selecting options.
A right click usually opens up a menu of options, and the user can left click on the desired one. Depending on the device used, a right click can be done in a variety of different ways.
Note: In this book, when the word “click” is used, it means the left click.
|
Touchpads and Touchscreens A touchpad, typically found on laptops, can be used in place of a mouse. Touchpad gestures (finger actions) may vary by computer and what settings are selected. For instance, a single click may result with a tap of a finger on the touchpad. For a right click, the user may tap two fingers or press the lower right corner of the touchpad. Using the settings, the user can select the finger movements (e.g., tap, swipe up, swipe right) for different computer actions. A touch screen can detect the touch input from a user. Touch screens are used for smartphones, personal computers (e.g., laptops), tablets, and kiosks. Not all touch screens gestures are the same among devices. Some of the common gestures include the following:
|
Taskbar
The taskbar is located at the bottom of the screen (Figures 1A and 1B). The taskbar includes the Start button and shortcuts to some of the application software on your computer. The application buttons (or app buttons) are pinned to the taskbar.
The user can personalize the taskbar.
- To organize the application buttons on the taskbar, the user needs to click and drag an app button to a new location.
- To hide the taskbar, right click any empty space on the taskbar. In Windows 10, select Taskbar setting and turn on “Automatically hide the taskbar in desktop mode.” In Windows 11, select Taskbar settings, select Taskbar behaviors, and then select “Automatically hide the taskbar.” (If the taskbar is hidden, the user can use the pointer and hover over the bottom edge of the screen to see the taskbar.)
- To change the location of the taskbar in Windows 10, right click any empty space on the taskbar. Select Taskbar setting. Using the dropdown list under Taskbar location on screen, select an option – Left, Top, Right, and Bottom. In Windows 11, the taskbar icons are centered. To align the icons to the side of the taskbar, right click any empty space on the taskbar. Select Taskbar Settings and Taskbar behaviors. Scroll to taskbar alignment and select Left.


To Pin an App Icon Button to the Taskbar and Unpin a Button
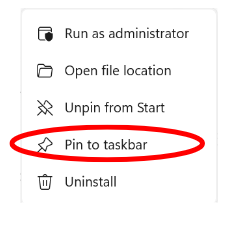
In Windows 10 and 11: Using the Search box, search for the application. When the application appears, select the app. Right click and select Pin to taskbar (Figure 2A).
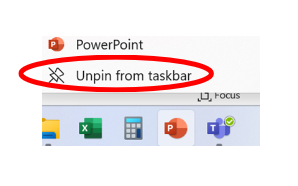
In Windows 10 and 11: To unpin the app icon button from the taskbar, right click on the app button on the taskbar and select Unpin from taskbar (Figure 2B).
To Pin an App Icon Button to the Start Menu and Unpin a Button
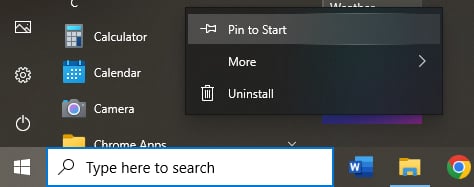
Windows 10: One of the ways to pin an application to the Start menu is to select the application when using the Start Button. Right click on the application. Select Pin to Start on the menu (Figure 3A).
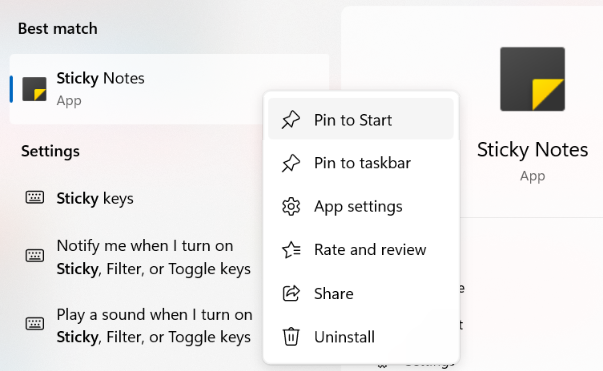
Windows 11: Search for the application using the Search box. When the application appears, select the app. Right click and select Pin to Start (Figure 3B).
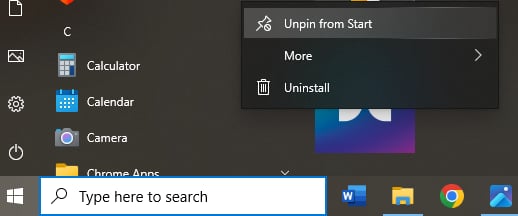
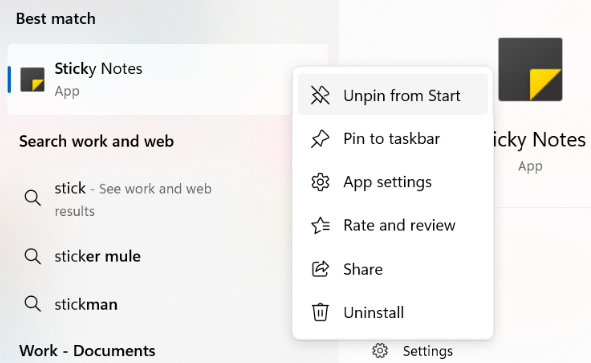
To unpin (remove) the app from the Windows 10 and 11 Start menu, right click on the app. Select Unpin from Start (Figures 3C and 3D).
Notification Area
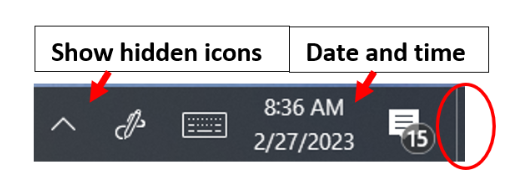
The notification area, also known as the System Tray, is on the right side of the taskbar (Figure 4). It contains helpful icons, such as the battery, clock (time) and calendar (date), and action center. The icons shown can vary by computer. Additional icons can be seen by clicking Show hidden icons.
If a lot of windows are opened, the user can see the desktop by clicking the bottom right corner of the taskbar (see the red circled area). Clicking the right corner will minimize all of the opened windows. Clicking it a second time will restore the minimized windows.
Working in Windows
There are many activities a user can do that relate to windows. This section addresses how to complete the following:
- Open Apps and Files using the Search Box
- Open Applications
- Reposition windows
- Switch between windows
- Minimize, maximize, and close windows
Open Applications and Files Using the Search Box
Windows uses Search to help users find application software (i.e., applications, apps) or files. The Search icon (Figure 5) or Search box (Figures 6A and 6B) is located on the taskbar next to the Start icon. If neither are visible or if the user wants to change what is visible, follow these steps:
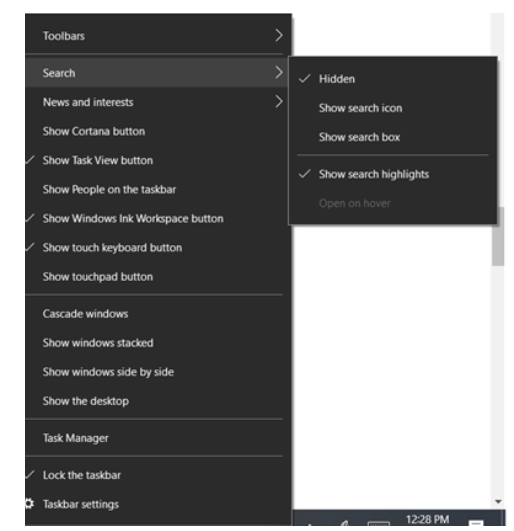
- Windows 10: Right click on the taskbar in an empty section and select Search (Figure 7A).
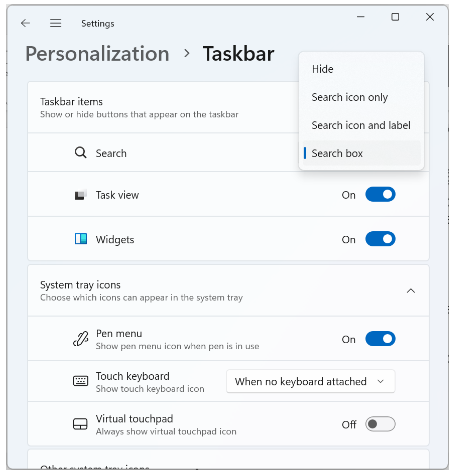
- Windows 11: Right click on the taskbar in an empty section and select Taskbar Setting from the menu. Select the desired option from the Search dropdown menu (Figure 7B).
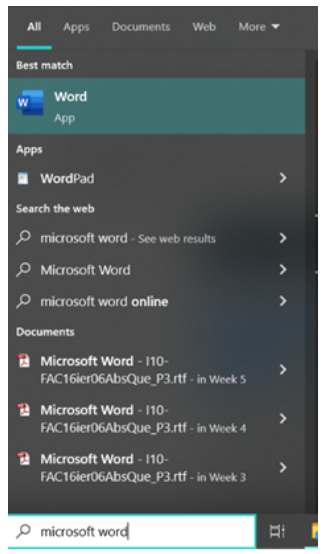
To search for an app or file using the Search icon, click on the icon and type in the search box. To search using the Search box, type the name of the app or file (Figure 8). A list appears showing apps, along with searches on the web and related documents.


Open Applications – Other Methods
An application can be opened by using the Start button or by using the app button (application icon) on the taskbar or desktop.
- To use the Start menu, click on the Start button. A list of application software and shortcuts to settings will appear. Click an application name to open it or click the setting shortcut to change a setting. When an application opens, it will open in a new window.
- If the application icon is on the taskbar or desktop, click to open the app.
When the application opens, the app button appears on the taskbar and the application opens in a new window. The user can adjust the window size as needed.
Repositioning and Sizing Windows
The user can reposition a window or multiple windows on the screen. To move a window, click on the colored bar at the top of the window. Drag the top of the window to the new location and release the mouse. The window will be moved to the new location.
The size of the window can be changed manually by moving the edges of the window or by using the Snap feature, which is described below.
If using two monitors side by side, move a window from one monitor to another by using: Windows logo + Shift + Left or Right Arrow keys.
Using Keyboard Shortcuts
Keyboard shortcuts can be pressed at once or in a sequence: A plus sign (+) indicates that the keys need to be pressed at the same time. For instance, Ctrl + B is a combination of keys. The user needs to press the Ctrl key and the B key at the same time.
Manually Sizing Windows
To reposition the window manually, hover the mouse pointer over any corner or edge of the window. The pointer will become a double arrow. Click and drag the window to the new location. This means the user should press and hold the left click while moving the mouse, making the window smaller or larger. The user can release the click button when the window is the correct size.
Snap and Snap Assist
The Snap feature allows the user to quickly resize and position the window using keyboard shortcuts. The first step is to select the window to reposition. Then, use the following shortcut keys to reposition the window:
- To stretch the selected window from the top to the bottom of the screen (and not change the width of the window), use these shortcut keys: Windows logo + Shift + Up Arrow
- To snap to the left half of the screen, use these shortcut keys: Windows logo + Left Arrow. Snap Assist will show the other windows that can be snapped to fill the right side of the screen. Select a window and it will fill in the right half of the screen.
- To snap to the right half of the screen, use these shortcut keys: Windows logo + Right Arrow. Snap Assist will show the other windows that can be snapped to fill the left side of the screen.
To position four windows, each covering a quarter of the screen, the user must use two shortcuts:
- Upper left quarter: Windows logo + Left Arrow keys and then Windows logo + Up Arrow keys
- Upper right quarter: Windows logo + Right Arrow keys and then Windows logo + Up Arrow keys
- Lower left quarter: Windows logo + Left Arrow keys and then Windows logo + Down Arrow keys
- Lower right quarter: Windows logo + Right Arrow keys and then Windows logo + Down Arrow keys
To unsnap a window, the user can click and drag the window out of the original position.
If the user is using dual monitors, some of these features may not work.
Tips on Using the Snap Feature
When using Windows logo + Down Arrow keys:
- If the window is not snapped, then it will be minimized.
- If the window is maximized, then it will be restored.
When using Windows logo + Up Arrow keys:
- If the window is not snapped, then it will be maximized.
Tip if Snap is Not Working Correctly
Check if the options turned on. This can be found in the Multitasking section in Settings. The Snap feature can be turned on, and additional features can be checked or unchecked. The additional features include the following:
- Snap Fill: The snapped window fills the available space (and not just a portion of the screen).
- Snap Assist: After a window is snapped, other windows to snap are shown.
- Snap Auto Resize: After resizing a snapped window, any adjacent snapped window is simultaneously resized.
Switching Between Windows
There are many options to switch between open applications. Below are some of the methods a user can use to move between open applications.
- Use the taskbar: When the pointer hovers over an icon on the taskbar, the user can see how many instances the application is opened. If the application is only opened once, the user can click on the icon on the taskbar or the taskbar thumbnail preview. If the application is opened more than once, the user can click on the taskbar thumbnail preview of the window to switch to the desired application window.
- Use the Flip feature: In Windows 10, the user must press and hold the Alt key. The opened applications will appear in a box. Press the Tab key to move between the window thumbnails. When the thumbnail is selected, it will have a white border around it. When the correct thumbnail is selected, release the Alt key and the application window will be displayed.
- Use Task View: Available in both Windows 10 and 11 and allows the user to switch between tasks or open tasks. To open Task View, either click on the Task View icon on the taskbar (near the Start button) or press Windows logo + Tab keys (see Figures 1A and 1B). Use the arrow keys to move between the windows until the correct window is selected. Then, press Enter.
Maximize, Minimize, and Close Windows
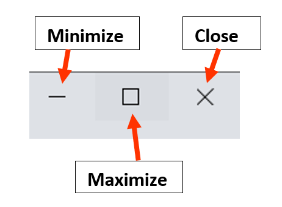
In the top right corner of most windows, the user can find the minimize, maximize, and close buttons.
- Minimize button: The window will be minimized to the taskbar, hiding it from view (Figure 9A). To make it reappear, click the icon on the taskbar. Shortcut keys include the following:
- Minimize current window: Windows logo + Down Arrow keys
- Minimize all windows: Windows logo + M keys
- Minimize all windows and show the desktop: Windows logo + D keys
- Minimize all windows except the current window: Windows logo + Home keys
- Maximize button: The window will fill the entire window (Figure 9A). When the maximize button is clicked, the restore button appears, and the maximize button will disappear (Maximize shortcut: Windows logo + Up Arrow keys).
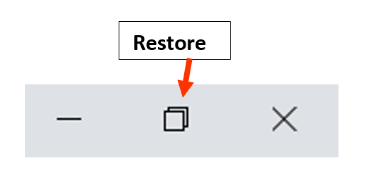
- Restore button: It is also called Restore Down button (Figure 9B). The window will return to its original size, and the maximize button will appear and the restore button will disappear (Restore shortcut: Windows logo + Shift + M keys).
- Close button: The window will close (Figure 9A).
Using the Recycle Bin
When documents are deleted from the C drive of a computer, they move into the Recycle Bin folder. This allows for there to be a second chance to recover a file or folder that was originally deleted. (File deletions from other drives are not moved into the Recycle Bin unless the user drags and drops the file into it. This will be discussed later in the chapter.) To permanently delete files, the user needs to empty the Recycle Bin.
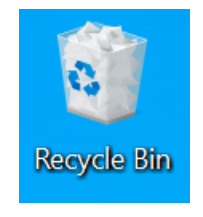
By default, the Recycle Bin shortcut (icon) is located on the desktop (Figure 10). If the shortcut is not visible on the desktop, the user can change the settings to make it visible.
To Change Settings for the Recycle Box
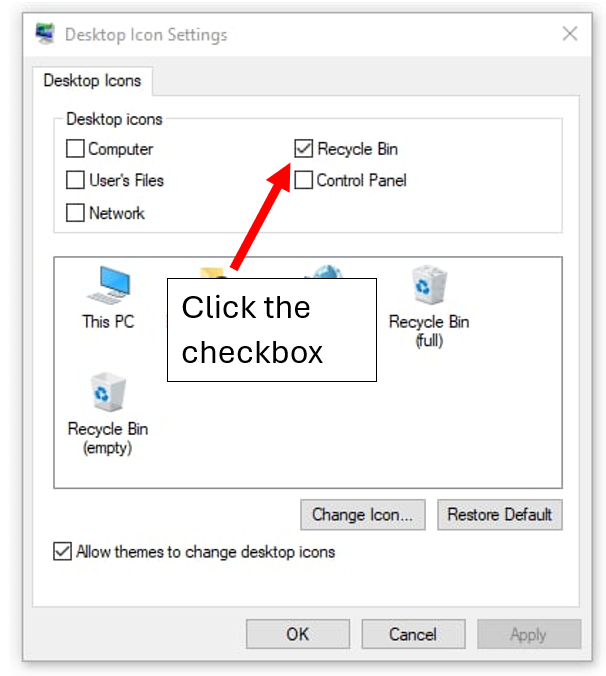
If the recycle bin is not found on your Windows 10 desktop, the user can change the settings to have it appear by following these steps:
- Select the Start button.
- Select Settings.
- Select Personalization. Select Themes and then Desktop icon setting.
- Select the Recycle Bin checkbox (Figure 11).
- Click Apply.
To Empty the Recycle Bin
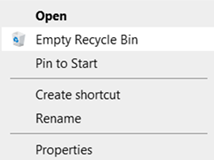
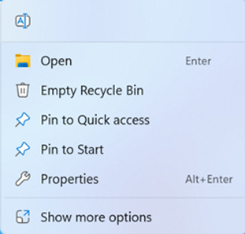
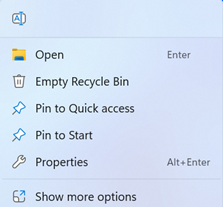
- Right click on the Recycle Bin icon (Figures 12A and 12B).
- Select Empty Recycle Bin.
To Recover Deleted Items
There are many ways to find and open the Recycle Bin. One of the easiest ways is to double-click the icon on the desktop and open the Recycle Bin.
1. Right click on the file or folder deleted – to find the file quickly, you can sort by the different characteristics of the file or folder, such as the name and date deleted. To sort by a characteristic, hover over the column header, and click on the box in the right corner (Figure 13). Select the option you wish.

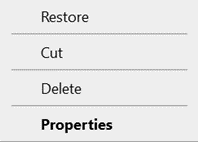
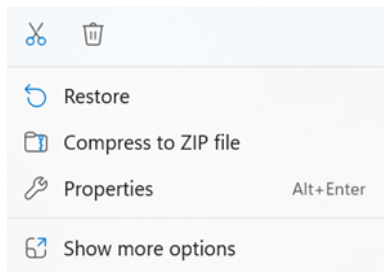
2. Select Restore (Figures 14A and 14B). The file or folder will be restored back to its original location.
Windows Task Manager
The Task Manager is a tool that allows the user to manage the applications used in Windows. It also provides information on the performance of the hardware. If an application locks up, the user can launch Task Manager and select “End Task” to close the application. The Task Manager can be launched many ways in both Windows 10 and 11, including the following:
- Pressing Ctrl + Shift + ESC
- Pressing Ctrl + Alt + Delete and selecting Task Manager
- Right click on the taskbar and select Task Manager
Shutting Down the Computer
When shutting down the computer, it is important to do it correctly. The user should save all files opened and close all application software.
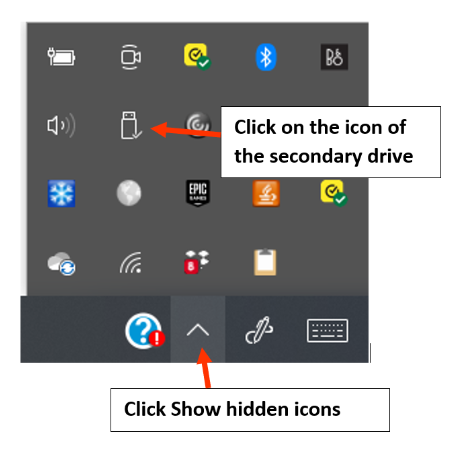
If using a secondary drive, such as a flash drive, safely remove the drive. A common method to remove a flash drive is to use the System Tray (Figure 15). To do so, follow these steps:
- Click Show hidden icons.
- Click on the icon of the secondary drive.
- Select Eject (the name of the drive is usually shown).
The computer will indicate when it is safe to remove the drive.
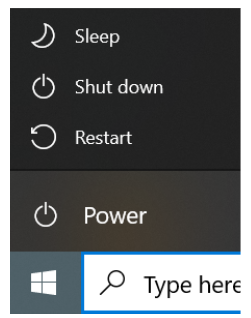
In Windows 10: To shut down the computer, click the Start button. Click Power and Shut down (Figure 16A). Additional options on the Power menu allows the user to do the following:
- Put the computer in Sleep mode. When the computer is in this mode, the operating system and any opened applications remain open, but most of the other processes are turned off. The advantage of sleep mode is that the computer takes less time to start up compared to shutting down and restarting the computer. To wake the computer up, the user just needs to move the mouse or press a key on the keyboard. Most computers are set up to go into Sleep mode if they are not used for a period of time. When the cover of a laptop is closed, the laptop goes into sleep mode.
- Restart the computer. Restarting the computer can be helpful when the computer becomes unresponsive to the user. The restart process turns off the computer and restarts it.
In Windows 11: To shut down the computer, right click the Start button. Select Shut down or sign out and click the desired option (Figure 16B).
Learning Activities
Working With Windows – Flash Cards
Application Exercise 1
Directions: Open two different programs, such as MS Word and MS Excel. Reposition the windows manually, using click and drag the windows to the new location. Position the Windows so each takes up half of the screen.
Application Exercise 2
Directions: Open two different programs. Use the Snap feature and the shortcut keys to resize and position the windows, placing one window on the left side of the screen and the other on the right side.
Application Exercise 3
Directions: Open four different programs. Use the Snap feature and the shortcut keys to resize and position the windows, placing a window in each quarter of the screen.
A small picture or image that represents an application, file, or folder. The user can click or double click the icon to open the application software, file, or folder.
The main screen display of a personal computer where icons, windows and other items appear.
May also be called application program, app, or application. May consist of one or several programs that allow the user to perform certain tasks or activities. Requires the system software to run it. All apps are programs, but not all programs are apps.
A place on a drive for holding and organizing multiple subfolders or files.
Describes the action of pressing on the left or right mouse button; can be one or more clicks.
A picture or design that is displayed in the background on a computer screen or mobile device screen.
A named collection of information, in the form of text, programs, graphics, etc., held on a permanent storage device such as a C drive or flash drive.
Found at the bottom of the computer screen by the default setting. Contains selectable buttons and icons of opened and pinned application software, along with the date and time.
Located on the bottom left or center of the taskbar. Clicking this will display the Start menu.
Placed on the desktop or within a folder and creates a link to a file or folder. Double clicking on the shortcut, will open the file or folder.
Describes the action of placing a shortcut on the taskbar, which allows the user to quickly access the application software.
Opens a list of application software (apps), shortcuts to settings, and files that can be selected.
A rectangular area on a screen in which a document or application can be viewed. Most windows allow the user to minimize, maximize, and close them.
The preset selection of an option offered by a system and will always be used unless the user changes it.

