Chapter 8 Formatting Text in Word
Vocabulary
Default: A specific setting automatically assigned by the software and remains until the user changes the setting.
Hover over: Moving the mouse pointer over an option without selecting it.
Margin: The space between the printed area and the edge of the document.
The Home Tab
In Chapters 6 and 7, an introduction to the File, Home, and Review tabs in Microsoft (MS) Word were discussed. In this chapter, the focus will be on the text formatting tools and commands in the Paragraph, Styles, Editing, and Editor groups on the Home tab. To open the Home tab, the keyboard shortcut (Alt + H) can be used.
Paragraph Group
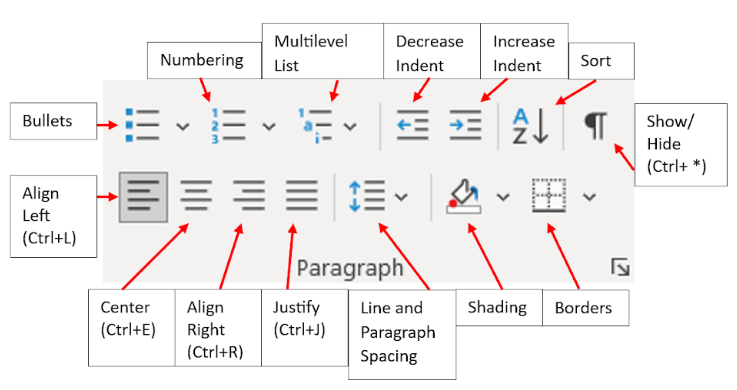
The Paragraph group includes features and commands that allow the user to format paragraphs, including adding bullets and numbers, aligning text, adding borders, and customizing spacing. Figure 1 shows the commands and tools in the Paragraph group.
Line and Paragraph Spacing
The Line and Paragraph command include the following spacing options: 1.0 pt (single line spacing), 1.15 pt, 1.5 pt, 2.0 pt (double line spacing), 2.5 pt, and 3.0 pt.
To change the spacing of a specific section of the document, select the text. Click the Line and Paragraph Spacing button in the Paragraph group on the Home tab. A menu will open. Select the desired spacing.
Paragraph Dialog Box
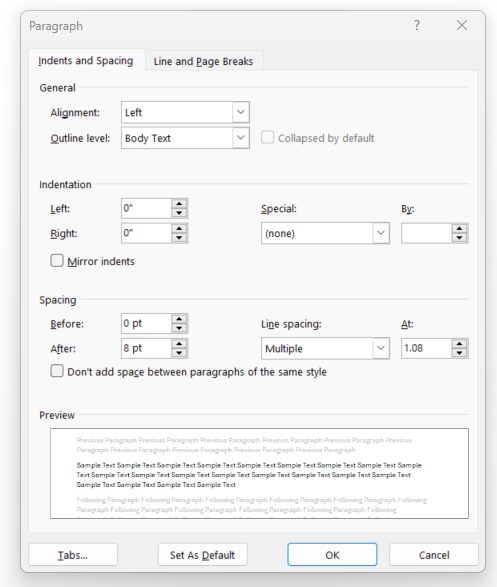
Customized spacing can be done by using the Paragraph dialog box (Figure 2A). This can be opened several different ways:
- On the Home tab in the Paragraph group, select the Line and Paragraph Spacing button and select Line Spacing Options on the menu.
- On the Home tab, in the Paragraph group, click the Dialog Box Launcher in the lower right corner.
- On the Layout tab, in the Paragraph group, select the Dialog Box Launcher in the lower right corner.
The lower half of the Paragraph dialog box focuses on spacing. The options for spacing include the following:
-
- Before: This adjusts the spacing before the paragraph.
- After: This adjusts the spacing after a paragraph.
- Line Spacing: This adjusts the space between each line in the paragraph. Several options are available to set the line spacing.
- Don’t add space between paragraphs of the same style.
To change the spacing before or after the line, the user can either type a number in the box or use the arrows to adjust the number. Select the line spacing using the dropdown menu. If the user does not want space added between paragraphs of the same style, click the box for “Don’t add space between paragraphs of the same style.” The Preview box will show the user how the options selected impact the paragraph.
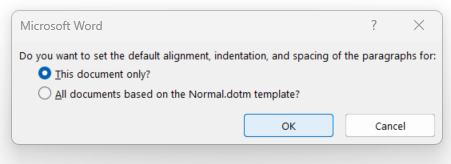
If the user wants the options to be the default, they need to select Set As Default, found at the bottom of the dialog box. When the box appears, click an option and select OK (Figure 2B).
Paragraph Spacing
If the user wants to change the spacing for the entire document, another option can be used. Using the Paragraph Spacing button in the Document Formatting group on the Design tab makes this a simple task. The text does not need to be selected prior to clicking the Paragraph Spacing button. Just click on the Paragraph Spacing button and the menu will open. Select the option desired or customize the spacing. Table 1 describes the differences in the options.
| Option | Spacing Before | Spacing After | Line Spacing |
|---|---|---|---|
| Default | 0 pt | 8 pt | 1.08 |
| No paragraph space (single) | 0 pt | 0 pt | 1 |
| Compact | 0 pt | 4 pt | 1 pt |
| Tight | 0 pt | 6 pt | 1.15 |
| Open | 0 pt | 10 pt | 1.15 |
| Relaxed | 0 pt | 6 pt | 1.5 |
| Double | 0 pt | 8 pt | 2 |
Alignment
To position the font using the alignment options, select the text and click on the desired alignment button. The alignment commands include the following:
- Align Left: The text is aligned at the left margin. The keyboard shortcut for this command is (Ctrl + L).
- Center: The text is horizontally centered on the page. The keyboard shortcut for this command is (Ctrl + E).
- Align Right: The text is aligned at the right margin. The keyboard shortcut for this command is (Ctrl + R).
- Justify: The text is aligned at both the left and right margin and extra spacing may be added between words for the alignment to occur. The keyboard shortcut for this command is (Ctrl + J).
Alignment can also be done using the Paragraph dialog box (see Figure 2A). To use this dialog box, click the Dialog Box Launcher in the lower right corner of the Paragraph group on the Home tab. The top section of the Paragraph dialog box on the Indents and Spacing tab provides options for alignment. This dialog box will be discussed in more depth later in this chapter.
Bullets, Numbering, and Multilevel List
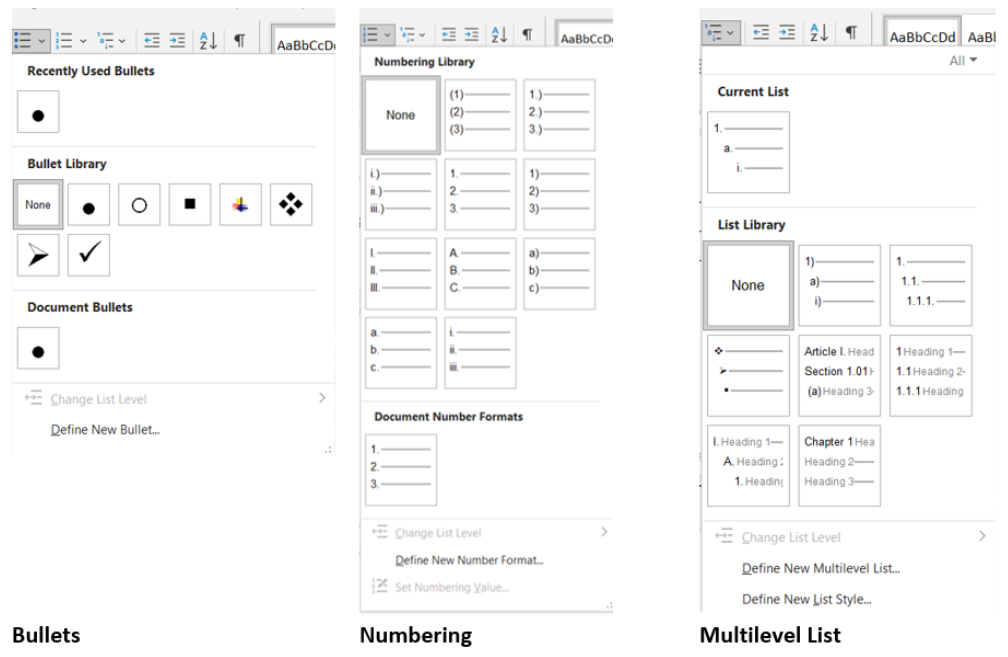
Bullets, numbering, and multilevel list can be used to create lists. Each of these three options has a down arrow, which provides the user with additional options. The user can select a bullet or number style shown or define (select) new bullet or number formats. Figure 3 shows the additional options for bullets, numbering, and multilevel List.
To start a bulleted list, type a symbol (such as a hyphen [-] or asterisk [*]) and a space before the text. Word will move the symbol over and start the bulleted list. To start a numbered list, type 1 followed by a period and a space. Word will indent and start the list as you start typing the text.
If you have an existing list that needs to be numbered or bulleted, select the text. Click on the bullets or numbering buttons in the Paragraph group on the Home tab. The selected text will become bulleted/numbered.
Indentations
Indentations, moving text away from the left margin, help text stand apart from other text. Indents can be used with bullets and paragraphs. The user can indent the first sentence of a paragraph, which is called first line indent. In resource reference documents (e.g., works cited pages), the user can use hanging indents. With hanging indents, the first line is at the left margin and all remaining lines are indented.
Decrease Indent and Increase Indent Commands
The Decrease Indent and Increase Indent commands (buttons) are used to decrease and increase the space of the paragraph or bulleted list from the left margin. If the Increase Indent button is used, the text will move one tab stop to the right. If the Decrease Indent button is used, the text will move one tab stop to the left. By default, tab stops are spaced every half an inch.
To use these commands, place the pointer in the paragraph or bulleted list or select the text to be moved. Click on the Decrease Indent or Increase Indent button in the Paragraph group on the Home tab.
Shortcut keys can also be used instead of clicking the button. Use (Ctrl + M) for the Increase Indent button and (Ctrl + Q) for the Decrease Indent button.
Tab Key
Using the Tab key on the keyboard is a quick way to indent the first line of a paragraph ½ inch or to create a first line indent. This key can also be used to move paragraphs and bullets. To move the first line, a paragraph, or a bullet to the left, use (Shift + Tab) as a keyboard shortcut.
When creating a first line indent, place the cursor at the start of the paragraph and press the Tab key. To move it back to the left margin, place the cursor at the start of the paragraph and press (Shift + Tab). To move a bullet to the left, place the cursor at the start of the text after the bullet and press the Tab key. To indent a paragraph, highlight the paragraph and press the Tab key. To move both the bullet and the paragraph to the left, use the (Shift + Tab) shortcut.
Customized Indentations
The user can customize the indents by using Indents in the Paragraph group on the Layout tab. The right and/or left margins can be customized. More advanced customization of indents can also be done using the Paragraph dialog box. The indentation options are in the middle of the dialog box and include the following:
- Left: Indents the paragraph to the left.
- Right: Indents the paragraph to the right
- Special: The user can select hanging indent or first line indent and the amount to indent. Hanging and first line indents will be discussed in the following sections.
- Mirror indent: Used as the printing style in books and the left and right indents become the inside and outside.
Indent Markers
Table 2 shows three types of indent markers. Using the indent markers on the horizontal ruler allows the user additional control over the indent placements. To make the ruler visible, select the View tab and click the checkbox next to the Ruler in the Show group.
| Type | Symbol | Description |
|---|---|---|
| First line indent marker |  |
Used to adjust first line indents. |
| Hanging indent marker | Used to adjust hanging indents. | |
| Left indent marker | Used to move both the first line indent and the hanging indent markers at the same time. Used if all lines of a paragraph need to be indented. |
To use the indent markers, place the cursor in a paragraph or select multiple paragraphs. Click and drag the indent marker to the desired location on the ruler. When the mouse is released, the paragraph(s) will be moved.
Sort
The Sort command allows the user to sort a one-level numbered or bulleted list. Depending on the option selected, the text can appear in ascending (A to Z) or descending (Z to A) alphabetical order.
To use, select the text to be sorted. Click the Sort button in the Paragraph grouping on the Home tab. Select either Ascending (A to Z) or Descending (Z to A). Click OK.
Show/Hide
The Show/Hide command can be used to show hidden spaces, tab markers, page insertion, and paragraph markers. To use, click the Show/Hide button to see the hidden markers and click again to hide them.
The Show/Hide feature can be helpful if the user is having issues formatting a document. Sometimes the hidden markers are the issue, and deleting a marker may solve the issue.
Borders
Adding borders to a document is another formatting technique that can make the document visually appealing. The Border button includes a down arrow to the right of it. By clicking the arrow, a menu of borders opens. The user can apply borders at the top, bottom, and right and left sides, and they can also choose to have no borders, all borders, outside and inside borders, and additional borders. The last option on the menu is Borders and Shading. When this is selected, the Borders and Shading dialog box appears.
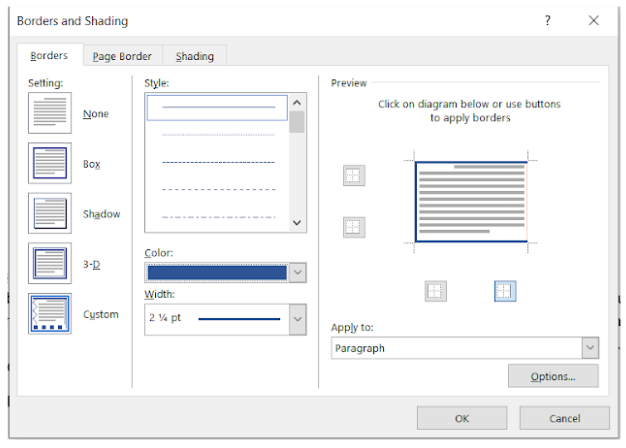
The Borders and Shading dialog box has many options for the user (Figure 4A). There are three tabs at the top of this box – Borders, Page Borders, and Shading. The Borders tab features will be discussed first.
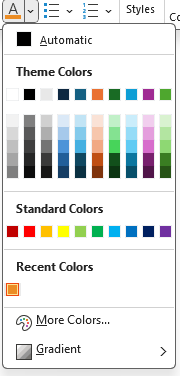
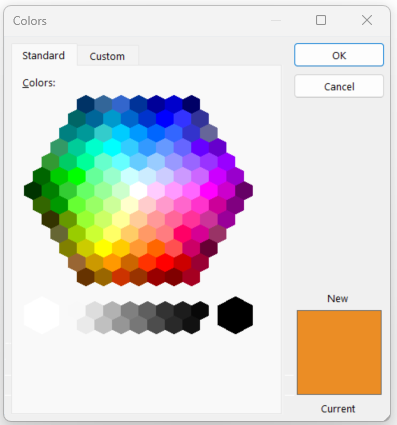
On the left side, the user can select a setting to use. The middle column allows the user to select the style, color, and width of the line. All these have dropdown menus with additional options. When selecting colors, if the user hovers over a color, the name appears (Figures 4B and 4C). The default setting is a solid black line with a width of 2 ¼ pt. After selecting the middle column options, the user can click the buttons in the third column to apply the new line.
To apply borders to a paragraph, start by selecting the paragraph. Click on the Borders button or the down arrow on the right. If the Borders button is clicked, the line shown will be applied. If the down arrow is selected, select the line style, color, and width. Click the buttons in the third column to apply the lines.
If the user needs to apply two different lines to a paragraph, start with one type of line first. Complete the middle column selecting the style, color, and width of the line and then indicate where the line is located in the third column. Then, go back to the middle column and make the new line selections. Indicate the locations for the new line in the third column.
Example
Apply a solid 3 pt blue line border to the top and bottom and a dashed 6 pt pink line border to the sides. To do this, select the text or paragraph that needs the borders. Click on the down arrow next to the Border command/button in the Paragraph group on the Home tab. Select Borders and Shading at the bottom of the menu. On the Borders and Shading dialog box, select the solid line, blue, and 3 pt. Then, click the top border and the bottom borders in the third column. Next, select the dashed line, pink, and 6 pt. Then, click the right and left borders in the third column. Click OK.
Page Border
To add a page border, the user can do either of the following:
- The Borders command/button down arrow button found in the Paragraph group on the Home tab. Click Borders and Shading at the bottom of the menu. Select the Page Border tab.
- Page Borders in the Page Background group on the Design tab.
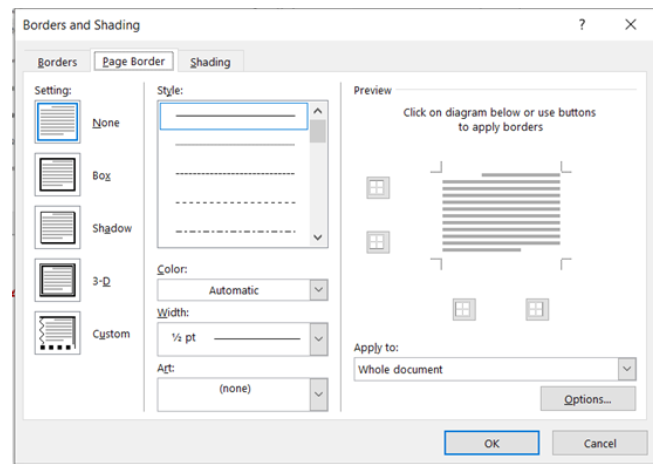
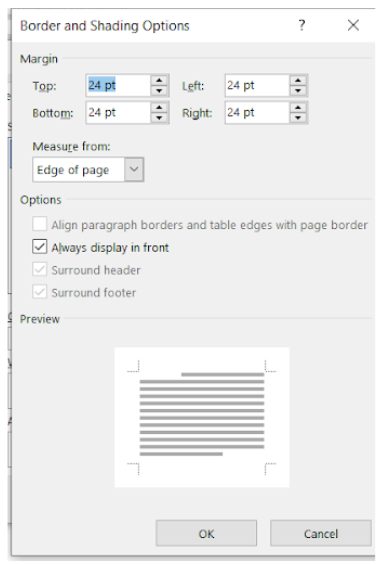
Both ways open the Borders and Shading dialog box with the Page Border tab opened (Figure 5A). Select the options desired. If the user wants to adjust the distance between the edge of the page and the border, click Options near the bottom of the dialog box. On the Borders and Shading Options dialog box, revise the measurements and select OK (Figure 5B). Click OK on the Border and Shading dialog box.
Shading
Shading can be applied as a background to words or paragraphs. Shading in the Paragraph group is different than the Text Highlight Color button in the Font group on the Home tab. The Text Highlight Color button looks like a highlighter. It has limited color options and does not change if the user applies another theme. Shading has many more options for the user.
To apply shading, select the text or paragraph to be shaded. If the color on the Shading button is desired, click the button to apply the color. To use another color, click the down arrow to the right of the Shading button in the Paragraph group on the Home tab. The color will show on the document as the user hovers over the color. Click the desired color.
If the user selects a color in the Themes section, it will update if the user changes the Theme of the document. If the user selects a color from Selection Colors or More Colors, the color will not change if the theme changes.
Styles Group
To add a consistent look to a document, the user can apply styles to the font. Using Styles, like headings, is essential if the user wants to incorporate a table of contents in the document.
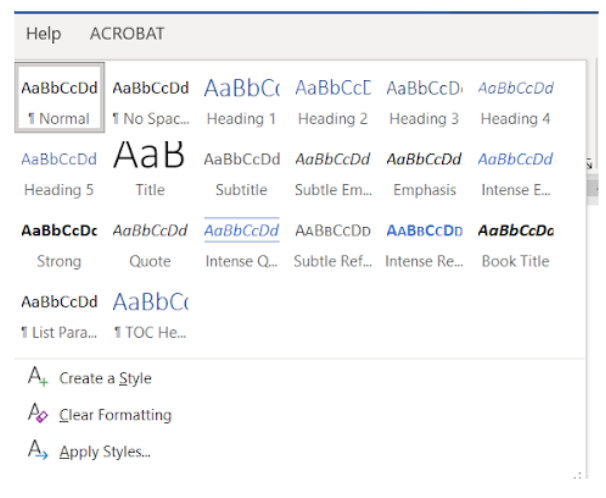
To apply a style to text, select the text to be formatted. If a paragraph needs to be formatted, just place the pointer in the paragraph, and the style will be applied to the entire paragraph. In the Styles group in the Home tab, click the More button to open the Styles gallery (Figure 6). As the user hovers over a style, the style is applied temporarily to the text. To apply a style to a document, click the desired style.
Additional options on the gallery menu allow the user to create a style, clear formatting, and apply style.
Using Headings and the Navigation Pane
When headings are applied to a document, the user can use the Navigation Pane. To use, click the box by Navigation Pane in the Show group on the View tab. The Navigation Pane opens on the side of the screen. The user can click the heading in the Navigation Pane, and the document will move to that location. Click the X to close the Navigation Pane.
Creating a Table of Contents
With the use of headings, the user can quickly create a table of contents. To create a table of contents after using headings, the user needs to place the pointer where the table of contents is to be inserted. Click on the Table of Contents button found in the Table of Contents group on the Reference tab. A menu of table of content styles opens. Select the desired table of contents style.
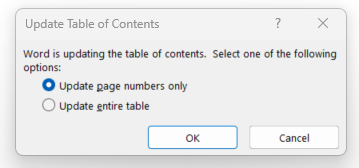
If the table needs to be updated, click Update Table found in the Table of Contents group on the Reference tab. The user can also place the cursor in the table of contents and right click. Select Update Field from the right click menu. Both techniques will open the Update Table of Contents dialog box. Select either Update page numbers only or Update entire table from the dialog box (Figure 7). Click OK.
Editing Group
The Editing group contains commands and features that are helpful when working on a document. If the user needs to select all the text to change the font or find and replace specific words, these tasks can be done using the buttons in the Editing group.
Find
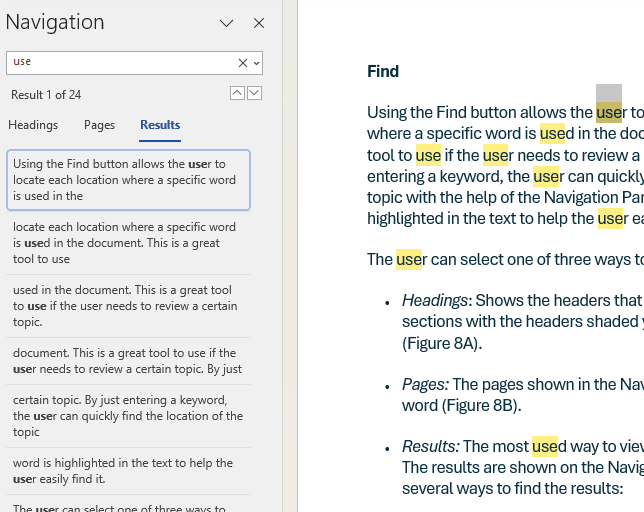
Using the Find button allows the user to locate each location where a specific word is used in the document. This is a great tool to use if the user needs to review a certain topic. By just entering a keyword, the user can quickly find the location of the topic with the help of the Navigation Pane. Also, the word is highlighted in the text to help the user easily find it.
The user can select one of three ways to view the results:
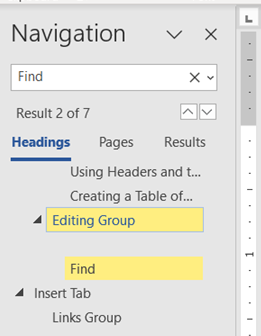
- Headings: Shows the headings that contain the word. The sections with the headings shaded yellow contain the word (Figure 8A).
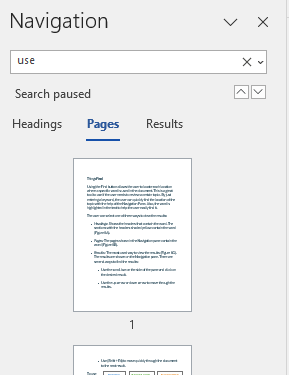
- Pages: The pages shown in the Navigation pane contain the word (Figure 8B).
- Results: The most used way to view the results (Figure 8C). The results are shown on the Navigation pane. There are several ways to find the results:
- Use the scroll bar on the side of the pane and click on the desired result.
- Use the up arrow or down arrow to move through the results.
- Use (Shift + F4) to move quickly through the document to the next result.
To use Find, click on the Home tab, and then click on Find in the Editing group. The Navigation pane will appear on the left side of the screen. The Navigation pane can also be opened using Ctrl + F. Type in the key word and click the search button, indicated by a magnifying glass. The results will appear in the Navigation pane. Select either Headings, Pages, or Results to view the results. The selection chosen will have a different font color and will be underlined. Sometimes if the word appears over 100 times in the document, then the “Too many results to show here” message will appear on the pane.
Replace
The Replace command is a helpful tool for the user who needs to find a specific word and replace it with another word.
To use the Replace command, follow these steps:
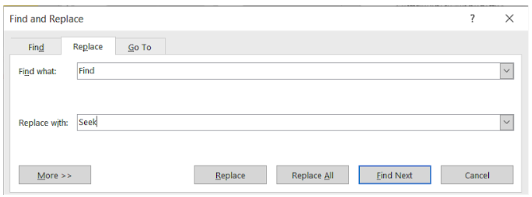
- Click on the Replace button in the Editing group on the Home tab or use the shortcut keys (Ctrl + H). The Find and Replace dialog box will appear (Figure 9A).
- Complete the “Find what” field with the word or phrase to find.
- Complete the “Replace with” field with the word or phrase to replace.
- To replace the text, the user has two options:
- To replace one word at a time, click the Find Next button at the bottom of the dialog box. The word will be highlighted. Click the Replace button to replace the text. The Find Next button will move to the next occurrence of the word or phrase in the document.
- To replace all of the occurrences of the word or phrase in the text, click the Replace All button.
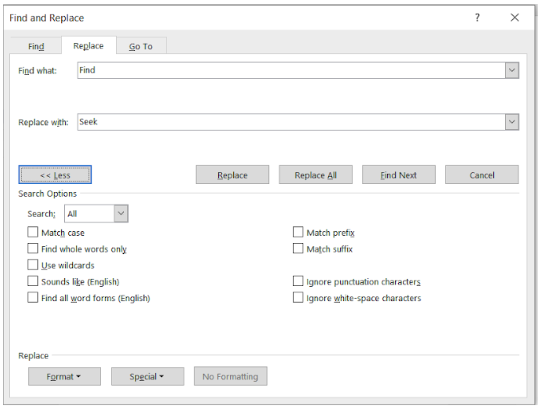
For additional options, the user can select the More>> button. This opens an extended menu of options (Figure 9B). One of the more common uses of the extended menu is to search for case-sensitive words. For example, the user realizes a word should start with a capitalized letter. The user can search for the word using lowercase letters, and then click to select Match case on the extended menu. All instances of the lowercase word would be in the results.
Here are some tips to keep in mind when using the Replace command:
- The content in the “Find what” field must be exact. For example, if the person types a word and adds a blank space after the word, only instances where that combination is present will be in the results. If the word appears before a period, that would not be in the results.
- If the content in the “Find what” field includes an extra space after the word and the “Replace with” field does not, it may create spelling errors. It may merge two words together because the space between the words was deleted.
- If the word in the “Find what” field is found within another word, it will be replaced. For instance, the “Find what” field contains the word “state,” the “Replace with” field contains the word “states.” A word like “statement” would then become “statesment.” It is safer to use the Find Next button than the Replace All button with these types of changes.
Editor Group
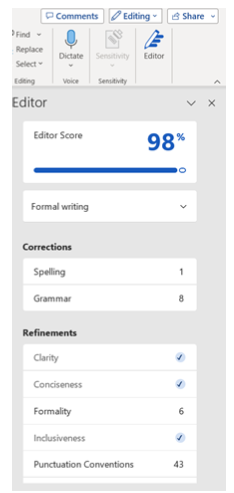
The Editor is located at the far-right side of the Home tab ribbon (Figure 10A). When the user clicks on the Editor command, the Editor pane opens. The Editor pane includes the following sections: Corrections, Refinements, Similarity, Insights, and Give feedback to Microsoft. The first two sections are the most helpful for students.
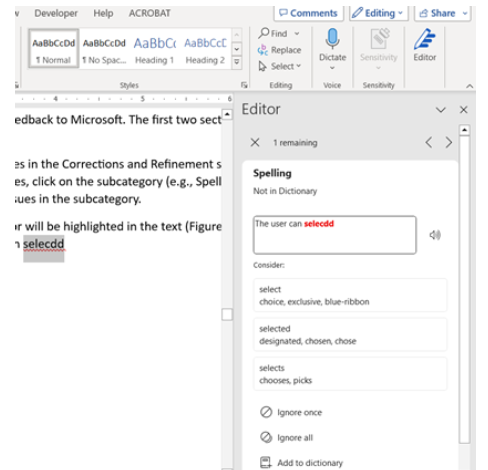
The Editor pane shows issues for each of the subcategories in the Corrections and Refinement sections. A checkmark indicates there are no issues. To review issues, click on the subcategory (e.g., Spelling). Arrows at the top allow the user to move between the issues in the subcategory.
If the user is checking the spelling errors flagged, the error will be highlighted in the text (Figure 10B). On the Editor pane, the error is shown in the box. The user can select the correct spelling or select Ignore once or Ignore all.
Learning Activities
Formatting Text in Word – Flash Cards
Application Exercise 1
Directions: You will create the flyer shown in Figure 11.

Steps:
1. Open a MS Word blank document.
2. Open the Paragraph dialog box and in the Spacing section, change the After: to 0 pt and the Line spacing to 1.5 lines. Click OK.
3. Key (type): Learning How to Manage Hypertension (High Blood Pressure).
4. Press the Enter key five times.
5. Indent 0.5 inch. Create a bulleted list, using a bullet of your choice. Add the following text:
- Saturday, May 23, 2024 at 2:00pm
- Memorial Hospital – Conference Room #1
- 2330 Hospital Road, Any City, WI 55555
6. Delete May 23, 2024, and add the date for Saturday in two weeks.
7. Delete Any City, WI 55555 and add your city, state abbreviation, and Zip code.
8. Use the following format for this phrase: Learning How to Manage Hypertension (High Blood Pressure)
- Use Calibri 48 pt bold font
- Change the font color to Standard Colors – blue
- Center the phrase
9. For the three bulleted lines, make these changes:
- Change the font to Calibri 18.
- Create a solid 3 pt line above and below the bulleted list. Use Standard Colors – blue.
- Apply light blue shading to the bulleted lines.
The preset selection of an option offered by a system and will always be used unless the user changes it.
The space between the printed area and the edge of the document.
Moving the mouse pointer over an option without selecting it.

