Chapter 6 Introduction to Word
Vocabulary
Collated: Assembled in a specific way.
Dialog box: A dialog box displays information and allows the user to interact with it. For instance, when the dialog box launcher is clicked, a dialog box appears. Unlike a window, most dialog boxes do not contain a maximize and minimize button, just a close button.
Dialog box launcher: A button (with a picture of an arrow) found on the lower right corner of Ribbon groups that is used to open the dialog box.
Group: A section on the Microsoft Ribbon that has related tools, commands, and options.
I-beam pointer: Also called I-cursor; appears like a capital I and shows the location of where the mouse cursor is located.
Keyboard shortcut: A key or a combination of keys that can be used to perform a task that can typically be done with the mouse.
Landscape orientation: The orientation of the page is such that the top and bottom are longer than the sides.
Line spacing: The space between each line in a paragraph.
Portrait orientation: The orientation of the page is such that the sides are longer than top and bottom.
Selection bar: An invisible section of the document to the left of the left margin; often used when selecting text with the mouse.
Template: A predesigned document with a specific layout, design, and style.
Window: A rectangular area on a screen in which a document or application can be viewed. Almost all windows allow the user to minimize, maximize, and close them.
Introduction
To successfully work in a software, the user must know how to move around and locate the different tools and features. This chapter provides a basic introduction to MS Word, including the features of the Word document screen, the default settings, and the different types of cursors/mouse pointers. Keyboard shortcut and opening, saving, and printing files are discussed.
Introduction To the Word Document Screen
Many of the features of the Microsoft Word document screen are similar to Microsoft PowerPoint and Microsoft Excel. In this section, the features of the screen are discussed. Knowing how to navigate the screen features helps the user became more efficient with the software. Figure 1 shows the features of the Word Document Screen.
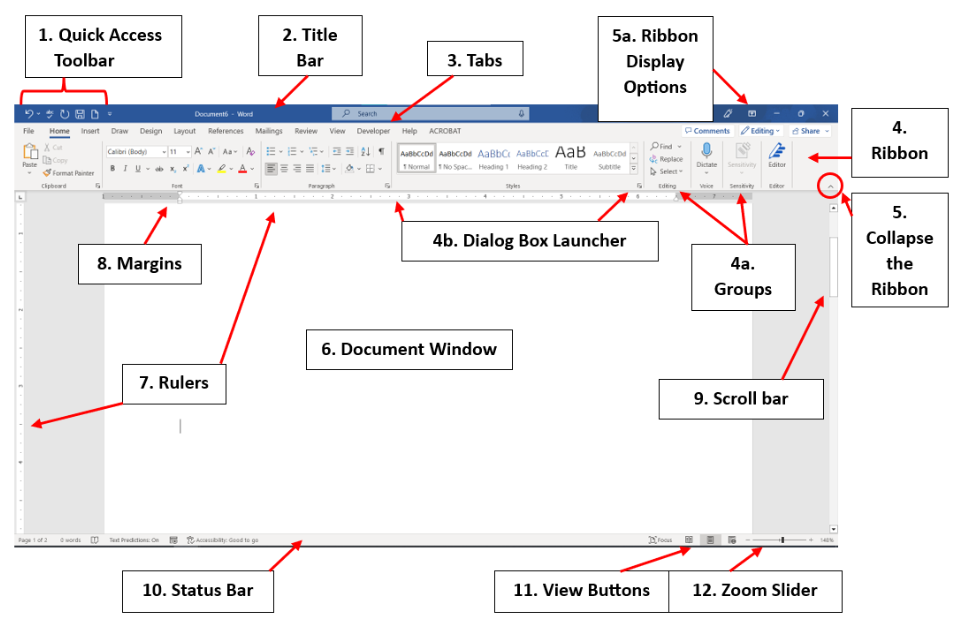
Features of the Word Document Screen
The following sections describe the features shown in Figure 1:
- Quick Access Toolbar: Located in the top left corner of the window and provides quick access to commonly used tools. This toolbar can be customized by the user by using the steps shown in Figure 2. Commonly used tools include the following and are shown in Figure 3:
- Undo (Ctrl + Z): Click to undo the last action or click multiple times to undo multiple actions
- Redo (Ctrl + Y): Click to redo something that was undone
- Spelling & Grammar (F7): Click to spell and grammar check the document
- Save (Ctrl + S): Click to save a document
- New Blank Document (Ctrl + N): Click to open a new blank document
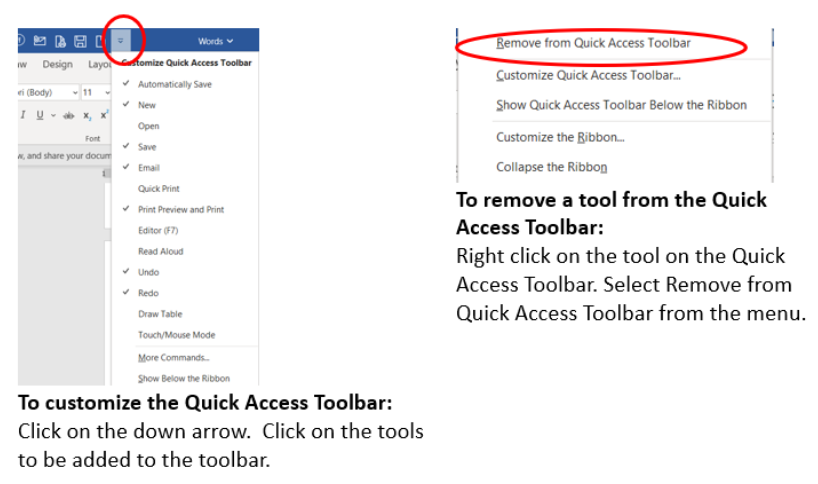
Figure 2. Steps to customize the Quick Access Toolbar by adding and removing tools. 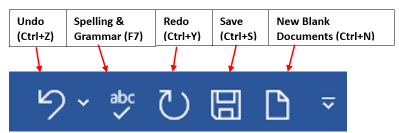
Figure 3. Commonly used tools on the Quick Access Toolbar.
- Title Bar: The horizontal blue bar that runs at the top of the screen and contains the title of the document that is opened.
- Tabs: Include File, Home, Layout, Insert, Draw, Design, etc. tabs and similar style for MS PowerPoint and MS Excel. When you click the tab, a different ribbon will appear, and a blue line will show under the name of the tab (Figure 4). Additional tabs can appear based on the task the user is doing. For instance, when a picture is selected in the document, the Picture Format tab appears.

Figure 4. The View tab is selected. The View Group on the View Ribbon contains different view options.
- Ribbon: Each tab has its own ribbon, and each ribbon is divided into groups (Figure 1, 4a). The name of the group is found at the bottom of the ribbon section. Some groups will have a little dialog box launcher (Figure 1, 4b) in the lower right corner. Click the arrow in the corner, to open the dialog box. The dialog box will show additional commands and options unique for the group.
- Ribbon Display Options: The dropdown menu provides options to show (expand) or hide (collapse) the ribbon. (The keyboard shortcut keys Ctrl + F1 expand and collapse the Ribbon.) The Ribbon Display Options dropdown menu has the following options:
-
- Full-screen mode: When selected, the Ribbon and the Quick Access toolbar are hidden. The Document Window is maximized. To show the Ribbon and Quick Access toolbar, click at the top of the Window.
- Show tabs only: When selected, the tabs only show. To show the Ribbon, click the desired tab and the Ribbon opens. When the user has finished using the Ribbon, it collapses.
- Always shows Ribbon: When selected, the Tabs and Ribbons are always shown.
- Hide Quick Access Toolbar: When selected, the Quick Access Toolbar disappears on the screen.

- Document Window: The section of the screen where the open document is shown.
- Rulers: The horizontal ruler is at the top of the Document Window and is used to set tabs, side margins, and indents. The vertical ruler is on the side and is used to set the top and bottom margins. The rulers can be turned on and off. To do this, go to the View tab. Then, in the Show group, you can click the box to add or remove the ruler.
- Margins: The gray area on the right and left side of the horizontal ruler and at the top and bottom of the vertical ruler.
- Scroll bars: Appear on the right side and bottom of the screen. Can be used to move through the document.
- Status Bar: Appears at the bottom of the window. The status bar provides information about the document, such as the page number, word count, and proofing errors. Right click on the Status bar to customize the bar and add or delete features.
- View Buttons: Allows the user to switch between different views – Read Mode, Print Layout, and Web Layout. The View commands (buttons) are also available in the Views group found on the View tab (Figure 4). Print Layout is the most commonly used view. Read mode opens the document to a full screen and is great for reading large amounts of text.
- Zoom Slider: Change the size of the window by either moving the bar or clicking on the plus or minus signs. Additional Zoom options are also found on the View tab ribbon in the Zoom group.
Default Word Settings
When opening a new Word document, the blank document is a template with specific default settings. This means certain formatting is applied when a new document is opened. The default settings are as follows:
- Calibri font, 11 point
- Line spacing of 1.08
- 8 point (pt) spacing after each paragraph
- 1-inch margins on all sides
- Text aligned at the left margin
Word allows the user to adjust the default settings. Use these steps to adjust the font default settings:
- On the Home tab, select the Font Dialog Box Launcher.
- Select the font characteristics for the default setting, including font type, style, size, color, etc. (Figure 6).
- Select Set As Default.
- Select either “for this document” or “all documents” and click OK twice (Figure 6).
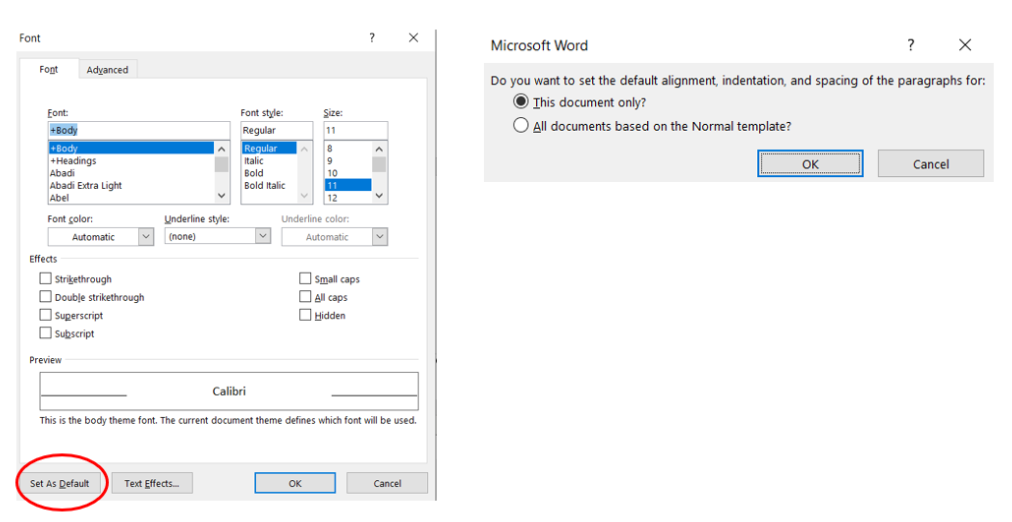
Figure 6. Using the Font Dialog Box Launcher to change the default font settings.
For some users, they need to create Word documents with spacing that differs from the default settings. Changing the default settings can save a lot of time. Follow these steps to change the spacing defaults:
- On the Home tab Ribbon, select the Paragraph Dialog Box Launcher.
- Change the defaults shown (Figure 7). For instance, if the user needs to create “single line spacing with 0 pt before and after,” change the settings shown in Figure 8.
- Select Set As Default.
- Select either “for this document” or “all documents” and click OK twice.
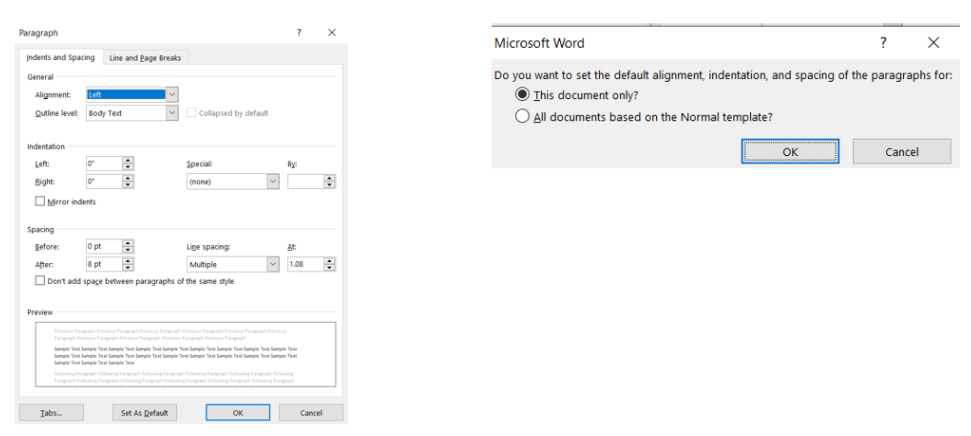
Figure 7. Using the Paragraph Dialog Box Launcher to change the default spacing settings. 
Figure 8. Changing the settings for single line spacing with 0 pt before and after.
Cursors/Mouse Pointers
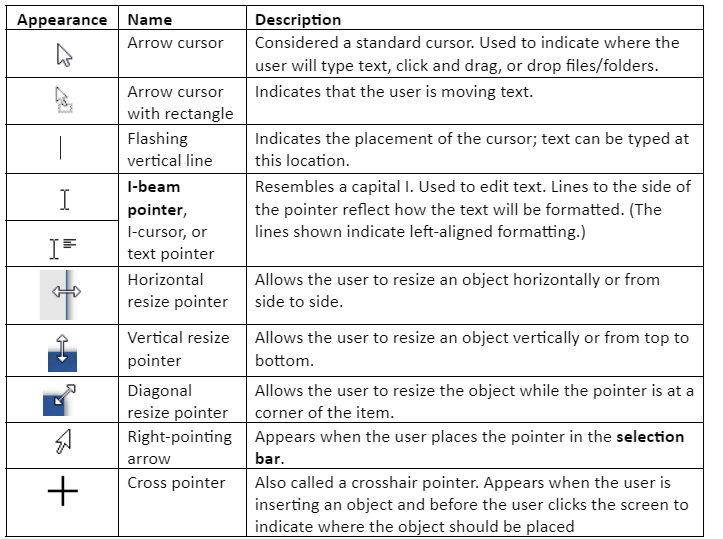
When working in Microsoft software, the mouse cursor, mouse pointer, or mouse arrow can appear differently based on the task being performed or where the pointer is located. Some of the more common pointers are shown in Table 1.
Tools/Options and Keyboard Shortcuts
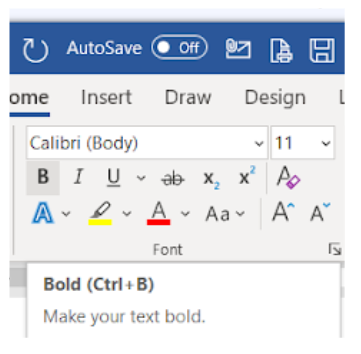
When learning Microsoft software, the user can learn about the tools and options on the ribbon. By using the mouse and hovering the cursor over the tool or option, information will appear. The name of the tool or option is shown, along with a brief description of it. If a keyboard shortcut is available for that tool or option, it will also be shown. In Figure 9, the user hovered over the capital B under the font type box. The information on the tool appeared.
Keyboard shortcuts can be pressed at once or in a sequence:
- A plus sign (+) indicates that the keys need to be pressed at the same time. For instance, Ctrl + B is a combination of keys. The user needs to press the Ctrl key and the B key at the same time.
- A comma (,) indicates that the keys need to be pressed in a specific sequence.
Insertion Point and Select and Delete Content
When working in Microsoft (MS) Word and other Microsoft software, learning how to move through the document and select content is critical for the user.
Insertion Point
When a new MS Word document is opened, the insertion point is positioned at the beginning of the document by default. The insertion point appears as a flashing vertical line. When the user moves the mouse, an I-beam pointer appears on the screen. The I-beam pointer can be used to move the insertion point and to select content. The user can move the insertion point by one of these ways:
- Pressing Enter. This moves the insertion point to the next line or paragraph.
- Moving the mouse to position the I-beam pointer. Once the I-beam pointer is in the correct location, the user can click the mouse, and the insertion point will be where the I-beam pointer was positioned. When a new MS Word document is opened, the user can position the I-beam pointer and double-click to move the pointer elsewhere in the document.
- Using keyboard shortcuts (see Table 2).
| Key Movement of the Insertion Point | |
| Ctrl + Home | Moves to the beginning of the document |
|---|---|
| Ctrl + End | Moves to the end of the document |
| End | Moves to the end of the line |
| Home | Moves to the beginning of the line |
| Ctrl + Page Down | Moves to the top of the next page |
| Ctrl + Page Up | Moves to the top of the prior page |
Select Content
Many times, the user must select content (e.g., text) before performing a specific task, such as formatting font. Learning how to select content efficiently is helpful to the user. Content can be selected by one of the following actions:
- Using the mouse to highlight the content
- Using keyboard shortcuts (see Table 3 and Table 4)
- Using Select, found in the Editing group on the Home tab (To select everything in a document, the user should select the Home tab, then click Select, and Select All.)
When selecting text with the mouse, often the user must click in the selection bar. The selection bar is to the left of the left margin. When the pointer is moved to this invisible bar, it changes to the right-pointing arrow.
| To select … | Using the Mouse |
|---|---|
| A line of text | Click in the selection bar to the left of the line |
| A word | Double (left) click the word |
| Multiple lines of text | Position the pointer, click and hold the left click, and move the mouse to select the text. Lift finger off of click to end the selection |
| A sentence | Press the Ctrl key and left click in the sentence |
| A paragraph | Double-click the selection bar to the left of the paragraph or triple click in the paragraph |
| Multiple paragraphs | Drag in the selection bar |
| An entire document | Triple click in the selection bar |
When selecting text using keyboard shortcuts, the user must first position the cursor. The position of the cursor dictates what is selected.
| To Select Text… |
Keyboard Shortcut Keys
|
|---|---|
| Below | Shift + Down arrow key |
| Above | Shift + Up arrow key |
| To the right | Shift + Right arrow |
| To the left | Shift + Left arrow |
| To the beginning of the paragraph | Ctrl + Shift + Up arrow key |
| To the end of the paragraph | Ctrl + Shift + Down arrow key |
| An entire document | Ctrl + A |
Hover Toolbar
When the user selects an image or text, a hover toolbar appears (Figure 10). The tools and options on the toolbar can vary based on what action the user is doing.

Delete Content
The user can delete content several different ways, including the following:
- Using the Backspace key, which deletes the text to the left of the insertion point.
- Using the Delete key after selecting the content to be deleted.
- Using the Delete key, which deletes the text to the right of the insertion point.
- Selecting the text to be deleted and then type. This deletes the selected text and replaces it with whatever is being typed.
The File Tab
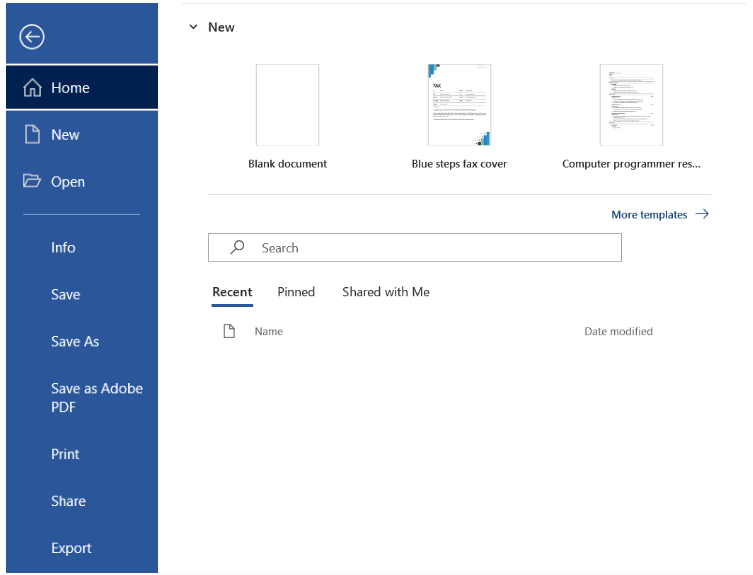
When the user clicks the File tab, the Backstage view opens (Figure 11). In the Backstage view, the user can create a new file, open a file, save or rename a file, print a file, and close the file.
Creating a New Document
To create a new document, the user needs to select a template. Templates for Word cover a wide range of documents, including fax cover sheets, flyers, letters, resumes, and a blank document. The user can click any of these figures. Additional template types are available by clicking on More templates.
To open a new blank document:
- Select the File tab.
- Select New and then click Blank document. A new document will open.
To create a new document from a template:
- Select the File tab.
- Select New.
- Click a template or use the search bar to find a specific template or click More Templates.
- A new (template) document will open.
Opening an Existing Document
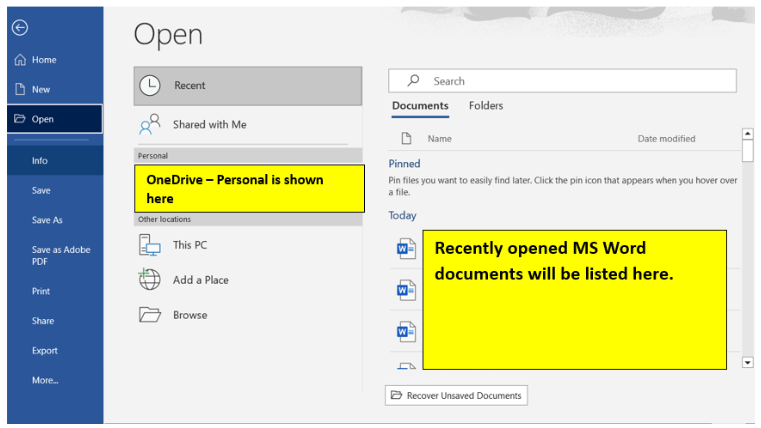
Microsoft Word documents can be opened after the user opens up the application. To open an existing document, follow these steps:
- Click the File tab and select Open (Figure 12).
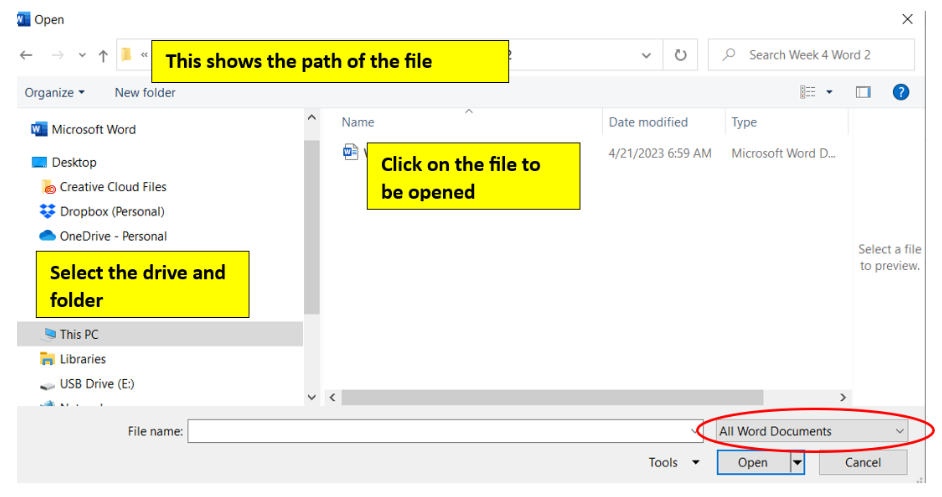
- Select This PC and click Browse or choose OneDrive to open a file on the OneDrive. The Open dialog box will appear (Figure 13).
- Locate your file by selecting the drive and folder. Then, click the file to open it. The user can use various features to find the file. Clicking the headers (e.g., Name, Date modified) sorts the files. Just above the Open button, the user can select the type of file to be shown.
Users can pin frequently used documents to the Backstage view. Pinning documents allows the user to have quick access to the files because they stay in the Recent Document section. To pin a document, click the File tab and select Open. Hover over the file name to be pinned. A pushpin will appear after the file name (Figure 14). Click on the pushpin icon. To unpin the document, select the pushpin icon again.

One Drive
Microsoft’s online storage space is called OneDrive. Users can sign up for a free account. OneDrive allows users to save and edit files and to also share files with others. OneDrive is available on mobile devices and computers. This allows for accessibility of saved files anywhere with Internet connection. OneDrive allows users to back up their files.
Save a Current Document
When a user is saving a document in MS Word, they have a choice between Save and Save As. Word documents are saved as .docx files by default. Older versions of MS Word save files as .doc files.
- Save: This option is the most frequently used option. As the user is working on a document, it is important to save the changes frequently. The Save command saves the document to its original location. To save a document, the user needs to click the Save command (icon) on the Quick Access Toolbar or click the File tab and select Save or use Ctrl + S.
- Save As: This option allows the user to save the document in another location or with a different name. With Save As a copy of the document is made. When a new document is created and saved, Save As is automatically used because the document has no location or name yet.
When using Save As, the user must complete the following:
- Click the File tab and select Save As. (If a new document is opened and the user clicks Save, it triggers the Save As screen window to appear.)
- Click Browse (or OneDrive) and navigate to find the location for the file.
- Type the new file name in the File Name box.
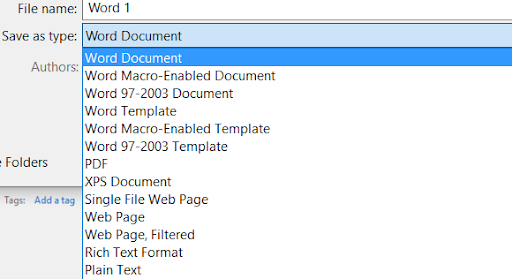
- Select the Save As type (Figure 15). (The Save As type allows the user to save the file as a different type. For instance, a Word document could be saved as a Rich Text Format file.)
- Click Save.
AutoRecover
AutoRecover allows the user to restore a file if changes were not saved for some reason (e.g., MS Word crashes). Microsoft automatically saves the file as the user is working every ten minutes per the default setting. The Document Recovery pane will appear on the left side of the screen when Word is opened. If the user wants to save an autosaved version of the document, they must click the file in the Document Recovery pane. The document will open.
If the autosaved versions are not shown in MS Word, the user can go to the Backstage view to see the versions. Click on the File tab, then select Info, and click the Manage Document button. Select Recover Unsaved Documents (Figure 16).

Export a Document
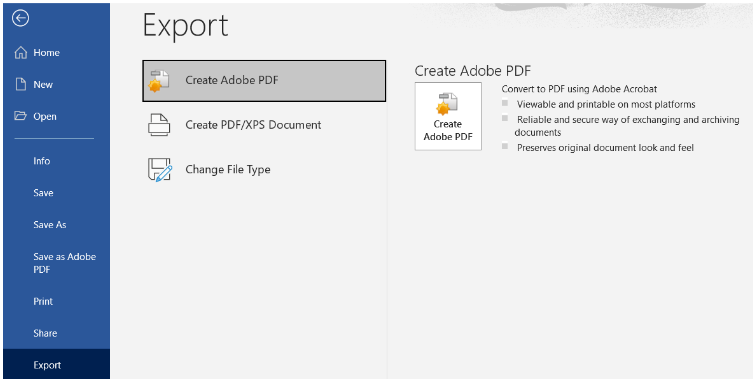
Documents can be exported as other types of documents. Converting a document as an Adobe Acrobat document (PDF file) can be done using the Export command.
- Click the File tab and select Export.
- Select the appropriate option in the middle (under the word Export) (Figure 17).
- Select the appropriate option at the right of the screen. The Save As dialog box will appear.
- Select the location for the new file. Type the file name and select the type of file.
- Click Publish.
Print a Document
To print the document that is currently opened in MS Word, the user needs to select the File tab and then select Print or use Ctrl + P. In the Print pane, the user can add or select the following print options (Figure 18) before clicking Print:
-
- Add the number of copies needed.
- Select the printer to use.
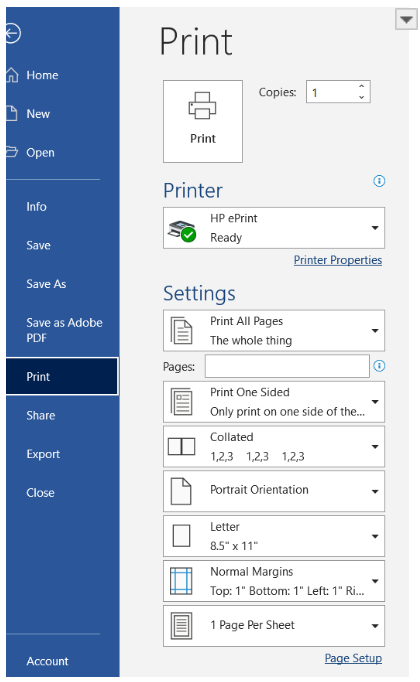
Figure 18. Print pane. - Select special settings, such as:
- Print All Pages or type the page numbers to be printed.
- To print a page range: Type the first page and then a hyphen and the last page. For example, 2-5 means that Pages 2 through 5 will be printed.
- To print individual pages: Follow each page number with a comma (for example: 2,4,7). Only three pages will print.
- To print a combination of ranges and individual pages: The user can type a combination of individual pages and ranges. For example, the user types 1, 3-5, 7, 10-12. Two ranges and two individual pages will print.
- Print All Pages or type the page numbers to be printed.
- Select if it should be printed on one side or both sides.
- Select if it needs to be collated.
- Select the orientation – portrait orientation or landscape orientation.
- Select the paper size.
- Select the margin sizes.
- Select the pages per sheet.
Learning Activities
Introduction to Word – Flash Cards
Application Exercise 1
- Open MS Word and select a blank document.
- Select the File tab. Click Save As and save the document as “Ch 6 Practice.”
- Close the file.
- Reopen the document and save the document as an RTF file extension. Remember to use Save As when changing the name, file extension, or location of the saved file.
- Close the file.
- Open File Explorer and navigate to the location of the two files.
- Click on the file: Ch 6 Practice.docx
- Close the file and exit MS Word.
A key or a combination of keys that can be used to perform a task that can typically be done with the mouse.
A rectangular area on a screen in which a document or application can be viewed. Most windows allow the user to minimize, maximize, and close them.
A section on the Microsoft Ribbon that has related tools, commands, and options.
A button (with a picture of an arrow) found on the lower right corner of Ribbon groups that is used to open the dialog box.
A dialog box displays information and allows the user to interact with it. For instance, when the dialog box launcher is clicked, a dialog box appears. Unlike a window, most dialog boxes do not contain a maximize and minimize button, just a close button.
A predesigned document with a specific layout, design, and style.
The space between each line in a paragraph.
Also called I-cursor; appears like a capital I and shows the location of where the mouse cursor is located.
An invisible section of the document to the left of the left margin; often used when electing text with the mouse.
Assembled in a specific way.
The orientation of the page is such that the sides are longer than top and bottom.
The orientation of the page is such that the top and bottom are longer than the sides.

