Chapter 15 Introduction to PowerPoint
Vocabulary
Banded: Having strips or bands of contrasting colors.
Cell: A single box on a table or spreadsheet that can contain text or numbers.
Column: Any of two or more vertical sections of type on a document.
Gridlines: Lines for visual reference only in Word and PowerPoint and cannot be printed. Typically, used for formatting content. Gridlines in Excel show the cell boundaries and can be printed.
Header row: The top row of a table that contains the titles for the columns.
Hyperlink: A picture, icon, phrase, or word in an electronic document that when clicked on, relocates the user to another section of the document or to another document.
Row: The horizontal series of cells separated by lines or space form other horizontal series of cells and found in a table or spreadsheet.
Template: A predesigned document with a specific layout, design, and style.
Introduction
Microsoft PowerPoint is a presentation software program used to organize and present information to others. PowerPoint is a popular presentation software that provides the audience a visual during the presenter’s discussion. PowerPoint uses slides and multimedia tools to present information. It can also be used for slide shows and multimedia projects.
Using PowerPoint
A PowerPoint file is called a presentation. When PowerPoint opens, it opens on the Home page. The bar on the left side includes a New icon and an Open icon. The main screen provides several templates at the top and existing presentations at the bottom.
Using a formatted template can save time because standard formatting (e.g., background and font) is provided on each slide. The PowerPoint software includes a limited number of templates. Additional templates can be found online, can be downloaded, and used. The Blank Presentation template is an unformatted presentation. The user can apply the desired formatting.
To open an existing presentation: Scroll through the recent presentations on the main Home screen or click on the Open icon on the left side. The Open icon presents a screen with additional recent presentations and has tools to search for an existing presentation. To open an existing presentation, click on the name of the presentation or browse the drive to find the presentation.
To create a new presentation: Select a template from either the Home screen or click on the New icon on the left bar. The New icon opens a screen with additional templates and includes a search bar for online templates. Browse and click the desired template.
Parts of the PowerPoint Screen
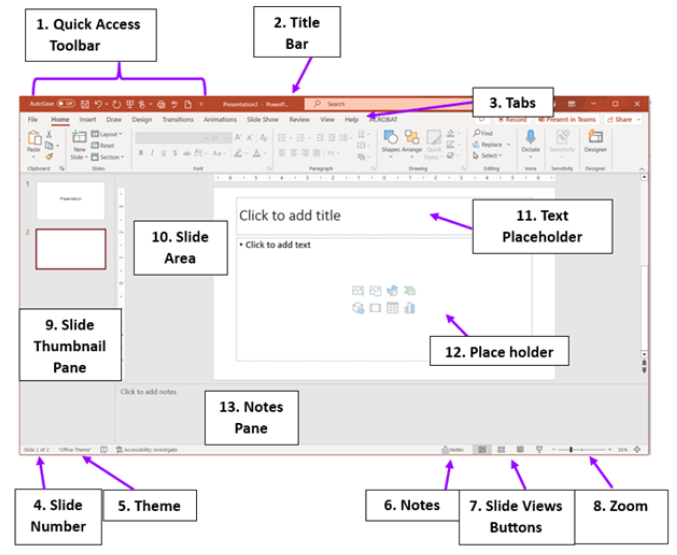
The following sections describe the features shown in Figure 1.
- Quick Access Toolbar: Is located in the top left corner of the window and provides quick access to commonly used tools. The user can customize this toolbar as described in Chapter 6.
- Title Bar: The horizontal blue bar that runs at the top of the screen and contains the title of the presentation that is opened on the screen.
- Tabs: A toolbar that consists of icons and tabs. Each tab has its own Ribbon of commands and menus. Depending on what the user is doing, additional tabs may appear on the Ribbon. Typically, the tabs shown on the PowerPoint screen include File, Home, Insert, Draw, Design, Transitions, Animations, Slide Show, Review, View, and Help. Like with other Microsoft products, the Ribbon is composed of Groups of related commands. The Group name appears at the bottom of the Ribbon. When the user clicks an icon (button), a command occurs. Some groups have a little dialog box launcher in the lower right corner. Click the iconic arrow in the corner to open the dialog box. The dialog box will show additional tools and options unique for the group.
- Slide Number: The first number indicates the slide selected, and the last number is the total slides in the presentation.
- Theme: Indicates the name of the theme applied to the presentation. Themes will be discussed in more detail in the next chapter.
- Notes: The user can click this to show the Notes Pane, and then it can be clicked again to close the Notes Pane.
- Slides Views Button: Allows the user to switch between views. The different views will be described later in this chapter.
- Zoom Slider: Change the size of the window by either moving the bar or clicking on the plus or minus signs. Additional Zoom options are also found on the View tab ribbon in the Zoom group.
- Slide Navigation Pane: Is on the left side of the PowerPoint screen and allows the user to navigate through the slides. To rearrange slides, click and drag a slide to a new location within the Slide Navigation Pane. The user can add, delete, and duplicate slides using this pane and the right click menu (Figure 2).
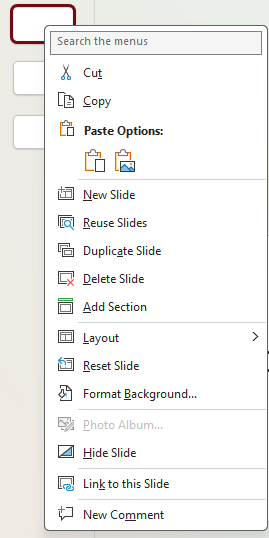
Figure 2. Menu shown when using the right click after selecting a slide. - Slide Area: The space that allows the user to design the slide.
- Text Placeholder: To add text to a Text Placeholder, simply click on “Click to add text” and add your text content. PowerPoint automatically sizes the text as it is typed to fit within the placeholder.
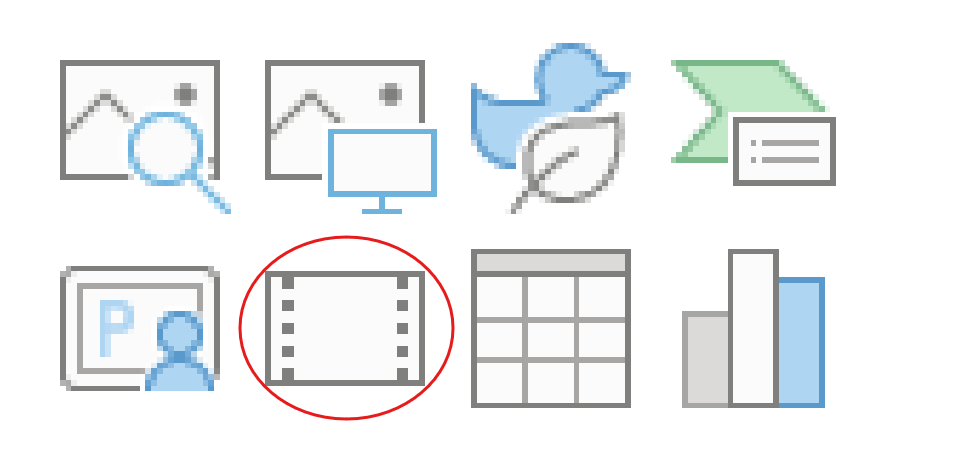
- Placeholder: Is preformatted and allows the user to add text or click one of the eight icons to insert a graphic. The eight icons include (top row left to right) stock image, picture, icon, SmartArt (bottom row left to right), 3D models, video, table, and chart. Once an icon is clicked, the software opens related windows to insert the graphic. Placeholders can be modified, resized, reformatted, or deleted. (For example, to add a picture to the slide, the user would click the picture icon. The File Explorer window appears. After the user locates the picture, they need to click on the file and then click the insert button. Once the picture is inserted into the slide, select the picture. The Picture Format tab appears on the Ribbon. Use the commands and menus on this tab to modify the picture.)
- Notes Pane: Used to create speaker notes for the presenter. The data in the Notes pane do not appear in the Slide Show view. The Notes pane can be opened or closed by clicking the Notes button on the status bar or by clicking Notes in the Show Group on the View tab.
Using the Home Tab Commands
As with Word and Excel, the Home tab contains many useful tools and features that are commonly used when creating a PowerPoint. The discussion below addresses differences and a few similarities between PowerPoint and Word. Additional similarities are not addressed because they are addressed in Word.
Delete and Add Slides
To delete a slide, select the slide and right click on the mouse. Select delete slide. The user can also select the slide and press the Delete key.
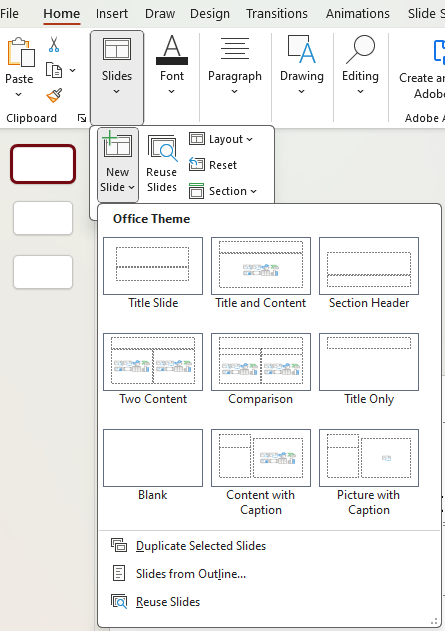
New slides can easily be added to a presentation. Slide layouts vary and depending on the content to be presented will determine the slide layout used. Most slide layouts include one or more placeholders for content (e.g., text and graphics).
To insert a new slide, select the New Slide command in the Slides group on the Home tab or the shortcut keys (Ctrl + M). The button can be clicked at the top or at the bottom, with different results:
- If the user is beginning a presentation and clicks the top half of the New Slide button, the default slide layout (Title and Content) will be inserted as the second slide.
- If the user is in the middle of a presentation and clicks the top half of the New Slide button, the slide inserted has the exact same layout as the current slide. For instance, if a Comparison layout slide is selected and the user clicks the top half of the New Slide button, another Comparison layout slide will be added.
- If the user clicks the bottom half of the New Slide button, a gallery of several different slide layouts will appear (Figure 3). The user can click on the desired slide layout.
Besides these options, the Insert tab also contains a New Slide button.
Changing the Layout of a Slide
A layout can be changed using the (Slide) Layout command (button).
To change the layout of an existing slide: Select the slide to revise. Click the Layout button in the Slides group on the Home tab. Select the desired layout form the dropdown menu.
Font Formatting
The Home Tab Ribbon has many similarities to Word. As with Word and Excel, to see the tab’s ribbon, you can click on the tab. Changing the formatting of the font in PowerPoint is the same as in Word. Once the font to be changed is selected, the user can use the features in the Font group on the Home tab. The user can also right click and use the Mini toolbar. Keyboard shortcut keys that can be used for font changes include the following:
- Bold: Ctrl + B
- Italic: Ctrl + I
- Underline: Ctrl + U
Tip: If you need to revise the font characteristics, select the font. Open the Home tab by using Alt + H. When the ribbon appears, keyboard shortcuts are shown (Figure 4). Press the key indicated. For instance, bold formatting is 1. Press 1. Even if you are on the Home tab, using the shortcut (Alt + H) can be done, and then the additional shortcut keys are indicated.

Changing the Paragraph Characteristics
The Home tab – Paragraph group is similar to Word. Bullets or numbers can be added to the text (Figure 5). Content can be aligned. Text direction can be changed. The following sections will discuss these features.
The Title and Content slide layout is both the default and the overwhelming most popular slide layout for most slides in a presentation. Presentations are more interesting if just key words or phrases are bulleted or numbered on the slide, instead of writing complete sentences. Using different types of slides can also add interest to the presentation.
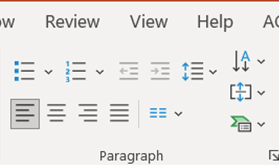
Bullets and numbers can also be indented to create sub lists. The Paragraph group contains the commands to increase and decrease the indentation of bullets and numbers. These buttons are to the right of the bullets. A quick method to indent a bullet is to press the Tab key. To move the bullet to the left, use Tab + Shift.
These keyboard shortcut tips are available for creating bullets in PowerPoint:
- Round bullets: Press the asterisk sign (*), spacebar, and then type the content. When you hit the Enter key, you should see the round bullets appear.
- Hyphen bullets: Follow the steps above, but just press the minus sign (-) instead of the asterisk sign.
- Diamond bullets: Press the left angle bracket (less than sign or <), then the right-angle bracket (greater than sign or >), spacebar, and then type the content and hit the Enter key.
- Arrow bullets: Press the right-angle bracket (greater than sign or >), spacebar, and then type the content and hit the Enter key.
Content can also be aligned, like with Word documents. Shortcut keys can also be used when alignment is needed using these actions:
- Align left: Ctrl + L (Content is aligned at the left margin.)
- Center: Ctrl + E (Content is centered.)
- Align right: Ctrl + R (Content is aligned at the right margin.)
- Justify: Ctrl + J (Content is justified at both the right and left margins; additional spacing may be added between words to accomplish this.)
Using the View Tab Commands
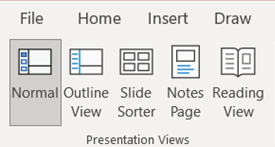
The View tab contains many features, including Presentation Views, Master (Slide) views, Show group, and Zoom (Figure 6). The Master Slide will be discussed in the next chapter. The other three topics will be discussed.

Presentation Views
PowerPoint has six different views for the user. Some of the views are available on the View tab and the Status bar, while others are only in one location (Figures 7A and 7B). Some views are more limiting than others, in terms of editing the presentation. The views are as follows:
- Normal View: Available on both the Status bar and on the View tab. This view is the default view (Figure 1). The Slide Area is in the middle of the screen, with the Notes Pane on the bottom. The Slide Navigation Pane is on the left and shows the slide thumbnails. This view is helpful when creating and editing slides.
- Outline View: Available only on the View tab. The Outline View is similar in both appearance and usefulness to the Normal View. The appearance of the Slide Navigation Pane differs and shows the outline of the presentation instead of the slide thumbnails.
- Slide Sorter View: Available on both the Status bar and on the View tab. Shows a thumbnail of each slide. Slides are presented in order horizontally across and down the screen. In this view, slides can be rearranged using the drag and drop method.
- Notes View: Available only on the View tab. Shows the document with the slide at the top and the notes for the slide at the bottom. The Notes Pane can be edited in this view.
- Reading View: Available on both the Status bar and on the View tab. Shows the slide for easy reading but does not allow editing of the slide. The appearance is similar to the Slide Show View, but it contains bars at the top and bottom with limited features. Press the ESC key to exit this view.
- Slide Show View: Available on both the Status bar and on the View tab. Shows the entire slide without the PowerPoint screen. Used to show the PowerPoint presentation to the audience. Press the ESC key to exit this view.

Show Group
The Show group on the View tab contains the ruler, gridlines, guides, and notes (Figure 6). The user can click to check or uncheck the ruler, gridlines, and guides. These three features are helpful when designing slides.
Zoom Group
The Zoom feature can either zoom in or zoom out on the content. When the user clicks on Zoom, in the Zoom group on the View tab, additional options appear. The user can type in a specific percentage to zoom in/out or click a preset zoom number. After the selection, click OK.
Using the Insert Tab Commands
The Insert tab includes features to insert tables, images, and illustrations (e.g., shapes, icons, 3D models, SmartArt, and charts) (Figure 8). The Text group includes buttons to insert text boxes, headers & footers, and WordArt.

Inserting Tables
Using the Table feature in PowerPoint is similar to Word. A table includes cells organized in columns and rows. The top row of a table usually contains the titles of the columns and, thus, is called the header row. The bottom row can be considered the total row and can be formatted differently.
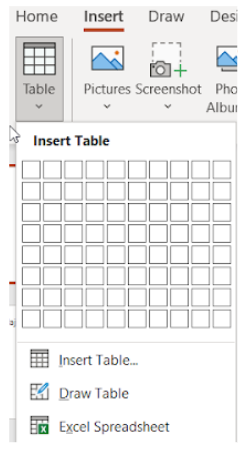
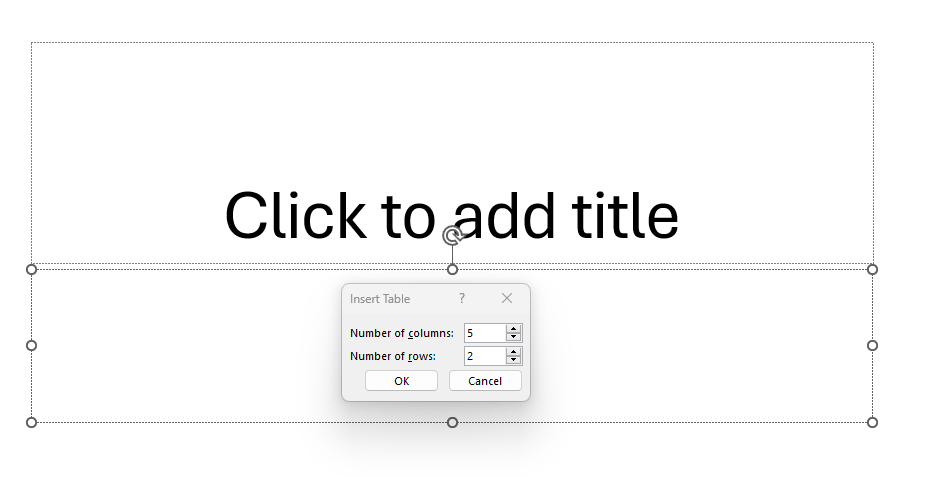
A table can be inserted using the Table menu from the Tables group on the Insert tab (Figure 9A). The user can also click on the table icon in the placeholder to create a table (Figure 9B).
A table can also be created in Word or Excel and pasted into the PowerPoint slide. When pasting an Excel table, data can be edited in PowerPoint using Excel formatting tools. Data can even be linked so that when the Excel file is updated, the PowerPoint slide is also updated. If the data is not linked, it is considered to be an embedded object, and any update in the original Excel file will not update the PowerPoint slide.
When the inserted table is selected, the Table Design contextual tab appears on the Ribbon. The following are the groups with the features and commands found on this ribbon:
- Table Style Options group: The user can select and unselect options, including indicating if the table has a header row or total row. Additional options include First Column, Last Column, Banded Row, and Banded Column.
- Table Styles group: The user can select a style from the gallery of table styles. To expand the options in the gallery, click the More button (down arrow). A table style includes unique borders, font, and colors. The user can hover over the style to see the name. To clear an applied table style, use the More button and select Clear Table near the bottom of the gallery menu. The Table Style group also includes commands to change the shading, borders, and effects.
- WordArt Styles group: The user can add a quick WordArt Style and revise the color. More details about WordArt will be discussed later in the chapter.
- Draw Borders group: The user can add borders and change the border characteristics.
Insert Pictures
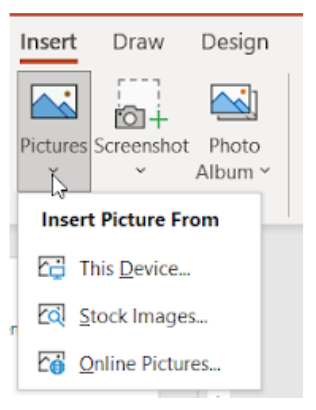
The Images group contains the Picture menu that allows the user to insert a picture from This Device, Stock Images, and Online Pictures (Figure 10). The placeholder has icons for the first two options in the picture menu. When the user clicks one of the three options on the menu, an additional window opens to allow the user to find the picture. For instance, when the user clicks This Device, a File Explorer window opens.
Insert Illustrations
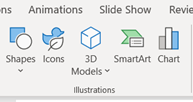
The user can insert shapes, icons, 3D models, SmartArt, and charts, which are all found in the Illustrations group (Figure 11).
Insert and Modify Shapes
Shapes can be found in three locations – in the Drawing group on the Home tab (Figure 12), in the Illustrations group on the Insert tab, and in the Insert Shape group on the Shape Format tab. Using the Shapes button, the user has a choice between eight categories of shapes from the gallery. These include lines, rectangles, basic shapes, equation shapes, flowcharts, starts and banners, callouts, and action buttons.

When the user selects a shape, a crosshair pointer allows the user to draw the shape on the slide using the mouse or touchpad. Once the shape is created, the Shape Format tab appears on the Ribbon and provides additional options to format the shape. More information on the Shape Format Tab will be provided in Chapter 16.
Insert Icons and 3D Models
The Illustration group includes buttons for icons and 3D models. Stock objects are available for both.
Insert SmartArt
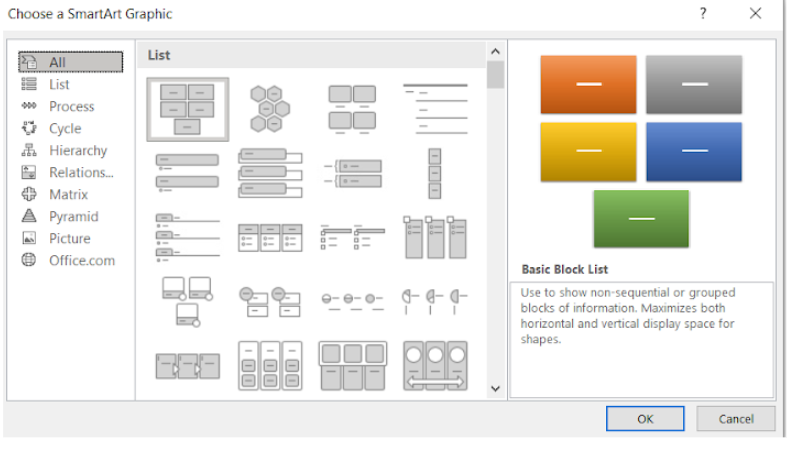
When the user clicks on SmartArt in the Illustrations group on the Insert tab, the Choose a SmartArt Graphic dialog box appears (Figure 13A). Categories of shapes are listed on the left side of the box.
To use SmartArt graphics, the user has two choices:
- Click on the SmartArt button in the Illustrations group on the Insert tab. Using the Choose a SmartArt Graphic dialog box, select a graphic and click OK. Edit the graphic by typing in the text.
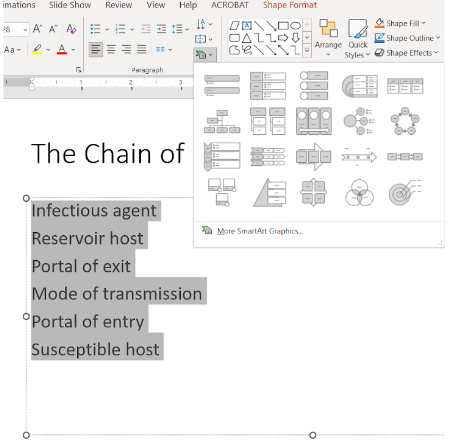
- Type the text on the slide. Select the text for the SmartArt graphic. On the Home tab, click the Convert to SmartArt Graphic button in the Paragraph group (Figure 13B). Select the graphic desired. The text is automatically inserted into the graphic (Figure 13C).

When a SmartArt graphic is created, two additional tabs appear on the Ribbon – SmartArt Design and Format. The SmartArt Design tab allows the user to modify the graphic by adding additional shapes, changing the layout and colors, and resetting the graphic. The Format tab provides the user with options to change the color, fill, or effect of the graphic and text.
Insert Charts
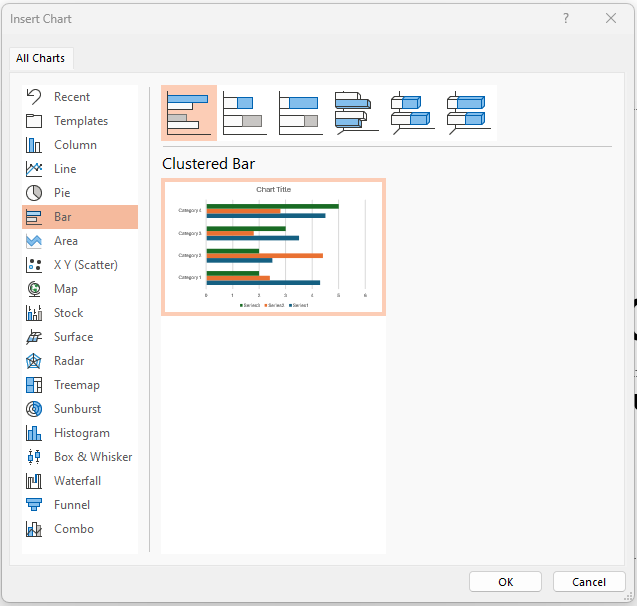
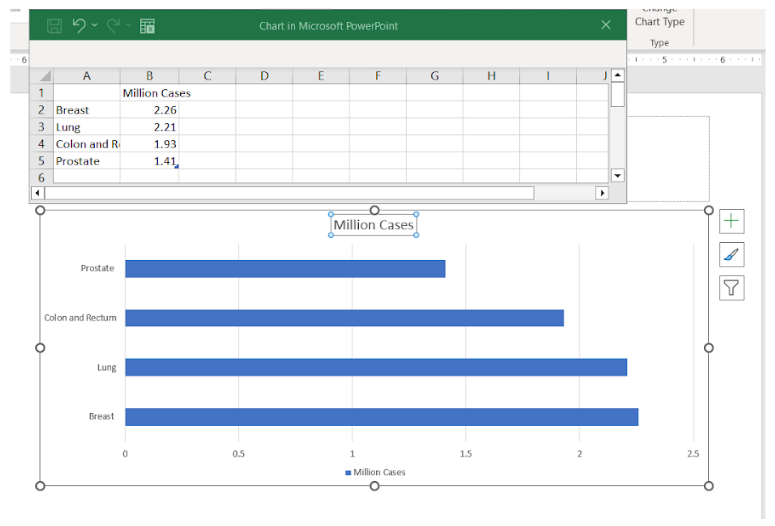
In the Illustrations group, the Chart button can be used to create a chart on the slide. The user also can click the Insert Chart icon in the placeholder. Clicking on the Chart button or icon will cause the Insert Chart dialog box to appear (Figure 14A). Chart types are listed on the left side of the box. Select the chart type and the variation of the chart. Click OK.
The chart is inserted into the slide and an Excel spreadsheet appears (Figure 14B). The user can enter the data into the spreadsheet, and the changes will appear in the chart. Columns can be deleted or added. Labels can also be added to clarify the data.
When inserting a chart on a slide, the Chart Design tab appears on the Ribbon. By using the features and commands on this ribbon, the user can modify the chart’s color, data, type, and other characteristics of the chart.
Insert Hyperlinks
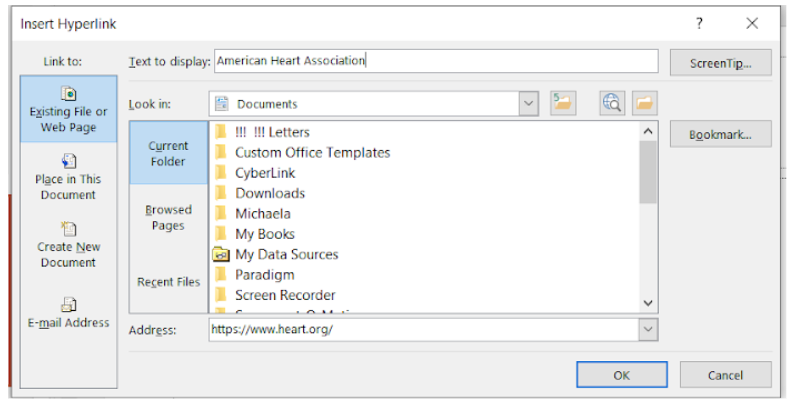
One of the most useful buttons in the Links group is the Link button. The bottom part of this button can be clicked to insert a recently used file. The top part of the button can be clicked to open the Insert Hyperlink dialog box. The left side of the box provides the user with options to link to, such as an existing file, web page, or email address.
A hyperlink is composed of two parts – the text to be displayed (on the slide) and the address (e.g., website, file location).
To insert a hyperlink, select the top portion of the Link command in the Links group on the Insert tab. When the Insert Hyperlink dialog box appears, select the type of hyperlink on the left side of the box (Figure 15A). Complete the Text to display field, the address, and any additional fields. Click OK. The text in the Text to display field will appear on the slide (Figure 15B). When the user clicks the hyperlink, the web page, document, etc. will open.
A hyperlink can also be applied to text using the right click menu. To do this, select the text on the slide, right click, and select Link from the right click menu. The Insert Hyperlink dialog box appears. Complete the fields required and click OK.

Insert Special Text
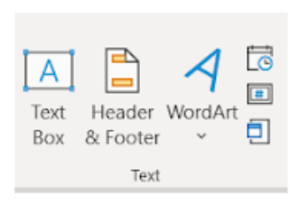
The Text group (Figure 16A) on the Insert tab allows the user to insert the following:
- Insert a text box: When the user selects a text box, a crosshair pointer allows the user to draw the box on the slide using the mouse or touchpad. Then, the user can type the text in the box.
- Insert date & time: This little button is at the top of the three buttons on the right side of the group. The user can select the format on the Date & Time dialog box.
- Insert slide number: This is the middle box of the three buttons on the right side of the group. The user can add the slide number to the slide.
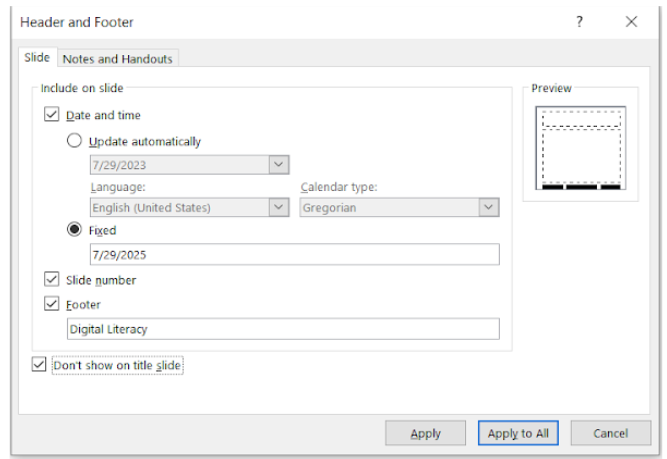
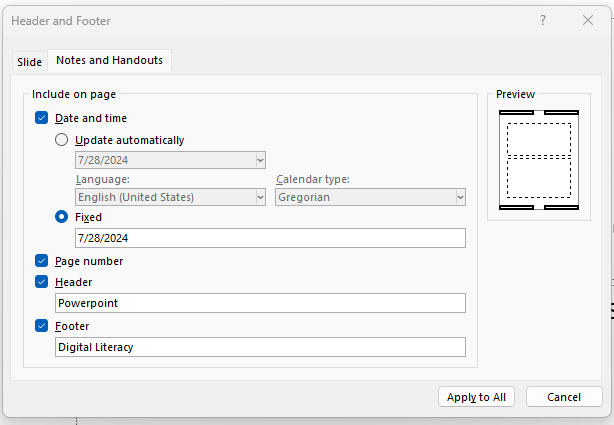
- Insert a header & footer: When the user selects the Header & Footer button, the Header and Footer dialog box appears (Figure 16B). Click on either the Slide tab or the Notes and Handouts tab (Figure 16C). Complete the fields. If the date and time’s “Update automatically” is selected, this will change as the file changes. Once the fields are completed, click Apply to All. The header and footers will be added to the slides. (Notice: A footer can be added to the slide. Both a header and footer can be added to the notes and the handouts.)
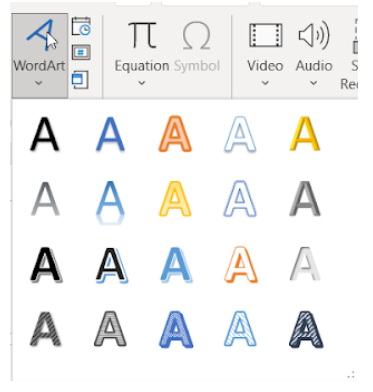
- Insert WordArt: WordArt adds effects to the text, such as shadows, gradients, outline, and fill. The user has these two options for WordArt:
- Click on the WordArt button and select a style (Figure 17A). Type the text in the box (Figure 17B).
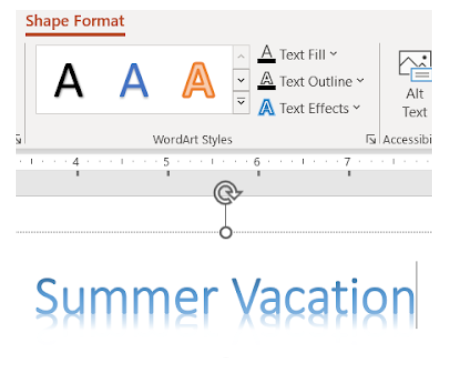
- Convert text to WordArt: Select text on the slide. Click the WordArt Style in the WordArt Style group on the Shape Format tab (Figure 17C). The text is immediately converted into the new style.

Insert Media
A video or audio clip can be inserted onto a slide and played during the presentation.
Inserting a Video
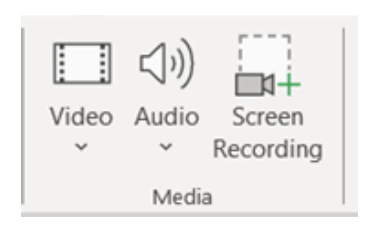
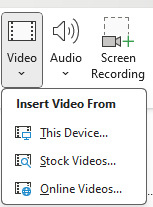
To insert a video using the Insert tab: In the Slide Navigation pane, select the slide for the video insertion. Using the Insert tab, select the Video command in the Media group (Figure 18A). When the dropdown menu opens, select the location of the video and then the video (Figure 18B.).
To insert a saved video using the icon in the slide placeholder box: A saved video can also be inserted using the icon on a slide’s placeholder box. To insert, click on the video icon in the placeholder box on a slide. Navigate to the video and select the video to insert (Figure 18C).
Resize an inserted video: Click and drag the corner sizing handles. Release the click button when the video is the desired size.
To move an inserted video: Inserted videos can also be moved using the click and drag technique.
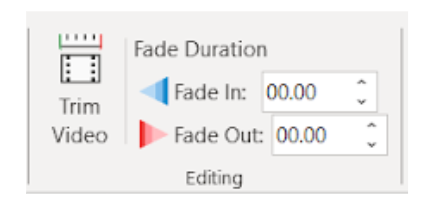
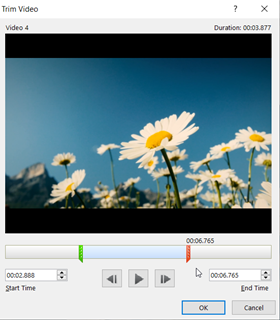
Trim the video length: To trim the beginning and/or end of the video, select the video on the slide. Click the Playback contextual tab. Select the Trim Video command in the Editing group (Figure 18D). When the Trim Video dialog box appears, move the green handle to the start of the video clip, trimming off anything to the left of it. (The green and red handle are below the video player.) Move the red handle to set the end time of the video file. Anything to the right of the red handle will be trimmed (Figure 18E). Click OK.
To delete an inserted video: Select the video and press the Delete key.
Inserting Audio Files
Audio files, including music, recordings, and sounds, can be added to PowerPoint presentations.
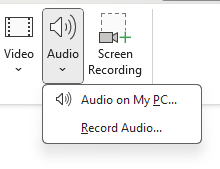
To insert an audio file: In the Slide Navigation pane, select the slide for the video insertion. Using the Insert tab, select the Audio dropdown arrow in the Media group. Select Audio on My PC from the menu (Figure 19). Navigate to and select the audio file. Click Insert.
Modify an audio file: To trim an audio file, select the audio file. Click the Playback contextual tab. Select the Trim Audio command in the Editing group. When the Trim Audio dialog box appears, move the green handle to the start of the audio clip, trimming off anything to the left of it. Move the red handle to set the end time of the audio file. Anything to the right of the red handle will be trimmed. Click OK.
To delete an audio file on a slide: Select the audio file and press the Delete key.
Learning Activities
Introduction to PowerPoint – Flash Cards
Application Exercise
Directions: Create a PowerPoint presentation using the content learned in this chapter. Practice inserting tables, images, icons, 3D images, textboxes, and hyperlinks.
- Open a new PowerPoint template and select a blank presentation template.
- Save the PowerPoint presentation as: Exercise 15 1
- On the title slide, select the text placeholder and type the following:
- Title or first line: Types of Healthcare Professionals in a Medical Clinic
- Subtitle or second line: (delete text placeholder and leave blank)
- Add a new slide (for slide two). Select a Title and Content slide.
- On Slide 2:
-
- Add the title: Medical Clinics
- Add the content shown in Figure 20A

Figure 20A. Slide 2. -
- Add a new slide (for Slide 3). Select a Title and Content slide.
- On Slide 3:
- Add the title: Common Types of Specialists
- Insert a table with two columns and eight rows.
- Type the information shown in Figure 20B.
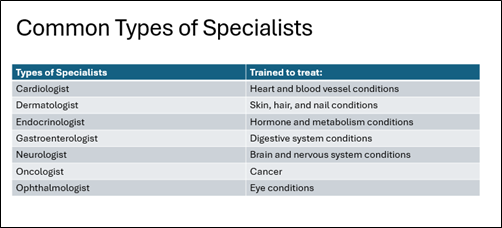
Figure 20B. Slide 3.
- Add a slide between 2 and 3, making the Common Types of Specialists slide now Slide 4.
- On the new Slide 3:
- Add the title: Types of Healthcare Providers
- Insert a table with two columns and five rows.
- Type the information shown in Figure 20C
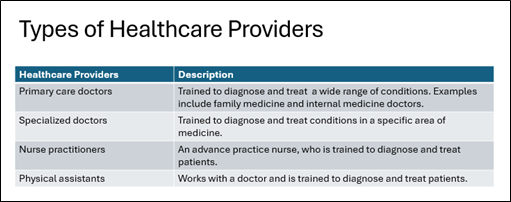
Figure 20C. New Slide 3.
- On the title slide, change the word Professional to Provider.
- On the title slide, insert two icons. Use the term “medical” when searching for icons. Enlarge the icons and arrange on the title slide (Slide 1).
- On Slide 2, change the slide layout to Two Content. Insert a medically related stock image on the blank half of the slide. If the Designer pane appears, select a desired layout.
- On Slide 3, insert a medically related 3D image. Resize the table to place the 3D image on the right side of the slide.
- Using the Internet, locate a reliable website that explains different types of specialists.
- On Slide 4, readjust the table size to create a blank space on the right of the slide. Insert a textbox in the blank area create. In the textbox, type: Additional information on medical specialists
- Using the text in the textbox, create a hyperlink to the reliable website.
- On Slides 3 and 4, change the table style and add a style of your choice.
- Insert a footer, adding the slide number and “By (your name).” Apply to all slides, but do not have it show on the title slide.
- Save the presentation. It should look similar to Figure 20D.

Figure 20D. Completed presentation.
A predesigned document with a specific layout, design, and style.
Lines for visual reference only in Word and PowerPoint and cannot be printed. Typically, used for formatting content. Gridlines in Excel show the cell boundaries and can be printed.
A single box on a table or spreadsheet that can contain text or numbers.
Any of two or more vertical sections of type on a document.
The horizontal series of cells separated by lines or space form other horizontal series of cells and found in a table or spreadsheet.
The top row of a table that contains the titles for the columns.
Having strips or bands of contrasting colors.
A picture, icon, phrase, or word in an electronic document that when clicked on, relocates the user to another section of the document or to another document.

