Chapter 16 Formatting PowerPoint Presentations
Vocabulary
Collated: Assembled in a specific way.
Color gradient: A set of colors arranged in order to provide a smooth color transition. For example, the bottom of the area may be green, and the top may be blue. A variety of shades are arranged in order to provide a smooth transition between the green color and blue color.
Contextual tab: A hidden tab on the Office ribbon that becomes visible when a specific item is selected, or a certain task is done by the user. For instance, when a picture is selected, the Picture Format tab appears on the tab row.
Default: A specific setting automatically assigned by the software and remains until the user changes the set
Dialog box: Displays information and allows the user to interact with it. For instance, when the dialog box launcher is clicked, a dialog box appears. Unlike a window, most dialog boxes do not contain a maximize and minimize button, but just a close button.
Footer: A section of the document or slide that appears in the bottom margin. May contain the page number, file name, date, and author’s name.
Header: A section of the document that appears in the top margin. May contain a variety of information, including the page number and title of the document.
Landscape orientation: The orientation of the page is such that the top and bottom are longer than the sides.
Portrait orientation: The orientation of the page is such that the sides are longer than top and bottom.
Transparency: The state of being transparent or easily detected.
INTRODUCTION
When creating a PowerPoint presentation, it is important to keep the audience interested. By using a theme and formatting the shapes and pictures inserted onto the slides, the user can create a professional-looking presentation. By using transitions between slides and animating objects, additional interest can be created in the presentation. It is always important to use transitions and animations sparingly. Overuse of these features can distract the view from the main points of the presentation. This chapter discusses the tools used on the Format tabs, along with the Animation, Design, and File tabs.
Using the Shape Format Tab Commands
The Shape Format contextual tab includes features and commands that allow the user to revise the shape inserted (Figure 1). This tab will appear on the ribbon when a shape is selected.

With the Insert Shape group, the user can add additional shapes. Use the Text Box to add text to the shape. Shapes can be merged with Merge Shapes or edited using Edit Shape. With the Edit Shape feature, the user can take a corner of the shape and extend or decrease it.
The Shape Styles group allows the user to change the color, fill, outline, and effects of the shape. The Arrange group allows the user to move objects in front or behind other objects. The Size group allows the user to resize the object. The Arrange and Size groups will be discussed in depth later in this chapter.
Using the Picture Format Tab Commands
When the user selects a graphic (e.g., picture) on a slide, two things will occur. A solid black border with sizing handles appears around the image. This is a quick visual to show what is selected. Secondly, the Picture Format contextual tab appears on the Ribbon (Figure 2). This tab contains many features and buttons that allow the user to manipulate the size, appearance, and location of the inserted image.
To modify the size of the graphic, click and drag the sizing handle until the object is the desired size.

Enhancing Pictures
The Adjust group allows the user to enhance the picture (Figure 3). To adjust the contrast, brightness, or sharpness of the picture, use the Corrections feature. Use the Color feature to change the saturation (vividness of the color), tone (warm or cool colors), or recolor the image. Thumbprints of the picture with the color changes are given.

To use these features in this group, select the picture. Click the button. Hover over the options to preview them. Click the option desired.
To reset the picture, select the picture and select Reset picture.
Transforming Pictures With the Picture Styles Group
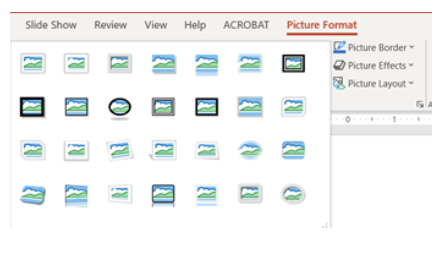
The user can utilize options in the Picture Styles group to transform pictures. A frame shape can be changed, and a border or 3D effect can be added. To use, select the picture and click on the More button (down arrow) in the Pictures Styles group, to open the Picture Styles drop-down gallery (Figure 4A). Select the desired option by clicking on the preview thumbnail to apply it to the picture.
When the user clicks on the Picture Border command (button), the Border menu appears. The Picture Border menu provides the user with options for the color, type, and weight (thickness) of border to add to the image. This menu works the same as the Border menu in Word.
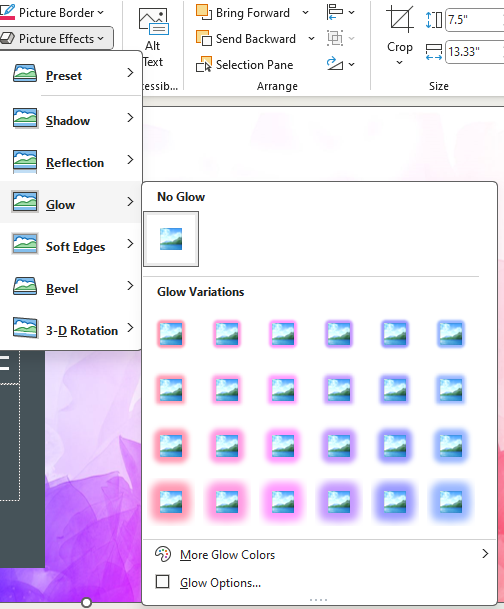
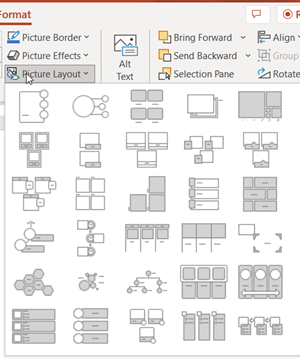
When the Picture Effects button is clicked, it opens a menu, giving the user multiple effects to select to enhance the picture (Figure 4B). The Picture Layout feature gives the user options of different presentation graphics (Figure 4C).
Arranging Objects with the Arrange Group
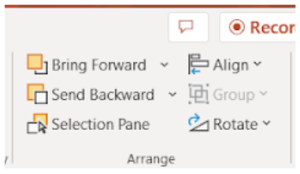
The Arrange group allows the user to arrange or rotate the objects on the slide (Figure 5).
Arranging Objects
When the user is adding shapes and pictures, these objects can overlap. The features in the Arrange group allow the user to change how items overlap, by moving an object to the front or back. The right click menu also has features to move objects to the front or back. (Remember the object must be selected before the right click menu is available.) To move an object to the front or back, select the object.
- Right click option: Select either Bring to Front or Send to Back.
- Arrange group option: Select either Bring Forward or Send Backward.
By selecting Bring to Front (or Bring Forward), the object is moved in front of another object. By selecting Send to Back (or Send Backward), the object is moved behind another object. If an object is hidden behind another object, click the Selection Pane and reorder the objects.
Rotating Objects
If the user wants to rotate an object, select the object and then select the rotation handle at the top of the object. Drag the handle in the direction you want. To flip an object vertical or horizontal, select the object. Click the Rotate button in the Arrange group on the Picture Format tab. Select an option: Rotate Right 90o, Rotate Left 90o, Flip Vertically, or Flip Horizontally. Additional options are available.
Aligning Objects
When aligning objects, the user can align one object or multiple objects at once. Click on the object to select it, and if multiple objects need to be selected, hold down the Shift key while selecting all of the objects. Select the Align button in the Arrange group on the Picture Format Tab. Options to align include the following:
- Align Left, Center, or Right
- Align Top, Middle, or Bottom
- Distribute Horizontally or Vertically
- Align to Slide
Using the Guides and Gridlines tools can be helpful. Those are found on the View tab in the Show group.
Resizing Pictures
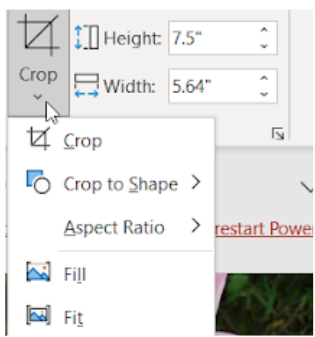
The Size group allows the user to change the size of the object or crop (remove) part of the picture (Figure 6A). To use the sizing tool, select the object and change the height or width of the object by typing in the number or using the arrows.
The cropping features allow the user to do multiple things.
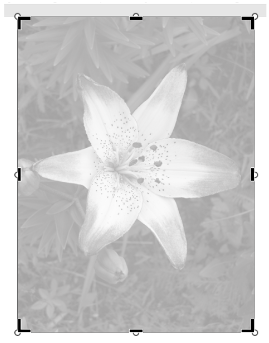
- Crop: To crop a picture, select the picture and click the Crop button in the Size Group or click the down arrow under the Crop button and select Crop (top menu item) (see Figure 2). Use the cropping handles to revise the image (Figure 6B). Click the Crop button when you are done.
- To crop one side of the picture: Drag the side cropping handle inward.
- To crop two adjacent sides at the same time: Drag the corner cropping handle inward.
- To crop equally on two parallel sides of the picture at once: Press and hold the CTRL key while dragging the side cropping handle inward.
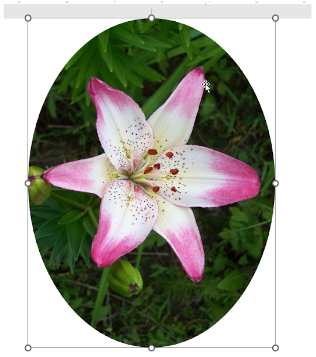
- Crop to Shape: To crop a picture to a specific shape, select the picture (Figure 6C). Click the Crop down arrow and select Crop to Shape. Select the shape and immediately the picture is cropped to that shape. The Fill button can be used to fill the entire shape with the picture. The Fit button can be used to make the entire picture fit within the shape, while maintaining the aspect ratio.
Using the Animation Tab Commands
The Animation tab is used if the user wants to animate a picture or text (Figure 7). For instance, a picture can fly into the presentation slide. Many animation effects are available to the user and are visible when the More button in the Animation group is selected (Figure 7). The animation effects are divided into subcategories, including entrance, emphasis, and exit. The motion path subcategory provides options to move the picture or text in different directions.
Additional commands on the Animation tab are available depending on the animation effect selected.

To animate a picture or text: Select the picture or text. Click the Animation tab. In the Animation group, click the More button and select the desired option(s). Click the Effect Options command in the Animation group (if available) and select the desired option.
Using the Design Tab Commands
If the user wants to change the theme or variant of the theme, these tools are available on the Design tab (Figure 8).

Adding Themes and Variants
The theme consists of a set of fonts, colors, and backgrounds that can be applied to a PowerPoint presentation. Each of these can be customized by the user.
The default theme is plain and appears boring to the audience. The user can select alternative themes from the gallery to increase the interest of the presentation.
To apply a theme: Select the Design tab. Using the cursor, hover over the different theme thumbnails in the Theme group. The name of the theme will appear, and the theme will change on the presentation temporarily. Additional themes are available by clicking the More button (the bottom arrow with a line over it on the Theme scroll bar). Click a thumbnail to select a theme. The theme will be applied to all of the slides.
To edit the theme: Hover over the color thumbnails in the Variants group. As with the theme thumbnails, the color on the presentation will momentarily change when the user hovers over a color. Click to select a color. The user can click the More button to see additional options to change the colors, fonts, effects, and background styles.
Changing Slide Size and Orientation
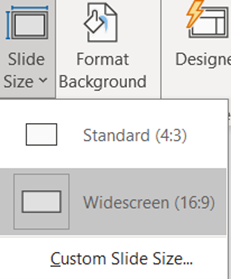
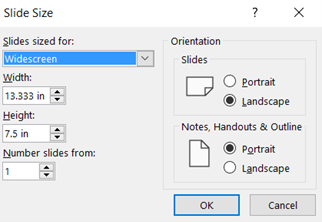
The Customize group provides the user options for the slide size and the background. For the slide size, the user can select standard, widescreen, or a customized setting (Figure 9A). When the Custom Slide Size option is selected, the Slide Size dialog box opens. The user can select a slide size and change the orientation of the slide and notes. Landscape orientation is the default setting for slides, and portrait orientation is the default setting for notes, outlines, and handouts.
To change the slide size, select the Design slide. In the Customize group, select the Slide Size command. From the dropdown menu, select either the Standard or Widescreen option. The user can also select Customize Slide Size, and additional options are available on the Slide Size dialog box. Select the desired options and click OK (Figure 9B).
To change the orientation, select the Design slide. In the Customize group, select the Slide Size command. From the dropdown menu, select Customize Slide Size. Select the desired options on the Slide Size dialog box and click OK (Figure 9B).
Changing the Background
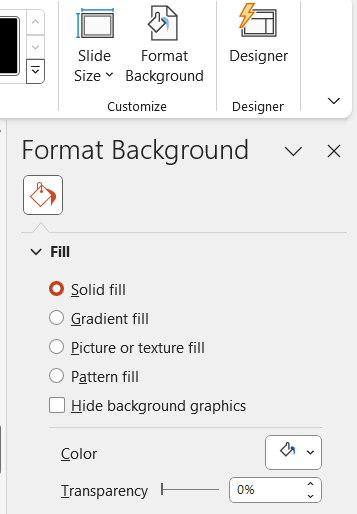
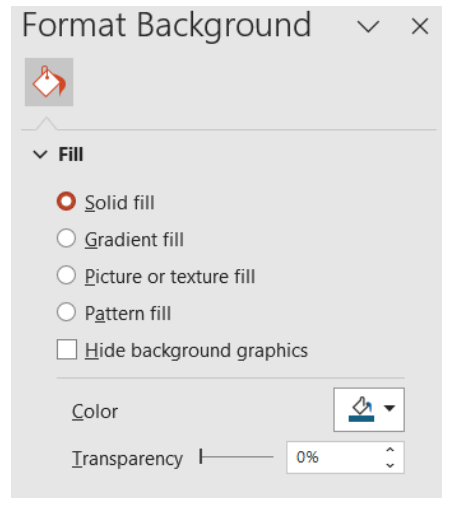
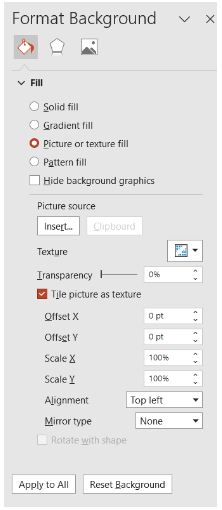
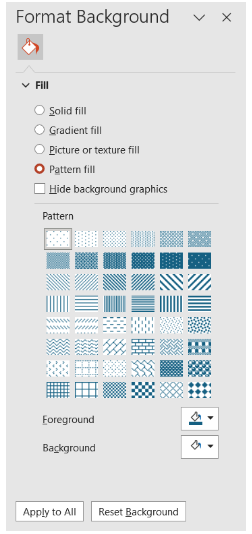
When the user clicks the Format Background button, the Format Background pane appears (Figure 10A). The user can select options for the background fill, including the following:
- Solid fill: A color and the transparency of the color can be selected (Figure 10A).
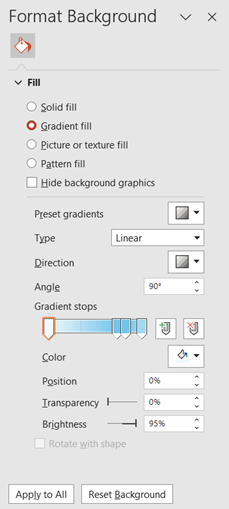
- Gradient fill: A color and characteristics of the color gradient are options (Figure 10B).
- Picture or texture fill: A picture can be uploaded, or a texture can be selected (Figure 10C).
- Pattern fill: A pattern style, along with a color and background color, can be selected (Figure 10D).
To change the background fill, click the Format Background command in the Customized group on the Design tab. Select the desired fill option. Then, select the additional desired options that are shown. Click Apply to All (Figure 10E).
Using the Designer Group Features
The Designer command in the Designer group at the very right of the Design tab ribbon provides the user with different options for slides (Figure 8). These slides can include different layouts, colors, icons, and pictures. Clicking a slide in the Designer pane will bring the slide into the presentation.
Using the View Tab Commands
In the prior chapter, several of the commands on the View tab were described. This section covers the Master Views group on the View tab. The Master Views group contains three commands:
- Slide Master View: Controls the appearance of all the slides, including the color, font characteristics, backgrounds, etc. If a picture is inserted, it will appear on all of the slides.
- Handout Master: Allows customization of the printed handout. The user can customize the background, header, footer, and the page setup.
- View Notes Master: Allows customization of the printed presentation with the notes.
Using the Slide Master View Command
Using the Slide Master View command allows the user to create a customized presentation with slides having the same appearance. It is helpful to customize the master slides prior to creating the presentation.
When the Slide Master command is selected, the Slide Master contextual ribbon opens (Figure 11A). A thumbnail pane on the left side of the screen will be visible (Figure 11B). The Slide Master is at the top of the pane, and Layout Masters are under it. Each layout slide is arranged uniquely, with the different placeholders used and in various locations. For each type of layout slide (e.g., Title Slide, Title and Content Slide, etc.), there is a layout master slide.
Any customizations done on the Slide Master will update on Layout Masters with similar features. Many times, customizations also need to be done on the Layout Masters. Customizations done either on the Slide Master or Layout Masters cannot be changed in the Normal view. The user must make changes by going into the Slide Master View. (Tip: If you are in the Normal view trying to make a change and it is not working, switch to the Slide Master View to see if it is a master customization.)

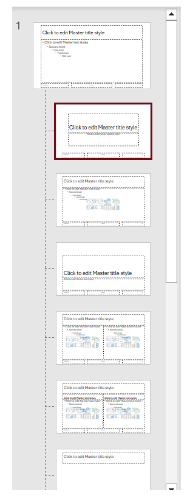
To change an existing master slide layout, select the View tab. Click Slide Master View found in the Master View group. Select the master slide layout that closely resembles the desired layout. Revise the existing layout by doing any of the following:
- Adding a theme: Click the Theme command in the Edit Theme group on the Slide Master tab and select a theme to apply to the master slide.
- Changing the font characteristics (size, color, and type): Select the font and revise using the commands found on the Home tab in the Font group or select an option from the Font dropdown list found in the Background group on the Slide Master tab.
- Changing the background color, effect, or style: Click the related command in the Background group on the Slide Master tab. Select the desired option(s).
- Revising a current placeholder on the slide: Increase or decrease the size by sizing handles on the placeholder. Select the placeholder. Hold the left click button down and drag the mouse to draw the desired size and then release the button.
- Deleting a current placeholder on the slide: Select the placeholder to be deleted and using the right click button. Then, select Cut from the menu.
- Adding a placeholder. On the Slide Master tab, select Insert Placeholder in the Master Layout group. Select an option from the dropdown menu (Figure 11C). In the desired location on the slide master, click and hold the left click button down. Drag to draw the desired size of the placeholder and then release the click button.
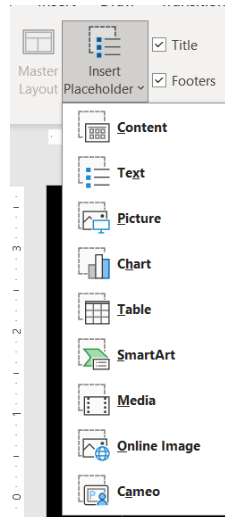
Figure 11C. The Insert Placeholder dropdown menu.
When the edits to the slide masters are completed, click the Close Master View command in the Close group on the Master Slide tab.
Using the Handout Master View Command
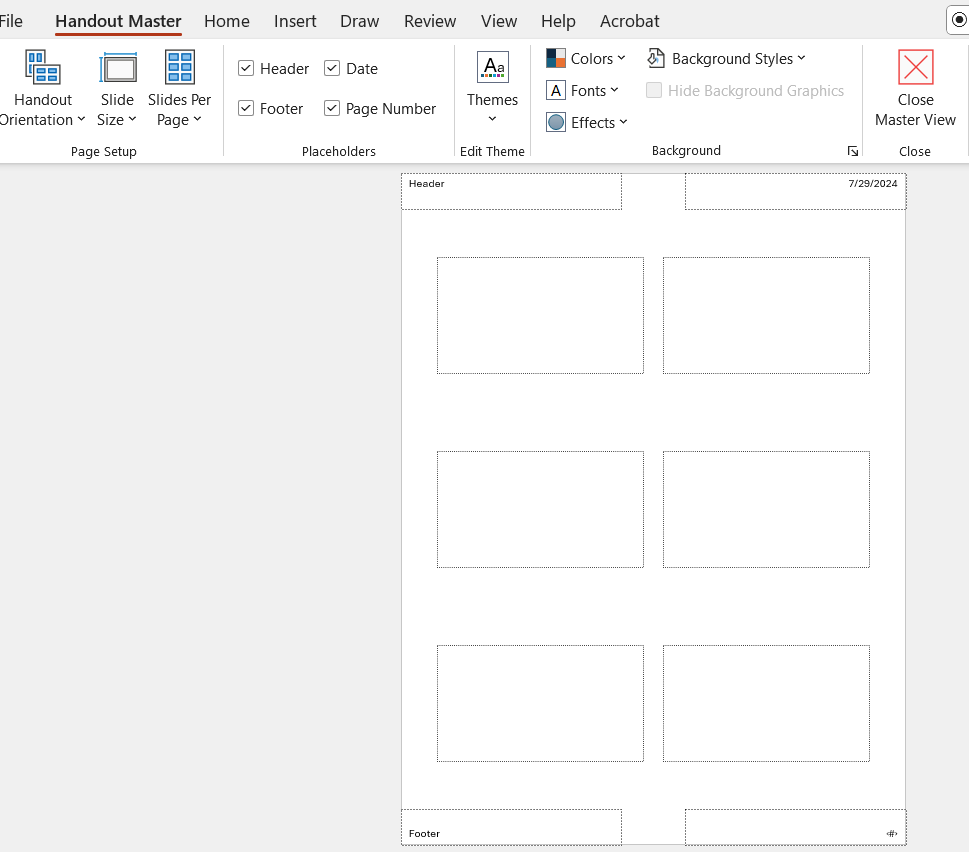
When the Handout Master command is selected, the Handout Master contextual ribbon opens (Figure 12). The ribbon provides options for the page setup, placeholders, themes, and background:
- Page Setup group: The Handout Orientation command can be used to change the handout to either portrait or landscape orientation. The Slide Size command provides options to change the slide size, along with the orientation. The Slides Per Page dropdown menu provides options for the number of slides to be inserted per page. The options include 1, 2, 3, 4, 6, and 9 slides per page.
- Placeholders group: Allows the user to select or deselect placeholders to be present on the handout. The default placeholders include header, footer, date, and page number.
- Background group: Allows the user to change the background appearance of the handout.
- Edit Theme group: Allows the user to change the theme.
- Close group: When the changes are completed, select Close Master View command.
Using the Notes Master View Command
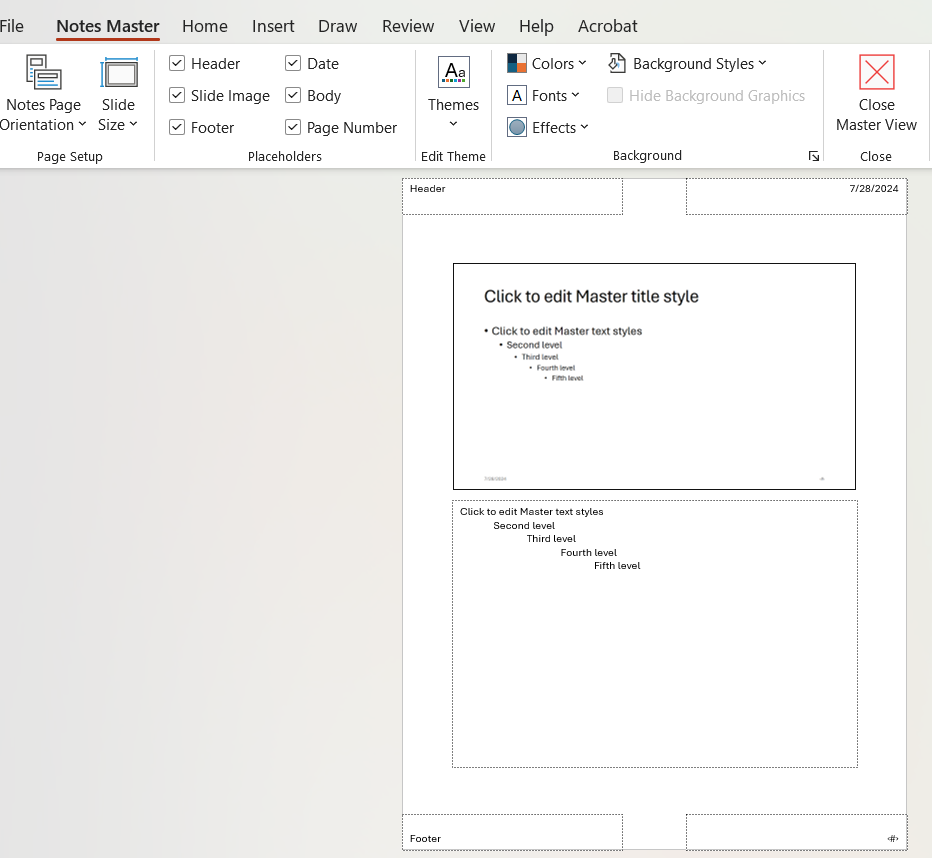
When the Notes Master command is selected, the Notes Master contextual ribbon opens (Figure 13). The notes document contains the speaker’s notes, along with the slide image (if selected). The options on the contextual ribbon are as follows:
- Page Setup group: The note page orientation can be changed. The default setting is the portrait orientation. The slide size can also be changed.
- Placeholder group: The default setting includes the header, slide image, footer, date, body, and page number. These placeholders can be selected or deselected.
- Edit Theme: The theme can be revised.
- Background: The colors, font, effects, and background styles can also be modified for the notes document.
Once the revisions are completed, the Close Master View command in the Close group should be selected.
Using the File Tab Commands
The File tab in PowerPoint is similar to Word. The user can use it to open a new or saved presentation. Save, Save As, Save as Adobe PDF, Print, Share, Export, and Close are also options found on the File tab.
Printing a Presentation
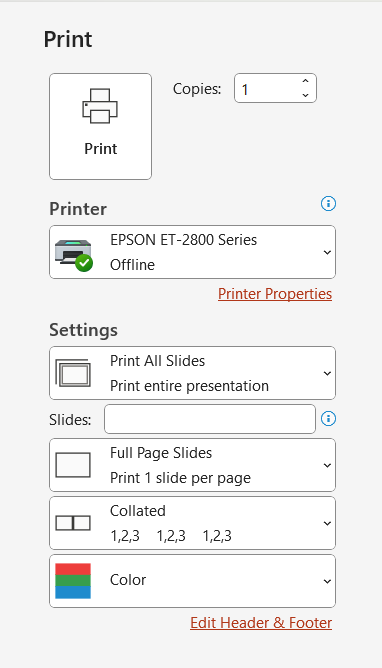
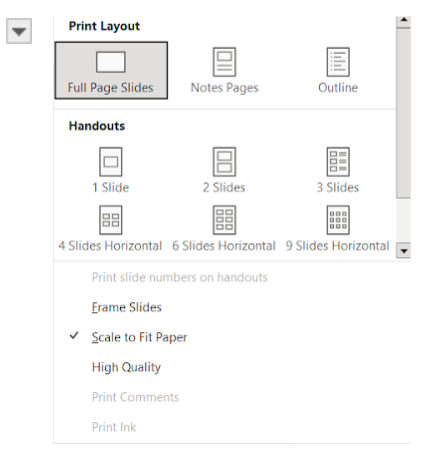
To print a presentation, handouts, or speaker’s notes, the user can use the options on the File tab (Figure 14A).
- Select the number of copies.
- Select the printer to use.
- For settings, select the options desired:
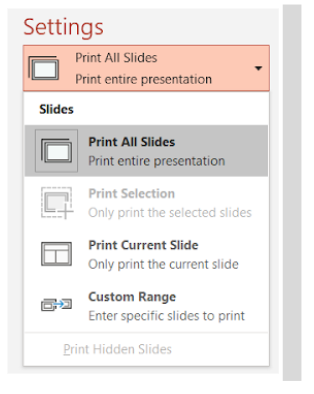
- Print all slides or select specific slides to print. For specific slides, the user must type the slide numbers (separated by a comma) in the text box (Figure 14B).
- Print layout (Figure 14C). Select from printing the slide’s notes, an outline, or handouts. To save paper, multiple slides can be printed on one page.
- Outline: Prints only the text and not the images.
- Notes: Shows the slide, along with the speaker’s notes for the slide.
- Handouts: Multiple format options are available, including several sides per page and space for taking notes.
- Print on one side or both.
- Collated (1, 2, 3) or uncollated (1, 1, 1, 2, 2, 2).
- Color: The user can select color, grayscale, or black and white.
- Edit header and footer.
- Select Print.
Using the Transitions Tab Commands
Special effects, also called slide transitions, can be added between slides. These effects are seen as one slide disappears and the next slide appears. Using slide transitions can create a professional appearance to the presentation. Using too many transitions or too many with sound can distract the audience.
Adding Transitions and Sounds
Transitions can be added to slides by using the Transition tab. The Transitions to the Slide group contains three categories of transitions (Figure 15):
- Subtle: These transitions use simple animation movements to transition the slides. The None transition is the default setting for PowerPoint.
- Exciting: These transitions are more interesting than the subtle transitions. Use Exciting Transitions sparingly in a presentation to prevent distracting the audience.
- Dynamic Content: Used if the layouts are similar between the two slides. Only the content in the placeholders is moved.
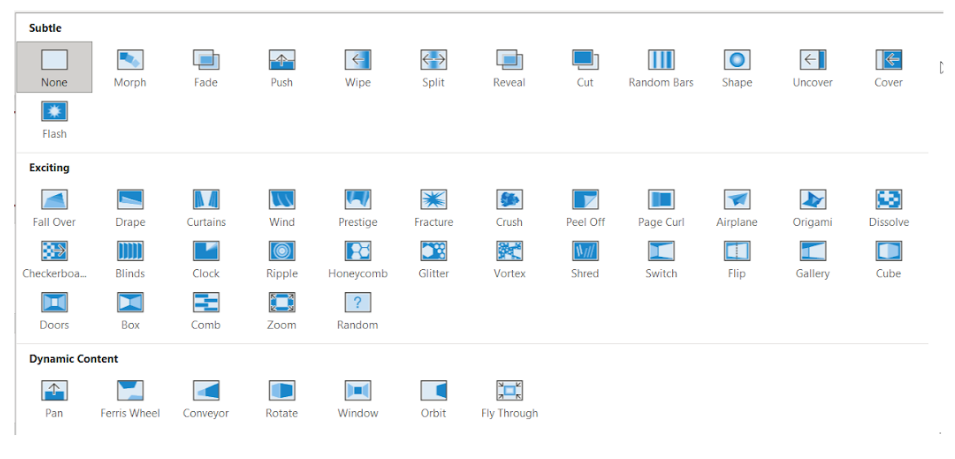
To apply a transition: In the Slide Navigation pane, select the slide that should appear after the transition. Using the Transitions tab, click the More dropdown arrow in the Transition to This Slide group (Figure 16A). Select the desired transition and a preview of the transition will be shown.
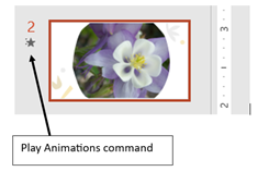
To view transitions applied to slides: Select the slide and click the Preview command in the Preview group on the Transitions tab (see Figure 16A). The transition can also be viewed by clicking the Play Animations command in the Slide Navigation pane (Figure 16B).
To modify a transition’s direction: Select the slide with the transition to be modified. Using the Transition tab, select the Effect Options command found at the far right of the Transitions to This Slide group. Select the desired option from the menu. The options vary based on the transition applied to the slide.
To change the speed of the transition: Select the slide with the transition to be modified. Using the Transitions tab, adjust the time in the Duration field in the Timing group (Figure 16C). Either type the time or use the arrows to adjust the time for the transition. Increasing the time will slow the transition time while decreasing the time will speed up the transition time.
To add sound to the transition: Select the slide to be modified. Using the Transitions tab, click the Sound dropdown menu in the Timing group (Figure 16C). Select the desired sound to be applied to the slide. The transition sound can be heard by clicking the Play Animations command in the Slide Navigation pane (Figure 16B).
To apply the same transition to all of the slides: Apply a transition as described in the prior section. Then, select the Apply to All command in the Timing group on the Transitions tab.
To remove a transition: In the Slide Navigation pane, select the slide with the transition that needs to be removed. Using the Transitions tab, click the More dropdown arrow in the Transition to This Slide group (Figure 16A). Select the None transition, and the transition will be removed.


Automatically Advance Slides
Once a transition is applied to a slide in the presentation, the slide(s) can be set to automatically advance in the Slide Show view.
To automatically advance a slide: Select the slide with the transition to modify. On the Transitions tab, uncheck the box to the left of On Mouse Click found in the Timing group (Figure 16C). In the After field in the Timing group, enter the time to display the slide. (Type the time or use the arrows to adjust the display time.) For example, if the slide is to be displayed for 1 minute and 20 seconds, the display time would be set for 01:20:00. These steps can be repeated if additional slides need to automatically advance. To automatically advance all of the slides, just select Apply to All command in the Timing group after setting the display time.
The automatic timing can be overridden by clicking the mouse or pressing the spacebar to advance to the next slide.
Learning Activities
Formatting PowerPoint Presentations – Flash Cards
Application Exercise
Directions: Create a PowerPoint presentation using the content learned in this chapter. Practice modifying and aligning inserted images, along with adding animations to pictures and transitions to slides.
1. Open a new PowerPoint template and select a blank presentation template.
2. Save the PowerPoint presentation as: Exercise 16 1
3. On the title slide, select the text placeholder and type the following:
-
- Title: Interesting Healthcare Careers
- Subtitle: By (type your first and last name)
4. Add two new slides, both having Two Content layout.
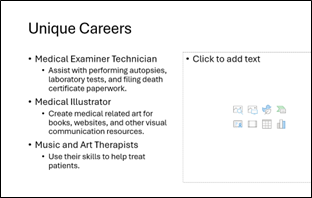
5. On Slide 2:
-
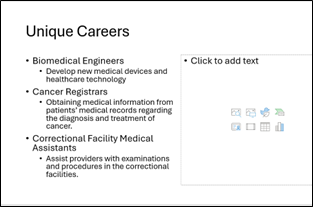
- Add the title: Unique Careers
- Add the content shown in Figure 17A
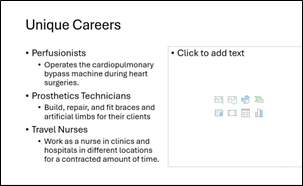
6. On slide 3:
-
- Add the title: Unique Careers
- Add the content shown in Figure 17B
7. On Slide 3:
-
- Add the title: Unique Careers
- Add the content shown in Figure 17C
8. Using the Design tab, add a Theme to the presentation. Apply one of the Variants. In the Notes Pane on Slide 1, indicate the theme applied.
9. On Slide 1, insert the title and apply a WordArt Style of your choice. (Remember, the WordArt Styles group is found on the Shape Format contextual tab.)
-
- On Slide 1, insert three medical related stock images.
- Resize the images and position them in a white space. Align the three images either horizontally or vertically on the slide. The images should not be touching.
- Apply a different animation to each of the stock images inserted on Slide 1.
10. On Slide 2, insert three stock images – a microscope, computer, and a stethoscope. Resize the images and place on the right side of the slide in the white space. Position the three images so they overlap, yet the image is still visible.
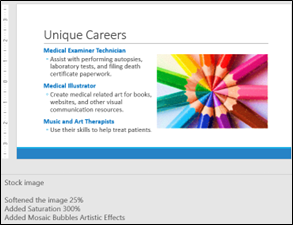
11. On Slide 3, insert a stock or online image that relates to art or music. Resize the images and place on the right side of the slide in the white space. In the Notes Pane, indicate if you used an online or stock image. For online images, provide the APA or MLA citation for the image.
-
- Using the commands in the Adjust group on the Picture Format contextual tab, apply three different adjustments to your picture. In the Notes Pane, indicate the adjustments you added to the picture.
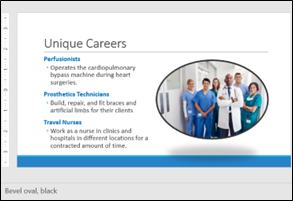
12. On Slide 4, insert a stock image that relates to a nurse. Resize the images and place on the right side of the slide in the white space. Using the commands in the Pictures Styles group on the Picture Format contextual tab, apply a picture style of your choice. Indicate in the Notes Pane, the style you applied. (Remember when hovering over the style, the name becomes visible.)
13. Apply a Fade transition to Slide 1 and a Push (up) transition to Slide 3.
14. Apply 24 pt font to the content in Slides 2-4. The tiles of each career should be in bold color font. (Select a color that goes with your theme.) The titles should be in 48 pt font.
15. Save the presentation. Save the presentation. It should look similar to Figures 17D-17G.


A hidden tab on the Office ribbon that becomes visible when a specific item is selected, or a certain task is done by the user. For instance, when a picture is selected, the Picture Format tab appears on the tab row.
The preset selection of an option offered by a system and will always be used unless the user changes it.
A dialog box displays information and allows the user to interact with it. For instance, when the dialog box launcher is clicked, a dialog box appears. Unlike a window, most dialog boxes do not contain a maximize and minimize button, just a close button.
The orientation of the page is such that the top and bottom are longer than the sides.
The orientation of the page is such that the sides are longer than top and bottom.
The state of being transparent or easily detected.
A set of colors arranged in order to provide a smooth color transition. For example, the bottom of the area may be green, and the top may be blue. A variety of shades are arranged in order to provide a smooth transition between the green color and blue color.
A section of the document that appears in the top margin. May contain a variety of information including the page number and title of the document.
A section of the document that appears in the bottom margin. May contain the page number, file name, date, and author’s name.
Assembled in a specific way.

