Chapter 9 Formatting Documents in Word
Vocabulary
Column: Any of two or more vertical sections of type on a document.
Contextual tab: A hidden tab on the Office ribbon that becomes visible when a specific item is selected, or a certain task is done by the user. For instance, when a picture is selected, the Picture Format tab appears on the tab row.
Footer: A section of the document that appears in the bottom margin. May contain the page number, file name, date, and author’s name.
Header: A section of the document that appears in the top margin. May contain a variety of information, including the page number and title of the document.
Hover over: Moving the mouse pointer over an option without selecting it.
Landscape orientation: The orientation of the page is such that the top and bottom are longer than the sides.
Margin: The space between the printed area and the edge of the document.
Portrait orientation: The orientation of the page is such that the sides are longer than top and bottom.
Introduction
In a prior chapter, you learned about formatting text. This section focuses on formatting the document, which covers adding hyperlinks, headers, and footers. Margins, page orientation, columns, breaks, and using the tab selector are also discussed. The Insert tab and Layout tab will be discussed in depth. The keyboard shortcuts that can be used to open these tabs are follows:
- Insert tab: (Alt + N)
- Layout tab: (Alt + P)
Insert Tab
The Insert tab contains many commands and features for formatting documents. This section will address the Links group, which is used for hyperlinks. The Header & Footer group will also be discussed. Future chapters will address the remaining groups.
Links Group
One of the most helpful commands in the Links group on the Insert tab is the Links button. This button allows the user to insert a hyperlink into the document. A hyperlink consists of a word, phrase, or picture that moves the user to another part of the document or to another document or web page when it is selected/clicked on. A hyperlink can be added to existing text.
To add a hyperlink, follow these steps:
- Select the text if using existing texts. Skip if not using existing texts.
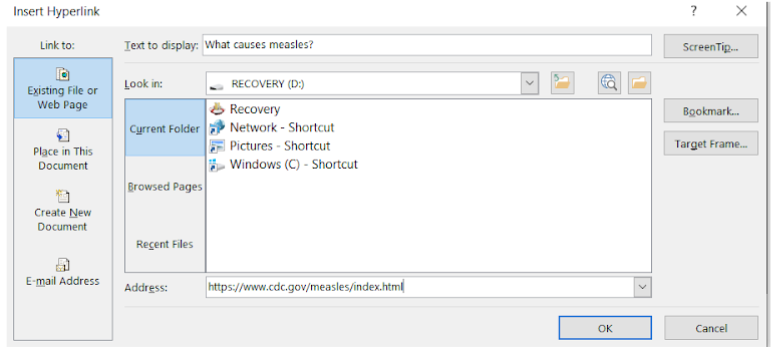
- Click on the Link button in the Links group on the Insert tab. The Insert Hyperlink dialog box appears (Figure 1A).
- In the far-left column of the box, select what the hyperlink should be linked to.
- Depending on the type of hyperlink, make additional selections and complete the remaining fields.
For instance, if the user wants to hyperlink to a web page, they will select Existing File or Web Page in the left column. The user needs to complete the following:
- Text to display field: Located at the top of the dialog box. The Text to display is the text that will be in the document. In Figures 1A and 1B, “What causes measles?” is the text in the document.
- Address field: Located at the bottom of the dialog box. This is the web page address.
Once a hyperlink is embedded in the document, the font differs from the surrounding nonhyperlinked font. This makes the hyperlink visible to the user. When users hover over this hyperlink, the directions are provided how to open the link (Figure 1B).
Right clicking on a hyperlink allows the user to edit, open, copy, or remove the hyperlink. To remove the hyperlink, right click the link. Select Remove Hyperlink from the menu. The link will be removed, but the text in the document will remain.

Header & Footer Group
The Header & Footer group provides the user the options to insert a header, footer, or page number. Depending on the style selected, they may contain borders, placeholders for text, page numbers, and date placeholders. When the Header, Footer, or Page Number buttons are selected, the user can click on a desired style. This triggers the Header & Footer tab, a contextual tab, to appear on the ribbon. This new tab provides additional options to the user (Figure 2).

Header & Footer Tab
Features and commands on the Header & Footer tab are as follows:
- Header & Footer group: These are the same commands that appear on the Insert tab.
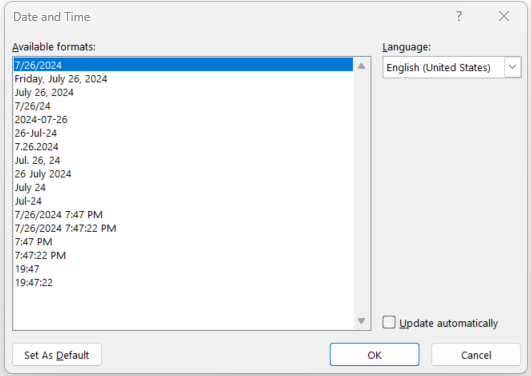
- Insert group: Includes the buttons Date & Time, Document information, Quick Parts, Pictures, and Online Pictures. These allow the user to select and insert pictures, document information (e.g., title and author’s name), and the date and time into the header and footer. The Date & Time button has several helpful features. The user can select the date and time format on the Date and Time dialog box (Figure 3A). If the date and time need to be automatically updated each time the document is opened, click the box for Update automatically found near the OK button.
- Navigation group: Allows the user to toggle between the header and footer by using the Go to Header and the Go to Footer buttons. The Previous and Next keys allow the user to move to the last or next header or footer.
- Options: This grouping has options that are helpful and used often:
- Different First Page: If the user wants the header and footer to be different on the first page of the document from the other pages, this box should be checked.
- Different Odd & Even Page: If the user wanted the even number/odd number pages to have a different header and footer, this box should be checked.
- Show Document Text: This box should be checked if the user wants to see the document text. If the box is unchecked, then the text in the document will not be visible.
- Close: The user should click the Close Header and Footer if they want the header and footer to be closed.
Insert, Edit, and Remove Headers and Footers
The process to insert a header and footer is the exact same. When the user clicks on the buttons, the menus that appear are similar.
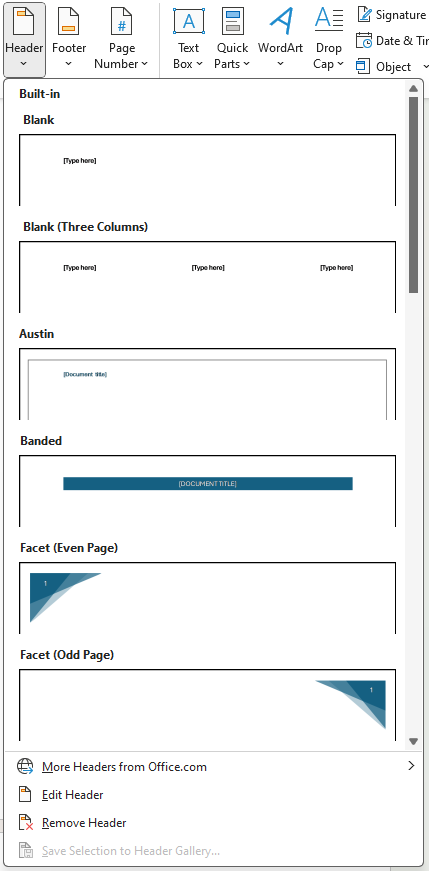
To insert a header, click Header & Footer group on the Insert tab. Scroll through the menu to find the desired header and click to select the header (Figure 3B). The document header will open, and the user can type content into the placeholders. (Click on “Type here” and that will disappear, leaving the newly typed text.) To close the header, the user can use one of these three techniques:
- Click the Close Header & Footer button in the Close group on the Header & Footer tab.
- Double-click in the body of the document.
- Press the ESC key.
To edit the header and footer: Double-click in the header or footer section of the document to open it. Make the changes and then close it using one of the three techniques discussed.
To delete the header or footer: Click the Header or Footer button in the Header & Footer group on the Insert tab. Click Remove Header, which is located towards the bottom of the menu. The user can either add a new header or footer or close it.
Insert Page Numbers
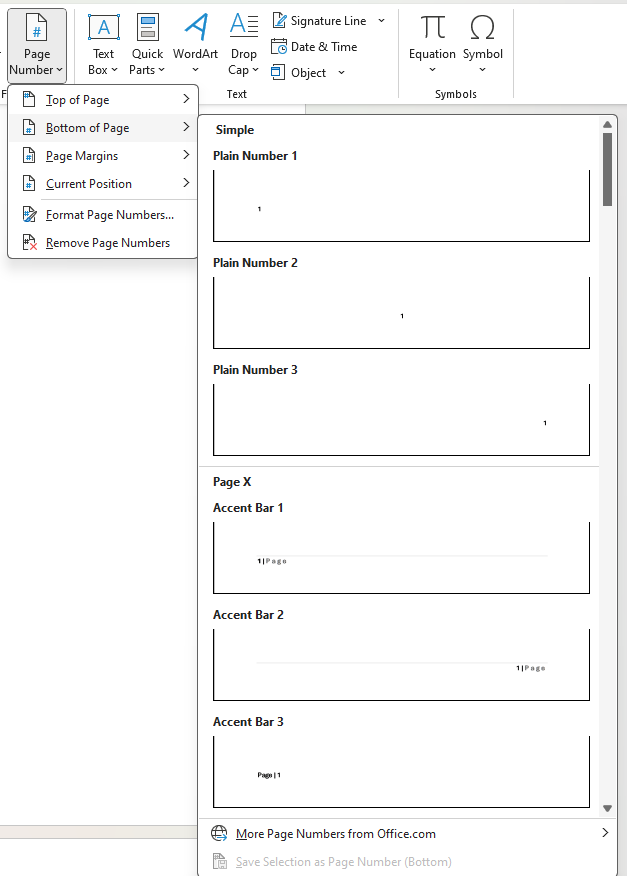
When inserting page numbers, the user must select the location of the page numbers – the top of page, the bottom of page, or the page margins. When one of these options is selected, a menu of choices appears (Figure 3C). Click the style desired to insert page numbers into the document.
Deleting page numbers is the same as deleting the header or footer. Click on the Page Number button and select Remove Page Numbers.
Hiding and Showing the Headers and Footers
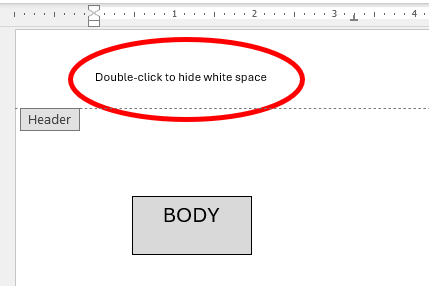
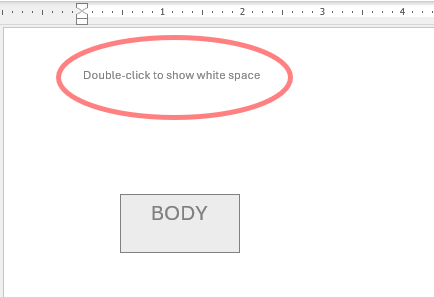
By default, the document’s headers and footers are visible. This can easily be turned off without realizing it and can be a source of frustration to the user. To hide the header and footer, move the cursor/pointer to the top of the page to the gray area below the ruler and double-click. (Notice in Figure 4A how the pointer changes appearance in the gray area.) To make the header and footer visible, move the pointer to the top of the page by the gray area and double-click (Figure 4B).
Layout Tab
The Layout tab is used to set margins, page size, columns, orientation of the paper, indent, and spacing. This section will examine the Page Setup and the Paragraph groups.
Page Setup Group
The Page Setup group includes key command buttons, including margins, orientation, size, and columns.
Margins
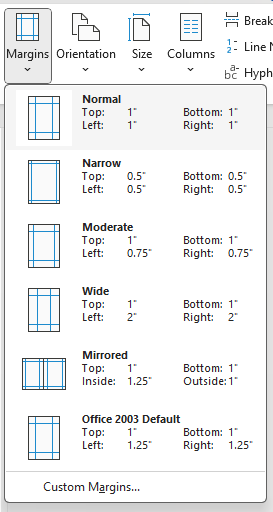
Margins are found on the top, bottom, and sides of the document. MS Word has predefined margin settings available for the user to apply to documents. The default setting for margins is one inch on the top, bottom, and sides of the document.
To change the margins of the document, click on the Margin button in the Page Setup group on the Layout tab. The Margins drop-down menu appears (Figure 5A). Select the desired predefined margins.
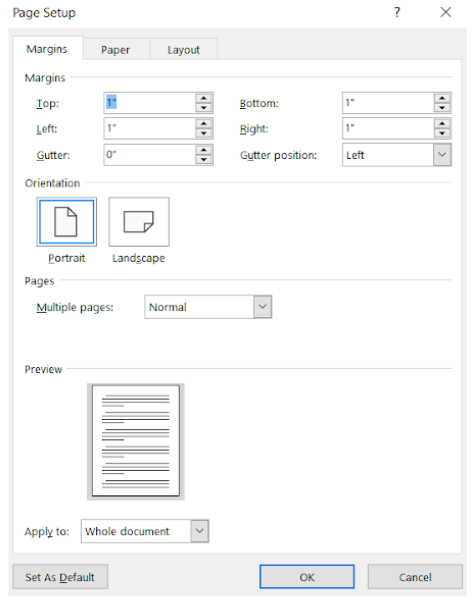
Custom margins can also be applied to a document. To set custom margins, click on the Margin button in the Page Setup group on the Layout tab. When the Custom Margins option at the bottom of the menu is selected, the Page Setup dialog box appears (Figure 5B). Enter the desired sizes for the top, bottom, left, and right margins and click OK.
Orientation
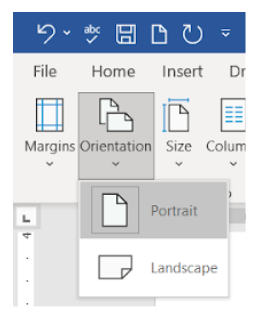
The document can be in portrait orientation or landscape orientation. To change the orientation of the document, click the Layout tab and select the Orientation button in the Page Setup. Select the desired orientation from the dropdown menu (Figure 6).
Size
By default, the page size for a new document is 8.5 inches by 11 inches. If the user needs a document size smaller or larger than the default size, the size can be revised. MS Word has predefined page sizes that the user can select.
To change the size of the document, select the Layout tab and click the Size button in the Page Setup group. The Size dropdown menu will appear (Figure 7A). The user can select the desired size.

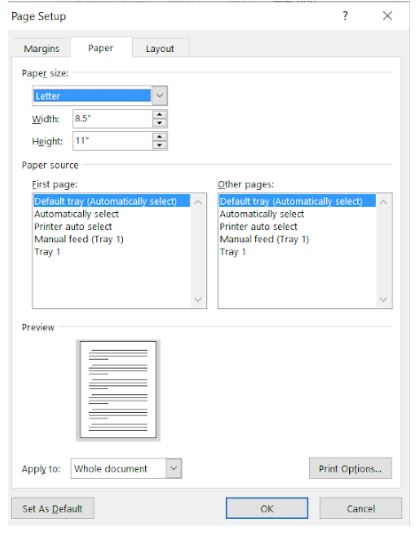
The user can also create a customized page size by using the Page Setup dialog box (Figure 7B). This can be opened by either selecting the More Paper Sizes on the Page Setup dropdown menu or by clicking the Dialog Box Launcher in the lower right corner of the Page Setup groups. When the Page Setup dialog box appears, the user can adjust the length and width of the paper size and click OK.
Columns
MS Word allows the user to create columns for the entire document or a portion of the document. Columns can be applied to a new document, or selected text can be turned into columns.
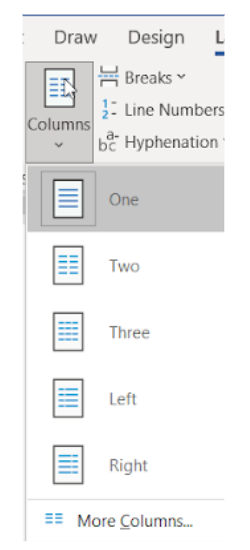
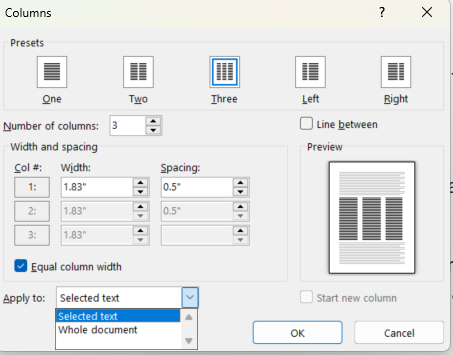
To apply columns to a new document, select the Layout tab and click the Columns button in the Page Setup group. Select the option desired from the Columns dropdown menu (Figure 8A). To create custom columns, select More Columns at the bottom of the dropdown menu. When the Columns dialog box opens (Figure 8B), select the following options:
- Number of columns: Either by selecting a preset number or typing the number in the Number of columns field.
- If a line between the columns is desired, click the box before Line between.
- If more than one column is selected, adjust the width and spacing of the columns as desired.
- Select to apply to the entire document or the selected text.
The Preview gives the user a visual picture of the column setup. When the options are selected, click OK.
When applying columns to specific text in the document, first select the text. Then, select the Layout tab and click the Columns button. Select the options desired and click OK. The column break will be applied.
The size of columns can also be adjusted by using the ruler. Click and drag the right or left margin to increase or decrease the width of the column.
To remove the columns, place the cursor in the column and select the Layout tab. Click the Columns button and select One from the dropdown menu.
Column Breaks
When using columns, the text flows from the bottom of one column to the top of the next column. Sometimes the user wants to control the text in each column. By adding column breaks, the user can indicate in the text where the column begins.
To add a column break, place the cursor in front of the first word for the column. Using the Layout tab, select the Breaks button. Select Column on the dropdown menu. This will cause the text to move to the next column. The user will not see the column break unless they click on the Show/Hide button in the Paragraph group on the Home tab (Figure 8C).
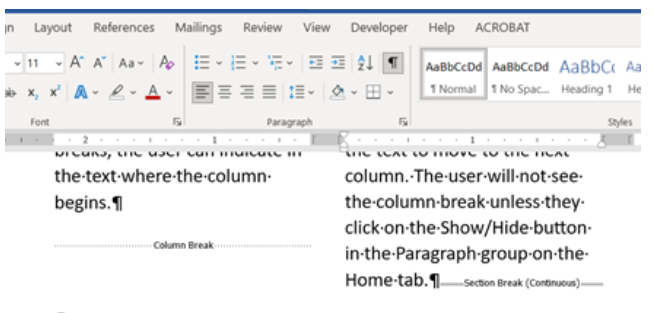
To delete the column break, place the cursor to the left of the column break marker. It is helpful to make the column breaks visible by using the Show/Hide button. Press the delete key, which will remove the column break. The text will flow from one column to another.
Breaks
Breaks allow the user to control the flow of the document. Column breaks were discussed in the prior section. Additional breaks that are commonly used are as follows:
- Page break: The user indicates where the next page begins.
- Section break: The user can create sections within the document and each section can be formatted differently.
Page Breaks
The page break ends the current page and starts another page. To create a page break, place the cursor where the page break needs to be. The user has several options when applying a page break:
- On the Insert tab, in the Pages group, select the Pages button and click Page Break on the menu.
- Use the shortcut (Ctrl + Enter).
- On the Layout tab, in the Page Setup group, select the Breaks button and click Page under Page Break.
To delete a page break, turn on the Show/Hide button (found on the Home tab, in the Paragraph group). Place the cursor before the page break marker and press the delete key.
Section Breaks
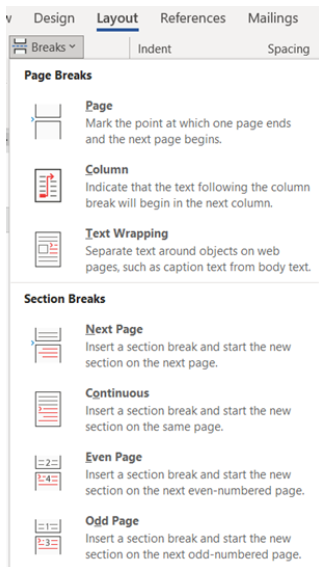
MS Word has three different section breaks, which include the following:
- Next Page: The text after the break is moved to the next page.
- Continuous: Allows a break to be placed and the user can still work on the same page.
- Odd Page and Even Page: The text after the section break is moved to the next odd page or the next even page.
To place a section break, place the cursor at the point where the section will begin. Click on Breaks, found in the Page Setup group on the Layout tab. Select the desired type of section break from the dropdown menu (Figure 9).
Tab Selector
Tabs allow the user to control the placement of text. When the Tab key is pressed, the text moves 0.5 inches to the right. (Remember using [Shift + Tab] causes the text to move 0.5 inches to the left.)
Adding tab stops to a document or a section of the document allows the user to change the size of the tabs. Because Word allows the user to apply more than one tab stop to a single line, the user has a lot of flexibility.
There are several tabs available for the user to place on the ruler. The tab selector, located above the vertical ruler on the left side of the screen, shows the active tab stop. The user can click the tab selector to change the type of tab stop. The following icons appear on the tab selector (see Table 1):
| Name | Icon | Description |
|---|---|---|
| Left tab stop | Left aligns the text at the tab stop. | |
| Right tab stop | Right aligns the text at the tab stop. | |
| Center tab stop | Centers the text around the tab stop. | |
| Decimal tab stop | Using the decimal point, aligns decimal numbers. | |
| Bar tab | Used to draw a vertical line. | |
| Hanging Indent | Inserts the hanging indent marker on the horizontal ruler. Indents all lines except for the first line, creating a hanging indent. | |
| First line indent | Inserts the indent marker on the horizontal ruler. Indents the first line of the text, creating a first line indent. |
To add a tab stop to the ruler, select the paragraph(s) you want to add the tab stop to. If the user wants to add the tab stop to the current and future paragraphs, nothing needs to be selected. Using the tab selector, click until the desired tab stop appears. Click the bottom edge of the horizontal ruler to position the tab stop selected. Add as many tab stops as desired. If a tab stop is placed incorrectly, click and drag it off the ruler.
Once the tab stops are placed, place the cursor in front of the text to be tabbed and press the Tab key. The text will move to the next tab stop.
To remove a tab stop that is currently being used for text, select all the text that uses that tab stop. Then, click and drag the tab stop off the horizontal ruler.
Learning Activities
Formatting Documents in Word – Flash Cards
Application Exercises 1
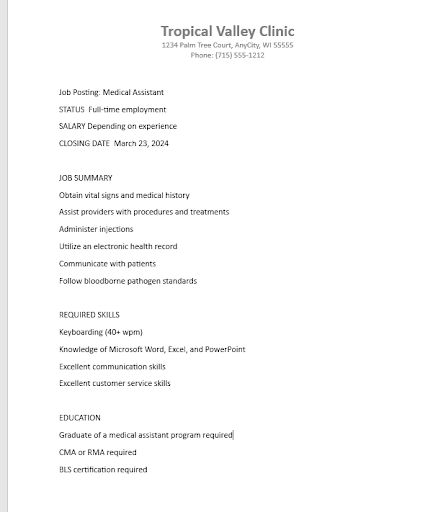
Directions: Create a job posting.
- Use the default spacing setting and Calibri (Body) 11 pt font. Create the document shown in Figure 10.
2. In the header of the document, center the following text:
Tropical Valley Clinic
1234 Palm Tree Court, AnyCity, WI 55555
Phone: (715) 555-1212
3. Use Calibri (Body) 22 pt bold black font for Tropical Valley Clinic.
4. For the address and the phone number, use Calibri (Body) 11 pt black font. Close the header.
5. Apply the Wide margin to the document. (Wide margin is 1″ on the top and bottom and 2″ on the left and right sides.)
6. Select the Job Posting line. Center align the font. Change the font to Calibri (Body) bold black 14 pt font.
7. Change the CLOSING DATE to two weeks from Friday.
8. Select the STATUS, SALARY, and CLOSING DATE lines.
a. Place a left tab stop at 1/2″ and 2.”
b. Tab STATUS, SALARY, AND CLOSING DATE to the 1/2″ left tab stop.
c. Tab Full-time, Depending on experience, and the date to the 2″ left tab stop.
9. For JOB SUMMARY, REQUIRED SKILLS, and EDUCATION, change the font to Calibri (Body) 14 pt bold underlined font.
10. Apply bullets in each of the three sections below the underlined font. Select bullets of your choice.
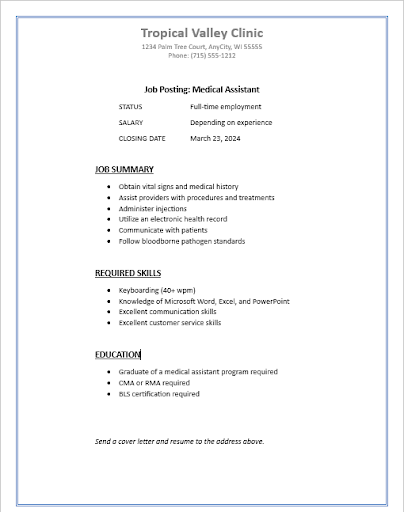
11. After the last bullet point (BLS certification required), press the Enter key three times. Using Calibri (Body) italicized 12 pt font, key (type): Send a cover letter and resume to the address above.
12. Add a page border of your choice.
Your document should look like Figure 11.
A section of the document that appears in the top margin. May contain a variety of information including the page number and title of the document.
A section of the document that appears in the bottom margin. May contain the page number, file name, date, and author’s name.
The space between the printed area and the edge of the document.
Any of two or more vertical sections of type on a document.
Moving the mouse pointer over an option without selecting it.
A hidden tab on the Office ribbon that becomes visible when a specific item is selected, or a certain task is done by the user. For instance, when a picture is selected, the Picture Format tab appears on the tab row.
The orientation of the page is such that the sides are longer than top and bottom.
The orientation of the page is such that the top and bottom are longer than the sides.

