Chapter 5 File Management
Vocabulary
Clicks: Describes the action of pressing on the left or right mouse button; can be one or more clicks.
Default: The preset selection of an option offered by a system and will always be used unless the user changes it.
Desktop: The main screen display of a personal computer where icons, windows, and other items appear.
File: A named collection of information, in the form of text, programs, graphics, etc., held on a permanent storage device such as a C drive or flash drive.
File management: Also called filed maintenance; copying, renaming, relocating, and deleting files in the computer.
Folder: A place on a drive for holding and organizing multiple subfolders or files.
Icon: A small picture or image that represents an application, file, or folder. The user can click or double-click the icon to open the application software, file, or folder.
Pin: Describes the action of placing a shortcut on the taskbar, which allows the user to quickly access the application software.
Screenshot: A picture created by copying all or part of a computer screen.
Subfolder: A folder that is placed within another folder.
Taskbar: Found at the bottom of the computer screen by the default setting. Contains selectable buttons and icons of opened and pinned application software, along with the date and time.
Window: A rectangular area on a screen in which a document or application can be viewed. Most windows allow the user to minimize, maximize, and close them.
Introduction
When saving a file, it is important to be able to quickly locate the file in the future. If a person saved all files to just one location on the storage device (e.g., flash drive), it could be difficult to find a file later. Imagine placing documents in a file cabinet drawer without using folders. It would be time-consuming to find the document if no filing system is used. Using a file system, which includes using folders, helps the computer user quickly locate files. File Explorer allows the user to manage files and folders, which is called file management.
The Hierarchical File System
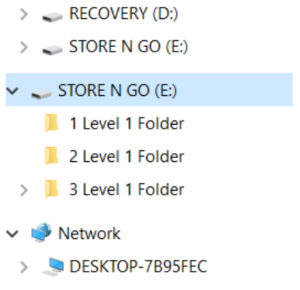
A hierarchical file system is a way that drives, folders, and files are organized on an operating system. A drive is a location where programs, folders, and files can be saved. On many computers the C: or C drive is the first primary drive on a computer’s hard drive. When a secondary drive, like a flash drive, is inserted into the computer, it is also another drive that can be used to save files on (Figure 1).
To create an organized file system, the user should create folders on the drive to help organize the files that are saved. Within a folder, subfolders can be created to further organize information. Within the folder or subfolder, the user can save a file.
In Figure 1, the user created three folders in the E drive named Store N Go. These three folders are considered Level 1 folders because they were saved in the drive and not in another folder.
Notice the arrows to the left of the drives and also left of the “3 Level 1 Folder.” If the user clicks an arrow, it will show what is in the nearby drive or folder. For instance, look at Drive E. When the arrow was clicked, it becomes a downward pointing arrow, and the folders become visible. If the arrow is clicked again the folders will disappear. Clicking the arrows allows the contents of the drive or folder to expand or close.
File Path
The file path is the route to a file on a storage device. For example, let us look at this file path on Windows: C:\Computer\Word\ProjectA.docx
If you have a file, but cannot remember where you saved it, you can see the file path following these steps: Open File Explorer or press Windows Key + E. Find the file. Right click on the file and select Properties from the menu. On the General tab, the file path is in the Location field.
When navigating in File Explorer, the file path is also visible in the Address Bar (Figure 2A). The user can click on any section of the path to see additional subfolders (Figure 2B).


File Format
File format describes how the data is stored. The file format is labeled with file extensions. The file extension consists of three or four letters behind the period, after the name of the file. For instance, a user saves a Word document and labels it Inventory. The file name and extension would be: Inventory.doc or Inventory.docx. (See Table 1.)
| Common File Extension | Application |
|---|---|
| .doc | Microsoft Word file from Word 97 to Word 2003 |
| .docx | Microsoft Word file from Office Word 2007 to Word 2021 |
| .rtf | Rich Text Format |
| .txt | Plain Text; all formatting lost when file is saved |
| .xls | Microsoft Excel workbook for Excel 97 to Excel 2003 |
| .xlsx | Microsoft Excel workbook for Office Excel 2007 to Excel 2021 |
| .ppt | Microsoft PowerPoint presentation for PowerPoint 97 to Office PowerPoint 2003 |
| .pptx | Microsoft PowerPoint presentation for Office PowerPoint 2007 to PowerPoint 2021 |
| Portable Document Format by Adobe | |
| .exe | An executable format used for programs |
| .jpeg or .jpg | An image file |
| .zip | A compressed file extension |
Features of File Explorer
To open File Explorer, the user can use several different methods, including the following:
- Using the Start button and locating File Explorer.
- Double-clicking the File Explorer icon on the desktop (Figures 3A and 3B).
- Clicking the File Explorer icon on the taskbar.
- Using Window key + E key.
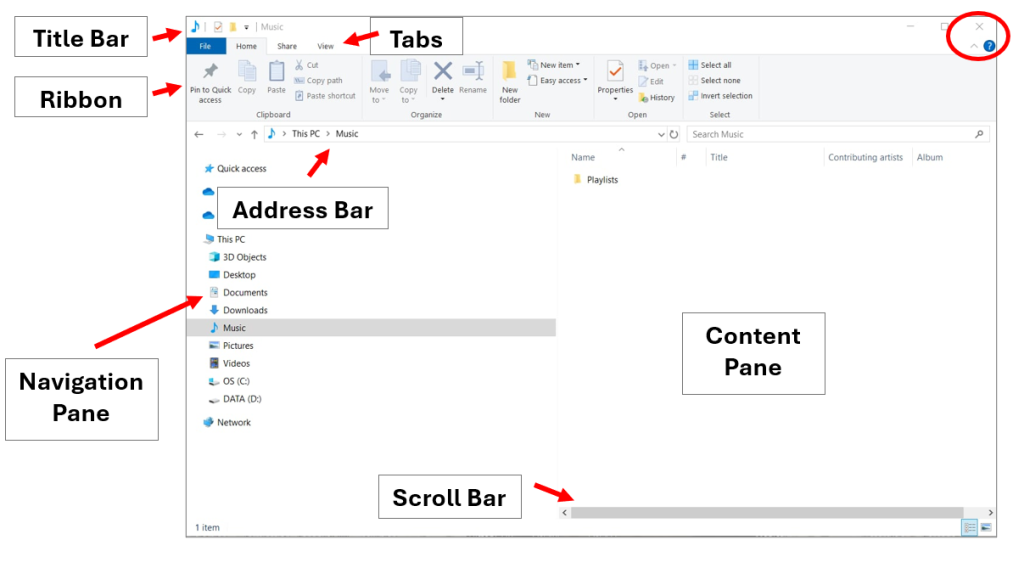
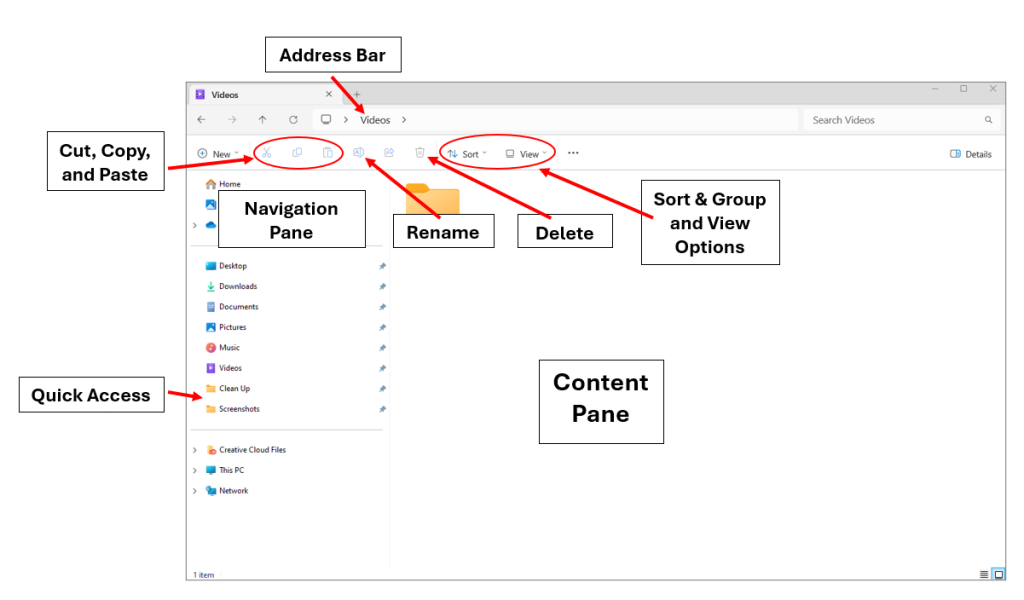
The features of File Explorer are shown in Figures 4A and 4B. The window has two main sections, the Navigation and the Content panes. When an item is selected in the Navigation pane, it appears in the Content pane. Just above these two panes is the Address bar, which shows the location of the folder. The Address bar also includes a Search box and navigation arrows.


Quick Access
When File Explorer opens, the Quick Access area is visible on the left side. This area contains frequently used folders and files. The user can also pin favorite folders to Quick Access, so they are easily accessible.
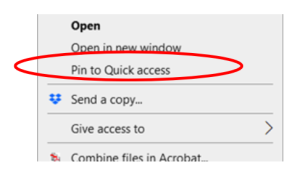
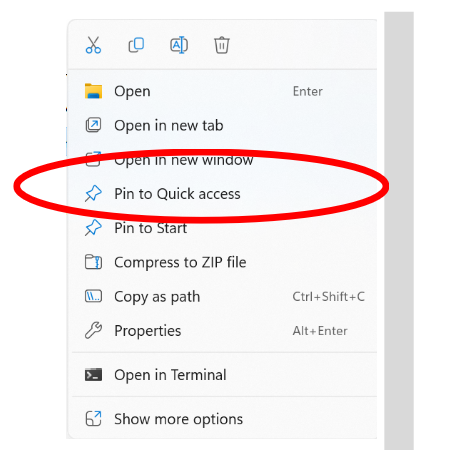
To have a folder appear in Quick Access, right click on the folder, and select "Pin to Quick Access" (Figures 5A and 5B). To unpin the folder from Quick Access, right click on the folder and select "Unpin from Quick Access."
Downloads Folder
The Downloads folder is a special folder that by default is located on the C drive. Also, by default, when downloading files from web browsers, the files will download to the Downloads folder. It is possible for the user to download files to another location besides the Downloads folder. Figure 4A shows the Downloads folder in the Navigation Pane.
Windows 10: Ribbons and Tabs
The ribbon is composed of tabs, groups, and commands. These elements are also used in Microsoft. The following discussion will address the Ribbon in Windows 10 File Explorer. (Windows 11 File Explorer has a simple toolbar.)
The Tabs for Windows 10 File Explorer include File, Home, Share, and View. When a tab is selected, it appears darker and the ribbon changes. The ribbon consists of commands and tasks that are related to the tab. The commands and tasks are organized into groups on the ribbon. The name of the group is located at the bottom of the ribbon. For example, the ribbon for the View tab has the following groups: Panes, Layout, Current view, and Show/hide. Additional menus can be found by clicking on the down arrow.
If the ribbon is not visible, click the down arrow just under the Close button in the upper right corner of the window. This will open the ribbon, and the arrow will become an up arrow. To close the ribbon, click the up arrow. Some users prefer the ribbon to be minimized. In this case, when a tab is clicked, the ribbon will appear until something is selected, or an action is done and then it will be minimized.
File Tab
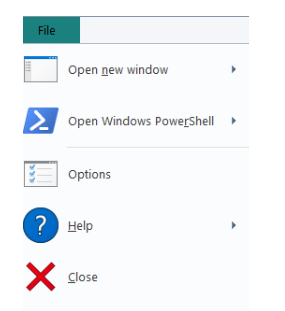
The File tab is unique (Figure 6). It is always blue. Unlike the other tabs, the File tab does not appear on the ribbon. Instead, it opens a menu.
Home Tab
The Home tab contains commands for managing the folders and files (Figure 7). Notice that some of the commands and text are grayed, for instance, “Pin to Quick access” and “Edit.” When something is grayed, it indicates it is not available. It may become available as the user is completing tasks. For instance, when a folder or file is selected, additional options may become available.

To move folders or files: If the user wants to move a folder or file to a new location, they must select the folder or file and select Cut in the Clipboard group on the ribbon (Figure 8). The user must find the new location and then select Paste in the Clipboard group. When a file or folder is cut, it is no longer located in the original location.
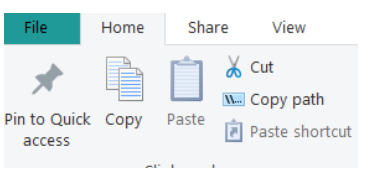
To copy folders or files: If the user wants to copy a folder or file and paste it to a new location, they must select the folder or file and select Copy in the Clipboard group on the ribbon (Figure 8). The user must find the new location and then select Paste in the Clipboard group. When a file or folder is copied and then pasted into another location, the user now has two copies of the file or folder. One copy is located in the original location and the other is in the new location.
Windows 11
The steps described above for copying and moving folders and files can be used in Windows 11. The commands Cut, Copy, and Paste are found on the simplified toolbar.
Share Tab
The Share tab allows the user to zip a folder or file (Figure 9). A zipped or compressed folder/file requires less storage space than the initial folder/file.

To zip a folder or file:
- Right click on the file or folder to zip.
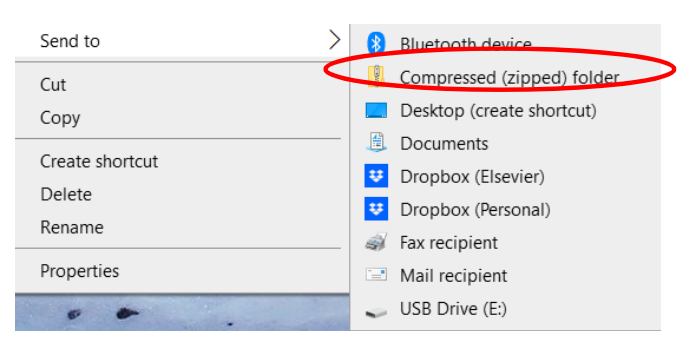
- Select Send to and then select Compressed (Zipped) folder (Figure 10A).
- A new zipped folder/file will appear. (The icon appears as a folder with a zipper.)
Windows 11
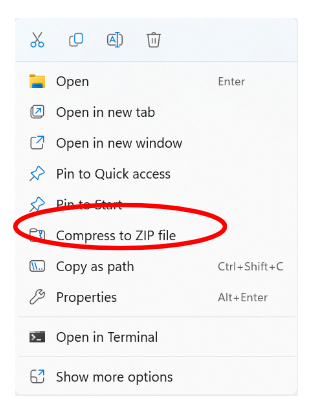
Right click on the folder or file to zip. Select Compress to Zip file on the menu (Figure 10B).
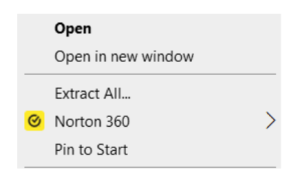
To unzip (extract) a folder or file in Windows 10 or 11, the user must locate and open the zipped file or folder. The folder or file needs to be dragged to or saved to a new location. The user can also right click on the zipped folder, select Extract All, and follow the directions to unzip the folder (Figure 11).
Note: If a file is opened from a zipped folder and it is not saved in a new location, any edits to the file will be lost. If opening a file from a zipped folder, save the file immediately to a new location before editing it. This will prevent the loss of edits if the user forgets to save it to a new location and just saves it to the original zipped location.
View Tab
The View tab provides the user with options of how to view the files and folders (Figure 12). The Layout group provides options for viewing the files and folders. For example, they can be viewed as icons or details (such as file size and dates) can be listed for each file and folder. The Panes group provides options for the appearance of the panes.

Managing Files and Folders
In File Explorer, folders and files can be opened and deleted. Folders can also be created. Remember the location of the folder is indicated in the address bar.
To Open a Folder and a File
To open folders, double-click on the folder to open it. All the files and subfolders in the opened folder will be shown.
There are two ways a user can open files:
- The user can find the file using File Explorer. Once the file is visible in the Content pane, double-click on the file. This will open the default application first and then the file will be opened within the application. For instance, if the user clicked on a letter.doc or letter.docx file, Microsoft Word would open, and the letter would be opened in the application.
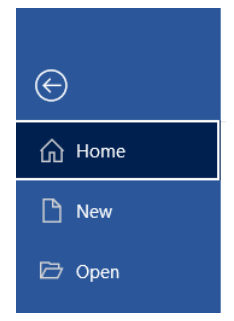
- The user can open up the application first and then open up the file using the application. For Microsoft applications, this can be done by selecting the File tab, and then Open on the menu (Figure 13).
To Create a New Folder
When creating a new folder in File Explorer, the user can either use the ribbon or the right click. Before creating the new folder, the user must position the pointer to where the new folder will be placed. Using the Navigation Pane, click on the folder or drive where the new folder is to be placed.
Regardless of how the folder is created, the user will need to type the name of the folder in the editable text box and then press Enter (Figure 14A).
- Using the Ribbon, click on the Home tab. In the New group, click on New folder (Figure 14B).


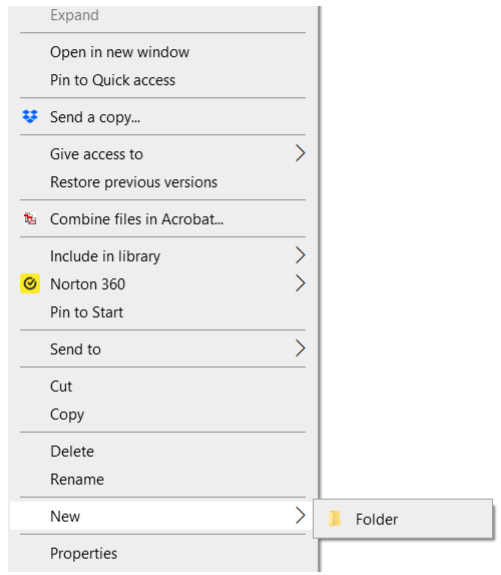
- To use the right click technique, the user should select the drive or folder in the Navigation Pane. Right click on the drive or folder, select New, and then select Folder (Figure 15).
Windows 11
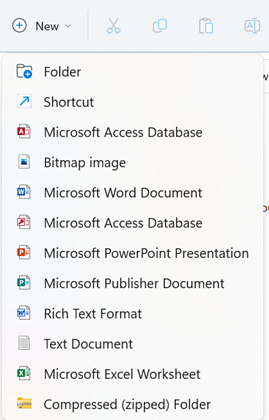
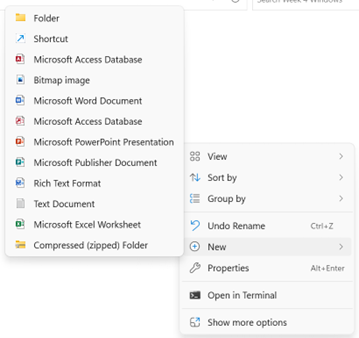
To create a new folder, the user can do one of the following methods:
- Select New on the toolbar and click Folder from the dropdown menu (Figure 16A).
- Right click in an opened space in the Content Pane. Select New and then Folder from the menus (Figure 16B).
Regardless of how the folder is created, the user will need to type the name of the folder in the editable text box and then press Enter (Figure 16A).
To Rename a Folder or File
In File Explorer, the user can rename a folder or file. To do this click on the file or folder name. Wait about a second and click again. The current name will appear in an editable text box. Type the new name and press Enter.
The user can also click on the folder or file name and then right click. Select Rename and the editable text box will appear. Type the new name and press Enter.
When naming a file from a Microsoft application, some symbols are not allowed as part of the file name, including the following:
- Less-than (<) and greater-than (>)
- Forward slash (/) and backslash (\)
- Asterisk (*)
- Colon (:), question mark (?), and quotation mark (" ")
- Pipe (|)
To Delete a Folder or File
In Windows 10 and 11 File Explorer, the user can delete a folder or file. If a folder is being deleted, all of the files in the folder will also be deleted. Depending on the location (the drive) of the original document, different results may occur when the user is deleting a file or folder. To delete a file or folder, the user can do the following:
- Click and drag the file or folder to the Recycle Bin.
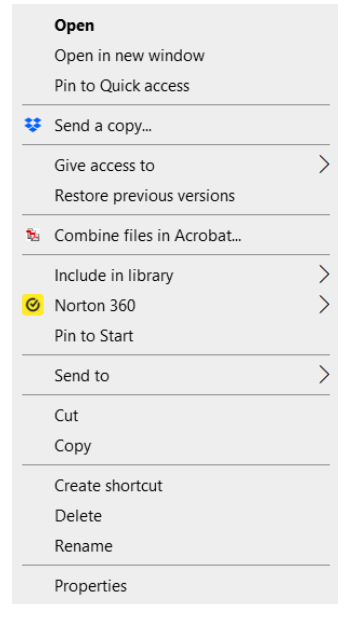
- Click on the file or folder in the Content Pane and then right click. Select Delete on the menu (Figure 17).
To Select Multiple Folders and Files
Many times, the user needs to complete a task with multiple folders and/or files. File Explorer allows the user to select and complete a task with multiple items.
- To select multiple folders or files that are not all together, press and hold the Ctrl key while selecting all items needed.
- To select multiple folders or files that are all together, click on the first item, press and hold the Shift key and then click on the last item. All items between the first and the last items should be selected.
- If the user is viewing the files and folders as icons, click and drag the mouse to form a box. All items within the box will be selected.
- If the user wants to select all the files within a folder, open the folder and press Ctrl + A keys.
To Move Files and Folders
File Explorer allows the user to move files or folders to different folders. To move a file or folder, click and drag the file or folder to the new location. (Click and drag means the user must click on the file or folder, keeping the left click held down while using the mouse to move to a new location).
Once the file or folder is in the new location, release the mouse click. This process is called drop. The user should be aware of the following when moving files and folders:
- If the user drags and drops a file or folder from one drive to another drive, the user will create a copy. This means the file or folder will be in the initial location and also in the new location. To move the file or folder and not create a copy, the user can press and hold the Shift key while performing the drag and drop process between drives.
- If the user drags and drops a file or folder from the same drive to a new location on the same drive, the user will move the file or folder. This means the file or folder is not in the initial location, but now in the new location.
To Copy a File or Folder
To copy a file or folder, right click on the file or folder. Select copy on the menu (or Ctrl + C) and then move to the new location. Right click and select Paste on the menu (or Ctrl + V). If the user is pasting the file or folder in the same location as the initial file or folder, the copy will have "-Copy" after the name. If copied to a new location, the file or folder name will not change.
Instead of using the right click procedure, the user can press and hold the Ctrl key while performing the drag and drop process. This will copy the file or folder.
To Create a Shortcut
A shortcut creates a link to a file or folder. A shortcut can be placed on the desktop or within a folder. When the user double-clicks on the shortcut, the file or folder will open.
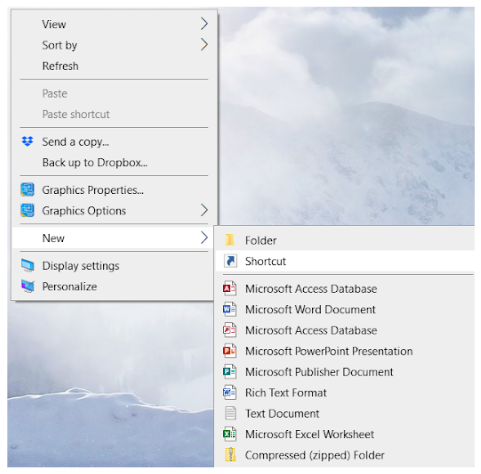
To create a shortcut to the Desktop for Windows 10 or 11, follow these steps:
- Right click on an empty spot on the desktop.
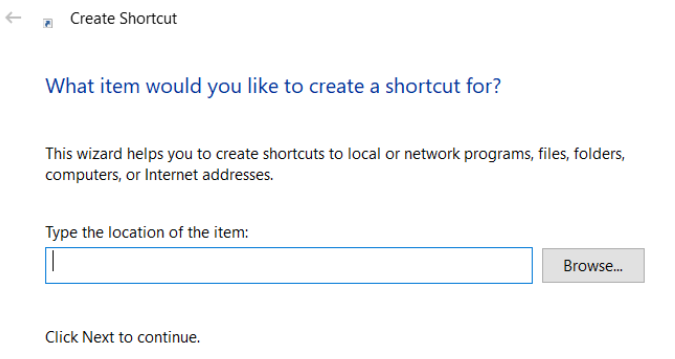
- Select New and Shortcut (Figure 18A).
- Click Browse and find the item (Figure 18B). Click OK.
- Click Next.
- Type a name for the shortcut and click Finish to create the shortcut.
To Create a Shortcut in a Folder
To create a shortcut in a folder, hold down the Ctrl + Shift keys while doing the drag and drop procedure. Release the keys when the file or folder is dropped in the new location.
The shortcut will have a different appearance than the original file or folder. For instance, a shortcut was created for Ch 6 Review (Figure 19A). Notice that the shortcut is clearly labeled "-Shortcut," and the file type indicates "Shortcut" (Figure 19B).


Taking Screenshots
Knowing how to take a screenshot is helpful when you have a computer problem or need to share information with another person. A screenshot can also be called a screen capture or print screen.
There are a variety of ways to create a screenshot. The process is composed of two main steps:
- Capturing the screen image.
- Pasting the image into a document or email.
The user can take a screenshot using the ALT + Print Screen (PrtSc, PrntScrn, or PrtScn) key on the keyboard. After taking the screenshot, paste the image into a document or email using Ctrl + V.
In Microsoft Windows 10, two helpful tools can be used to take screenshots - Windows Snipping Tool and Windows Snip & Sketch Tool. In Windows 11, these two tools were merged into the Snipping Tool. The following sections describe how to use these tools.
Windows Snipping Tool
To use the Snipping Tool in both Windows 10 and 11, follow these steps:
- Open the Snipping Tool by clicking the Start button. Type "snip" into the search box on the taskbar. Select Snipping tool from the list of results. (In Windows 11, the user can open the tool by using the Windows logo + Shift + S keys.)
- When a small menu appears at the top of your screen, select the type of screenshot you want.
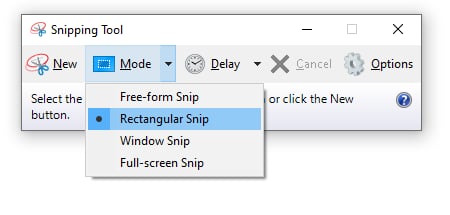
- Windows 10: Click on the down arrow to the right of Mode and select the type of screenshot (Figure 20A). Options include the following:
- Free-form Snip: Allows the user to select any shape for the snip by using the mouse.
- Rectangular snip: Creates a rectangular screenshot when the user uses the mouse.
- Window snip: Takes a screenshot of the window.
- Full-screen snip: Takes a screenshot of the entire screen.
- Windows 11: Click on the Snipping Mode command and select the desired option, which are the same steps as in Windows 10 (Figure 20B).
- Windows 10: Click on the down arrow to the right of Mode and select the type of screenshot (Figure 20A). Options include the following:

- Click on New.
- If the user selected full screen, the screenshot is automatically done.
- If the user selected one of the other three options, they would need to take the screenshot by moving the cursor/pointer over the screen.
- The image will appear in the Snipping Tool window.
- To save the image, the user can (a.) right click on the image and select Save As on the menu, (b.) select the File tab and then click Save As, or (c.) Use the shortcut keys Ctrl + S. The user will need to navigate to find the location to save the file and click Save.
- To copy the image, the user can (a.) right click on the image and select Copy on the menu, (b.) select the Edit tab and then click Copy, or (c.) Use the shortcut keys Ctrl + C. The image can now be pasted into an email or another document by using the Paste command (tool) in the software.
Windows Snip & Sketch Tool
The Snip & Sketch Tool in Windows 10 was a new tool, which allowed more functionality than the Snipping Tool. With the Snip & Sketch Tool, the user can capture a full-screen image, a rectangular image, or a free-form image. The tool also has a timer that allows a screenshot to be taken in 3 or 10 seconds.
Once the user creates the image, the screenshot should automatically open in a new window. The user can then crop, draw, and perform other editing tasks to the image before the image is pasted into a document or program or saved.
To use the Snip & Sketch Tool:
- Open the tool by either: (a) selecting the Start button, typing "snip" in the search box on the taskbar, and then selecting Snip & Sketch app from the list of results or (b) clicking Windows logo + Shift + S keys.
- When a small menu appears at the top of your screen, select the type of screenshot you want. Options include rectangular selection, free-form, whole window, or full-screen.
- Take your screenshot.
- The screenshot is saved to your clipboard. Place your pointer in the location of where you want to paste your image. Paste the image by clicking on the Paste button on the Home tab if in Microsoft Word or by using the right click on the mouse and selecting paste.
Learning Activities
File Management – Flash Cards
Application Exercises
Directions: Using File Explorer, create a folder and use this course name as the title. In the folder, create four subfolders. Use the following titles: Week 1, Week 2, Week 3, and Week 4. Create a shortcut to one of the subfolders. Place the shortcut at the same level as the folder with the course title.
A named collection of information, in the form of text, programs, graphics, etc., held on a permanent storage device such as a C drive or flash drive.
A place on a drive for holding and organizing multiple subfolders or files.
Also called filed maintenance, copying, renaming, relocating and deleting files in the computer.
A folder that is placed within another folder.
Describes the action of pressing on the left or right mouse button; can be one or more clicks.
A small picture or image that represents an application, file, or folder. The user can click or double click the icon to open the application software, file, or folder.
The main screen display of a personal computer where icons, windows and other items appear.
Found at the bottom of the computer screen by the default setting. Contains selectable buttons and icons of opened and pinned application software, along with the date and time.
A rectangular area on a screen in which a document or application can be viewed. Most windows allow the user to minimize, maximize, and close them.
Describes the action of placing a shortcut on the taskbar, which allows the user to quickly access the application software.
The preset selection of an option offered by a system and will always be used unless the user changes it.
A picture created by copying all or part of a computer screen.

