Chapter 7 Basic Formatting in Word
Vocabulary
Dialog box: A dialog box displays information and allows the user to interact with it. For instance, when the Dialog Box Launcher is clicked, a dialog box appears. Unlike a window, most dialog boxes do not contain a maximize and minimize button. They contain just a close button.
Dialog Box Launcher: A button (with a picture of an arrow) found on the lower right corner of Ribbon groups that is used to open the dialog box.
Group: A section on the Microsoft Ribbon that has related tools, commands, and options.
Keyboard shortcut: A key or a combination of keys that can be used to perform a task that can typically be done with the mouse.
Introduction
On the Home Ribbon, the tools in the Clipboard group and the Font group are frequently used. These contain basic formatting tools, along with the cut, copy, and paste tools. This chapter discusses these two groups, along with the Proofing group on the Review tab.
The Home Tab
The Ribbon for the Home tab includes tools and options for formatting and editing a document. The following Groups are the most commonly used ones on the Ribbon:
- Clipboard: Used to copy, cut, and paste content. The Format Painter allows the user to copy and apply the same format to multiple areas of the document.
- Font: Used to select the font type and size. Options in this area allow the user to apply bold, italic, and underline font. Subscript, superscript, strikethrough, font shade, and font color are also options available to the user. The Dialog Box Launcher provides additional options, including character spacing, which allows the user to space out each letter in a word.
- Paragraph: Used to insert bullets, numbering, and multilevel lists. Indented content can be moved either to the right or left. Content can also be aligned left, center, or right. This group also contains the tools for shading and borders, along with sort and show/hide. The Dialog Box Launcher provides additional options to insert tabs and change spacing and indents. Using this Dialog Box Launcher to help create consistent line and paragraph spacing provides a polished looking document.
- Styles: Provides many types of styles, including headers, fonts, and titles. The user can also create unique styles.
- Editing: These tools are used for finding and replacing text, along with selecting some or all content.
This section will cover the first two groups on the Home tab, the Clipboard group and the Font group.
Clipboard Group
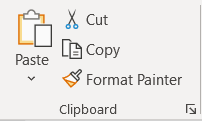
The Clipboard group consists of Paste, Cut, Copy, Format Painter, and a Dialog Box Launcher (Figure 1).
Cut, Copy, and Paste
When content is cut, it is removed from the initial location and can be pasted into a new location. When content is copied, it remains in the initial location and can be pasted into a new location.
- To perform the cut and paste technique: Select the content to be cut. Click Cut (on the Home tab or on the right click menu) or use the keyboard shortcut (Ctrl + X). Move the insertion point to the new location, where the cut text will be placed. Click Paste (on the Home tab or on the right click menu) or use the keyboard shortcut (Ctrl + V).
- To perform the copy and paste technique: Select the content to be copied. Click Copy (on the Home tab or on the right click menu) or use the keyboard shortcut (Ctrl + C). Move the insertion point to the new location, where the copied text will be placed. Click Paste (on the Home tab or on the right click menu) or use the keyboard shortcut (Ctrl + V).
Paste Options
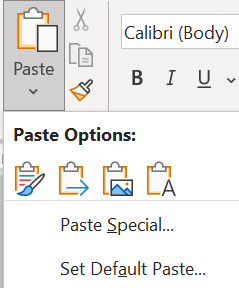
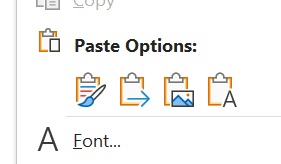
Paste options are available by clicking the down arrow below Paste in the Clipboard group or by right clicking (Figures 2A and 2B). The user can hover over the image to see the type of paste option. The types of paste options available during a task can vary (review Table 1).
| Icon | Name | Description |
|---|---|---|
| Keep Source Formatting | Keeps the original formatting of the text when pasting it elsewhere. | |
| Merge Formatting | The original formatting of the text is changed to the formatting of the new location’s surrounding text. | |
| Picture | The pasted text is inserted as an image. | |
| Keep Text Only | All formatting is removed from the pasted text. |
Drag and Drop Text
The user can drag and drop text instead of cutting and pasting it. To perform drag and drop, select the text that needs to be moved. Click, hold the mouse click down, and drag the text to the new location. The arrow will have a rectangle at the bottom of it to indicate text is being moved. When the pointer is at the desired location, release the mouse click. The text will appear in the new location.
Dialog Box Launcher
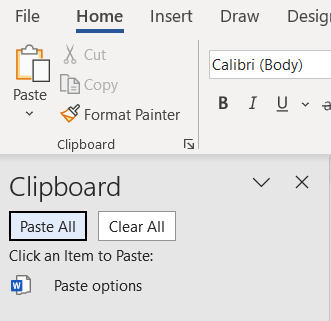
The Dialog Box Launcher opens up the Office Clipboard. The Office Clipboard shows the content (e.g., text and graphics) that you have cut or copied. The latest item you copied will be on the top of the list. To use the Dialog Box Launcher, follow these steps:
- Click the launcher in the lower right corner of the Clipboard group. The Clipboard pane will appear on the left side of the screen (Figure 3).
- Position the insertion point where you would like the content to be placed.
- Click the content in the Clipboard pane. It will appear in your document where the insertion point was located.
- To close the pane, click the X in the upper right corner of the pane.
Format Painter
The Format Painter is used to copy the formatting of one section and apply it to other sections. To use the Format Painter to apply formatting to one section, follow these steps:
- Select the content with the formatting you want to copy.
- Click the Format Painter or use the keyboard shortcut (Ctrl + Shift + C).
- Select the content you want to apply the formatting to. (You will see a little paintbrush appear as you select the content.)
If you want to copy the formatting to multiple areas, perform the following:
- Select the content with the formatting you want to copy.
- Double-click the Format Painter.
- Select the content you want to apply the formatting to and continue to select the content and apply the new formatting.
- To turn off the Format Painter, click the Format Painter.
Font Group
When creating basic Word documents, the Font group is one of the most used sections of the ribbon (Figure 4). With the Font group, many options are available for the font. To use these font options, select the font and then click the desired option(s). Some of the options have down arrows, such as Underline. By clicking on the down arrow, a selection of lines appears, and the user can click the option preferred. Text Highlight Color and Font Color are discussed in more detail, along with the Font Dialog Box Launcher.
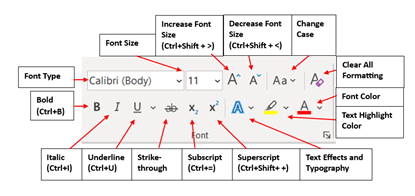
When using the bottom row buttons in the Font group, the user can apply bold, italicize, and underline font. Additional buttons in the Font group are as follows:
- Strikethrough button: Allows the user to “cross out” text (e.g.,
Example). - Subscript button: Allows the user to type small letter font below the text line. For example, if the user were typing the chemical abbreviation for oxygen, the subscript button is used for the 2 (e.g., O2).
- Superscript button: Allows the user to type small characters above the text line. For example, if the user were making the degree symbol, the superscript button can be used (e.g., 32oF).
- Clear all Formatting button: Allows the formatting to be removed from text.
- Change Case button: Provides the user with additional options to change to lowercase or uppercase letters, along with other styles.
The remaining sections discuss the remaining buttons in more detail.
Font Type and Font Size
The font type can be selected by doing either of the following:
- Typing in the font name in the box after clicking on the font type box.
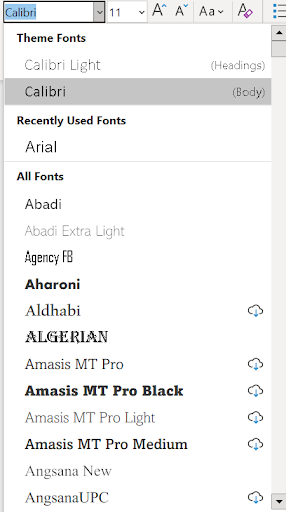
- Clicking the down arrow to open a menu of font types (Figure 5A). The user can scroll through the font types and click the selected font.
The font size works the same as the font type. The user can click the box and type the size, or they can click the down arrow and select the size (Figure 5B).
The Increase Font Size and the Decrease Font Size buttons can be used to adjust the font size.
Remember, the text must be selected prior to selecting the font type and size.

Text Effects and Typography
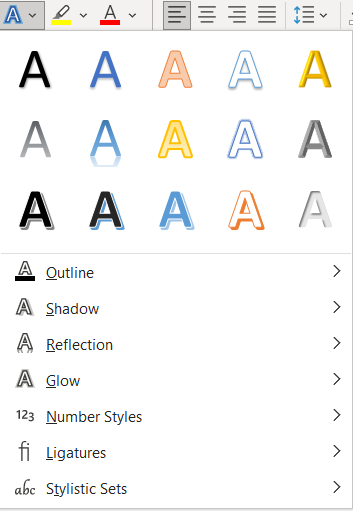
The Text Effects and Typography button provides the user with the ability to change the look of the font by changing the fill or the outline (Figure 6). Additional effects, such as glows, shadows, and reflections, can also be added.
To use the Text Effects and Typography button, select the text and click the Text Effects and Typography button. Click the desired option or click the side arrow to see additional options.
Font Color
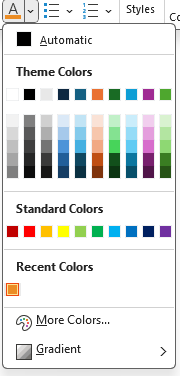
When the user clicks on the Font Color button, the color shown on the button is applied to the selected text.
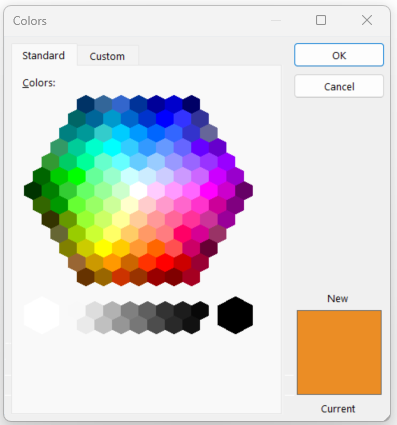
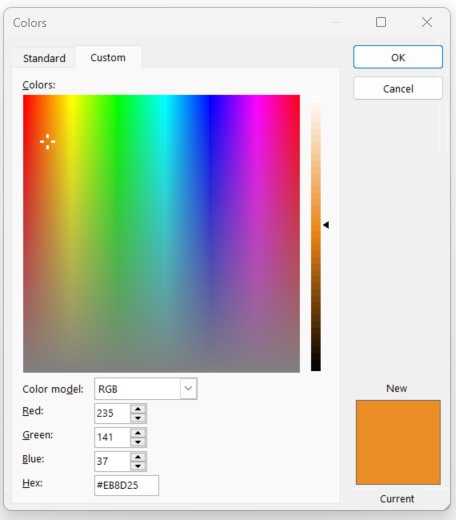
The user can also click the down arrow to see additional color options. The Theme Colors changes based on the Theme applied to the document (Figure 7A). For additional colors, the user can click Gradient or More Colors. With the More Colors option, the Colors dialog box opens, and the user has a choice between the Standard tab or the Custom tab (Figures 7B and 7C). Both tabs work the same. The user clicks a color and clicks OK. The new color is applied to the font.
Text Highlight Color
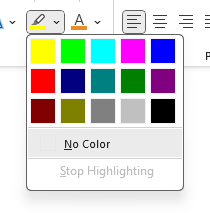
When the Text Highlight Color down arrow is clicked, additional highlight colors are available (Figure 8). Select the text and then click the color of choice.
To remove highlight color, select the highlighted text and then select No Color.
The Text Highlight Color option can be turned on and off. To turn on, click the option. The pointer appears as a highlighter. To use, position the pointer over the text to be highlighted. To turn off the highlight option, click the Text Highlight Color option again.
Font Dialog Box Launcher
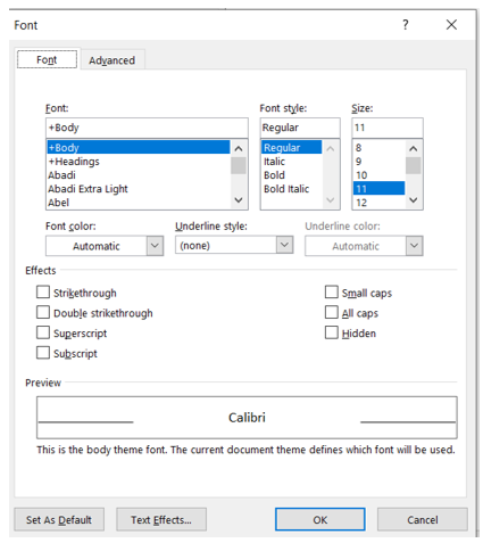
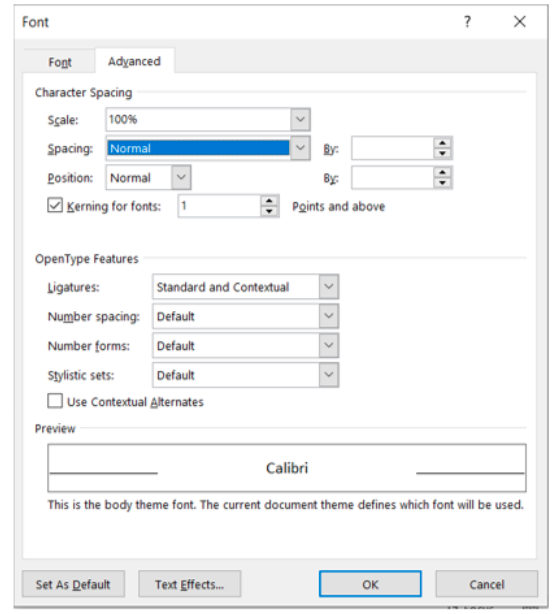
The Font Dialog Box Launcher can be opened by clicking the small arrow in the lower corner of the group or by using keyboard shortcut keys (Ctrl + Shift + F). The Font Dialog Box Launcher allows the user to apply many different types of font options. The user can select from two tabs – Font and Advanced.
- Font Tab: The user can apply font options found in the Font group, such as bold, underline, and font size (Figure 9A). Additional options area also available, such as All caps and Small caps. Of the two tabs, the Font tab is used more often.
- Advanced Tab: The user has a choice of more complex feature formats, such as character spacing scale, spacing, and position (Figure 9B).
The font options selected can be set as default. Text effects can also be applied.
The Review Tab
The Review Tab in MS Word contains tools and options to help the user proof a document and track changes. The Review Tab has the following groups:
- Proofing: Contains useful tools such as spelling and grammar check, thesaurus, and word count. These tools will be discussed in this section.
- Speech: Allows the document to be read aloud for the user.
- Accessibility: Contains options and tools to help the user create documents that are accessible to people with disabilities. Uses an Accessibility Checker to help the user identify issues.
- Language: Allows the user to set translation and language preferences.
The following groups on the Review Tab are commonly used if a document is being shared and reviewed by others:
- Comments: Allows the user to see and add comments to a document.
- Tracking: Allows tracking of changes in the document. Helpful when circulating a document to others to review.
- Changes: Allows the user to accept or reject changes suggested in a document.
- Compare: Allows the user to compare two versions of the same document to identify the changes.
- Protect: Allows the user to add restrictions to limit formatting and editing of the document.
The following sections will focus on the tools within the Proofing group.
Proofing Group
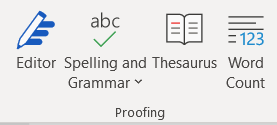
Of the four tools in the Proofing group, three are used most often in college and administrative settings (Figure 10). The following sections will discuss the Spelling and Grammar, Thesaurus, and Word Count tools.
Spelling and Grammar
The user can do a spelling and grammar check. Autocorrect is a spelling and grammar checker and that is used by default in MS Word. Using Autocorrect is discussed in the following section.
To use the spelling and grammar check, click on Spelling and Grammar in the Proofing group on the Review Tab. On the right, the Editor pane will appear showing corrections and refinements.
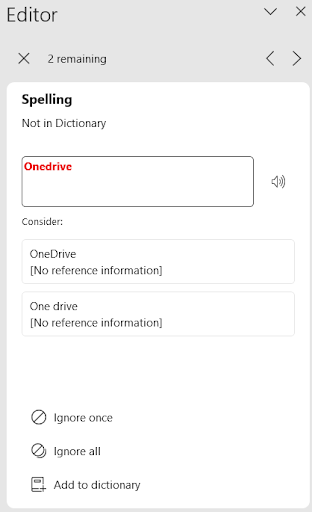
- To correct the spelling: Click on Spelling under Corrections. The first error is shown in the document. A list of potential corrections to consider is given. The user can click on the correct word, click on the Ignore option, or add the word to their dictionary (Figure 11A).
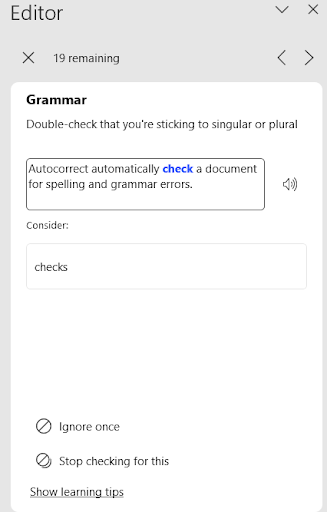
- To use the grammar check: Click on Grammar under Corrections. The first error is shown in the Content window, like with the spelling check. On the Editor pane, the user can select the correction under “Consider” or click on Ignore Once or Stop checking for this (Figure 11B).
Autocorrect
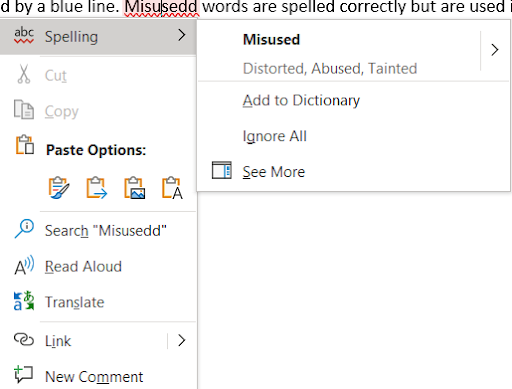
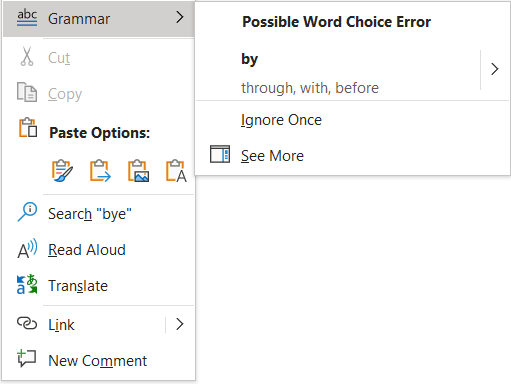
Autocorrect automatically checks a document for spelling and grammar errors. Misspelled words or repeated words are indicated by a red line. Grammatical errors and potentially misused words are indicated by a blue line. Misused words are spelled correctly but are used incorrectly.
Right clicking on a misspelled word brings up additional tools and options (Figure 12). The user can click on the following:
- The correct spelling from the list.
- Ignore All if the word is spelled correctly.
- Add to Dictionary, so the word is in the dictionary for the next time it is used.
Right clicking on a grammar error brings up additional tools and options (Figure 13). The user can click on the following:
- The correct word, phrase, or punctuation from the list.
- Ignore Once.
Changing Settings for AutoCorrect
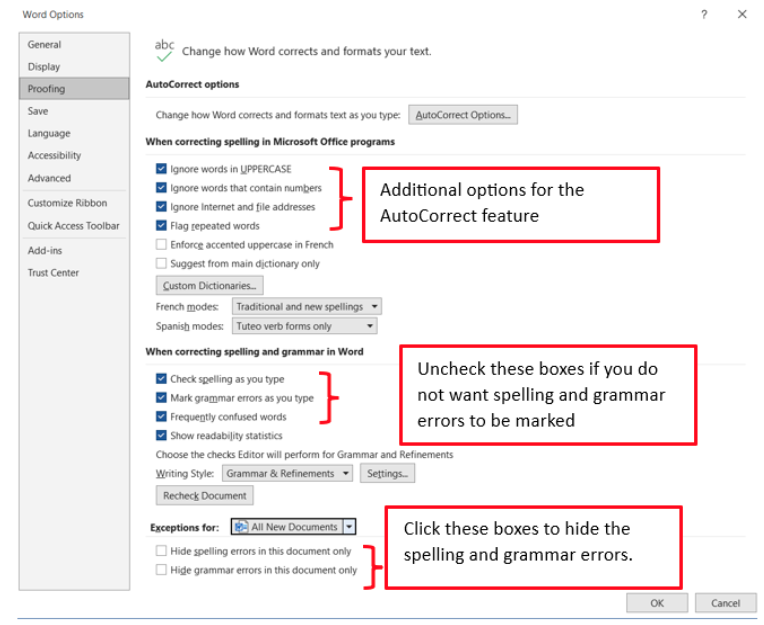
The user can change the default settings for the automatic spelling and grammar check. The setting can be found in the Backstage view.
- Click the File tab and select Options.
- On the Word Options dialog box, select Proofing.
- Add or remove checkmarks (Figure 14).
- Click OK.
Thesaurus
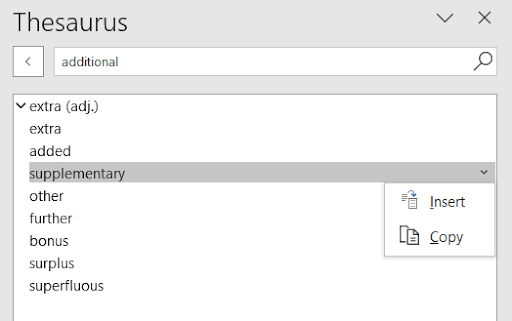
The Thesaurus in MS Word provides the user with a list of synonyms (words with the same meaning). A thesaurus provides the user additional ideas of related terms and identifies the part of speech for the words provided (e.g., verbs, nouns). To use the thesaurus, follow these steps:
- Select the term to look up.
- Click the Review tab and select Thesaurus.
- A list of words will appear. Right click on a word to replace the initially selected word.
- Click Insert to have the word replace the initially selected word (Figure 15).
By clicking on a word in the Thesaurus pane, the word moves into the search box and synonyms for that word appear in the list.
Word Count
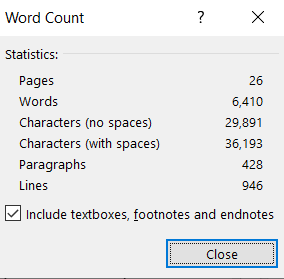
The Word Count tool provides the user with statistics related to the document size, including the number of words and paragraphs (Figure 16). To use the Word Count tool, click on the Review tab and select Word Count. The Word Count dialog box appears.
Learning Activities
Basic Formatting in Word – Flash Cards
Application Exercise 1
- Open a new MS Word document and save it to your drive.
- Type a person’s name on the first line. (The name can be real or fictitious.) Press the Enter key.
- Type a second person’s name. Press the Enter key.
- Continue until you have five names in a list.
- Using the cut and paste tools, organize the names in alphabetical order by their first names.
- Select all of the names and apply black Arial 12 pt font.
- Change the format of the names:
- For the first name: Select the name and change the font color to red.
- For the second name: Select the name and apply yellow highlight to the name.
- For the third name: Select the name. Open the Font Dialog Box Launcher. Select the Small caps option found in the Effects section. Press OK.
- For the fourth name: Select the name. Open the Font Dialog Box Launcher. Select the Strikethrough option found in the Effects section. Press OK.
- For the fifth name: Change the font type to a style of your choice.
- Select the second name. Click the Format Painter or use the keyboard shortcut (Ctrl + Shift + C). Select the fifth name.
- Spell check the document.
- Save the document.
A section on the Microsoft Ribbon that has related tools, commands, and options.
A button (with a picture of an arrow) found on the lower right corner of Ribbon groups that is used to open the dialog box.
A key or a combination of keys that can be used to perform a task that can typically be done with the mouse.
A dialog box displays information and allows the user to interact with it. For instance, when the dialog box launcher is clicked, a dialog box appears. Unlike a window, most dialog boxes do not contain a maximize and minimize button, just a close button.

