Chapter 10 Citations, Tables, and Mail Merge
Vocabulary
Ascending sort: Organizes the information from A to Z or from the smallest number to the largest number.
Banded: Having strips or bands of contrasting colors.
Cell: A single box on a table or spreadsheet that can contain text or numbers.
Column: The vertical series of cells separated by lines or space from other vertical series of cells and found in a table or spreadsheet.
Descending sort: Organizes the information from Z to A or from the largest number to the smallest number.
Header row: The top row of a table that contains the titles for the columns.
Hover over: Moving the mouse pointer over an option without selecting it.
Parenthetical: Using or containing parentheses.
Row: The horizontal series of cells separated by lines or space form other horizontal series of cells and found in a table or spreadsheet.
Table: A rectangular grid consisting of columns and rows. Allows for an orderly arrangement of data.
Introduction
In the past chapters, you have learned to format text and documents. This chapter will address inserting citations, creating bibliographies, working with tables, and using the Mail Merge tool. Commands on the References, Insert, and Mailing tabs are discussed. When selecting a table in Word, the Table Design and Layout tabs appear on the tab row. Commands on these contextual tabs will also be addressed.
Citations, Bibliography, and Footnotes
When writing papers, citing sources can be a challenging task. With Microsoft Word, commands on the References tab have made this process much easier for the user.
Creating Citations
Using the tools in Word, the user can create in-text citations for citations styles. Chicago style, APA format, and MLA format are the most common citation styles. These are all parenthetical citation styles.
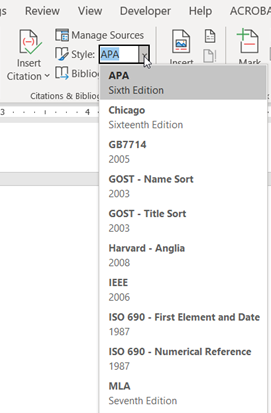
To create an in-text citation: The user needs to place the pointer at the end of the text to be cited. Select the References tab and select a Style type from the dropdown menu in the Citations & Bibliography group (Figure 1A). After selecting a style, click Insert Citation. Select a citation from the list or Add New Source.
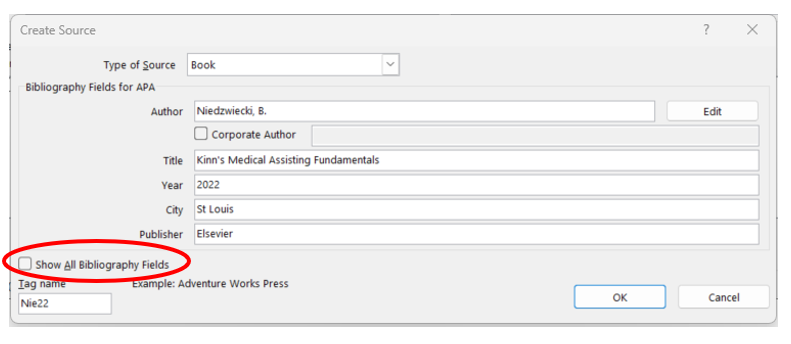
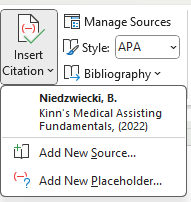
To add a new source: Once the Add New Source is selected, the Create Source dialog box appears (Figure 1B). Start by selecting the citation source by clicking on the desired choice from the Type of Source dropdown menu. Based on the type selected, different fields will display. Click Show All Bibliography Fields in the lower left area of the box to see additional fields (see Figure 1B). When this box is selected, the required fields are indicated. Complete the required fields and click OK. A citation will be entered into the text, and this source will be listed on the Insert Citation dropdown menu (Figure 1C).
To cite from the same source later in the document: Place the pointer at the end of the text to be cited. Select Insert Citation in the Citations & Bibliography group on the References tab. Select the citation from the list on the dropdown menu.
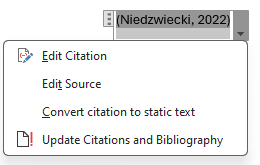
To edit in-text citations: Click on the in-text citation. Click the down arrow on the right side to see Citation Options (Figure 1D). To edit the page number, select Edit Citation from the menu. Select Edit Source to revise information regarding the source, such as the title or author. Other options that the user can select include Convert Citation to Static Text and Update Citations and Bibliography.
Managing Sources
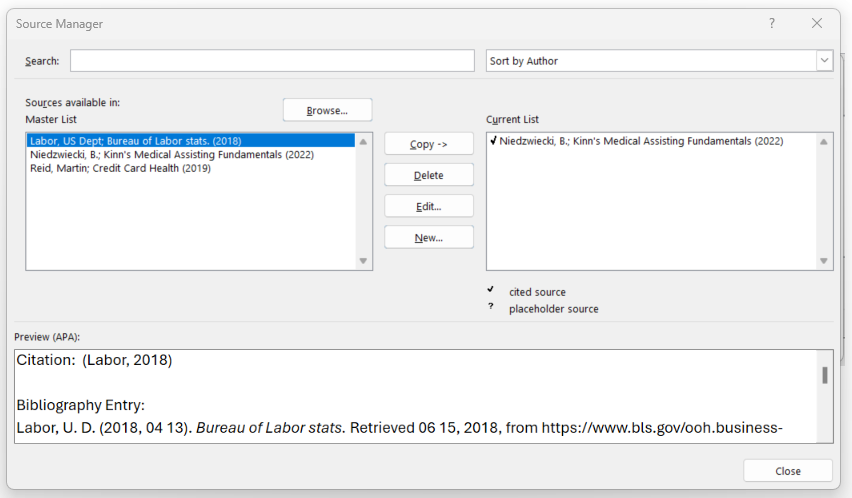
Word has a tool that allows the user to manage sources. To use, select the Manage Sources command (button) in the Citations & Bibliography group on the References tab. The Source Manager dialog box will open (Figure 2). The user can search for and sort sources. Sources can be deleted, edited, and moved to the current list.
Inserting a Bibliography, Reference List, or Works Cited Section
Once the citations are placed within the document, a bibliography, reference list, or works cited section can be quickly created.
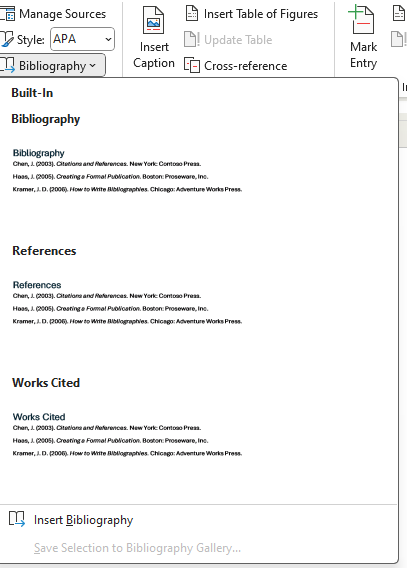
To create: Place the pointer in the location where the bibliography will be. Select the References tab and click Bibliography in the Citations & Bibliography group. When the dropdown menu appears, select the desired format. The user can select either Bibliography, References, or Works Cited from the dropdown menu (Figure 3A). The desired selection will automatically be inserted into the document.
To edit or update the bibliography, references, or works cited section: Click into the inserted section. At the top, select the little icon on the left to switch between Bibliography, References, or Works Cited (Figure 3B). Select the right button (Update Citations and Bibliography) to update the section.

Inserting Footnotes and Endnotes
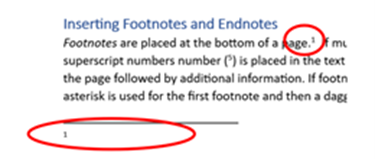
Footnotes are placed at the bottom of a page. If multiple footnotes are used in the document, superscript numbers (e.g., 5) are placed in the text, and the matching number is also at the bottom of the page followed by additional information. If footnotes are used infrequently in the document, an asterisk (*) is used for the first footnote and then a dagger (†) is used for the second one. (To add a dagger in Windows, hold down the Alt key and type 0134 using the numeric keypad. Do not use the number keys above the letter keys.) A footnote superscript number, asterisk, or dagger is usually placed at the end of the sentence following the punctuation mark (e.g., period).
An endnote is similar to a footnote, but it is placed at the end of the document just before the reference list or the bibliography. Usually, either footnotes or endnotes are used, but not both.
The footnote or endnote is used to cite a reference with certain styles, such as Chicago style. With APA and MLA, a footnote or endnote is used to provide additional information to the reader. These two styles do not use footnotes and endnotes for citations.
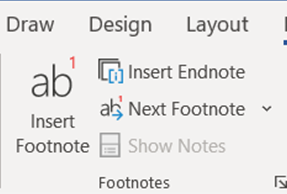
To add a footnote or endnote: Position the pointer in the location where the reference number will be placed. Select Insert Footnote or Insert Endnote in the Footnotes group on the References tab (Figure 4A). A number or symbol will be placed in the text. The pointer will be to the right of the number or symbol at the bottom of the page for footnotes (Figure 4B). The user can type in the information required after the footnote number or symbol. To return to the position of the footnote or endnote in the text, double-click the number or symbol at the start of the note.
To delete a footnote or endnote: Select the footnote or endnote in the text and press the Delete key. The reference in the text and at the bottom of the page or the end of the document will be removed.
Create a Table
Tables provide a way for information to be grouped and organized. Using a table in a document provides the reader with an easy-to-read format.
A table includes cells organized in columns and rows. The top row of a table usually contains the titles of the columns and is called the header row.
To navigate in a table, the user can use the mouse and click into a cell. A quicker way to move through cells is to use the Tab key. The Tab key will move the cursor to the next cell to the right in the row. Using the Shift key + Tab key will move the cursor to the cell to the immediate left of the current cell.
Microsoft Word contains tools to insert tables. Thus, several options are available to the user.
Insert a Table Using the Grid
- To insert a table, place the cursor in the location where the table should be inserted.
- Select the Insert Tab and click Table tool in the Tables group.
- A dropdown menu opens.
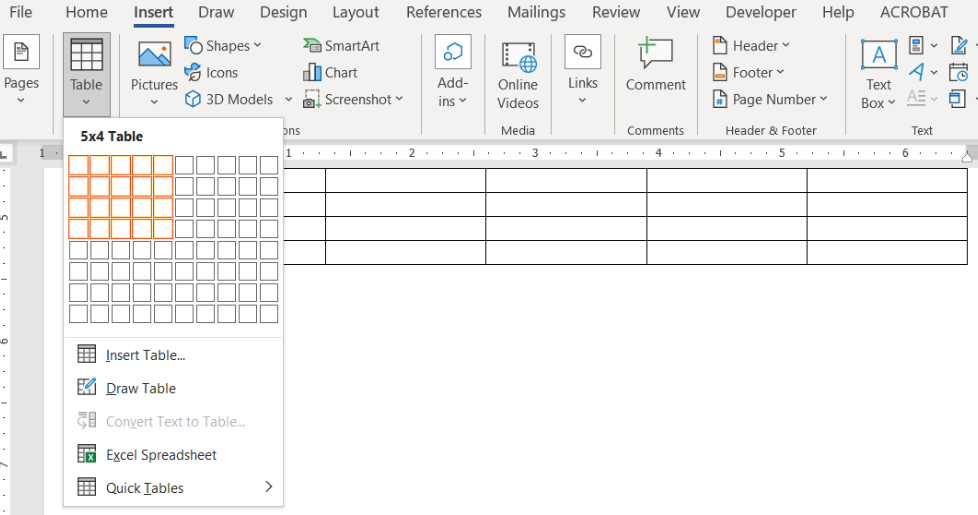
- Using the “Insert Table” grid, hover over and select the number of columns and rows needed (Figure 5). Click the table and the table will be inserted into the document.
Insert a Table Using the Table Dialog Box
- To insert a table, place the cursor in the location where the table should be inserted.
- Select the Insert Tab and click Table tool in the Tables group.
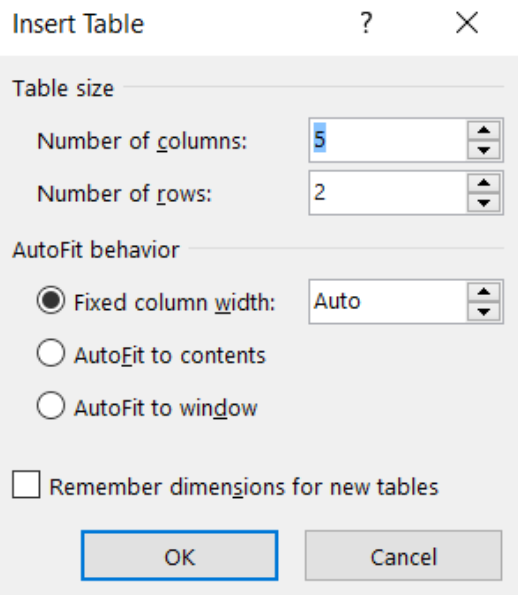
- When the dropdown menu opens, select the “Insert Table,” which is found below the grid (Figure 5). The Insert Table dialog box opens (Figure 6).
- Under the Table size section, indicate the number of columns and rows. The arrows to the right of the box can be used to adjust the number, or a number can be typed into the text box.
- Indicate the appropriate AutoFit behavior. Click OK.
Create a Table from Existing Text
- Select the text to be converted to a table.
- Select the Insert tab and click on the Table tool.
- On the dropdown menu, select Convert Text to Table.
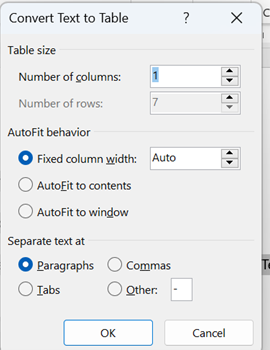
- When the Convert Text to Table dialog box appears, choose the options needed (Figure 7). Click OK.
Layout Tab
When a user clicks into a table, the Layout contextual tab appears on the far-right side (Figure 8). This tab allows the user to modify the table, including adding or deleting rows and columns, changing cell size, aligning text, and managing data.

Rows & Columns Group
The Row & Column group provides the user with options and tools to add rows and columns and delete rows, columns, and tables. These tasks can also be done using other techniques. This section describes different ways to add rows and columns and delete rows, columns, tables, and cells.
To Add a Row or Column
The user can add a row or column by using the Layout Tab, the plus sign, the right click menu, or the Hover Toolbar. A new row can also be added using the Tab key.
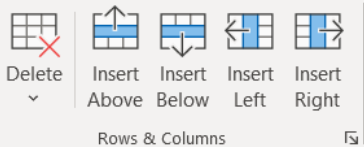
- Layout Tab: The Rows & Columns group on the Layout Tab contains options for adding rows and columns (Figure 9). To add a row or column, click in the table where the new row or column will be added. Select the Layout Tab. In the Rows & Columns group, select either of the following:
- “Insert Above” or “Insert Below” to insert a row.
- “Insert Left” or “Insert Right” to insert a column.
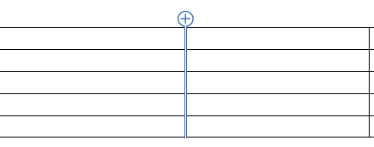
- Plus sign: Using the cursor, hover on the left or top side of the table. A plus sign appears. To add a row, click the plus sign on the left side (Figure 10A). A row will appear below the plus sign. To add a column, click the plus sign on the top side of (Figure 10B). A column will appear on the right side.

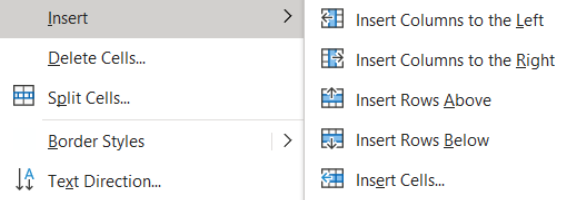
- Right click menu: Right click on the table and select “Insert” (Figure 11). An additional menu appears. Select the appropriate option.
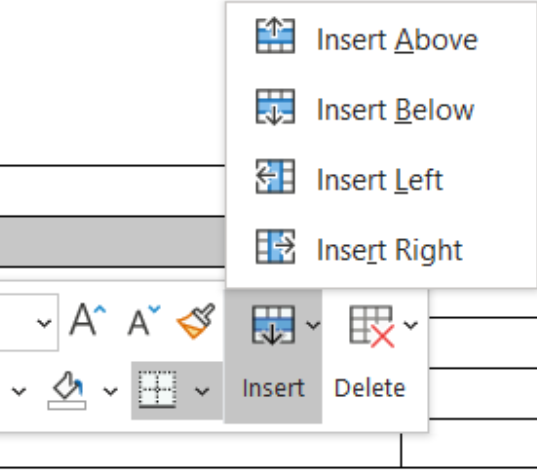
- Hover Toolbar: Select a complete row or column. Right click and the Hover Toolbar appears. Click Insert and then select the appropriate option from the menu (Figure 12).
- Tab key: If the cursor is in the last cell in the last row of the table and the Tab key is pressed, a new row will be added to the table.
To Delete a Column, Row, or Table
The user can delete a column or row by using the right click menu, the Hover Toolbar, or the Delete tool in the Rows & Columns group on the Layout Tab. The table can be deleted by using the Hover Toolbar or the Delete tool on the Layout Tab.
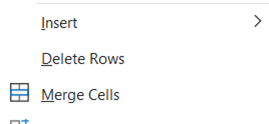
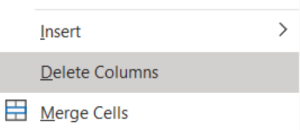
Right Click Menu: After selecting a complete row or column, right click to see the right click menu (Figures 13A and 13B). Select either Delete Rows or Delete Columns.
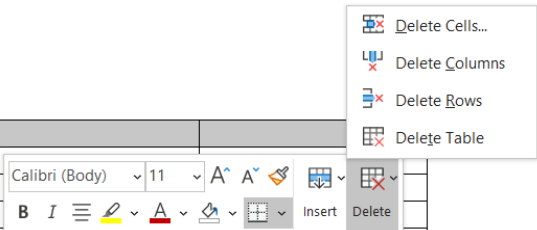
Hover Toolbar: Select a complete row or column. Right click and the Hover Toolbar appears. Click Delete and then select the appropriate option from the menu (Figure 14).
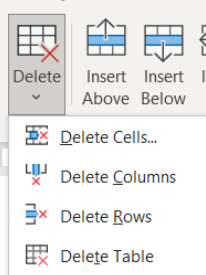
Layout Tab: The Rows & Columns group on the Layout Tab contains the Delete tool (Figure 15). To delete a row, column, or table, click in the row or column to be deleted. If the table is to be deleted, click into the table. Select the Layout Tab. In the Rows & Columns group, select Delete and then the appropriate option from the menu.
To Delete a Cell
When the user deletes a cell, it is important to ensure the data in the table is not compromised or shifted.
- Select a cell and right click to open the Hover Toolbar (Figure 16A). Select Delete.
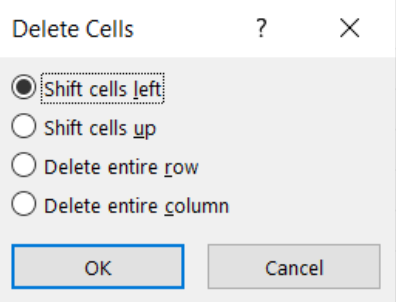
- The Delete Cells dialog box appears (Figure 16B).
- Select the appropriate option.
- Click OK.

Figure 16A. Hover Toolbar.
Merge Group
Within MS Word, tools are available to merge and split cells. Merging means to create one cell using two or more cells. Splitting a cell means to create two or more cells from one cell.
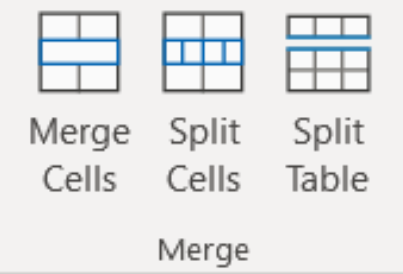
By using the options/tools in the Merge group on the Layout Tab, cells can be merged or split, or tables can be split (Figure 17). Other methods are also available and are discussed in this section.
Merge Cells
To merge cells, select the cells to be merged into one cell. These cells must be next to each other, either horizontally and/or vertically. After selecting the cells, do either of the following:
- Click on the Layout tab and select Merge Cells in the Merge group (Figure 17).
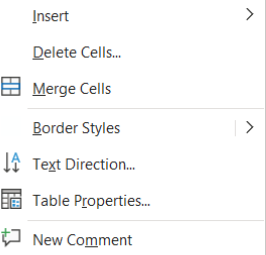
- Right click and select Merge Cells on the menu (Figure 18).
Split a Cell
To split a cell, select the cell to be split and do either of the following:
- Click on the Layout tab and select Split Cells in the Merge group (Figure 17).
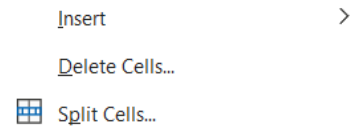
- Right click and select Split Cells on the menu (Figure 19).
Split a Table
To split a table, select the row, which will be the top row in the new table. After the row is selected, click on the Layout tab and select Split Table in the Merge group (Figure 17). All rows above the selected row will be in the first table. The selected row will be the first row of the second table.
Cell Size Group
The Cell Size group on the Layout tab allows the user to size the rows and columns. In the Cell Size group, the following commands are available:
- Autofit: To use, click on the table. Select Autofit in the Cell Size group on the Layout tab. Select Autofit Contents. Then, select one of the following three options:
- Autofix Contents: Used to size the columns so they automatically fit the contents.
- Autofix Windows: Used to automatically adjust the table width.
- Fixed Column Width: Used to “turn off” Autofit, so the columns or table are not automatically adjusted.
- Width and Height: The user can type the number or use the arrows to increase or decrease the size.
- Distribute Rows and Distribute Columns: Allows the user to make selected columns or rows the same size. To use, follow these steps:
- Select the columns or rows. If you need to select rows or columns that are not next to each other, press CTRL while selecting them.
- Select Distribute Columns or Distribute Rows in the Cell Size group on the Layout tab.

Change Row Size
There are several ways a user can change the column width.
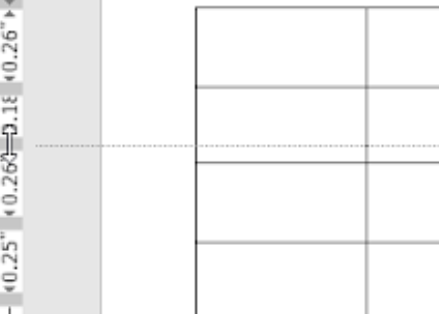
- Place the cursor/pointer on the row border that needs to be moved. Once the cursor changes to a double line with an arrow on the top and bottom side, drag the border to the height wanted (Figure 21A).
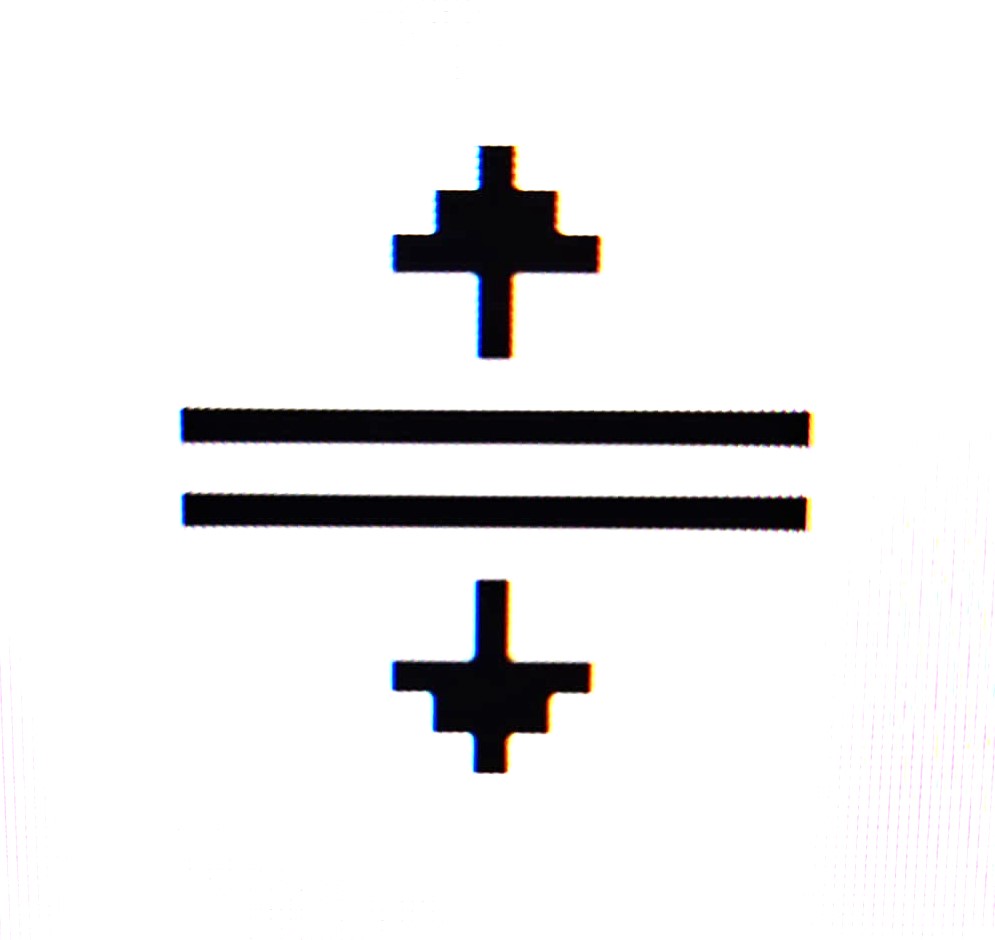
- Select a cell in the table and drag the marker on the ruler. The cursor will appear as a vertical line with an arrow on both ends (Figure 21B). If the user presses the ALT key while dragging the marker on the ruler, the size of the columns appears (Figure 21A).
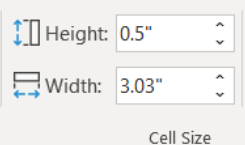
- Select a cell to resize. Select the Table Row Height box, found in the Cell Size group on the Layout tab (Figure 21C). Adjust the size as needed.
Change Column Size
There are several ways a user can change the column width.
- Place the cursor/pointer on the column border that needs to be moved. Once the cursor changes to a double line with an arrow on the right and left side, drag the border to the width wanted (Figure 22A).
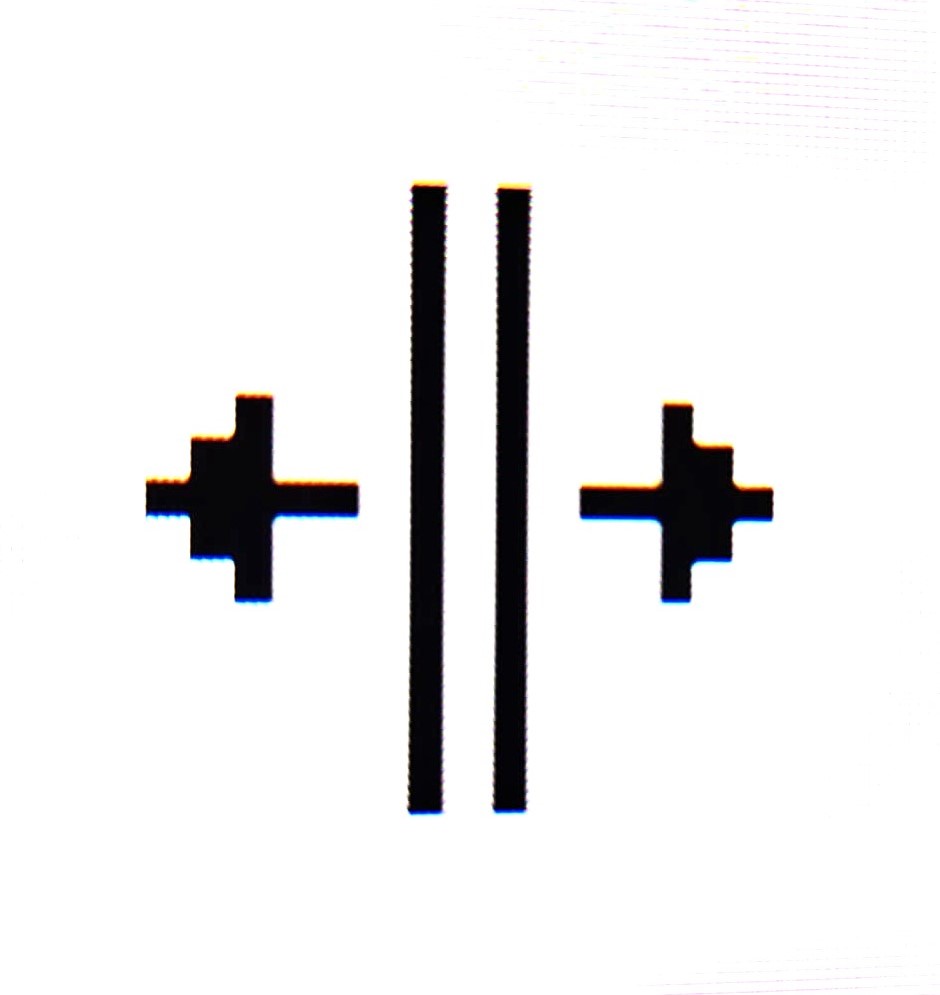
- Select a cell in the table and drag the marker on the ruler. The cursor will appear as a horizontal line with an arrow on both ends (Figure 22B). If the user presses the ALT key while dragging the marker on the ruler, the size of the columns will appear.

- Select a cell to resize. Select the Table Column Width box, found in the Cell Size group on the Layout tab (Figure 22C). Adjust the size as needed.

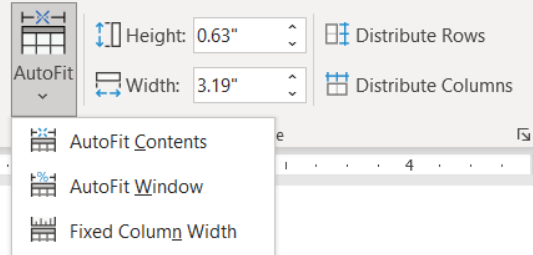
- To automatically resize the columns to fit the content, click on the table. Select the Layout tab and click AutoFit (in the Cell Size group) and click AutoFit Contents (Figure 22D).
Alignment Group
The Alignment group is used to align text or change the direction of the text. The changes are applied to any cells selected. The following are commands in this group:
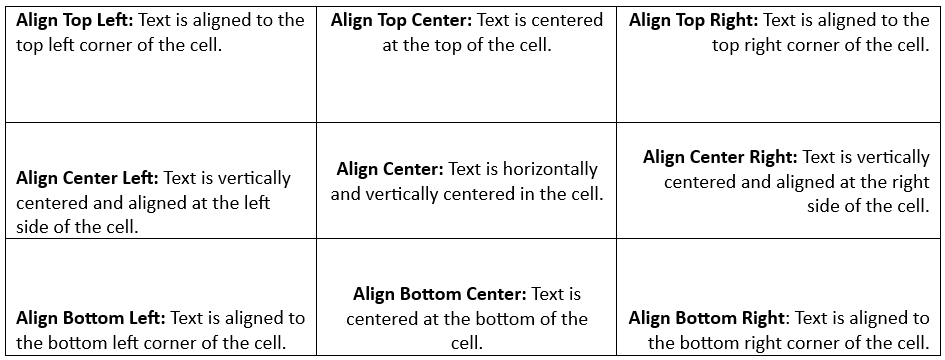
- Alignment buttons: Select one of the nine commands to align the text (see Table 1). The selected button is grayed.
- Text Direction: Used to change the direction of the text. This command can be selected multiple times to change the text direction (Figure 23).
- Cell Margins: Used to change the cell margins and the spacing between cells.

Data Group
The Data group includes commands to sort data, convert to text, and add formulas (Figure 24A). The following are commands in this group:
- Sort: Allows the user to sort a column either alphabetical or numerical order. To use, click into the table. Select the Sort command. Complete the options on the Sort dialog box, including the column(s) to sort (Figure 24B). Indicate if the table has a header row or no header row. When the desired options are selected, click OK.
- Repeat Header Rows: If selected, the header row is repeated if the table is split between two or more pages.
- Convert to Text: Allows the user to convert the table to regular text.
- Formula: The user can perform simple calculations like averaging the column of numbers or calculating the sum. This command is limited. If the user changes a number, the calculation does not automatically update like it does in an Excel spreadsheet.
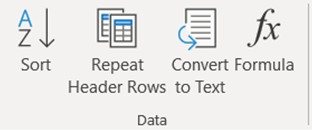
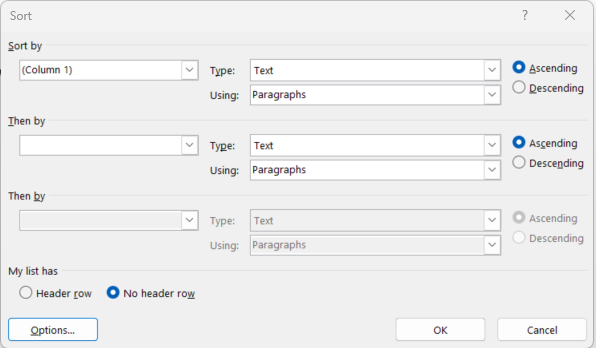
Table Design Tab
When a user clicks into a table, the Table Design contextual tab appears on the far-right side (Figure 25). This tab provides the user with commands to change the appearance of the table. The following sections discuss the groups on the Table Design tab.

Table Styles Group
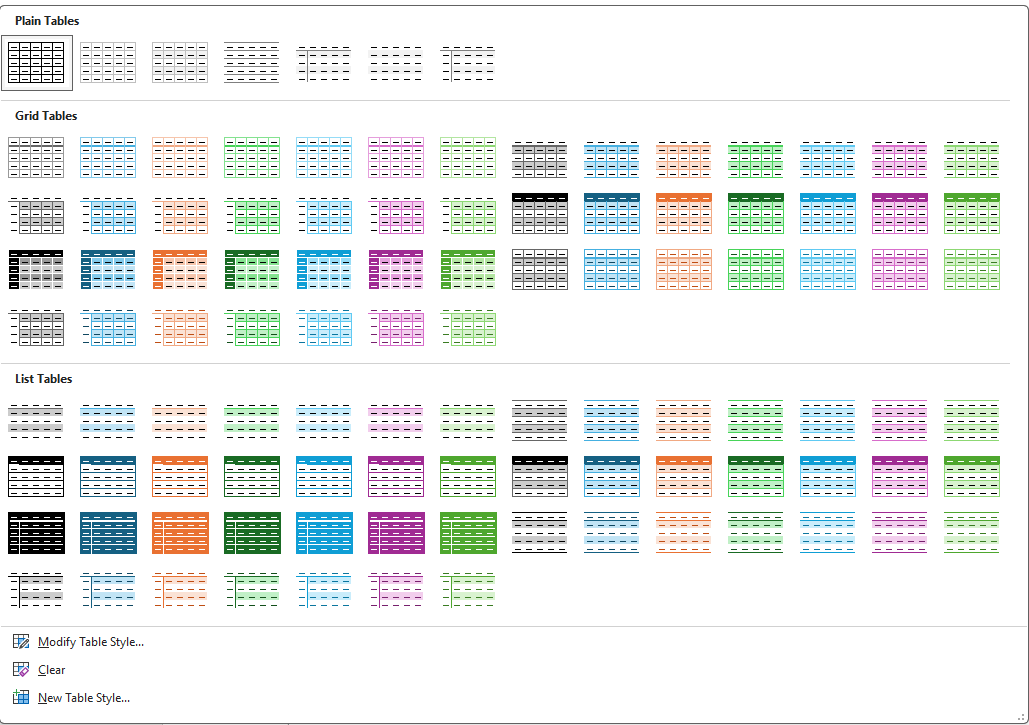
The Table Styles group is in the middle of the ribbon. The user can select from the gallery of table styles. A table style includes unique borders, font, and colors. Table styles do not include customized cell sizes (e.g., row height and column width).
To apply a table style: Click into any cell in the table. Select the Table Design Tab and click the More button (down arrow) in the Tables Styles group. The Table Styles gallery will open (Figure 26). Hover over the style to see the style applied to the table. The name of the style will also appear. Click the desired style to apply it to the table.
To clear an applied table style: Select the More button to open the Table Styles gallery. Select Clear near the bottom of the gallery menu. The style will be removed from the table.
To add or revise the shading: Select the cell or cells. Click the Shading command to apply the color shown or click the down arrow to open the menu. Hover over a color to see it temporarily applied to the cell. The name of the color will also appear. Click to select the desired color to apply.
Table Style Options Group
The Table Styles Options group is located on the left side of the ribbon (see Figure 25). This allows the user to change the design of the table. The user can select the following commands:
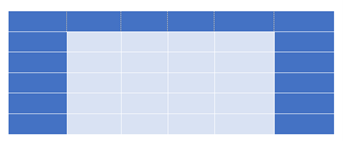
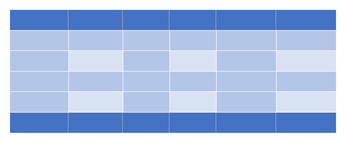
- Header Row: Add special formatting to the first row of the table, indicating it is the header row (Figures 27A and 27B).
- Total Row: Add special formatting to the last row of the table, indicating it is the total row (Figure 27B).
- First Column and Last Column: Add special formatting to the first and last columns (Figure 27A).
- Banded Column and Banded Row: Banded rows and columns help the reader quickly read the data in the table. Usually, a little darker color is applied to every other row or column, depending on what is selected (Figure 27B).
Borders Group
The Borders group is located on the right side of the ribbon (see Figure 25). These commands allow the user to change the style, weight (thickness), and color of the borders. The commands include the following:
- Border Style: Provides preset borders that can be applied to the cell(s).
- Borders: The menu is the same as the Borders command in the Paragraph group on the Home tab.
- Border Painter: Used to apply formatting to specific borders in the table.
Mail Merge
The Mailings tab in MS Word allows the user to create customized items, such as letters, emails, and labels. The Mail Merge tool is used to create these customized items.
The Mailings tab contains the Step-by-Step Mail Merge Wizard. This tool makes the customizing process easy and efficient. The user can also use the other tools and options on the Mailings tab to perform the same process as the Wizard.
This section will focus on the Step-by-Step Mail Merge Wizard. For the mail merge process, the user will need a document (e.g., letter, email, or labels) and an MS Excel worksheet with the information for each individual. The Step-by-Step Mail Merge Wizard allows the user a lot of flexibility. The document used can be templates, existing documents, or create documents. This document is customized by merging information from an MS Excel worksheet or a list the user created.
Create a Mail Merge Letter
When creating a letter, the user can select to create a new letter or use a template or an existing document. The following directions provide the steps to create a letter using an existing Excel worksheet of addresses.
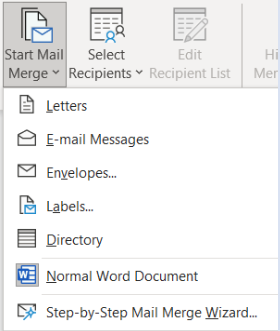
- Click the Mailings tab and select Start Mail Merge. When the drop-down menu opens, select Step-by-Step Mail Merge Wizard (Figure 28).
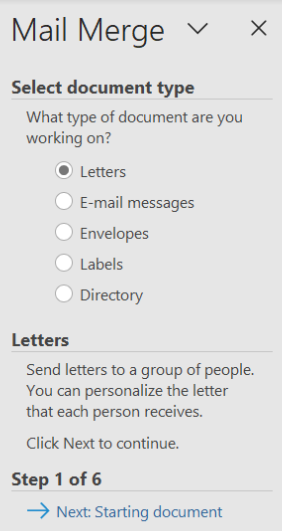
- The Mail Merge pane opens on the right side of the screen.
2. Step 1: Select document type. Click on the document type to be created (Figure 29).
3. Click “Next: Starting Document” at the bottom of the pane to move to the next step.
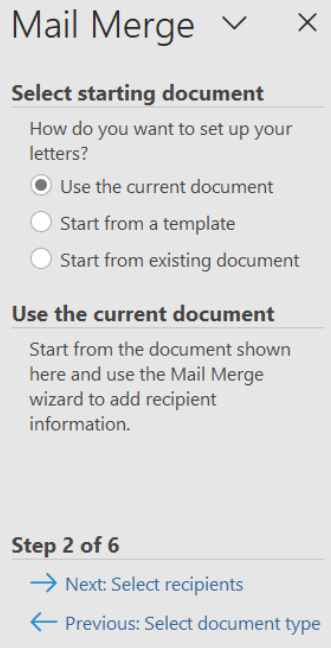
4. Step 2: Select Starting Document. Select one of the three options for the letter – use a current document (which is on the screen), use a template, or use an existing document (Figure 30A).
- If a template is clicked, a template must be selected.
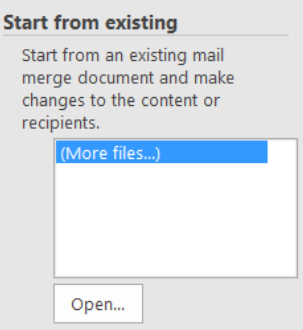
- If an existing document is clicked, an existing document must be located and opened (Figure 30B).
5. Click “Next: Select recipients.”
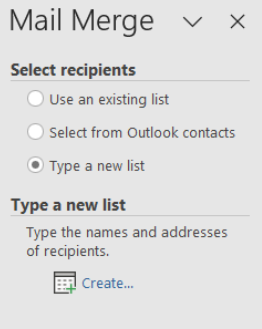
6. Step 3: Select recipients. Recipients can be selected from an existing list, from Outlook contacts, or type a new list (Figure 31A).
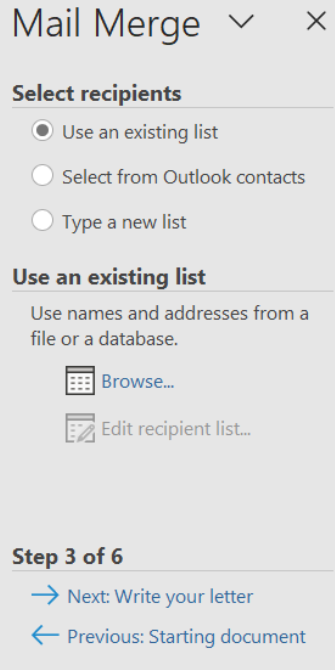
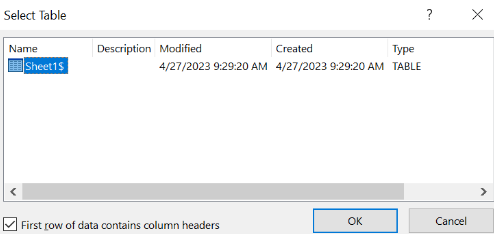
- When using an existing list, browse to find the Excel spreadsheet file. Select the worksheet. If the worksheet contains headers in the first row, check the box in the lower left corner of the dialog box. Click OK (Figure 31B).
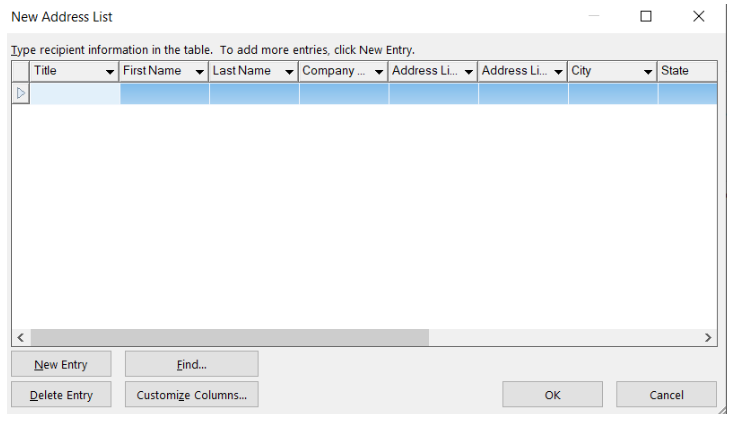
- When selecting Type a new list, click Create under the Type a New List section, and the New Address List dialog box appears (Figures 31C and 31D). (For additional directions, see Typing a New List box.)
Typing a New List
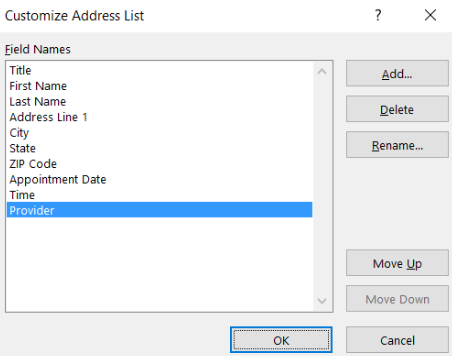
On the New Address List dialog box, the user can add or delete an entry. The user can also customize columns by adding, deleting, or renaming them. To do this, select the Customize Columns button.
When the Customize Address List dialog box appears, select the field name to be deleted or renamed (Figure 31E). Click the desired button. To add a new field, click the Add button. Type the field name in the box. After the revisions are completed and the desired field names appear in the box, click OK.
The New Address List dialog box appears (see Figure 31D). Type the information in the fields. Use the tab key to move to the next key. Click New Entry to start another row of information. After all the information is entered, click OK. The user will be prompted to save the newly desired list. Navigate to the desired location to save the file. Type the file name and click Save. The Mail Merge Recipients dialog box appears.
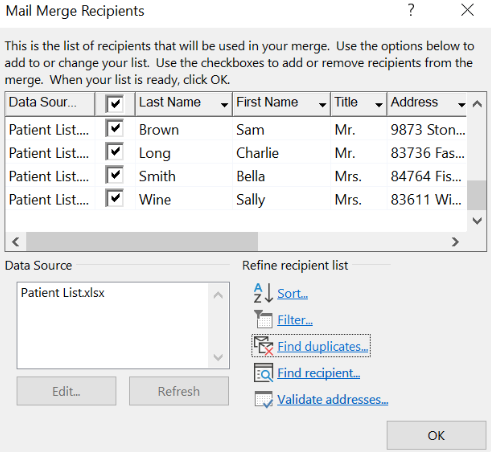
7. On the Mail Merge Recipients dialog box, verify the recipients (Figure 32).
- Unclick to remove the checkmark to unselect a name. By default, all of the recipients are checked.
- The recipient list can be refined using the Sort, Filter, and Find duplicates tools.
To sort:
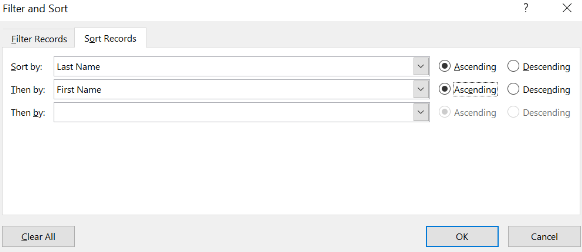
- To sort the list of names, click Sort. The Filter and Sort dialog box opens (Figure 33). Click on the dropdown box and select the fields to sort by. Select how the sort should be done, for instance ascending sort or descending sort. Then, click OK.
8. When completed, click OK on the Mail Merge Recipients dialog box (Figure 32).
9. Click “Next: Write your letter” (Figure 31A).
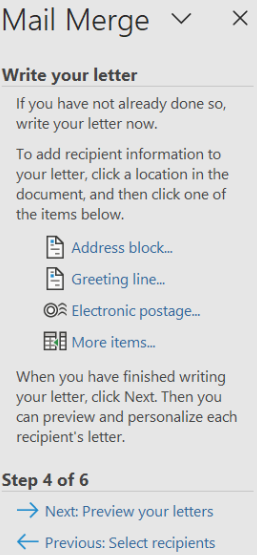
10. Step 4: Write your letter. To create a letter, the user can type text (such as the date and the body of the letter) and insert fields, like the address block, greeting, and other specific information (Figure 34).
To insert the date:
- To have the date automatically update each time the letter template is used, follow these steps:
- On the insert tab in the Text group, click Date & Time.
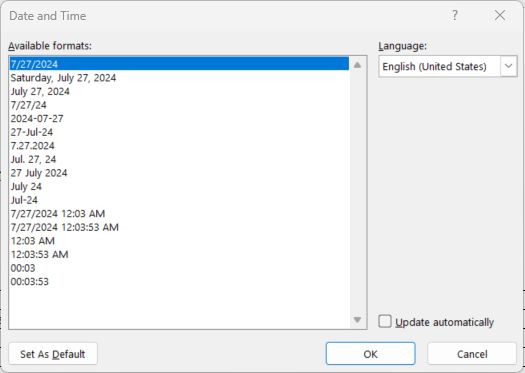
- When the Date and Time dialog box appears, select the format for the date (Figure 35). In letter writing, the format of the month, space, date, comma, space year is used (e.g., August 1, 2023).
- Click the Update automatically box just above the OK button.
- Click OK.
To insert the inside address:
- Click “Address Block” (Figure 34) and the Insert Address Block dialog box appears (Figure 36).
- Scroll and select the format for the recipient’s name.
- Select additional options as needed.
- The address format appears in the Preview box.
- When finished, click OK. The Address Block field appears in the document (Figure 37).
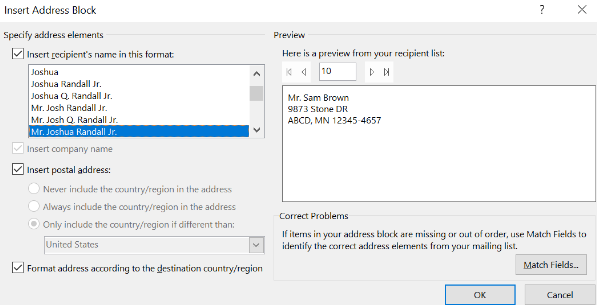
Figure 36. Insert Address Block dialog box.

To insert the greeting line:
- Click “Greeting Line” (Figure 34), and the Insert Greeting Line dialog box appears (Figure 38).
- Select the Greeting line format using the dropdown lists.
- The format will appear in the Preview box.
- When finished, click OK. The Greeting Line field will appear in the document (Figure 39).
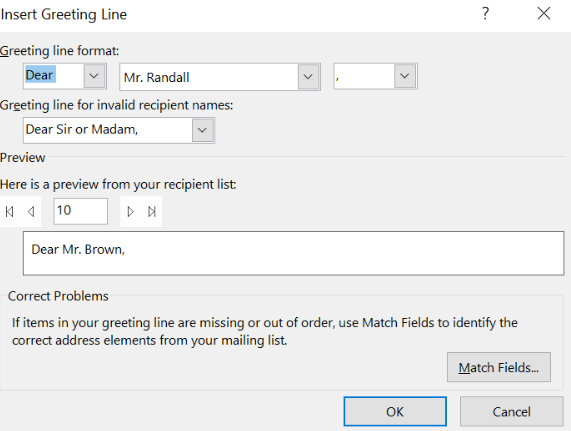
Figure 38. Insert Greeting Line dialog box.

To insert other fields:
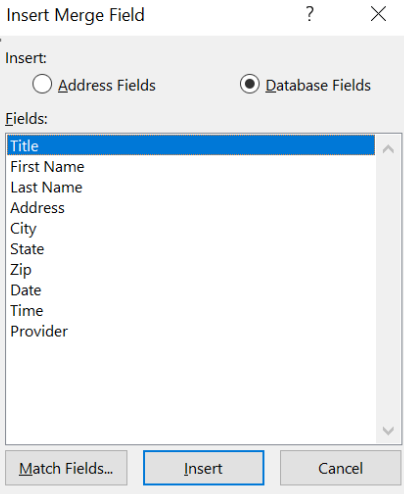
- Click “More items…” (Figure 34), and the Insert Merge Field dialog box appears (Figure 40).
- Select the field and click Insert. Then, click Close.
- The field will appear in the document. If the field appears twice in the document by mistake, delete the extra field.
- Make sure the spacing and/or punctuation before and after the field is correct (Figure 41).
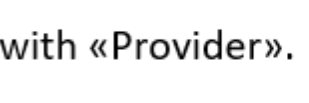
11. Step 5: Preview your letter. After composing the letter and inserting the fields, click “Next: Preview your letters” (Figure 34).
12. The content for the inserted fields will show in the letter. The user can move between the letters to preview them (Figure 42).
13. Click “Next: Complete the merge.”
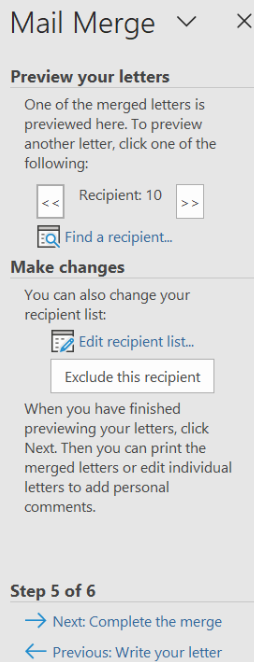
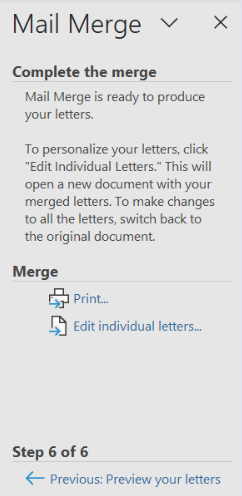
14. Step 6: Complete the merge. For the final step, the user must do either of the following:
- Select “Print” to print the letter (Figure 42). The Merge to Printer dialog box will appear and allow the user to select all or some of the records to print.
- Select “Edit individual letters” (Figure 43). The Merge to New Document dialog box appears. Select to merge all or some of the letters. Click OK. A new document will be created. Save this document with a new name. All the merged letters will appear in the new document.
Learning Activities
Citations, Tables, and Mail Merge in Word – Flash Cards
Application Exercise 1
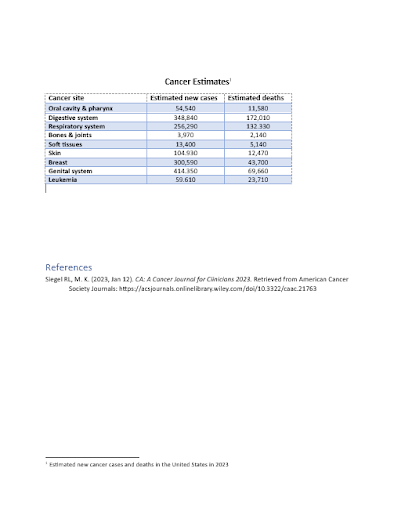
Directions: For this exercise, you will create a table, apply a style, and insert a footnote and reference.
1. Open a blank document in MS Word and save it as: Cancer Estimates.docx
2. Create a title. Using Calibri (body) 14 pt, bold black font, type: Cancer Estimates
-
- Center the title
3. Press the Enter key twice.
4. Insert a 3 column, 10 row table. Add the information shown below to the table. Use Calibri (body) 11 pt font.
| Cancer Site | Estimated new cases | Estimated deaths |
|---|---|---|
| Oral cavity & pharynx | 54,540 | 11,580 |
| Digestive system | 348,840 | 172,010 |
| Respiratory system | 256,290 | 132,330 |
| Bones & joints | 3,970 | 2,140 |
| Soft tissues | 13,400 | 5,140 |
| Skin | 104,930 | 12,470 |
| Breast | 300,590 | 43,700 |
| Genital system | 414,350 | 69,660 |
| Leukemia | 59,610 | 23,710 |
5. Select the top row (header row) and change the font to 12 pt and bold font. Center font.
6. Using the Design tab, apply a table style. Under the grid table section, select the blue shade style in the second row.
7. Select the numbers in Columns 2 and 3 and center the text. Adjust the column widths so the numbers are centered under the headers.
8. Place a footnote after the title above the table. The footnote should read: Estimated new cancer cases and deaths in the United States in 2023
9. Create two blank lines after the table.
10. Create a reference in the document.
-
- Type of source: Document from a website
- Authors: Siegel RL, Miller KD, Wagle NS, Jemal A
- Name of web page: CA: A Cancer Journal for Clinicians 2023
- Name of web site: American Cancer Society Journals
- Year: 2023
- Month: January
- Date: 12
- URL: https://acsjournals.onlinelibrary.wiley.com/doi/10.3322/caac.21763
11. Create five blank lines after the table and then insert the reference section.
12. Save the document. Your document should look like Figure 44.
Application Exercise 2
Directions: For this exercise, you will create a merged letter and create an address list.
1. Open a MS Word document. Save the document as: Letter.dox
2. Click on the Mailings tab. In the Start Mail Merge group, select Start Mail Merge command. In the dropdown list, select Step-by-Step Mail Merge Wizard. On the Mail Merge pane, do the following:
-
- Under Select document type, select letter.
- Click Next: Starting document at the bottom of the pane.
- Under Select starting document, select Use the current document.
- Click Next: Select recipients at the bottom of the pane.
- Under Select recipients, select Type a new list.
- Under Type a new list, click Create.
3. When the New Address List window appears, click Customize Columns.
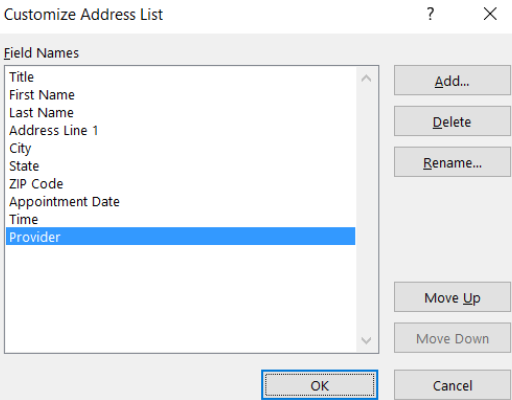
4. The Customize Address List window appears. You will need to delete unused fields, by selecting the Field Name, click Delete, and then click Yes. Keep the following fields and delete the rest:
-
- Title
- First Name
- Last Name
- Address Line 1
- City
- State
- ZIP code
5. Add the following three fields, by clicking on Add and then typing the field name. Add these three fields:
-
-
- Provider
- Appointment Date
- Time
-
6. Once you have the ten fields listed, click OK (Figure 45A).
7. When the New Address List dialog box appears, add the following three people. Add appointment dates that are two weeks from today. Save the file as: Addresses
| Title | First Name | Last Name | Address Line 1 | City | State | ZIP code | Appointment Date | Time | Provider |
|---|---|---|---|---|---|---|---|---|---|
| Mr. | Sam | Green | E123 State St | Somewhere | WI | 55555 | 8:30 a.m. | Dr. Smith | |
| Mrs. | Rose | Thorn | 223 Flower Lane | Somewhere | WI | 55555 | 9 a.m. | Dr. Smith | |
| Mr. | Mike | Snow | 543 Ice Drive | Somewhere | WI | 55555 | 10:30 a.m. | Dr. Smith |
8. On the Mail Merge Recipients dialog box, select to sort the names using the descending sort.
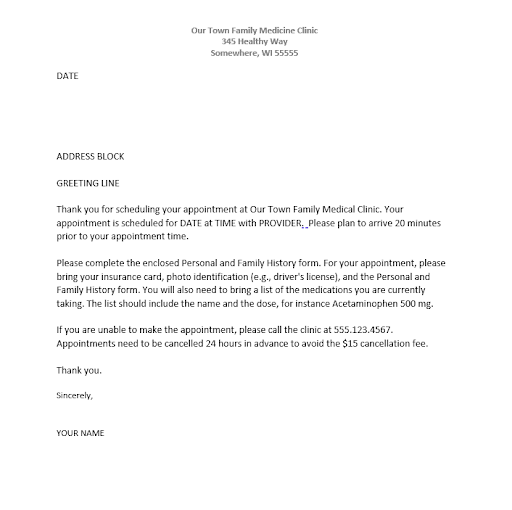
9. Create the letter in Figure 45B. Use the following:
-
- Calibri (Body) 11 pt; 1-inch margins
- Spacing: 0 pt before, 8 pt after, multiple line spacing at 1.08
- In the space indicated by DATE, insert the date using the Date & Time command found on the Insert tab in the Text group. Ensure the date automatically updates by selecting the Update automatically box.
- Insert the following fields to the letter in the locations shown in the figure.
- Address block
- Greeeting Line
- Date
- Time
- Provider
10. Review the letter for any revisions required, such as a missing space before or after a block.
11. Save the letter.
12. Complete the merging process. Save the new document that contains the merged letter as: Merged Letter.docx
A rectangular grid consisting of columns and rows. Allows for an orderly arrangement of data.
The horizontal series of cells separated by lines or space form other horizontal series of cells and found in a table or spreadsheet.
Using or containing parentheses.
A single box on a table or spreadsheet that can contain text or numbers.
Any of two or more vertical sections of type on a document.
The top row of a table that contains the titles for the columns.
Moving the mouse pointer over an option without selecting it.
Having strips or bands of contrasting colors.
Organizes the information from A to Z or from the smallest number to the largest number.
Organizes the information from Z to A or from the largest number to the smallest number.

