4.1 Patient Assessment
Basic Vital Signs
You will learn about various vital signs, including temperature, pulse, respiration, blood pressure, oxygen saturation, and pain. Measurement of vital signs is a foundational psychomotor skill for health care providers and students in post-secondary health-related programs such as respiratory therapy. These measurements provide information about a person’s overall state of health and, more specifically, about their cardiovascular and respiratory statuses. These measurements can also reveal changes in a patient’s vital signs over time and changes in their overall state of health. Proficiency in vital sign measurement is essential to patient safety, care, and management. Measurements can influence clinical decision-making related to therapeutic interventions.
Determining the significance of vital sign measurements involves a process of diagnostic reasoning. The respiratory therapy student needs to know whether the patient’s vital signs are normal or abnormal and whether the findings are significant to make appropriate treatment choices.
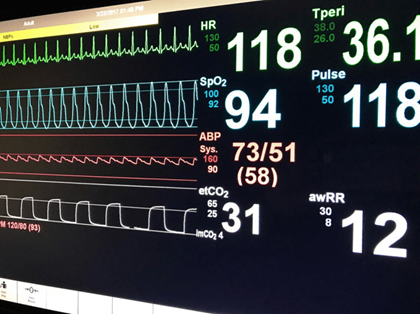
Additionally, the respiratory therapy student considers the patient’s baseline vital signs to obtain a better sense of the patient’s “normal” and to allow comparison (i.e., trends) over time. Typically, these trends can be assessed using a vital sign monitor (see Figure 20[1])).
Temperature
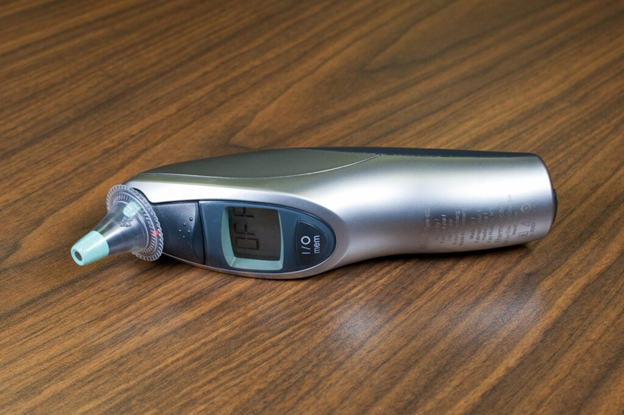
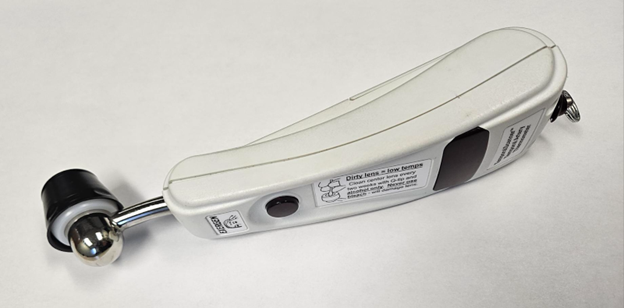
The human body’s core temperature (internal body temperature) is measured in degrees Celsius (ºC) or Fahrenheit (ºF). In adults, the normal body temperature is 98.6ºF or 37ºC. It is slightly higher in children because of a higher metabolic rate. Important terms to know are hypothermia, which is low body temperature, and hyperthermia, which is a high body temperature. A person with a normal body temperature is afebrile, and a person with a fever or elevated body temperature is known as febrile. Temperature can be taken by several types of thermometers including tympanic or temporal (see Figures 21[2] and 22[3]).
Pulse/Respiration
Pulse and respiration are discussed together because these vital signs are taken in succession.
Pulse
Pulse refers to a pressure wave that expands and recoils the artery when the heart contracts/beats. It is palpated at many points throughout the body. Pulse can be measured in many locations; the most common locations to accurately assess pulse as part of vital sign measurement include radial, brachial, and carotid. When determining the best location, health care providers consider the patient’s age and health and illness state, as well as the reason for taking the pulse.
Pulse is measured in beats per minute (bpm), and the normal adult pulse rate (heart rate) at rest is 60–100 bpm. The pulse rhythm, rate, force, and equality are assessed when palpating pulses.
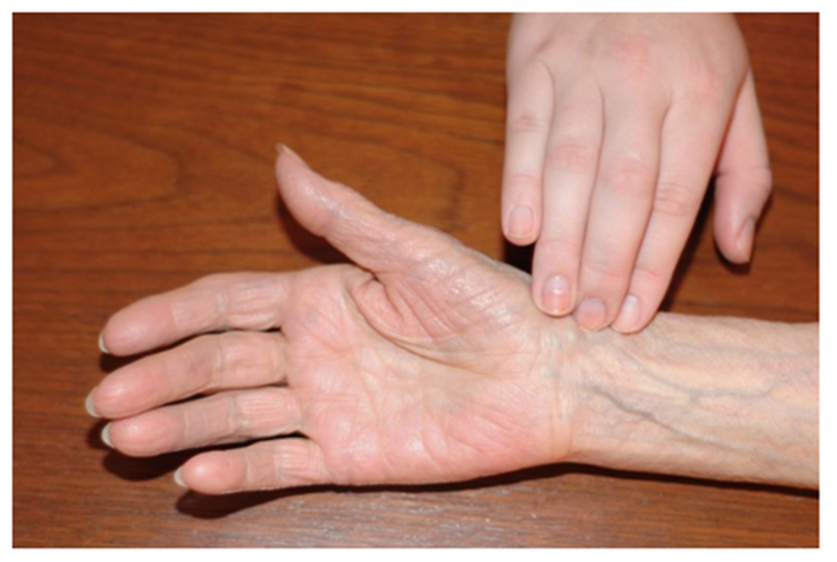
Use the pads of your first three fingers to gently palpate the radial pulse (see Figure 23[4]). The pads of the fingers are placed along the radius bone, which is on the lateral side of the wrist (the thumb side; the bone on the other side of the wrist is the ulnar bone). Place your fingers on the radius bone close to the flexor aspect of the wrist, where the wrist meets the hand and bends.
Some terms that are helpful when assessing the pulse are bradycardia, a slow heart rate; tachycardia, a high heart rate; pulsus paradoxus, a pulse that becomes weaker on inspiration; and pulsus alternans, an alternating pattern of strong and weak pulses.
Respiration
Respiration refers to a person’s breathing and the movement of air into and out of the lungs. The respiratory system provides oxygen to body tissues for cellular respiration, removes the waste product carbon dioxide, and helps maintain acid–base balance. A respiratory cycle (or one breath while you are measuring respiratory rate) is one sequence of inspiration and expiration. The normal adult respiratory rate is 12–20 bpm.
The respiratory rate is counted after taking the pulse rate so that the patient is not aware that you are taking it. Once you have finished counting the pulse, leave your fingers in place and then begin assessing respiration. You should keep your fingers on the pulse while counting the respiratory rate to avoid alerting the patient, as they may unconsciously change their breathing pattern if they realize they are being observed. Observe the chest or abdomen rise and fall. One respiration includes a full respiratory cycle. Count for 30 seconds if the rhythm is regular or for a full minute if irregular. Respiration is assessed for quality, rhythm, and rate. Report the respiration as breaths per minute, as well as whether breathing is relaxed, silent, and has a regular rhythm. Report whether chest movement is symmetrical.
Measurement of pulse and respiration is important because these vital signs provide current data about the patient’s health and illness state. Changes in pulse and respiration act as cues for health care providers’ diagnostic reasoning and can be assessed for impending respiratory distress or respiratory failure (see Figure 24[5]).
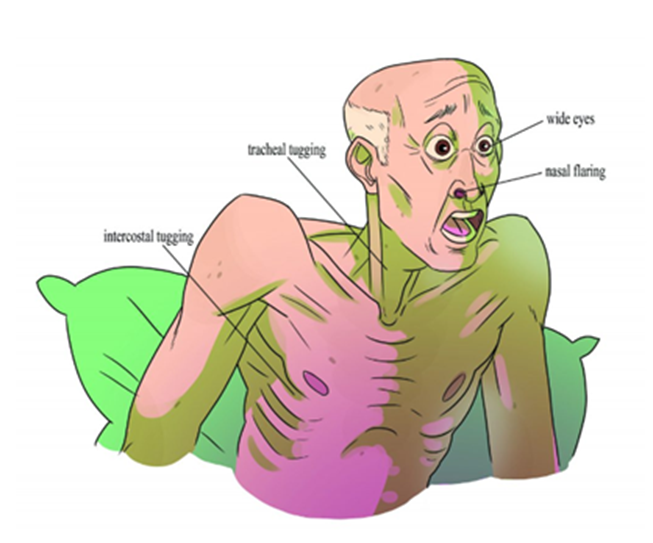
When determining the relevance of pulse and respiration data, health care providers consider the patient’s baseline data and the situation. Diagnostic reasoning about pulse and respiration always considers additional information, including other vital sign measurements and subjective and objective patient data.
Blood Pressure
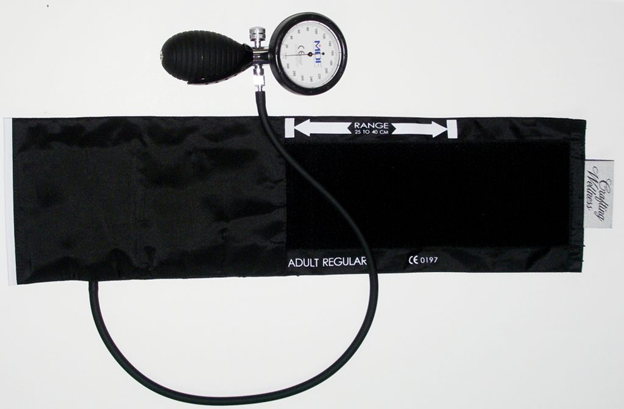
Manual blood pressure measurement is taken using a blood pressure cuff with a sphygmomanometer and a stethoscope. Blood pressure is reported in mm Hg, in which the systolic is the numerator and diastolic is the denominator. The normal average blood pressure for an adult is 120/80 mm Hg.
A health care provider uses a stethoscope and a blood pressure cuff with a sphygmomanometer to measure blood pressure manually (see Figure 25[6]). The stethoscope is used to listen to the blood pressure sounds, which are called Korotkoff sounds.
To measure a blood pressure, inflate the blood pressure cuff until the pulse is no longer felt, and then quickly continue to inflate 30 mm Hg more. Place the bell of the cleansed stethoscope over the brachial artery using a light touch with a complete seal. Open the valve slightly. Deflate the cuff slowly and evenly at about 2 mm Hg per second. Note the points at which you hear the first Korotkoff sound (systolic blood pressure) and the point in which the Korotkoff sounds go silent (diastolic blood pressure). Health care workers are sometimes trained in a two-step method for obtaining blood pressure. Either method is appropriate if done correctly.
Blood pressure measurement is important because it provides objective data about the patient’s health and illness state. Changes in blood pressure act as a cue for health care providers’ diagnostic reasoning. Blood pressure fluctuates with internal and external factors. Therefore, it is essential to take multiple measurements before making clinical decisions and to ensure the patient is in the proper body position, with their legs uncrossed and their arms relaxed.
Oxygen Saturation
Health care providers measure oxygen saturation because it provides information about a patient’s state of health. The body’s tissues and organs require oxygen for metabolism, and oxygen saturation can reveal whether there is sufficient oxygen in the blood or whether the patient is in a state called hypoxemia (insufficient oxygen in the blood).
Measuring oxygen saturation via pulse oximetry is a noninvasive way to quickly assess a patient’s oxygen level and can influence clinical decisions about whether the patient is receiving sufficient oxygen and/or requires supplemental oxygen.
A pulse oximetry device includes a sensor that measures light absorption of hemoglobin and represents arterial SpO2. Oxyhemoglobin and deoxygenated hemoglobin absorb light differently. The sensor measures the relative amount of light absorbed by oxyhemoglobin and deoxygenated (reduced) hemoglobin and compares the amount of light emitted to light absorbed. This comparison is then converted to a ratio and is expressed as a percentage of SpO2. (See Figure 26[7].)
The normal oxygen saturation level for an adult is 95–100%. Older adults typically have lower oxygen saturation levels than younger adults. It is important to note that the oxygen saturation level varies considerably based on a person’s state of health. Keep in mind that oxygen saturation readings can be overestimated or underestimated due to skin pigmentation. Therefore, it is important to consider this as just one part of trending a person’s state of health. Thus, it is important to understand both baseline readings and underlying physiology associated with certain conditions to interpret oxygen saturation levels and changes in these levels. The term “SATS” is often used as a shorthand for oxygen saturation, but it should not be pronounced as “STATS.”
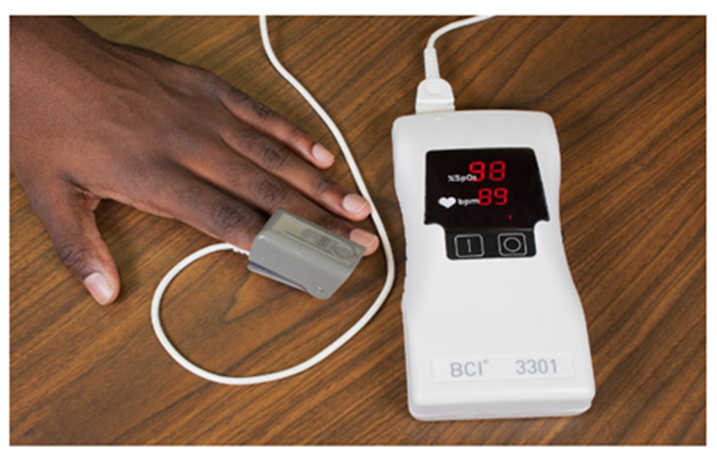
The sensor can be attached in many ways, including clipping and taping probes to the finger, toe, earlobe, and forehead. The type and location of the apparatus are selected based on the patient’s age, the presence of vasoconstriction, the adequacy of peripheral perfusion, whether intermittent or continuous monitoring is required, and the patient’s health and illness state.
When determining the relevance of the oxygen saturation reading, health care providers consider the patient’s health and wellness state. Specifically, they consider other data related to oxygenation, including respiratory quality, rate, and rhythm; pulse; skin color and temperature; and the patient’s subjective description of ease or difficulty breathing. Decreases in oxygen saturation readings are potentially life-threatening and require immediate intervention[8].
.
The Pulmonary Exam[9]
The pulmonary exam allows the respiratory therapist to gather valuable information for diagnosing respiratory conditions, developing treatment plans, and monitoring the patient’s progress. Collaboration with other health care professionals is crucial for comprehensive patient care. The exam involves a series of evaluations to assess the patient’s respiratory function and lung health. The assessment includes inspection, palpation, percussion, and auscultation.
Inspection
During the inspection, the respiratory therapist should pay attention to the pattern of breathing: thoracic breathing, thoracoabdominal breathing, costal markings, and use of accessory breathing muscles. The use of accessory breathing muscles (i.e., scalene muscles, sternocleidomastoid muscle, intercostal muscles) could point to excessive breathing effort caused by pathologies. The body habitus or visual appearance of the patient’s body could provide information regarding chest compliance, especially in the case of severely obese patients where chest mobility and compliance are reduced due to added weight from excess tissue.
The position of the patient should also be noted. Patients with extreme pulmonary dysfunction will often sit upright, be in distress, and assume the tripod position (leaning forward, resting their hands on their knees). Additionally, the respiratory therapist should look for capillary refill of the nail beds and clubbing of the fingers, which indicate chronic hypoxemia, pedal edema, and fluid overload.
Pursed-lip breathing is a common technique observed in patients with COPD, as it helps to improve air exchange and reduce breathlessness. During patient interviews, the inability to speak in full sentences or the onset of shortness of breath can indicate diminished pulmonary function or reduced respiratory reserve. These signs are clinically significant, as they may reflect advanced disease progression or compromised lung capacity.
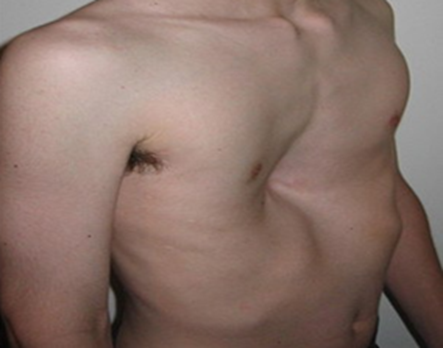
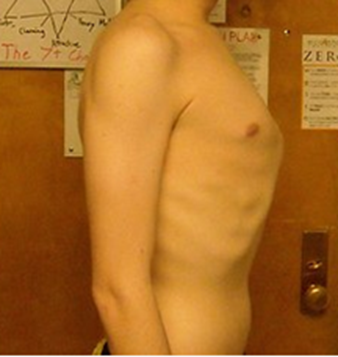
Skeletal chest abnormalities should also be noted during the inspection. The most common chest abnormality is pectus excavatum, where the sternum is depressed into the chest cavity (see Figure 27[10]). Pectus carinatum is the exact opposite of pectus excavatum. In pectus carinatum, the sternum is protruding from the chest wall (see Figure 28[11]).
 |
 |
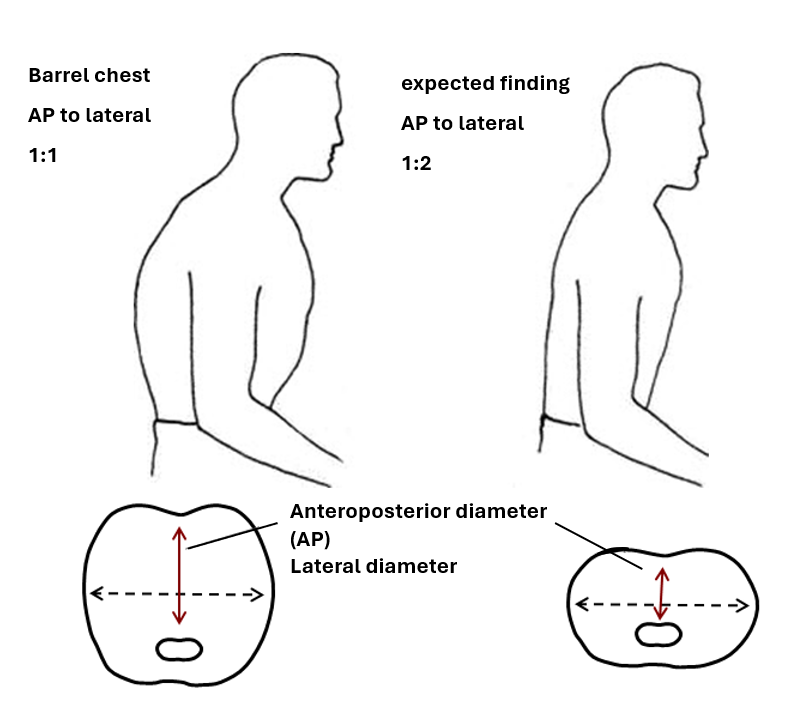
Barrel chest could also be present, which consists of an increased anterior–posterior (AP) diameter of the chest wall and is a normal finding in children, but it is suggestive of hyperinflation with COPD in adults (see Figure 29[12]). Thoracic spine abnormalities such as kyphosis and scoliosis could also be noted during physical examination of the chest.
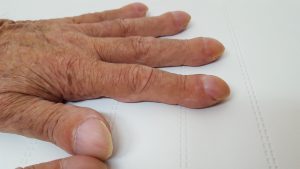
Digital clubbing is a physical deformity of the fingers and toes characterized by a widening and increased convexity of the nail bed. It develops due to chronic hypoxemia in certain chronic diseases such as bronchiectasis, cystic fibrosis, pulmonary fibrosis, and altered systemic circulation, leading to soft tissue and vascular changes in the fingertips (see Figure 30[13]). It is important for the respiratory therapist to inspect a patient’s fingers for clubbing as it could indicate chronic respiratory conditions including, COPD, cystic fibrosis, or bronchiectasis.
Palpation
Palpation of the chest may be performed to investigate for areas of abnormality related to injury or procedural complications. For example, if a patient has a chest tube or has recently had one removed, the nurse may palpate near the tube insertion site to assess for areas of air leak or crepitus. Crepitus feels like a popping or crackling sensation when the skin is palpated and is a sign of air trapped under the subcutaneous tissues. If palpating the chest, use light pressure with the fingertips to examine the anterior and posterior chest wall. Chest palpation may be performed to assess specifically for growths, masses, crepitus, pain, or tenderness.
Confirm symmetric chest expansion by placing your hands on the anterior or posterior chest at the same level, with thumbs over the sternum anteriorly or the spine posteriorly. As the patient inhales, your thumbs should move apart symmetrically. Unequal expansion can occur with pneumonia, thoracic trauma, such as fractured ribs, or pneumothorax.
View this supplementary YouTube video[14] that demonstrates palpation of the chest:
Auscultation
Using the diaphragm of the stethoscope, listen to the movement of air through the airways during inspiration and expiration. Instruct the patient to take deep breaths through their mouth. Listen through the entire respiratory cycle because different sounds may be heard on inspiration and expiration. Allow the patient to rest between respiratory cycles, if needed, to avoid fatigue with deep breathing during auscultation. As you move across the different lung fields, the sounds produced by airflow vary depending on the area you are auscultating because the size of the airways change. You should move in a systematic manner from right to left on the front and back of the chest (see Figures 31[15] and 32[16]). Some health care textbooks may instruct you to begin auscultation at the lower lobes in order to catch certain sounds you may not have normally heard if you started in the upper lobes.
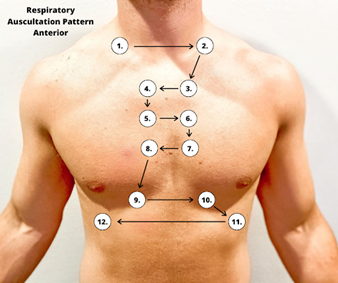
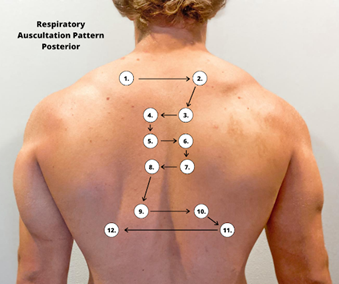
Correct placement of the stethoscope during auscultation of lung sounds is important to obtain a quality assessment. The stethoscope should not be placed over clothes or hair because these may create inaccurate sounds from friction. The best position to listen to lung sounds is with the patient sitting upright; however, if the patient is acutely ill or unable to sit upright, turn them side to side in a lying position. Avoid listening over bones, such as the scapulae or clavicles or over the female breasts, to ensure you are hearing adequate sound transmission. Listen to sounds from side to side rather than down one side and then down the other side. This side-to-side pattern allows you to compare sounds in symmetrical lung fields and allows for patient comfort throughout auscultation. Many patients may need a break from repetitive breathing, so the side-to-side pattern provides an opportunity for rest in between breaths.
Special Auscultation Maneuvers
- Whisper Pectoriloquy—Ask the patient to whisper a word such as “Ninety-nine” and listen with a stethoscope. Typically, words are heard faintly. In cases of consolidation, the whispered sounds will be heard clearly and distinctly.
- Egophony—Egophony is elicited by asking the patient to say “Ee,” and it will sound like an “A.” This may be suggestive of consolidation or pleural effusion.
- Bronchophony—Bronchophony is elicited by asking the patient to say “Ninety-nine” or “Ee” in a clear and loud voice. If the spoken phrase is clear, loud, and distinct, it may indicate increased lung density or consolidation, often seen in conditions like pneumonia or areas of lung collapse.
View the following YouTube video[17] for a demonstration of the pulmonary exam that can be performed by respiratory therapists:
- “Unstable-VS-Monitor.png” by unknown author is reused under Fair Use. https://rebelem.com/topics-in-post-rosc-care/ ↵
- “Tympanic-Thermometer-768x512” by unknown author is licensed under CC BY 4.0. Access for free at https://opentextbc.ca/vitalsignmeasurement/chapter/tympanic-temperature/ ↵
- “Temporal Artery Thermometer” by Nic Ashman, WisTech Open is licensed under CC BY-NC 4.0 ↵
- “radial-pulse” by unknown author is licensed under CC BY 4.0. Access for free at https://pressbooks.library.torontomu.ca/vitalsign/ ↵
- “Figure-3.6-Signs-of-respiratory-distress-final-1024x813.jpg” by Paige Jones is licensed under CC BY 4.0. Access for free at https://pressbooks.library.torontomu.ca/vitalsign/ ↵
- “Sphygmomanometer&Cuff.JPG” by ML5 is in the Public Domain. ↵
- “02-Sat-Apparatus-1-1024x682.jpg” by unknown author is licensed under CC BY 4.0. Access for free at https://pressbooks.library.torontomu.ca/vitalsign/ ↵
- Ernstmeyer, K., & Christman, E. (Eds.). (2023). Nursing skills 2e. Open RN. https://wtcs.pressbooks.pub/nursingskills/ ↵
- Ernstmeyer, K., & Christman, E. (Eds.). (2023). Nursing skills 2e. Open RN. https://wtcs.pressbooks.pub/nursingskills/ ↵
- “Pectus1.jpg’ by User:The Number C is licensed under CC BY-SA 3.0 ↵
- “Ben_Fraser_pectus_carinatum.jpg” by Tolson411 is licensed under CC BY-SA 3.0 ↵
- This image is derivative of "Βυτιοειδής_θώρακας_%28barrel_chest%29" by Open courses tei athinas and is licensed under CC BY-SA 3.0 ↵
- "Clubbing_fingers_2" by Wesalius is licensed under CC BY-SA 4.0 ↵
- Clinical Examination Videos. (2018, August 15). Palpitation of the thorax | Respiratory examination [Video]. YouTube. All rights reserved. https://www.youtube.com/watch?v=MxBGzJsJKN8 ↵
- “Anterior Respiratory Auscultation Pattern.png” by Meredith Pomietlo for Chippewa Valley Technical College is licensed under CC BY 4.0 ↵
- “Posterior Respiratory Auscultation Pattern.png” by Meredith Pomietlo for Chippewa Valley Technical College is licensed under CC BY 4.0 ↵
- RegisteredNurseRN. (2017, December 13). Chest assessment nursing | Heart & lung assessment | Head-to-toe exam [Video]. YouTube. Reused with permission. All rights reserved. https://www.youtube.com/watch?v=kv3B81mWc1E ↵

