3.1 Patient Safety and Communication
By focusing on key aspects of patient safety, such as emergency responses and evacuation, and understanding patient positioning and restraints, respiratory therapy students can develop a strong foundation for delivering safe and effective care to patients with respiratory conditions.
Patient Safety
Evacuation
In the event of a fire or other emergency situations, it is crucial to prioritize patient safety. You should always know the established safety plans for the health care facility and follow designated evacuation routes and assist patients as needed.
Both vertical and horizontal evacuations are essential components of an effective emergency evacuation plan, and the appropriate approach will depend on the specific circumstances and nature of the emergency. The goal is to ensure the safety and well-being of individuals by efficiently relocating them to a secure area or outside of the danger zone, minimizing the potential for harm during an emergency or disaster.
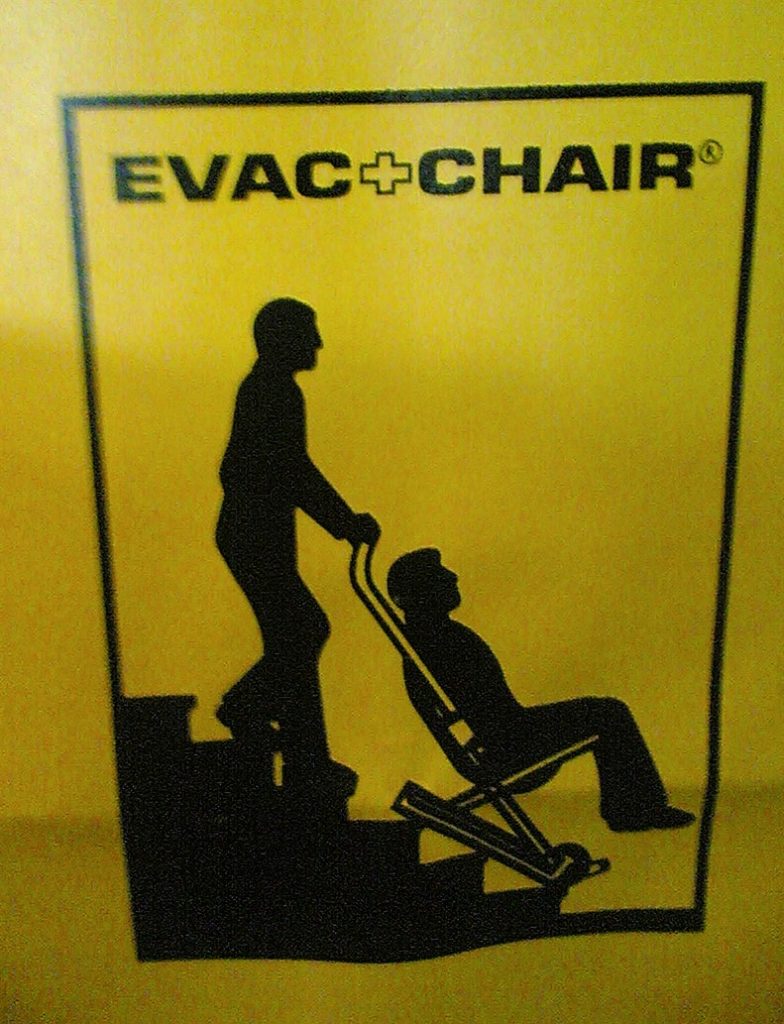
Vertical evacuation involves moving individuals from one level of a building or structure to another, typically in a vertical direction, such as going up or down stairs or using elevators. This approach is used when it is safer to move individuals within the building rather than directly outside. Vertical evacuation is often necessary in multistory health care facilities or structures with designated safe areas on different floors. Oftentimes a special chair or cot is used to move patients from one level to another (see Figure 9[1]).
Example Scenarios
- Evacuating from lower to higher floors in a building to escape flooding or rising water levels.
- Moving to upper floors to avoid hazards such as fire or chemical leaks on lower levels.
Horizontal evacuation involves moving individuals horizontally or laterally, typically from one area of a building or facility to another on the same level or to an adjacent building. The purpose of horizontal evacuation is to move people away from an immediate threat while remaining on the same level. This approach is often used when it is unsafe to go up or down stairs or when exiting the building is not yet necessary.
Example Scenarios
- Moving from one wing of a building to another to escape a localized fire or hazardous materials leak.
- Relocating to a neighboring building or area to avoid a threat in the current facility, such as an explosive device or structural instability.
Fire Safety
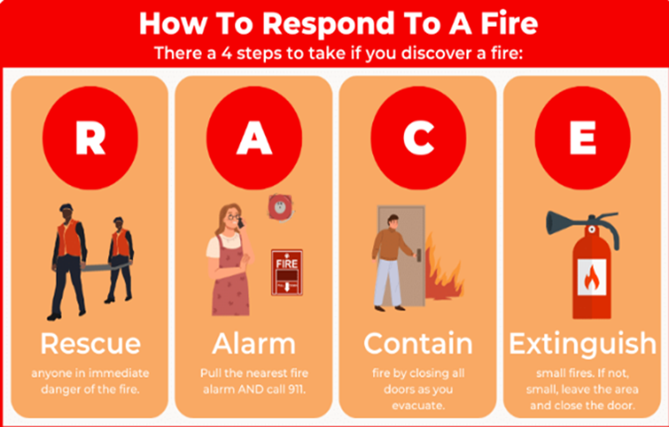
The RACE protocol (see Figure 10[2]) serves as a guideline for responding to fires in health care facilities.
While the RACE acronym has a priority order, understand that these should ideally be done at the same time by multiple staff members. By taking a divide-and-conquer mentality, you will help ensure the safety of the staff and patients.
Rescue
The first step in the RACE protocol is to rescue individuals from immediate danger. If it is safe to do so, assist patients in evacuating the affected area. Remember to prioritize those who have difficulty moving or require additional assistance.
If you are evacuating residents from their rooms, make sure to tag the doors so the next person knows the room has been evacuated.
Alarm
Once individuals have been removed from the immediate danger zone, it is essential to activate the fire alarm system. Activate the nearest fire alarm pull station to alert other occupants and staff members about the fire. Promptly notifying everyone in the facility helps ensure a swift response and initiates the evacuation process.
You should follow the facility’s processes for notifying emergency providers such as the fire department and emergency responders.
Contain
After sounding the alarm, take steps to confine the fire. Close any doors or windows in the area if it can be done safely and without risking personal harm. Confining the fire helps limit its spread and provides more time for evacuation and the arrival of emergency responders. However, only attempt this if you can do so without endangering yourself or others.
Extinguish or Evacuate
The last step in the RACE protocol depends on the severity of the fire and the resources available. If the fire is small and can be safely extinguished using a portable fire extinguisher, follow the appropriate protocols for its use. However, remember that personal safety should always take precedence over attempting to extinguish the fire.[3]
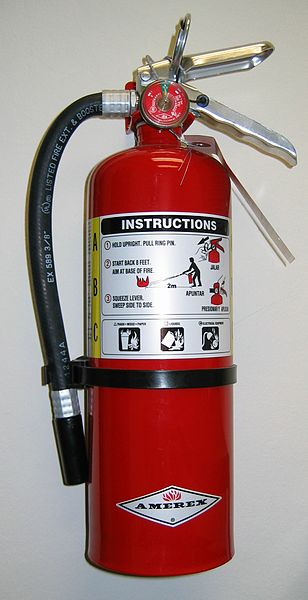
Understanding the proper operation of fire extinguishers is crucial. (See Figure 11.[4]) The PASS acronym provides a helpful reminder of these steps to follow when using a fire extinguisher:
Pull the Pin
The first step of the PASS acronym is to pull the pin. This pin is usually located on the top of the fire extinguisher and is designed to prevent accidental discharge. By pulling the pin, you are preparing the extinguisher for immediate use, ensuring that it is ready to be deployed to suppress the fire.
Aim at the Base of the Fire
Once the pin is pulled, the next step is to aim at the base of the fire. The base of the fire is the area where the flames are originating. It is crucial to direct the extinguishing agent at the base because that is where the fuel source is located. By aiming at the base, you can effectively smother the fire and cut off its oxygen supply, aiding in its suppression.
Squeeze the Handle
After aiming at the base of the fire, firmly squeeze the handle of the fire extinguisher. Squeezing the handle activates the discharge mechanism, allowing the extinguishing agent to be expelled. It is essential to maintain a steady grip on the handle while squeezing it to control the flow of the extinguishing agent.
Sweep from Side to Side
While continuing to aim at the base of the fire, sweep the fire extinguisher from side to side. This sweeping motion ensures that the extinguishing agent covers the entire fire, effectively smothering it. By sweeping, you can prevent the fire from reigniting or spreading. It is important to cover the entire fire area with the extinguishing agent to ensure its complete suppression.[5]
View the following supplemental YouTube video[6] for a demonstration of the proper use of a fire extinguisher using the PASS method: How to use a fire extinguisher using the PASS method
Restraints
Restraints are devices used in health care settings to prevent patients from causing harm to themselves or others when alternative interventions are not effective. Any restraint requires a valid provider order and time frame for use. A restraint is a device, method, or process that is used for the specific purpose of restricting a patient’s freedom of movement without the permission of the person. These include mechanical devices such as a tie wrist device, mitt type device, chemical restraints, or seclusion.
The Joint Commission defines chemical restraint as a drug used to manage a patient’s behavior, restrict the patient’s freedom of movement, or impair the patient’s ability to appropriately interact with their surroundings that is not standard treatment or dosage for the patient’s condition. It is important to note that the definition states the medication “is not standard treatment or dosage for the patient’s condition.”
Seclusion is defined as the confinement of a patient in a locked room from which they cannot exit on their own. It is generally used as a method of discipline, convenience, or coercion. Seclusion limits freedom of movement because, although the patient is not mechanically restrained, they cannot leave the area.
Although restraints are used with the intention to keep a patient safe, they impact a patient’s psychological safety and dignity and can cause additional safety issues and death. A restrained person has a natural tendency to struggle and try to remove the restraint and can fall or become fatally entangled in the restraint. Furthermore, immobility that results from the use of restraints can cause pressure injuries, contractures, and muscle loss. Restraints take a large emotional toll on the patient’s self-esteem and may cause humiliation, fear, and anger. Respiratory therapy patients who are intubated for ventilation are typically restrained to prevent them from removing or dislodging their endotracheal tube.
Once restrained, the patient should be treated with humane care that preserves human dignity. In those instances where restraint, seclusion, or therapeutic holding is determined to be clinically appropriate and adequately justified, health care providers who possess the necessary knowledge and skills to effectively manage the situation must be actively involved in the assessment, implementation, and evaluation of the selected emergency measure, adhering to federal regulations and the standards of The Joint Commission regarding appropriate use of restraints and seclusion.
Side rails and enclosed beds may also be considered a restraint, depending on the purpose of the device. Recall the definition of a restraint as “a device, method, or process that is used for the specific purpose of restricting a patient’s freedom of movement or access to movement without the permission of the person.” If the purpose of raising the side rails is to prevent a patient from voluntarily getting out of bed or attempting to exit the bed, then use of the side rails would be considered a restraint. On the other hand, if the purpose of raising the side rails is to prevent the patient from inadvertently falling out of bed, then it is not considered a restraint. If a patient does not have the physical capacity to get out of bed, regardless of whether or not side rails are raised, then the use of side rails is not considered a restraint.
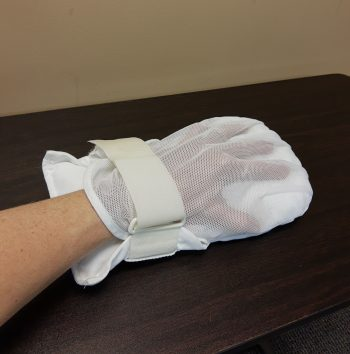
A hand mitt is a large, soft glove that covers a confused patient’s hand to prevent them from inadvertently dislodging medical equipment (see Figure 12[7]). Hand mitts are considered a restraint by The Joint Commission if used under these circumstances:
- Are pinned or otherwise attached to the bed or bedding
- Are applied tightly so that the patient’s hands or finger are immobilized
- Are bulky so that the patient’s ability to use their hands is significantly reduced
- Cannot be easily removed intentionally by the patient in the same manner it was applied by staff, considering the patient’s physical condition and ability to accomplish the objective[8]
Patient Positioning
Proper patient positioning is crucial for ensuring both comfort and safety during medical procedures, treatments, or daily care. Careful consideration of the patient’s condition, mobility, and specific requirements is essential to prevent discomfort, pressure injuries, and other potential risks, thus promoting a safe and conducive healing environment. Positioning a patient in bed is a common procedure in the hospital. There are various positions possible for patients in bed, which may be determined by their condition, preference, or treatment related to an illness.
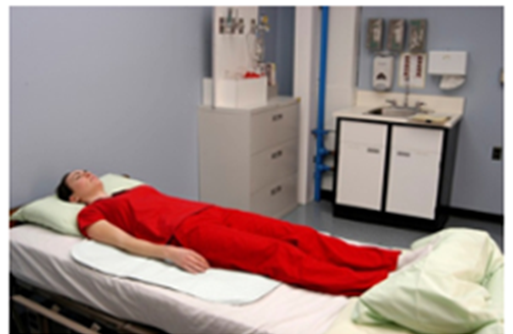
The patient lying flat on their back is considered supine (see Figure 13[9]). Additional supportive devices may be added for comfort.
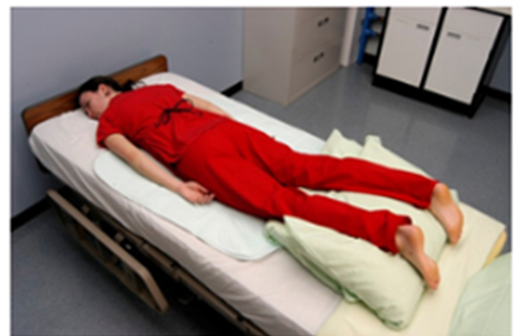
The patient lying on the stomach with their head turned to the side is considered prone (see Figure 14[10]). The patient can be placed in the prone position to help with oxygenation.
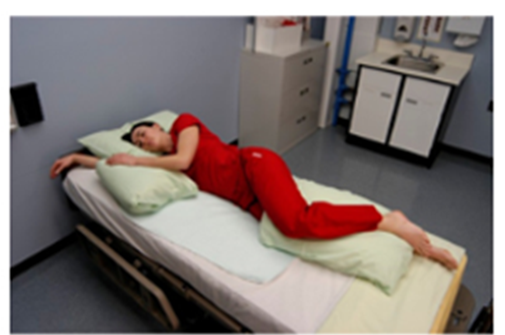
The patient lying on the side of their body with the top leg over the bottom leg is considered lateral (see Figure 15[11]). This position helps relieve pressure on the coccyx.
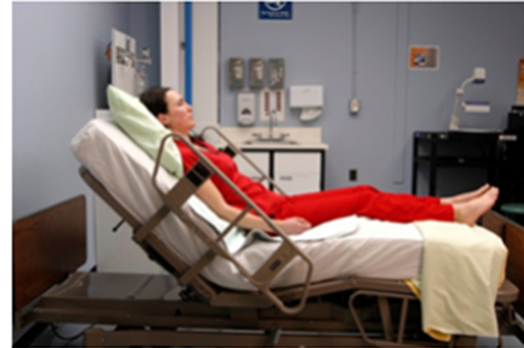
Fowler’s position is when the patient’s head of the bed is placed at a 45-degree angle (see Figure 16[12]). Their hips may or may not be flexed. This is a common position to provide patient comfort and care. Respiratory therapists utilize this position to help with common therapies such as hyperinflation and bronchial hygiene.
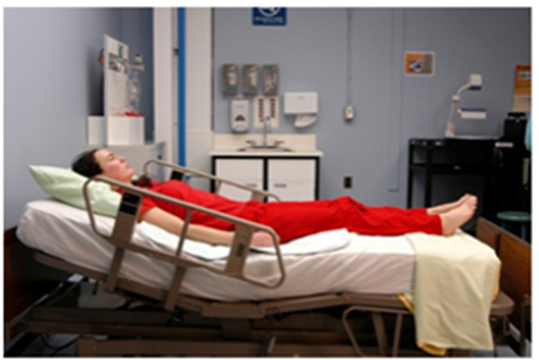
Semi-Fowler’s position is when the patient’s head of the bed is placed at a 30-degree angle (see Figure 17[13]). This position is used for patients who are on mechanical ventilation, or have cardiac or respiratory conditions.
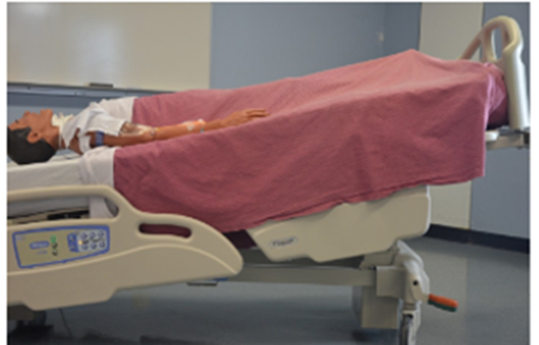
Placing the head of the bed lower than the feet is considered the Trendelenburg position (see Figure 18[14]). This position is used in situations such as hypotension and medical emergencies. It helps promote venous return to major organs such as the head and heart. Respiratory therapists may use this position for postural drainage, percussion and vibration to promote secretion mobilization in certain lung segments.
Communication
Therapeutic communication is a type of professional communication used by health care providers with patients and defined as, “The purposeful, interpersonal information-transmitting process through words and behaviors based on both parties’ knowledge, attitudes, and skills, which leads to patient understanding and participation.”
When communicating with patients and family members, take note of your audience and adapt your message based on their characteristics such as age, developmental level, cognitive abilities, and any communication disorders. For patients with language differences, it is vital to provide trained medical interpreters when important information is communicated.
Adapting communication according to the patient’s age and developmental level includes the following strategies:
- When communicating with children, speak calmly and gently. It is often helpful to demonstrate what will be done during a procedure on a doll or stuffed animal. To establish trust, try using play or drawing pictures.
- When communicating with adolescents, give freedom to make choices within established limits.
- When communicating with older adults, be aware of potential vision and hearing impairments that commonly occur and address these barriers accordingly. For example, if a patient has glasses and/or hearing aids, be sure these devices are in place before.
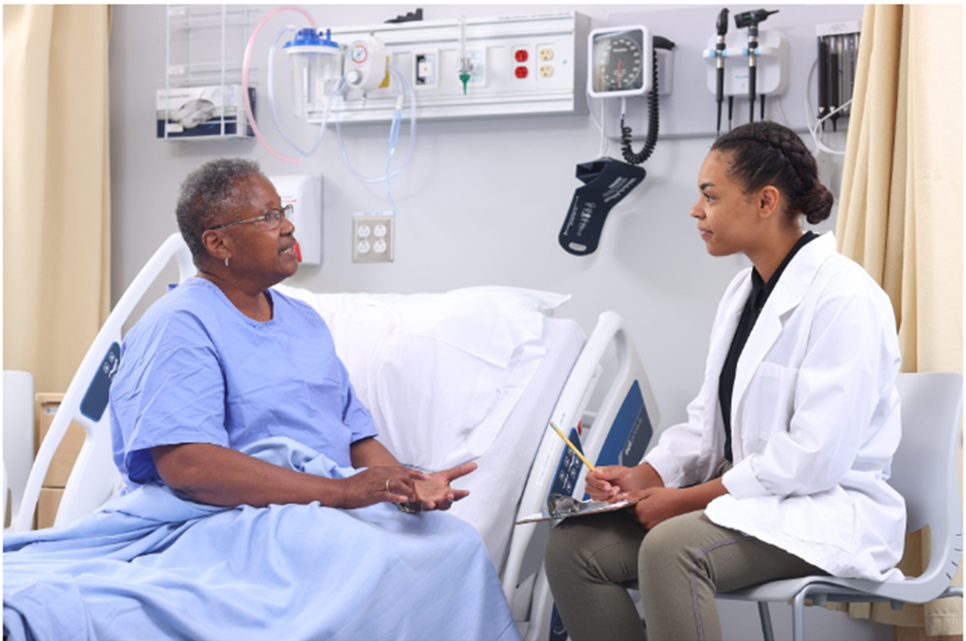
When communicating with any age, be an active listener. Active listening is a type of listening that shows you are engaged in the conversation and that you hear and understand what the client is saying. Active listening is important to facilitate your understanding of, and the integration of, client’s experiences, preferences, and health goals into their care. Being at eye level with a patient is beneficial in fostering effective communication and building rapport (see Figure 19[15]). This approach helps create a sense of connection, making the patient feel heard, respected, and valued. Maintaining eye contact at the same level can also reduce feelings of intimidation or anxiety, particularly in vulnerable situations. Additionally, it allows health care providers to better assess the patient’s facial expressions, emotions, and overall comfort, leading to more patient-centered and compassionate care.
Focused Health History
Taking a patient history is crucial in understanding the patient’s medical background, current health status, lifestyle, and symptoms. This information helps health care professionals formulate an accurate diagnosis, develop appropriate treatment plans, and provide tailored care. Additionally, understanding a patient’s medical history enables identification of potential risk factors, allergies, and contraindications for certain treatments, ensuring safe and effective health care delivery. It also establishes a foundation for building a trusted patient-provider relationship and promotes shared decision-making in the management of the patient’s health.
The components of a focused health history include the following: demographic data, childhood diseases and development, hospitalizations, surgeries, injuries, accidents, and major illnesses. Additionally, questions should focus on allergies, medications, immunizations, general health, and previous sources of health care. Questions should also touch on family history; familial disease history; and social and environmental history, including alcohol, drug, smoking history, and satisfaction/stress with life situations that might affect health. A complete review of systems (ROS) should be conducted as well. The ROS provides subjective data or that which is evident only to the patient and cannot be perceived by an observer and can only be described by the patient.
The provider conducting the focused health history should use open-ended questions that encourage patients to describe events and symptoms, and they should use clarifying questions to get a complete patient description of their concerns. Interviews should be conducted with empathy, and a relaxed conversational style of speaking is helpful to mitigate patient anxiety.[16]
- “Evac_chair” by Daniel Morris is licensed under CC BY-SA 2.0 ↵
- “R.A.C.E Acronym for How To Respond To A Fire First Response Safety Training.png” by Matt Esner is reused with permission. https://www.firstresponsecpr.com/blog/child-care-fire-evacuation/ ↵
- Go, C. (2023). Elder care facility fire safety tips, resources, & training. First Response Safety Training. https://www.firstresponsecpr.com/blog/elder-care-fire-safety-tips/ ↵
- “FireExtinguisherABC” by Dante Alighieri is licensed under CC BY-NC-SA 2.0 ↵
- Go, C. (2023). Elder care facility fire safety tips, resources, & training. First Response Safety Training. https://www.firstresponsecpr.com/blog/elder-care-fire-safety-tips/ ↵
- CQ Fire & Safety. (2020, September 22). How to use a fire extinguisher using the PASS method [Video]. YouTube. All rights reserved. https://www.youtube.com/watch?v=PQV71INDaqY ↵
- “Hand Mitt” by Myra Reuter for Chippewa Valley Technical College is licensed under CC BY 4.0 ↵
- Ernstmeyer, K., & Christman, E. (Eds.). (2024). Nursing fundamentals 2E. Open RN | WisTech Open. https://wtcs.pressbooks.pub/nursingfundamentals/ ↵
- “Supine_position.jpg” by Glynda Rees Doyle and Jodie Anita McCutcheon is licensed under CC BY 4.0 ↵
- “Prone_position.jpg” by Glynda Rees Doyle and Jodie Anita McCutcheon is licensed under CC BY 4.0 ↵
- “Lateral_position.jpg” by Glynda Rees Doyle and Jodie Anita McCutcheon is licensed under CC BY 4.0 ↵
- “Fowler%27s_Position.jpg” by Glynda Rees Doyle and Jodie Anita McCutcheon is licensed under CC BY 4.0 ↵
- “Semi-Fowler%27s_position.jpg” by Glynda Rees Doyle and Jodie Anita McCutcheon is licensed under CC BY 4.0 ↵
- “Trendelenburg_position.jpg” by Glynda Rees Doyle and Jodie Anita McCutcheon is licensed under CC BY 4.0 ↵
- “BP3I7661-2048x1365.jpg” by Nick Pearce is licensed under CC BY-NC-SA 4.0. Access for free at https://caul-cbua.pressbooks.pub/diversityexchange/ ↵
- Doyle, G. R., & McCutcheon, J. A. (2015). Clinical procedures for safer patient care. BCcampus. https://opentextbc.ca/clinicalskills/ ↵

