3.1 Advanced Airways and Intubation
We are now advancing from basic airways to advanced airways. In particular, you will be learning to both intubate and assist with an intubation. Depending on where your career takes you, you may be called on to do either procedure. In addition, these procedures cannot be taken lightly because patients are often critically ill, and death can occur as a negative outcome of improperly performed procedures.
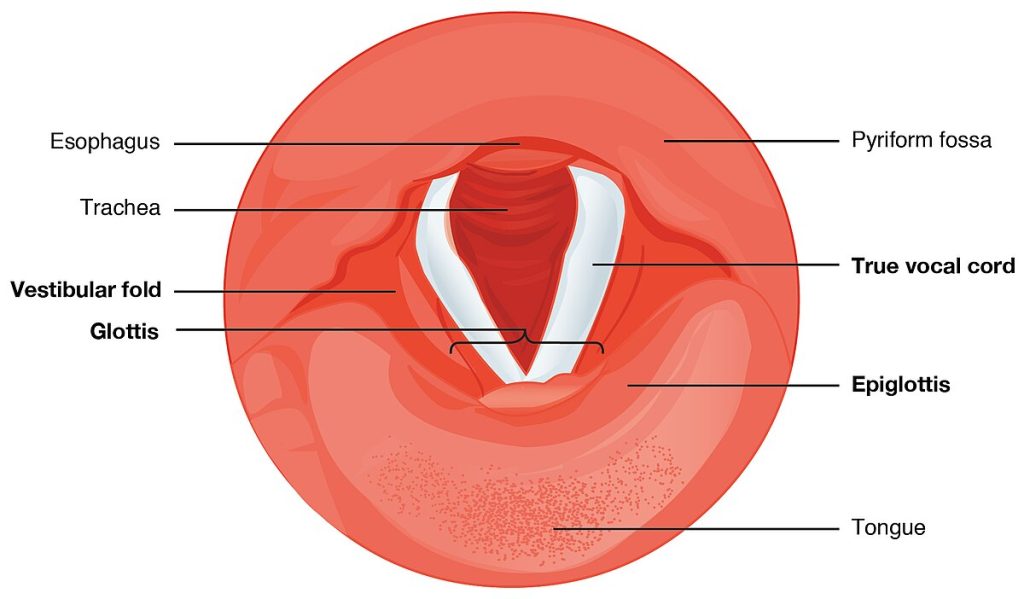
You need to remember back to your anatomy and physiology course so you can recall the anatomical landmarks utilized in intubation. The anatomical landmarks that you need to visualize during intubation are the trachea, glottis, epiglottis, vallecula, and vocal cords (see Figure 11[1]).
When the epiglottis is in the “closed” position, the unattached end of the epiglottis rests on the glottis. A vestibular fold, or false vocal cord, is one of a pair of folded sections of mucous membrane. A true vocal cord is one of the white, membranous folds attached by muscle to the thyroid and arytenoid cartilages of the larynx on their outer edges. The inner edges of the true vocal cords are free, allowing oscillation to produce sound.
Mallampati Classification
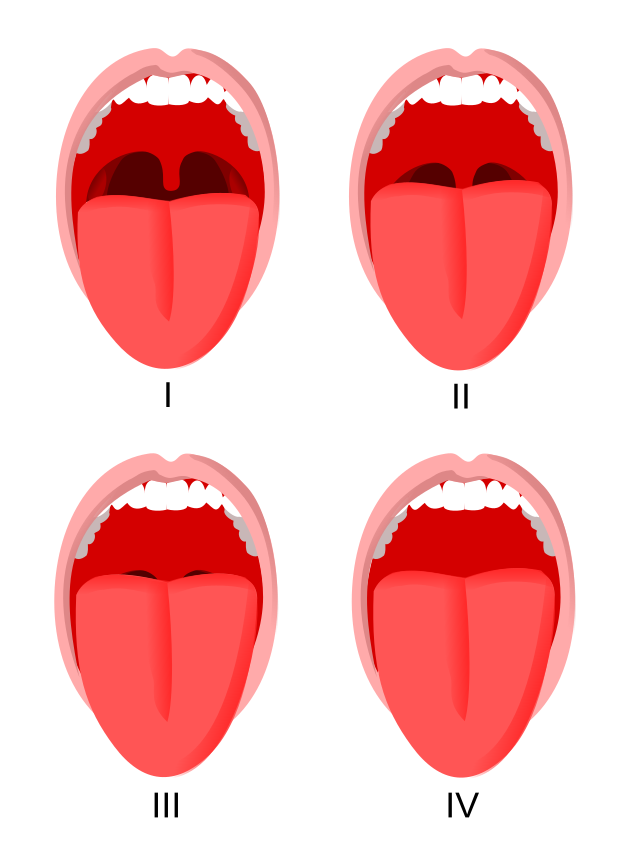
The mouth cavity should be assessed by sitting the patient upright with the head in a normal position, mouth open as wide as possible, and tongue poking out. The airway can then be given a Mallampati score, depending on how much of the oral cavity can be seen. The Mallampati score is a visual assessment of the size of the base of the tongue relative to the oropharynx (see Figure 12[2]). It is used to predict how easy it will be to intubate a patient.
If the patient has a Mallampati Class 1 airway and no other airway problems, most intubations will be easy.
If the patient has a Mallampati Class 4 airway, then intubation may be difficult.
Patients with more than one airway abnormality are more likely to have a difficult intubation. For example, an obese patient with a short neck; a patient with reduced movement in the cervical spine; or a patient with large upper teeth, small mouth, and small mandible would be more difficult to intubate.
Advanced Airways
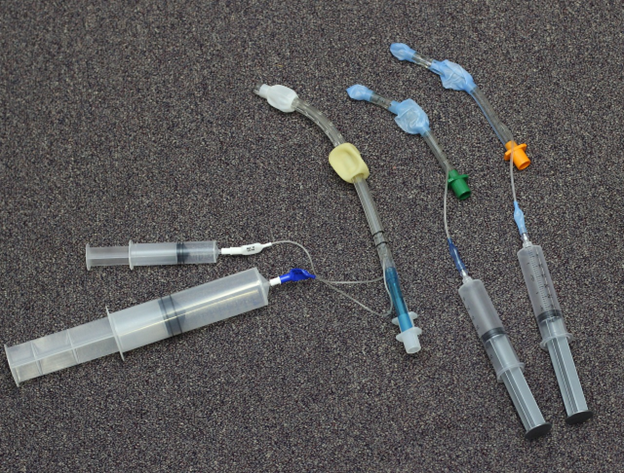
The King LT (aka King Airway) and Combitube are both advanced airway management devices used in emergency and pre-hospital settings to secure a patient’s airway (see Figure 13[3]). Additionally, they offer an alternative means of securing an airway when standard intubation is not feasible.
Both the King LT and Combitube are intended to have their distal tip placed in the esophagus. With the King LT, the pharyngeal balloon and esophagus balloon are inflated through a single inflation port and pilot balloon, while the Combitube has two ports and pilot balloons. There has been one case report where over-inflation of the esophageal balloon collapsed the trachea (from behind), preventing ventilation even though the tip of the device was in the esophagus.
The protocol for ventilating with the Combitube involves the following steps. First, attempt ventilation using Lumen 1 (the blue lumen). If this is unsuccessful, switch to Lumen 2 (the transparent lumen) in case the tip of the device has entered the trachea directly. If both attempts fail, advance the device slightly, as the pharyngeal balloon might be folding down the epiglottis and obstructing airflow.
For the King LT, insert the device as deeply as possible after selecting the appropriate size. Inflate the balloons and then gently withdraw the device until ventilation is successful. While tracheal insertion is possible with the King LT, it is less likely than with the Combitube due to the King LT’s shorter and more flexible design. If tracheal insertion does occur, withdraw the device slightly before attempting ventilation again.[4]
Laryngoscopes
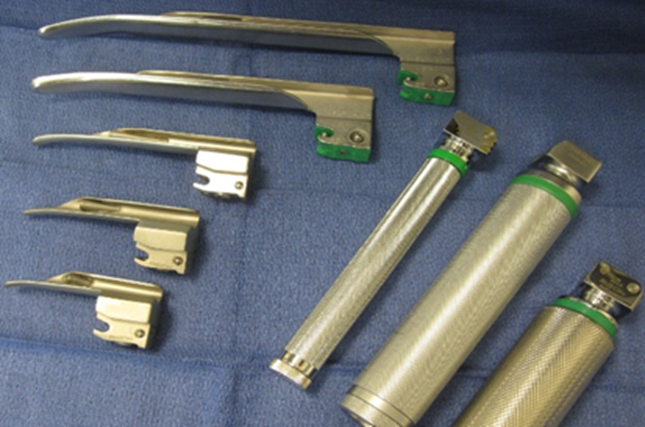
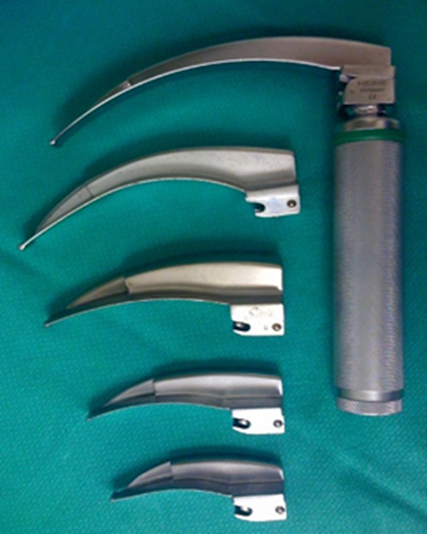
The standard rigid laryngoscope consists of a detachable blade with a removable bulb (or fiber optic light) that attaches to a battery-containing handle. The blade has a flange on the left side for displacing the tongue. The blade may be curved (e.g., Macintosh) or straight (e.g., Miller). (See Figures 14[5] and 15.[6]) The curved blade may present more room in the mouth as the blade matches the curve of the oropharynx. The straight blade may be better when mouth opening is vertically limited, or the larynx is anterior. When laryngoscopy is difficult with one blade, the other blade may be useful. Laryngoscope blades are available in different lengths. Adults usually need a Size #3 or #4 Macintosh blade, children younger than 8 years of age usually need a Size #2 Macintosh blade, term infants usually require a Size #1 Miller blade, and premature infants usually need a Size #0 Miller blade.
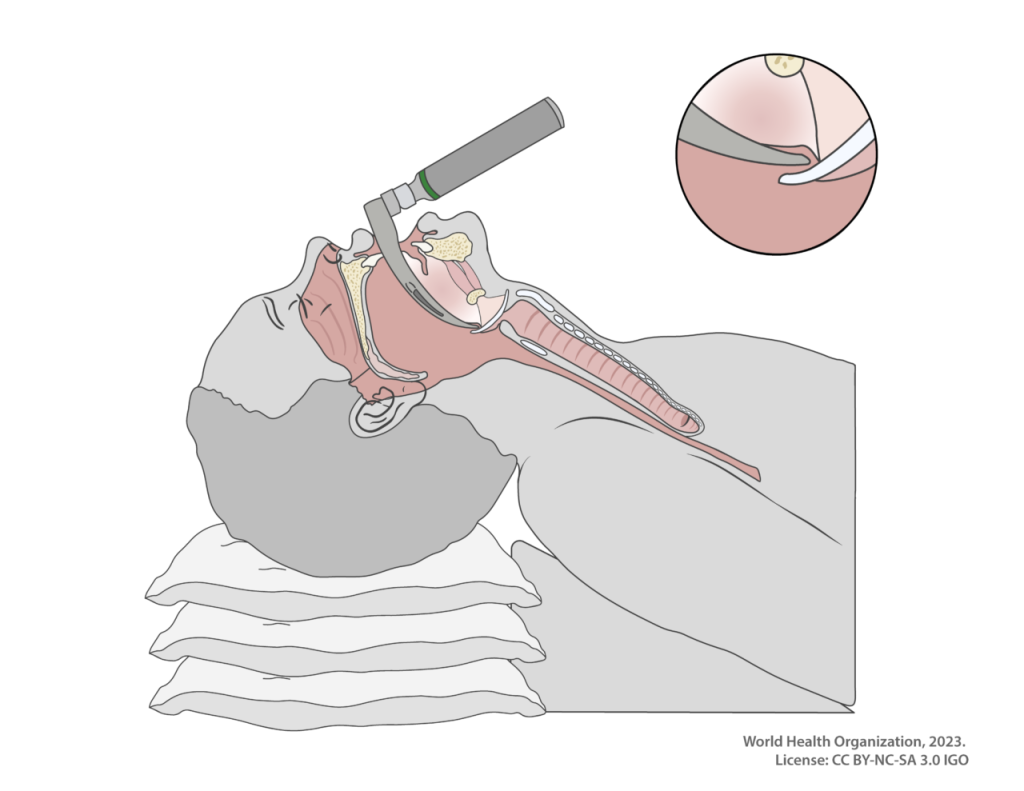
When attempting intubation, you always use your left hand (laryngoscopes are left-handed devices) and when inserting the blade into the right side of the mouth. Be careful not to pinch the lips or knock the incisor teeth. At the tonsillar pillars, sweep the tongue to the left and identify the uvula. Advance the laryngoscope blade slowly down the midline over the base of the tongue until the epiglottis is seen. A common mistake is to insert the blade too far down and into the esophagus. If unsure, withdraw the laryngoscope slowly, and the epiglottis may fall into view. A curved blade should have its tip in the vallecula. The tip of a straight blade is placed over the epiglottis. Exposure of the laryngeal inlet is improved by lifting the laryngoscope in the direction of the handle. Do not use the blade as a lever on the teeth and gums. The laryngoscope should only be moved in the direction of the handle.
In addition to traditional nondisposable laryngoscope handles and blades, video laryngoscopy offers an advanced method for airway visualization. This technique provides indirect visualization of the airway via a video screen, rather than requiring the provider to directly view the anatomical structures. Video laryngoscopy offers several benefits, including improved intubation success rates, reduced need for upper airway manipulation, and enhanced opportunities for training. Additionally, it allows for the capture of videos and photos, which can be valuable for quality improvement initiatives and case documentation.
View the following supplementary YouTube video[7] to learn more about video laryngoscopy: Mastering Video Laryngoscopy
Endotracheal Intubation
Endotracheal intubation is a medical procedure used to secure the airway by inserting a tube into the trachea (windpipe) through the mouth or nose. This procedure is commonly performed in emergency situations, during surgery, or in patients with respiratory failure.
The indications for intubation are relief of upper airway obstructions, protection of the airway, or the need for mechanical ventilation or tracheal suctioning.
Intubation Procedure[8]
Prepare your endotracheal tube (ETT) by testing the cuff with 10 milliliters of air, lubricating the end of the tube, and inserting a stylet. Place the person’s head in a neutral position and insert a laryngoscope into their mouth to hold the tongue and pharynx out of the way (see Figure 16[9]). Then, the ETT can be inserted down the patient’s throat, past the vocal cords, and into the trachea.
Insert the tube until the lower depth marker is at the vocal cords. As you are inserting the tube, you should be able to see where it is going until it gets past the vocal cords. At that point, you need to start watching for the marking near the end of the tube to line up with the vocal cords.
Check that the depth marker is at the opening of the mouth. There are length markers all along the length of the tube. When the tube is in place properly in an adult, it should indicate a depth of anywhere from 20 to 25 cm at the corner of the mouth.
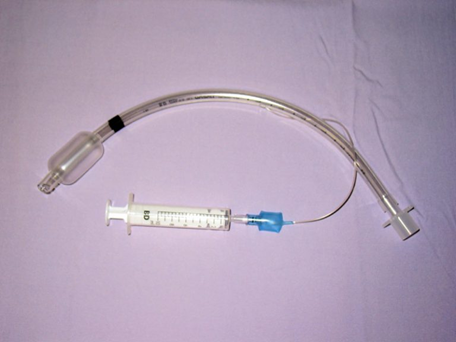
Once you have inserted the tube to the correct depth, remove the stylet and inflate the cuff to hold the ETT in place. (See Figure 17.[10]) There is a balloon at the bottom of the ETT that holds the tube still in the trachea. It is inflated by attaching a syringe to its port and squeezing in 10 milliliters of air. In addition to holding the tube in place, the cuff keeps liquids out of the lungs. This helps minimize the chance of aspiration while the person is intubated.
View the following supplementary YouTube video[11] to learn where the vallecula is located and how to visualize it when intubating: Vallecula (Medical Definition) | Quick Explainer Video
To ensure that the tube is inserted correctly, you should either place a colormetric device or a CO2 detector on the 15 mm adapter end of the ETT. If the colormetric detector senses any amount of CO2 being exhaled, it will simply change color. This shows that the patient is receiving oxygen properly, as CO2 is a byproduct expelled only when oxygen is supplied.
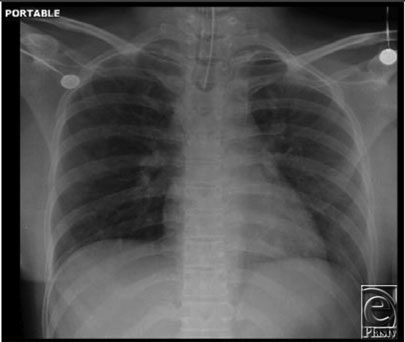
Verify proper insertion. Once you have applied oxygen to the tube, make sure the chest is rising and falling. Listen to lung sounds. Make sure you can hear them bilaterally. Then, verify that the tube is in the right position and secure the ETT using a securement device. To verify proper placement, an X-ray should be taken (see Figure 18[12]).
Record the position of the ETT so movement can be identified. Recording the positioning of a tube at insertion will allow you to make sure it hasn’t moved over time. Write down the measurement printed on the tube at a specific position in the mouth, such as at the front teeth or the lips. When checking on the patient later, you can ensure that the tube is still in the proper position by referencing this documentation.
Measure the air pressure in the ETT. Once the ETT is in, it’s a good idea to measure the amount of pressure being created by respiration through the tube. This can be done by performing the minimal leak technique or minimal occlusion volume. Watch the video on how to perform these maneuvers.
View the following supplementary YouTube video[13]in which ETT cuff pressure and assessment are demonstrated: ETT Cuff Pressure Check/ Assessment
Tips and Tricks
- When intubating someone, it is best to have several ETTs available at a moment’s notice. This will allow you to use a different size if you cannot get the one you chose into the person’s trachea.
- If the person is not already unconscious, they will need to be sedated before having an ETT inserted.
- The tip of the ETT should be between 3–7 cm (1.2–2.8 inches) from the bottom of the trachea above the carina. The carina is the point at the bottom of the trachea where it splits into the bronchi. You do not want the ETT to go this far down, as it could damage this area.
- A rigid stylet and flexible bougie are excellent intubation aids. The rigid stylet is placed in the ETT, and the tube is bent into a more useful shape. Usually, the curve at the distal end is increased. The stylet should not extend beyond the end of the endotracheal tube because it could cause tracheal trauma. The flexible bougie (gum elastic bougie) should be 60 cm long with a “J” shape at the distal tip. It should be soft and flexible to prevent trauma to the trachea. The flexible bougie is used as a guide for the ETT.
- Colormetric (CO2) monitors are single use. When they sense CO2, the face of the monitor changes color irreversibly. Because of this, they are typically used just once right after intubation.
- Measuring the pressure of the cuff in the trachea will help prevent damage to the trachea and the lungs. A safe pressure at the cuff of the ETT is between 20 and 30 cmH2O.
- Betts, J. G., Young, K. A., Wise, J. A., Johnson, E., Poe, B., Kruse, D. H., Korol, O., Johnson, J. E., Womble, M., & DeSaix, P. (2022). Anatomy and Physiology 2e. OpenStax. https://openstax.org/books/anatomy-and-physiology-2e/pages/1-introduction ↵
- “Mallampati” by Jmarchn is licensed under CC BY-SA 3.0 ↵
- “biad-king-airway-combitube-1936581” by kkirkemtp via Pixabay is licensed under CC0 ↵
- Levitan, R. M. (2011). Ems-delivered airways, part II. Emergency Physicians Monthly. https://epmonthly.com/article/ems-delivered-airways-part-ii/ ↵
- “Laryngoscopes-Miller_blades.JPG” by DiverDave is licensed under CC BY 3.0 ↵
- “Macintosh_Blades.jpg” by Sasata is licensed under CC BY 3.0 ↵
- Medmastery. (2018, September 20). Mastering video laryngoscopy [Video]. YouTube. All rights reserved. https://www.youtube.com/watch?v=V6RAx8LyBOI ↵
- RNspeak. (2021). Patients with endotracheal tube - Nursing roles, management & procedure. https://rnspeak.com/endotracheal-intubation-procedure/ ↵
- “Sagittal-Cross-Section-w-Laryngoscope-intubation-mac3091122-f0vs3p.png” by World Health Organization is licensed under CC BY-NC-SA 3.0 ↵
- “Sondeintubation.jpg” by bigomar2 is licensed under CC BY-SA 3.0 ↵
- Respiratory Therapy Zone. (2023, July 26). Vallecula (Medical Definition) | Quick Explainer Video [Video]. YouTube. All rights reserved. https://www.youtube.com/watch?v=6dWnS5mM-_U&t=8s ↵
- “A-chest-x-ray-showing-correct-endotracheal-tube-placement-and-no-acute-lung-pathology.png” by Ankit Jain is licensed under CC BY 2.0 ↵
- George O. RRT. (2017, November 8). ETT Cuff Pressure Check/ Assessment [Video]. YouTube. All rights reserved. https://www.youtube.com/watch?v=Yv7Fs9ljw-k ↵

