Chapter 8: Airway Management, Respiration and Ventilation
Brian Litza, EdD, NRP
8.1 Introduction
Airway management is a core skill for Emergency Medical Responders. Your understanding of airway anatomy and physiology supports intervention and treatment choices, from airway positioning to advanced airway utilization. Correct application of both basic and advanced skills form the foundation of effective airway management in the field.
Note that in medicine the terms respiration and ventilation are often used interchangeably, and can be confusing. They are not the same process. Ventilation is the physical movement of gasses (primarily oxygen and carbon dioxide) between the environment and the lungs. This is the act of breathing. Respiration is the gas exchange at the cellular level, contributing to metabolism. The first site of respiration is exchange at the alveoli, termed external respiration due to the interface with the environment. The second site of respiration is at the tissue level (such as muscles or organs), termed internal respiration.
Learning Objectives
- Identify airway anatomy and physiology.
- Identify airway assessment.
- Identify airway maneuvers.
- Identify airway adjuncts.
- Identify relief of airway obstruction
- Identify non-visualized airway.
8.2 Airway Anatomy and Physiology
Without oxygen, the body cannot function properly. An adequate airway is essential to assuring the body has what it needs to function properly. We will start with the basics, understanding the anatomy and physiology of the respiratory system.
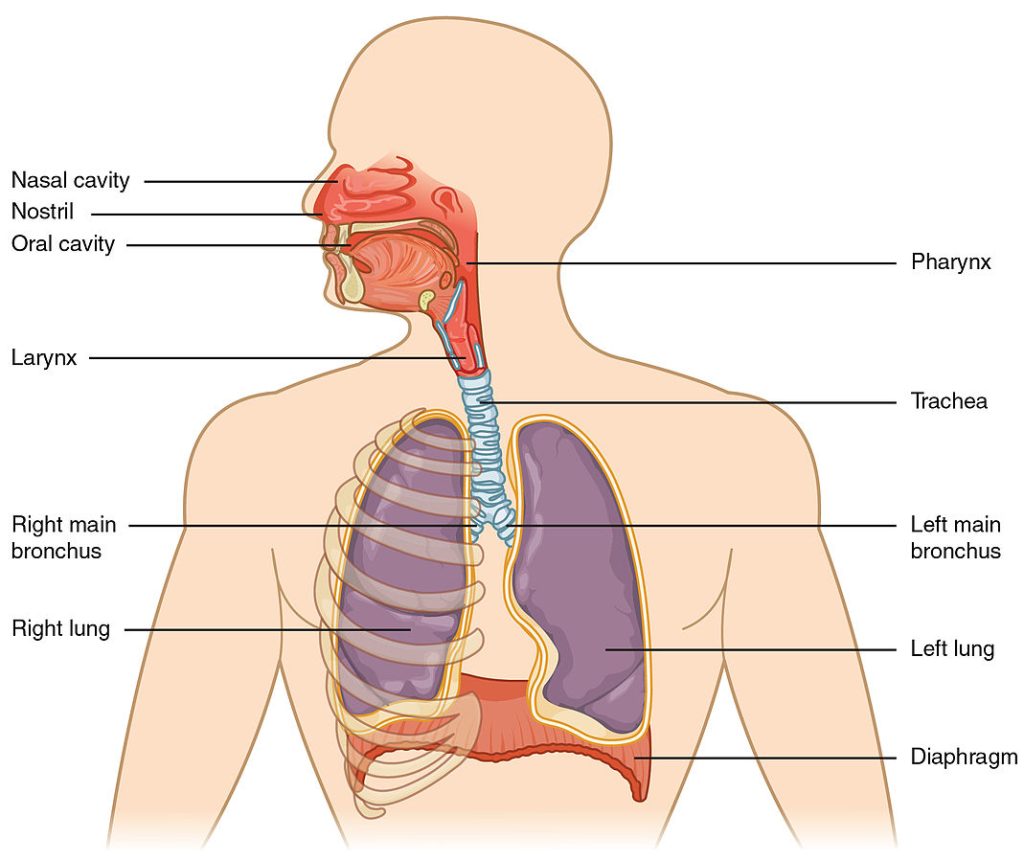
Anatomy of the Upper Airway
The upper airway is the initial pathway for air to enter the respiratory system, a complex and vital process for life. It begins with the nose, the primary entry point for air. The nasal passages filter, warm, and humidify inhaled air, preparing it for the lungs. Inside the nose, specialized cells and structures like cilia and mucous membranes trap dust, pollen, and other foreign particles, preventing them from reaching the lower respiratory tract. This filtration process is necessary for maintaining respiratory health.
The mouth is an alternative airway, especially in emergencies when the nasal passages are obstructed. It also plays a role in the digestive system, as it’s the entry point for food and liquids. Beyond respiration and digestion, the mouth is essential for speech production. The tongue, a muscular organ located within the mouth, manipulates food during chewing and swallowing, as well as for forming sounds during speech. Its position and movement significantly impact the quality and clarity of spoken language.
The jaw, composed of the mandible (lower jaw) and maxilla (upper jaw), provides the bony framework for the mouth and supports the teeth used for chewing. The jaw’s movement, facilitated by muscles and joints, allows for biting, chewing, and speaking. Proper jaw alignment is necessary for both oral function and facial structure. Any injury or misalignment can impact breathing, eating, and/or speech.
In the back of the mouth and the nasal cavities lies the throat, or pharynx. The pharynx is divided into three regions: the oropharynx, nasopharynx, and laryngopharynx. The oropharynx is located directly behind the mouth, while the nasopharynx is behind the nose. The laryngopharynx is the lower part of the pharynx and connects to the esophagus and larynx. The epiglottis, a leaf-shaped flap of cartilage, sits at the entrance to the larynx. During swallowing, the epiglottis closes over the glottis, the opening to the trachea, preventing food and liquids from entering the lungs.
The larynx, also known as the voice box, is a cartilaginous structure located in the anterior neck. It houses the vocal cords, which vibrate to produce sound. The vocal cords are two folds of tissue that can be tightened or relaxed to change the pitch of the voice. The larynx also contains the thyroid cartilage, which protects the front of the larynx and forms the Adam’s apple, and the cricoid cartilage, a ring-shaped structure that forms the lower portion of the larynx. The larynx’s primary function is to protect the lower airway and facilitate sound production.
Maintaining a patent airway is the priority in emergency medical care. Knowledge of these structures enables EMS providers to effectively assess and manage airway issues, whether through basic maneuvers like the head-tilt/chin-lift or more advanced techniques such as endotracheal intubation. A thorough understanding of the upper airway’s anatomy is fundamental for providing effective prehospital care and ensuring patient survival.
Anatomy of the Lower Airway
The lower airway begins with the trachea, commonly known as the windpipe. This hollow tube serves as the connection between the pharynx, located in the upper airway, and the lungs, the primary organs of respiration. The trachea’s structure is reinforced by a series of C-shaped cartilage rings, which provide support and prevent the trachea from collapsing, ensuring a continuous and open passageway for air to travel to the lungs. This open airway is essential for effective breathing and gas exchange.
Distributing air throughout the lungs is the bronchi. These hollow tubes branch off from the trachea and further subdivide into a complex network of progressively smaller airways, much like the branches of a tree. Similar to the trachea, the bronchi are also supported by cartilage, ensuring their patency and facilitating the efficient transport of air into the deeper structures of the lungs. The branching pattern of the bronchi allows for a wide distribution of inhaled air, maximizing the surface area available for gas exchange.
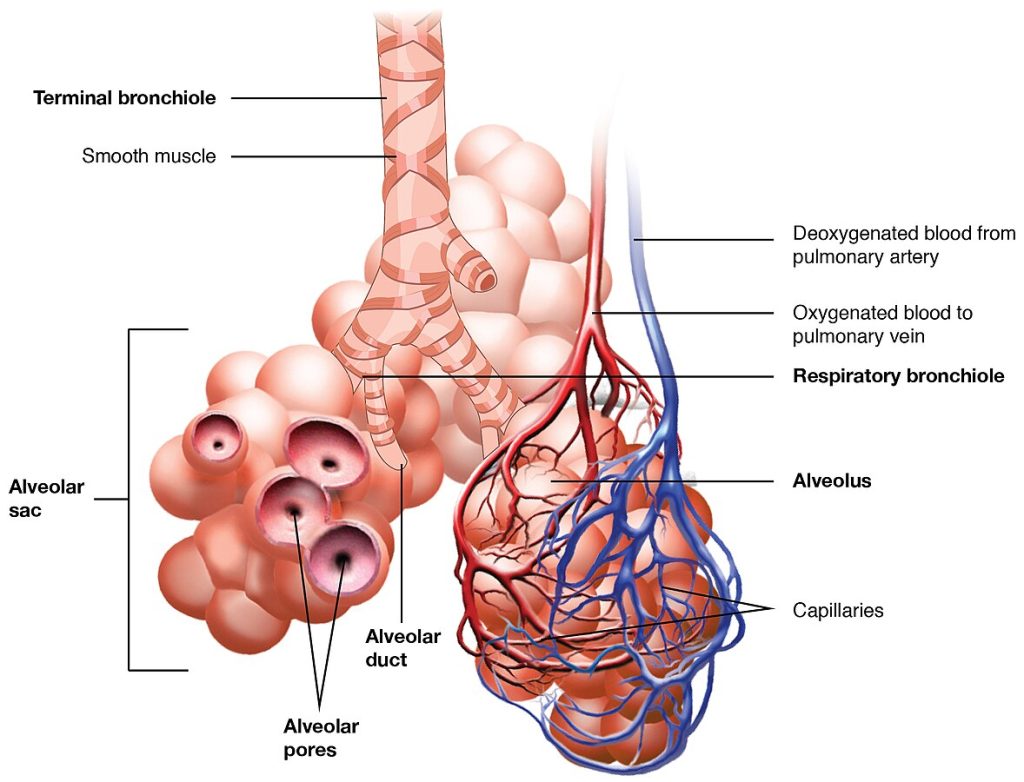
The lungs themselves are complex organs containing millions of tiny air sacs called alveoli. The bronchi eventually lead to smaller and thinner tubes called bronchioles. These bronchioles, unlike the bronchi, are not supported by cartilage rings but instead maintain their open state through smooth muscle tone. This smooth muscle can constrict or relax, influencing airflow to the alveoli. The alveoli, located at the very end of the airway, are the functional units of the lung. These microscopic, thin-walled sacs are where the exchange of oxygen and carbon dioxide takes place.
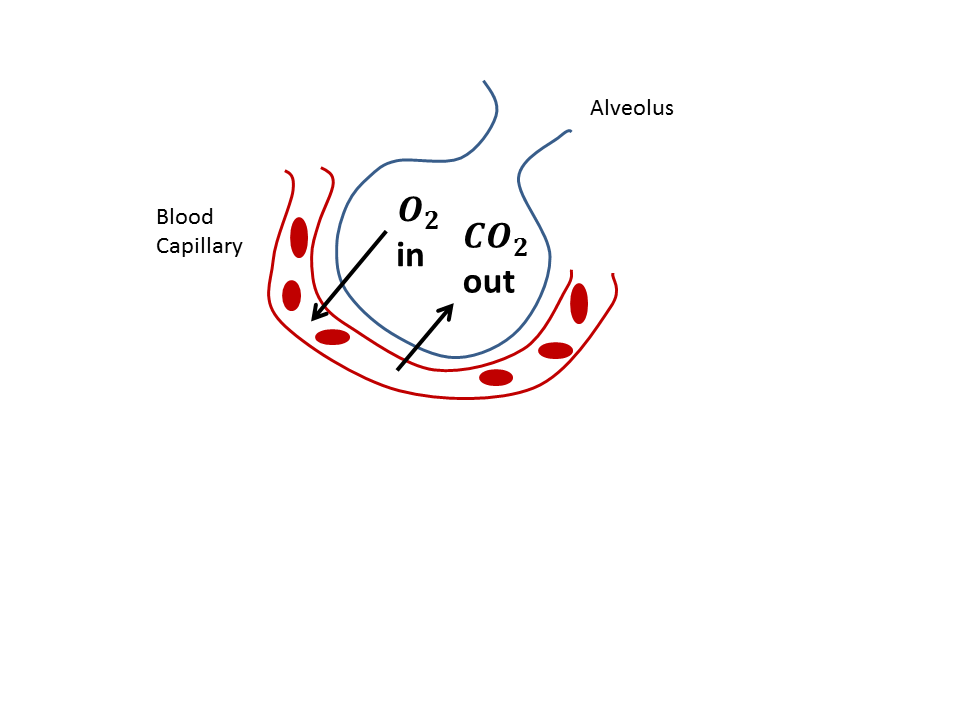
Each alveolus is surrounded by a dense network of capillary blood vessels. The proximity of the alveoli and capillaries allows for rapid diffusion of oxygen from the inhaled air into the bloodstream, while carbon dioxide, a waste product of cellular metabolism, diffuses from the blood into the alveoli to be exhaled. This intricate system of airways and alveoli within the lungs ensures the efficient delivery of oxygen to the body’s tissues and the removal of carbon dioxide. Understanding both the anatomy of the upper and lower airways is important to understanding their function within the body.
View the following YouTube videos for more information about the respiratory system:
Age-Related Respiratory System Variations
Age-Related Respiratory System Variations in Pediatric Patients
The unique anatomical and physiological characteristics of pediatric patients is important to understand. Age-related variations in pediatric patients significantly impact assessment, treatment, and overall outcomes. This section highlights key differences in pediatric airway anatomy that necessitate special considerations during emergency medical interventions.
Infant vs. Adult Airway Differences
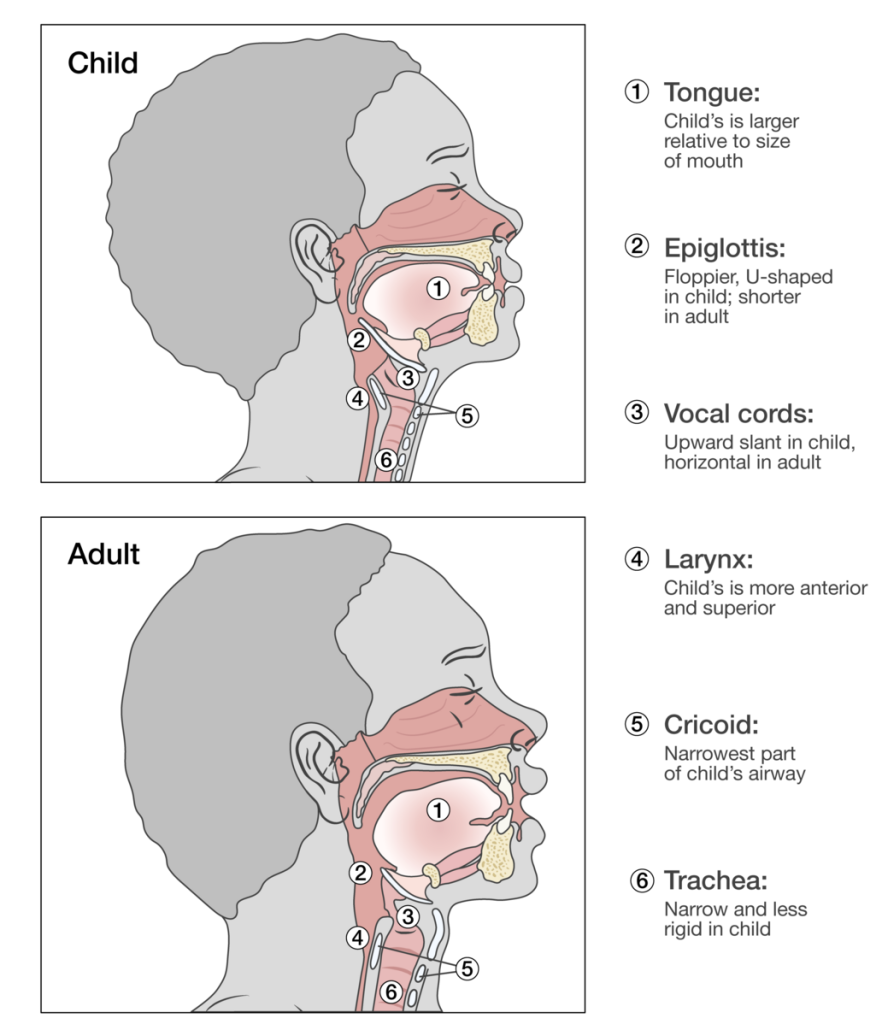
Not only is the size of the airway different, the shapes and locations of the structures also vary between the infant and the adult. The table and illustration summarize the major anatomical differences in the infant and toddler airways compared to the older child and adult. The younger the child, the more different the airway.
One notable distinction lies in the size and structure of the pediatric airway. Infants and young children have a smaller nose and mouth compared to adults. This seemingly minor difference can pose challenges when implementing airway maneuvers or using airway adjuncts. Additionally, the jaw of a pediatric patient is smaller, while their tongue is proportionally larger, occupying more space in the oral cavity. This anatomical feature contributes to infants being nose breathers, as their oral cavity is primarily occupied by the tongue.
The trachea, or windpipe, in pediatric patients, also exhibits distinct characteristics. It is more pliable and has a smaller diameter compared to adults. The increased pliability makes the trachea susceptible to compression or kinking during neck movements, potentially leading to airway obstruction. The smaller diameter implies that even minimal swelling or foreign objects can significantly compromise airflow.
Furthermore, the cricoid cartilage, a ring-like structure that helps maintain the trachea’s patency, is less rigid and less developed in children. This immaturity increases the risk of airway collapse, especially in cases of increased airway resistance or external pressure. Consequently, airway structures in pediatric patients are generally more easily obstructed due to a combination of these anatomical differences.
The epiglottis, a flap of cartilage that covers the trachea during swallowing, also differs in pediatric patients. In infants and toddlers, the epiglottis is longer, floppier, and narrower, extending at a 45-degree angle into the airway. This unique shape and position can increase the risk of airway obstruction.
These age-related variations in pediatric airway anatomy necessitate careful consideration during airway management. EMS professionals must be knowledgeable about these distinctions and adapt their techniques accordingly. For instance, when positioning a pediatric patient for airway management, gentle maneuvers are necessary to avoid hyperextension or hyperflexion of the neck, which can lead to airway compromise.
As an EMS provider, it is important to understand age-related variations in pediatrics to provide effective and safe care. Recognizing the unique anatomical and physiological characteristics of pediatric airways enables prompt and appropriate interventions, ultimately improving patient outcomes.
Age-Related Respiratory System Variations in Geriatric Patients
Geriatric patients present unique challenges in the prehospital setting due to age-related physiological changes. One significant alteration occurs in the respiratory system. The chest wall loses elastic recoil, leading to air-trapping and a subsequent increase in both lung capacity and residual volume. This means that while the total volume of air the lungs can hold might increase, the efficiency of gas exchange is compromised. Simultaneously, there is a loss of alveoli, the tiny air sacs where oxygen and carbon dioxide exchange takes place. This reduction in surface area further diminishes the body’s ability to effectively oxygenate tissues and remove waste products. These changes contribute to a decline in overall respiratory function, making geriatric patients more vulnerable to respiratory distress.
Adding to these challenges, the aging respiratory system experiences a reduction in the exchange of oxygen and carbon dioxide. This diminished exchange capacity, coupled with the structural changes already mentioned, means that geriatric patients may present with lower baseline oxygen saturation levels and a reduced ability to compensate for respiratory difficulties. Furthermore, the body’s ability to respond to respiratory distress is often reduced. A key physiological response to declining oxygen levels or increasing carbon dioxide is an increase in respiratory rate. However, geriatric patients often exhibit an inability to significantly increase their respiratory rate in response to these stressors. This limited ability to compensate can mask the severity of respiratory problems and delay recognition of critical illness.
Beyond the changes in lung tissue and gas exchange, the body’s defense mechanisms within the respiratory system also weaken with age. The cough reflex, a vital protective mechanism that helps clear the airway of foreign material, is often diminished in geriatric patients. This makes them more susceptible to aspiration pneumonia and other respiratory infections. Compounding this issue is the decreased ability of cilia, the tiny hair-like structures lining the respiratory tract, to effectively move mucus upward and out of the lungs. This impaired mucociliary clearance further contributes to the increased risk of pneumonia and other respiratory complications in the elderly population.
In the prehospital setting, EMS providers must be acutely aware of these age-related respiratory changes in geriatric patients. A seemingly minor respiratory complaint may quickly escalate into a life-threatening situation due to the reduced reserve capacity and impaired compensatory mechanisms. A thorough assessment, including careful observation of respiratory rate and effort, pulse oximetry, and auscultation of lung sounds, is crucial. Early recognition of respiratory distress and prompt intervention, including supplemental oxygen and potentially assisted ventilation, are essential to improving outcomes for geriatric patients experiencing respiratory compromise.
8.3 Airway Assessment
Learning Objectives
- Outline signs of an adequate airway.
- Outline signs of an inadequate airway.
- Differentiate swelling due to trauma or infection.
Adequate Airway
A patent airway is essential for ensuring oxygen delivery to the lungs and the removal of carbon dioxide. Several key indicators suggest an adequate airway. First and foremost, the airway is open, or patent. This can be assessed by visually inspecting the oral cavity for obstructions and by listening and feeling for the movement of air at the patient’s mouth and nose. This simple step confirms that air is flowing. Beyond simply being open, the quality of the airway is assessed through other signs.
A patient’s ability to speak in full sentences without difficulty is a strong indicator of an adequate airway. This demonstrates that air is moving freely through the upper airway and into the lungs. The ability to articulate full sentences suggests sufficient airflow and adequate respiratory effort. This assessment is particularly useful in conscious patients and provides a rapid gauge of airway patency.
The sound of the patient’s voice also provides valuable information about the airway. Changes in voice quality, such as hoarseness, muffled speech, or stridor (a high-pitched whistling sound), can indicate airway compromise. These changes may be due to swelling, obstruction, or other issues affecting the larynx and vocal cords.
Observing the chest rise and fall is another component of airway evaluation. Equal and symmetrical chest expansion indicates that both lungs are receiving adequate ventilation.
Finally, auscultating (listening) breath sounds using a stethoscope provides data about the patient’s airway. Clear breath sounds heard bilaterally (on both sides of the chest) indicate that air is moving freely through the lungs. Auscultation is a skill that needs to be practiced and used on all patients.
While these five signs are key indicators of an adequate airway, it’s important to remember that they represent a snapshot in time. A patient’s condition can change rapidly, and continuous monitoring of the airway and breathing is essential, especially in critical patients. Furthermore, these assessments should be integrated with other vital signs, such as pulse rate, respiratory rate, and oxygen saturation, to provide a comprehensive picture of the patient’s condition.
View the following YouTube video playlist for more information on different lung sounds: Lung and Breath Sounds
Inadequate Airway
Recognizing the signs and symptoms of an inadequate airway is critical for prompt intervention. An inadequate airway can manifest in a variety of ways, ranging from subtle indicators to overt signs of respiratory distress. One of the most alarming signs of an inadequate airway is the absence of breathing or air movement. This can be readily assessed by observing the patient’s chest for rise and fall or by placing a hand near the patient’s mouth to feel for exhaled air. If no breathing or air movement is detected, immediate intervention is necessary.
Patients with an inadequate airway may also exhibit difficulty speaking. They may be unable to speak full sentences or may speak with difficulty. This difficulty in speaking can be attributed to the reduced airflow through the airway.
Unusual lung sounds can also indicate an inadequate airway. These lung sounds may include wheezing, stridor, or crackles. Such sounds can be indicative of airway obstruction or other respiratory problems.
A very common cause of an inadequate airway is obstruction by the tongue when the patient has a decreased level of consciousness. This may be as benign as snoring while asleep or significant with angioedema (tongue swelling often due to a medication reaction).
Another sign of an inadequate airway is the presence of foreign bodies in the airway. These foreign bodies can include blood, vomit, or other objects, such as broken teeth. The presence of such foreign bodies can obstruct the flow of air, leading to respiratory distress or arrest.
An inadequate airway can manifest in a variety of ways, ranging from subtle indicators to overt signs of respiratory distress. EMS professionals must be vigilant in recognizing these signs and symptoms to ensure prompt intervention and patient safety.
Airway Swelling
When assessing a patient with swelling, EMS providers must differentiate between swelling due to trauma or infection. Trauma-related swelling is often accompanied by other signs of injury, such as bruising, open wounds, or deformities. The swelling may also be localized to the injured area. Infection-related swelling, on the other hand, may be accompanied by redness, warmth, tenderness, and pus. The swelling may also be more diffuse and may involve multiple areas of the body.
In either case, it is important to assess the patient’s airway to determine if the swelling is causing any compromise. This can be done by listening for stridor, which is a high-pitched whistling sound that indicates a narrowing of the upper airway. If stridor is present, the patient may need immediate intervention to secure the airway.
8.4 Airway Maneuvers
Learning Objectives
- Differentiate between manual airway maneuvers.
- Demonstrate manual airway maneuvers.
Assessment and Management of Airway Patency
Ensuring a patent airway is the first step in patient care. Assessment begins with observing for signs of airway compromise, such as stridor, inability to speak, or snoring sounds. If the patient is unresponsive or has an altered mental status, manual airway maneuvers should be used. The head-tilt/chin-lift maneuver is the primary technique for opening the airway in non-trauma patients, effectively lifting the tongue away from the posterior pharynx. In patients with suspected cervical spine injury, the modified jaw-thrust maneuver is preferred, as it minimizes neck movement while still lifting the mandible and opening the airway. Once the airway is open, it’s essential to maintain it and address any obstructions.
The head-tilt/chin-lift maneuver is a basic technique used to open the airway by extending the patient’s neck and lifting the chin. The purpose of this maneuver is to align the oral, pharyngeal, and tracheal axes, creating a clear pathway for air to flow. It is indicated for any patient with a non-patent airway unless a cervical spine injury is suspected. Contraindications include suspected neck, spine, or head injury, as manipulating the neck in these situations could exacerbate the injury. While generally safe, complications can arise. Multiple attempts may be needed to achieve a patent airway, and the position must be maintained to ensure continued airway patency. The procedure itself involves placing one hand on the forehead to tilt the head back while the other hand lifts the chin.
The modified jaw-thrust maneuver is an alternative technique specifically designed for patients with suspected head, neck, or spine injuries. Its purpose, like the head-tilt/chin-lift, is to open the airway by aligning the airway structures. It is indicated in patients with a non-patent airway and a suspected or unknown mechanism of injury that could involve the cervical spine. There are no absolute contraindications when a patient cannot maintain their airway. However, if the jaw thrust is ineffective, it can be augmented by mechanical tools such as an oral airway. If the jaw thrust is unsuccessful, the head-tilt/chin lift should be used, even with a suspected spinal injury, as a compromised airway poses a more immediate threat to life.
The ability to quickly and accurately assess a patient’s airway and select the appropriate manual maneuver can significantly impact patient outcomes. Regular training and practice are essential to ensure competency in these life-saving techniques.
Manual Airway Maneuvers — Procedures
1. Head-Tilt/Chin-Lift Maneuver
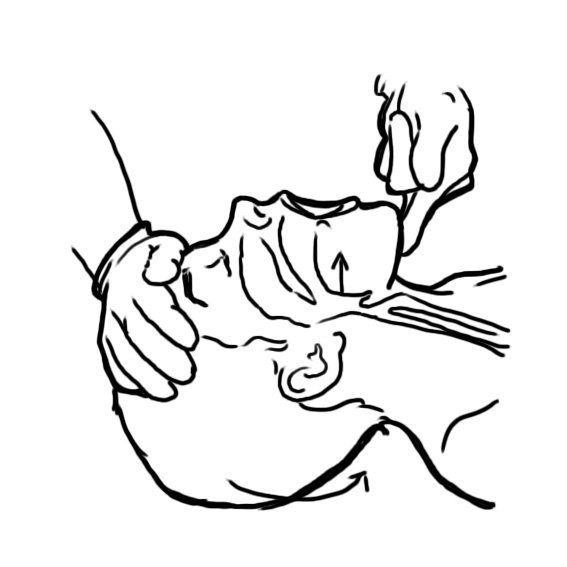
The head-tilt/chin-lift is a first-line maneuver for opening the airway when cervical spine injury is not suspected. It involves tilting the patient’s head back by placing one hand on the forehead and gently applying pressure while simultaneously lifting the chin with the other hand. This action lifts the tongue away from the back of the throat, effectively opening the airway.
2. Modified Jaw-Thrust Maneuver
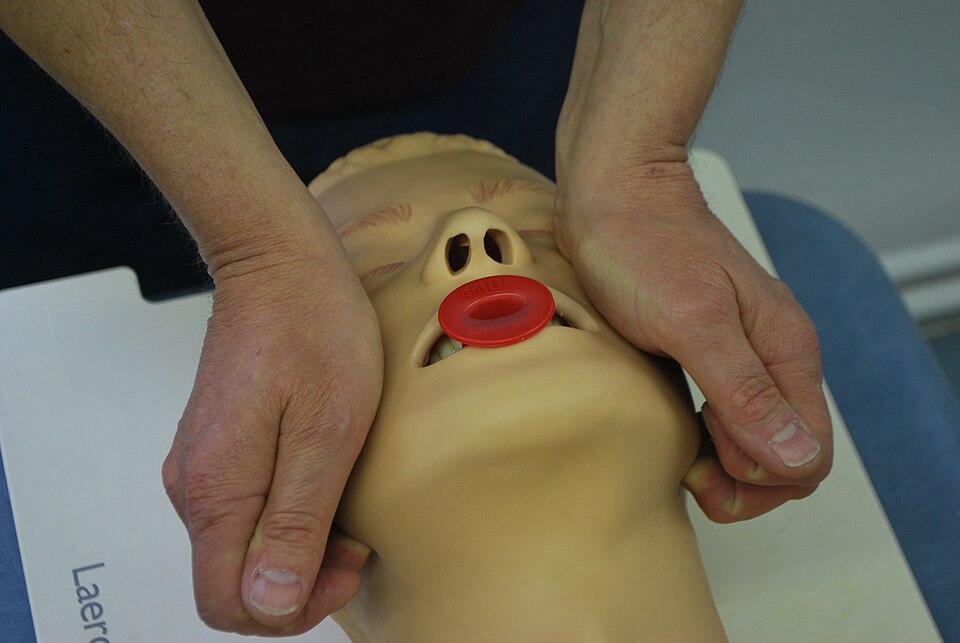
The modified jaw thrust is the preferred technique when cervical spine injury is suspected. It involves grasping the angles of the mandible (jawbone) and lifting them upward, effectively moving the tongue forward and opening the airway without manipulating the neck. This technique requires practice and precision to avoid causing further injury.
Additional Considerations:
- Both maneuvers should be performed gently and with caution, especially in patients with potential head or neck injuries.
- It is important to assess the patient’s breathing and responsiveness before and after performing either maneuver.
- These techniques are often used in conjunction with other airway management tools, such as oropharyngeal or nasopharyngeal airways.
View the following YouTube video on manual airway maneuvers:
8.6 Relief of Airway Obstructions
Learning Objectives
- Identify foreign body airway obstructions (FBAO)
- Demonstrate relief of an airway obstruction.
- Demonstrate relief of FBAO through visualization.
- Explore techniques of upper airway suctioning.
Relief of Foreign Body Airway Obstructions (FBAO)
Foreign body airway obstruction (FBAO) is a medical emergency that requires immediate intervention. Prompt recognition and appropriate treatment are necessary to prevent serious complications, including death. The techniques used to relieve an FBAO vary depending on the patient’s age (adult, child, or infant) and the severity of the obstruction. Effective management hinges on quickly assessing the situation and applying the correct procedures.
Recognizing an FBAO is the first step. The AHA distinguishes between non-severe and severe obstructions. A non-severe obstruction allows for some air exchange. The patient may be able to speak, cough, wheeze, or gasp. While concerning, a non-severe obstruction does not necessitate the immediate, forceful interventions required for a complete blockage. However, it’s vital to monitor the patient closely as a partial obstruction can quickly become complete.
A severe FBAO is characterized by the inability to speak, cough, or breathe. There will be no air movement, and the patient may be clutching their throat (the universal choking sign). They might also exhibit signs of increasing distress, such as cyanosis (bluish discoloration of the skin) and eventually, loss of consciousness.
Treatment for non-severe obstructions in all age groups involves encouraging the patient to cough forcefully. This natural mechanism is often effective in expelling the foreign body.
Treatment for severe FBAO differs based on the patient’s age. For adults and children over 1 year old with a severe obstruction, the abdominal thrusts (Heimlich maneuver) are the recommended technique. These involve delivering quick, upward thrusts to the abdomen, just below the rib cage to dislodge the object. Chest thrusts are used for pregnant or obese individuals. Back blows are also part of the management algorithm in the Red Cross training.
For infants under 1 year old with a severe obstruction, the approach is different. Back blows and chest thrusts are used instead of abdominal thrusts. It’s important to support the infant’s head and neck during these maneuvers. This is supported by both the American Heart Association (AHA) and the Red Cross.
Whenever a person who is choking becomes unresponsive, they are lowered to the ground and CPR is initiated. When breaths are given, the airway is quickly inspected for any foreign objects to be removed. Blind finger sweeps are prohibited, as the object may be pushed back down the airway.
Skills for Relief of an Airway Obstruction
Note that in many examples of stepwise instruction from resources such as the American Heart Association or Red Cross, the prompt to call for help or activate 911 is included. If you are alone, request assistance or resources. When responding in the EMS system, you are the resources.
Relieving Choking in Adults (Conscious)
- Assess the Situation: If an adult is conscious and choking, they may be unable to speak or cough. Look for the universal choking sign (hands clutching the throat).
- Call for Help (if alone or a bystander): If someone is nearby, have them call 911 or your local emergency number.
- Back Blows (Red Cross): Stand behind the choking person and slightly to one side. Place one arm across their chest for support. Bend them forward at the waist and give five distinct back blows between their shoulder blades with the heel of your hand.
- Abdominal Thrusts (Heimlich Maneuver): If the back blows are unsuccessful, perform abdominal thrusts. Stand behind the person and wrap your arms around their waist. Make a fist with one hand and place the thumb side against the abdomen, just above the navel. Grasp your fist with your other hand and give five quick, upward thrusts (in a “J” motion).
- Alternate Between Back Blows (Red Cross) and Abdominal Thrusts: Continue alternating between five back blows and five abdominal thrusts until the object is dislodged or the person becomes unconscious.
Relieving Choking in Adults (Unconscious)
- Assess the Situation: If an adult is unconscious, check for responsiveness. If they are unresponsive, call for help immediately.
- Position the Person: Carefully lay the person on their back on a firm, flat surface.
- Open the Airway: Use the head-tilt/chin-lift maneuver to open the airway. Place one hand on the forehead and gently tilt the head back while lifting the chin with your other hand.
- Look for an Object: Look into the person’s mouth. If you see an obstruction, carefully remove it with your fingers. Do not perform blind finger sweeps.
- Begin CPR: If the person is not breathing or is only gasping, begin CPR. Chest compressions may help dislodge the object.
Relieving Choking in Children (Conscious)
- Assess the Situation: If a child is conscious and choking, they may be unable to speak or cough. Look for the universal choking sign (hands clutching the throat).
- Call for Help (if alone or a bystander): If someone is nearby, have them call 911 or your local emergency number.
- Back Blows (Red Cross in children): For a child over 1 year old, stand or kneel behind them. Place one arm across their chest for support. Bend them forward at the waist and give five distinct back blows between their shoulder blades with the heel of your hand. For a child under 1 year old, hold them face down on your forearm, supporting their head and neck. Give five back blows between their shoulder blades with the heel of your hand.
- Abdominal Thrusts: If the back blows are unsuccessful, perform abdominal thrusts on a child over 1 year old. Stand or kneel behind them and wrap your arms around their waist. Make a fist with one hand and place the thumb side against the abdomen, just above the navel. Grasp your fist with your other hand and give five quick, upward thrusts using a “J” motion. For a child under 1 year old, perform chest thrusts instead of abdominal thrusts. Place two fingers on the breastbone, just below the nipple line, and give five quick, downward thrusts.
- Alternate Between Back Blows (Red Cross in Children) and Abdominal Thrusts: Continue alternating between five back blows and five abdominal or chest thrusts until the object is dislodged or the child becomes unconscious.
Relieving Choking in Children (Unconscious)
- Assess the Situation: If a child is unconscious, check for responsiveness. If they are unresponsive, call for help immediately.
- Position the Person: Carefully lay the child on their back on a firm, flat surface.
- Open the Airway: Use the head-tilt/chin-lift maneuver to open the airway. Place one hand on the forehead and gently tilt the head back while lifting the chin with your other hand.
- Look for an Obstruction: Look into the child’s mouth. If you see an object/obstruction, carefully remove it with your fingers. Do not perform blind finger sweeps.
- Begin CPR: If the child is not breathing or is only gasping, begin CPR. Chest compressions may help dislodge the object.
- Check Airway: Prior to each set of breaths, check the airway for object/obstruction. Never perform a blind finger sweep.
View the following supplementary YouTube videos on relief of foreign body airway obstruction:
What to Do When an Adult is Choking (Responsive) Red Cross
What to Do When an Adult is Choking (Unresponsive) Red Cross
Conscious Adult Choking – ProCPR
What to Do When Infant is Choking (Responsive) Red Cross
Conscious Child Choking – ProCPR
What to Do When an Infant is Choking (Unresponsive) Red Cross
Upper Airway Suctioning
Upper airway suctioning clears the airway of obstructions like fluids, secretions, or foreign materials. The primary indications for suctioning include audible gurgling sounds, which strongly suggest the presence of liquid in the airway, and visual evidence of such materials in or around the patient’s mouth and airway. Effectively removing these obstructions can significantly improve a patient’s respiratory status and oxygenation.
Suctioning is not appropriate in all situations. Conscious patients typically have intact airway reflexes and can manage their secretions, making suctioning unnecessary and potentially uncomfortable. Specific conditions like epiglottitis and croup, which involve inflammation and swelling in the upper airway, are also contraindications. Suctioning in these cases can exacerbate the swelling and worsen the patient’s condition. Patients with severe hemodynamic instability or bronchospasm may experience further deterioration with the procedure.
Complications associated with upper airway suctioning, though usually avoidable with proper technique, can be serious. Hypoxia, a deficiency in oxygen reaching the tissues, is a major concern, especially if suctioning is prolonged or performed without adequate pre-oxygenation. Bradycardia, a slow heart rate, can also occur due to vagal nerve stimulation during the procedure. Trauma to the airway, including tissue damage and bleeding, is another potential complication, particularly if the suction catheter is inserted too forcefully or manipulated roughly.
There are limitations of upper airway suctioning. In some cases, the patient may require pre-oxygenation before suctioning to prevent hypoxia. This is especially true for patients with pre-existing respiratory compromise or those who require multiple suctioning attempts. Additionally, suctioning may not be effective in removing thick, tenacious secretions or solid foreign body obstructions. In these situations, alternative airway management techniques, such as manual extraction or advanced airway procedures, may be necessary. Continuous reassessment of the patient’s condition is crucial to determine the effectiveness of suctioning and the need for additional interventions.
Soft suction catheter sizing: What is “French” anyway?
Soft suction catheters are listed in sizes from 6 Fr to 18 Fr. The old system of measurement was developed in the 19th century and refers to the proportion of outer diameters. This scale measures the outer diameter of catheters, with 1 French (Fr) equal to 0.33 millimeters. For example, a catheter labeled as 12 Fr has an outer diameter of approximately 4 mm. The standard Yankauer catheter is equal to a size 20 Fr. Most EMS providers choose a soft suction catheter based on visual assessment rather than any anatomical measurements. Children with special healthcare needs may have specialized home care equipment appropriate for their age and airway devices, and their caregivers will know the required size.
Upper Airway Suctioning Technique
Upper airway suctioning is a technique used to remove secretions or foreign material from the upper airway. It is often used in conjunction with other airway management techniques, such as abdominal thrusts (Heimlich maneuver), to relieve FBAO.
- Equipment: Gather the necessary equipment, including a suction catheter, suction tubing, and a suction device.
- Prepare the Catheter: Select a catheter that is the appropriate size for the patient.
- Usually this is the Yankauer suction device, which is rigid catheter of standard size.
- If a flexible suction catheter is used, the size is proportional to the patient and location being suctioned. For open airway suctioning (versus endotracheal tube) size is less of a limit and larger diameter is preferred.
- Depth of suctioning is estimated by measuring the length of the catheter from corner of the patient’s mouth to the tip of their ear lobe. (Similar to sizing an OPA)
- Insert the Catheter: Gently insert the catheter into the patient’s mouth or nose, advancing it until you reach the oropharynx or nasopharynx.
- Apply Suction: Apply suction by placing your finger over the suction control port on the catheter. Suction for no more than 10-15 seconds at a time.
- Remove the Catheter: Suctioning is done as the catheter is removed from the oropharynx or nasopharynx.
- Repeat as Needed: Repeat the suctioning procedure as needed until the airway is clear.
- If Oxygen is being administered, replace it between suction attempts and recheck SpO2 if available.
- Clear the Catheter as Needed: If the suction catheter becomes obstructed, use sterile water to clear the debris between rounds of suctioning. If unable to clear the obstruction, attach a new suction catheter.
Additional Considerations:
- If the patient is conscious, explain the procedure to them before you begin.
- Use appropriate personal protective equipment (PPE), such as gloves and a mask, when performing airway suctioning.
- Be careful not to suction for too long or with too much force, as this can damage the airway tissues.
View the following YouTube videos on suctioning:
8.8 Respiration, Ventilation, and Oxygenation
Anatomy, Physiology, and Pathophysiology of Respiration, Ventilation and Oxygenation
Airway Anatomy Review
The upper airway, consisting of the nasal cavity, pharynx, and larynx, is responsible for warming, humidifying, and filtering inhaled air. The nasal cavity, lined with mucosa and cilia, traps particles and pathogens while the pharynx serves as a passageway for both food and air. The larynx, containing the vocal cords, regulates airflow and produces sound. The lower airway, comprising the trachea, bronchi, and bronchioles, facilitates gas exchange. The trachea, a flexible tube reinforced with cartilage rings, leads to the right and left bronchi, which further divide into smaller bronchioles. These terminate in alveoli, tiny air sacs where oxygen and carbon dioxide exchange occurs between the lungs and bloodstream.
Vascular Structures Supporting Respiration
The intricate process of respiration, essential for life, relies heavily on a network of vascular structures that facilitate gas exchange. At the core of this network are the pulmonary capillaries, tiny blood vessels that intertwine with the alveoli, the microscopic air sacs in the lungs. These capillaries are the primary site of oxygen and carbon dioxide exchange. As deoxygenated blood flows through the pulmonary capillaries, it comes into proximity with the oxygen-rich air within the alveoli. Through simple diffusion, oxygen from the alveoli crosses the capillary walls and binds to hemoglobin in red blood cells, effectively “picking up” the life-sustaining gas. Simultaneously, carbon dioxide, a waste product of cellular metabolism, diffuses from the blood within the capillaries into the alveoli, ready to be exhaled.
The heart plays a critical role in driving the circulation of blood to and from the lungs, ensuring a continuous supply of oxygen and removal of carbon dioxide. The right side of the heart receives deoxygenated blood from the body and pumps it through the pulmonary arteries to the lungs. This blood, low in oxygen and high in carbon dioxide, travels through the branching network of pulmonary arteries, and arterioles, and finally reaches the pulmonary capillaries surrounding the alveoli. It is here, as described previously, that the vital gas exchange takes place.
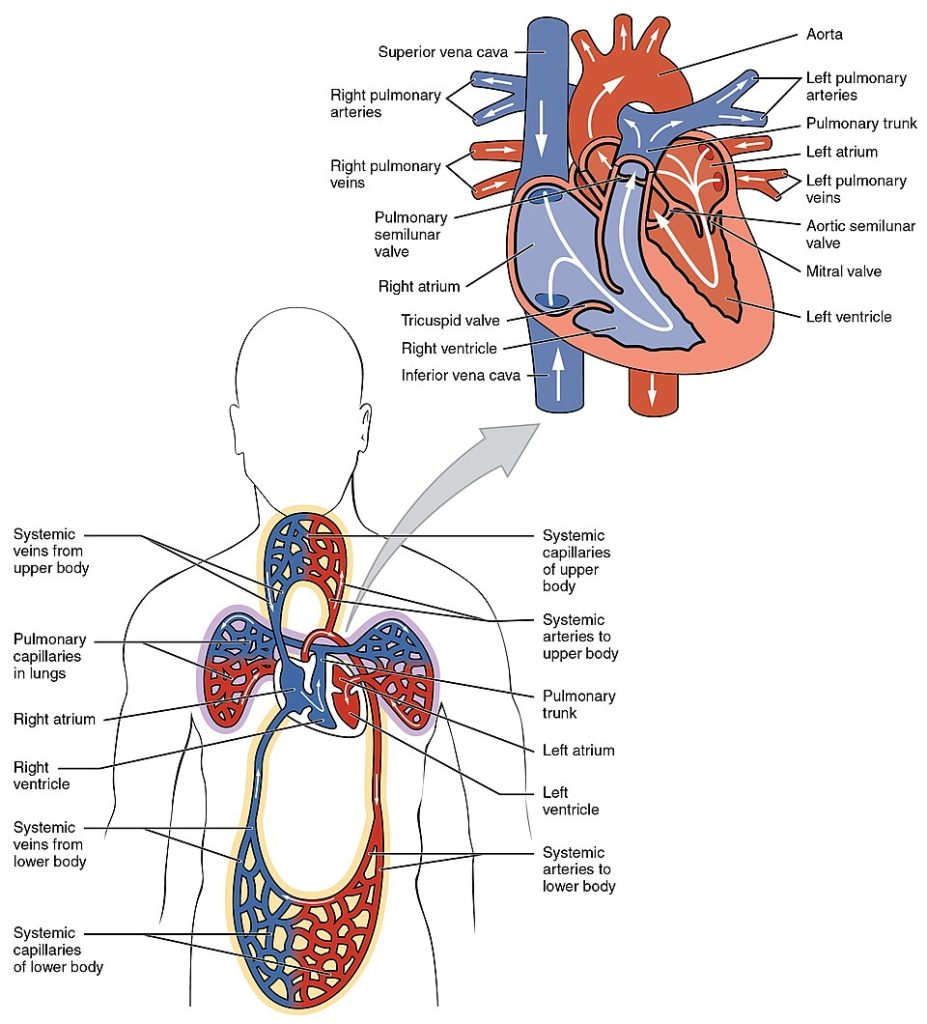
Once the blood has been oxygenated in the pulmonary capillaries, it flows back to the heart, this time rich in oxygen and depleted of carbon dioxide. The oxygenated blood travels from the capillaries to venules, which merge into larger pulmonary veins. These pulmonary veins are unique in that they carry oxygenated blood, then empty into the left atrium of the heart. From the left atrium, the blood flows into the left ventricle, the heart’s strongest pumping chamber. The left ventricle then propels the oxygenated blood out into the systemic circulation, delivering it to all tissues and organs of the body.
This oxygen-rich blood nourishes cells, providing them with the necessary fuel for their metabolic processes. As cells consume oxygen and produce carbon dioxide, the blood gradually becomes deoxygenated. This deoxygenated blood then returns to the right side of the heart, completing the circulatory loop and beginning the process of pulmonary gas exchange anew. This continuous cycle, driven by the heart and facilitated by the pulmonary capillaries, ensures the delivery of oxygen to the body’s tissues and the removal of carbon dioxide, sustaining life.
Understanding the Mechanics of Breathing
The mechanics of breathing involve the intricate interplay of muscles, pressure gradients, and the elastic properties of the lungs and chest wall. Inspiration, the active phase, begins with the contraction of the diaphragm, the primary muscle of respiration. This contraction flattens the diaphragm and increases the volume of the thoracic cavity. Simultaneously, the external intercostal muscles contract, lifting the rib cage up and outward, further expanding the chest cavity. These actions create a negative pressure within the lungs, drawing air in until the pressure equalizes with the atmosphere. Expiration, typically a passive process, occurs when the diaphragm and intercostal muscles relax.
The elastic recoil of the lungs, along with the weight of the chest wall, causes the thoracic cavity to decrease in volume. This leads to an increase in pressure within the lungs, forcing air out until the pressure equalizes with the atmosphere. In situations requiring forceful exhalation, such as during exercise or respiratory distress, the abdominal muscles can actively contract to further reduce the thoracic cavity volume and expel air more rapidly.
View the following Medline Plus and YouTube videos on respiration:
View the following YouTube videos on respiratory anatomy and breathing mechanics:
Respiration
Physiology and Pathophysiology of Respiration
Respiration, the fundamental process of gas exchange, is essential for life and can be broadly defined as the exchange of gases between the cardiopulmonary system and the body’s cells. This complex process is typically divided into external, internal, and cellular respiration, each playing a crucial role in maintaining homeostasis. External respiration, occurring in the lungs, involves the exchange of oxygen and carbon dioxide between the alveoli and the pulmonary capillaries. This exchange is critically dependent on the availability of sufficient oxygen in the inhaled air and the integrity of the alveolar-capillary membrane, which allows for the efficient diffusion of gases. Factors such as altitude, lung disease, or airway obstruction can impair external respiration, leading to hypoxemia (low blood oxygen levels).
Internal respiration takes place at the cellular level, where oxygen and carbon dioxide are exchanged between the systemic capillaries and the body’s tissues. This exchange is driven by the concentration gradients of these gases between the blood and the cells. Oxygen, transported by hemoglobin in red blood cells, diffuses from the capillaries into the interstitial fluid and then into the cells, while carbon dioxide, a byproduct of cellular metabolism, diffuses from the cells into the capillaries for transport back to the lungs
The efficiency of internal respiration is influenced by factors such as blood flow, capillary permeability, and the metabolic demands of the tissues. Impaired circulation or tissue hypoxia can disrupt internal respiration, leading to cellular dysfunction and potentially organ damage.
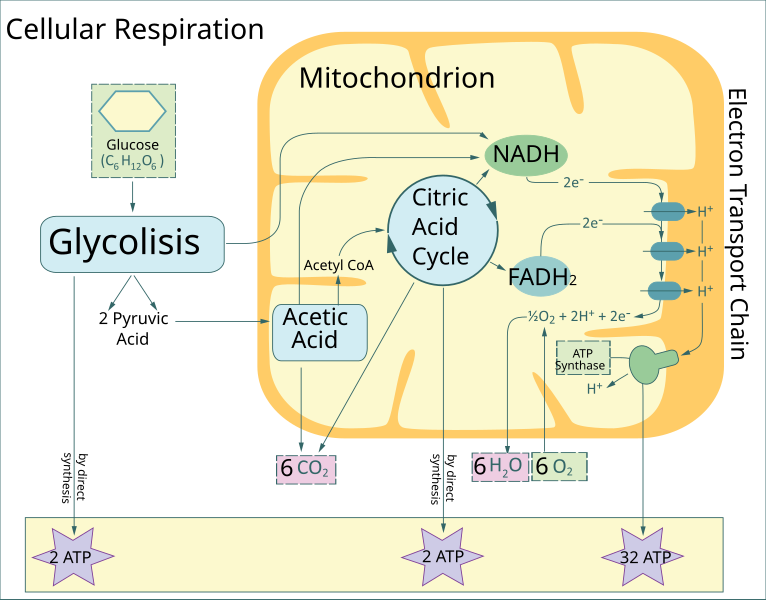
Cellular respiration, the final stage, refers to the cells’ utilization of oxygen for metabolism. Within the mitochondria, oxygen serves as the final electron acceptor in the electron transport chain, a crucial process that generates ATP, the cell’s primary energy currency. This process also produces carbon dioxide as a waste product. Cellular respiration is dependent on the cell’s ability to effectively utilize oxygen. For example, in cyanide poisoning, cyanide binds to the cytochrome oxidase enzyme in the electron transport chain, preventing the cells from using oxygen, even if it is available. This effectively halts ATP production and leads to rapid cellular death. This highlights the critical dependence of cellular function on the proper delivery and utilization of oxygen.
Differences Between Adequate and Inadequate Respiration
Adequate respiration, reflecting proper ventilation and oxygenation, is characterized by a patient exhibiting a normal mental status appropriate for their age and baseline condition. Their skin color should be normal, indicating good perfusion. A pulse oximeter (SpO2) reading should ideally be greater than 94%. These combined factors suggest the patient is effectively exchanging gases and maintaining appropriate oxygen levels.
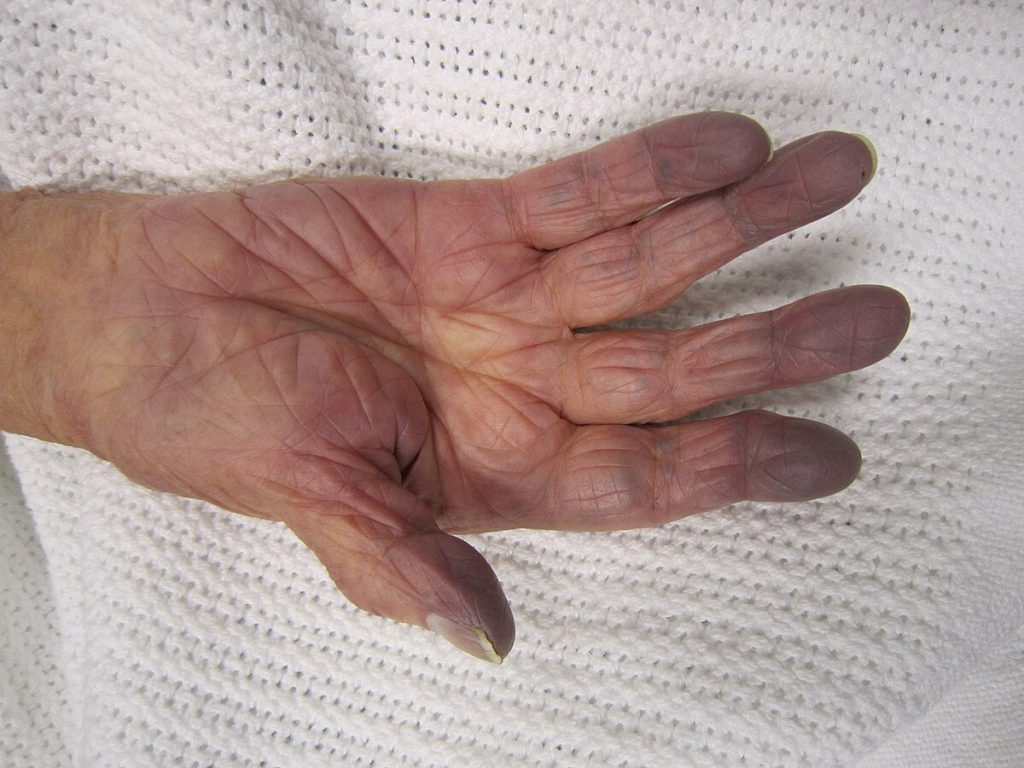
In contrast, inadequate respiration signifies compromised ventilation and oxygenation, often presenting as respiratory distress, failure, or even arrest. A hallmark of inadequate respiration is an abnormal or altered mental status, ranging from confusion and lethargy to unresponsiveness or unconsciousness. Visual signs can include cyanotic (bluish) or pale (ashen) skin, indicating poor oxygenation and circulation. Pulse oximetry (SpO2) readings will typically be less than 95%, reflecting decreased oxygen saturation.
Recognizing these distinctions allows Emergency Medical Responders to act quickly. Patients with adequate respiration still require monitoring to detect any deterioration, while those with inadequate respiration need assisted breathing, possibly with a bag-valve-mask (BVM) device and supplemental oxygen. Advanced airway devices such as supraglottic airways may be considered if trained providers and protocols allow. Prompt recognition and treatment of inadequate respiration are essential to prevent further deterioration and potentially life-threatening consequences such as hypoxia and cardiac arrest.
Reasons for Inadequate Respiration
Inadequate respiration can happen for several different reasons. Sometimes the problem lies in ventilation. If the airway is blocked by choking, swelling, or a severe asthma attack, air cannot reach the lungs. Breathing may also become ineffective if the muscles of respiration are weakened or paralyzed, or if the brain fails to send signals to breathe, as seen with drug overdoses, head injuries, or neurological diseases. Even external factors such as severe obesity or chest trauma can physically prevent the lungs from expanding fully, leading to poor ventilation.
In other situations, the oxygen cannot transfer into the blood. Conditions such as pneumonia or pulmonary edema fill the alveoli with fluid, leaving little room for oxygen to diffuse across the alveolar-capillary membrane. A pulmonary embolism can block blood flow to portions of the lung, preventing any exchange in the affected area. In severe cases such as acute respiratory distress syndrome (ARDS), the lung tissue itself becomes damaged and gas exchange is globally impaired.
Respiration can also be compromised when the circulatory system or the blood itself cannot carry oxygen efficiently to the tissues. Anemia reduces the blood’s ability to transport oxygen because of low hemoglobin. In systemic illnesses like sepsis or shock, blood flow to the tissues may be inadequate, leaving cells starved of oxygen even when the lungs are working.
Understanding the intricate physiology and potential pathophysiology of respiration is crucial for EMS professionals to effectively assess and manage patients with respiratory distress and provide timely interventions to support oxygenation and ventilation.
Oxygenation
Physiology and Pathophysiology of Oxygenation
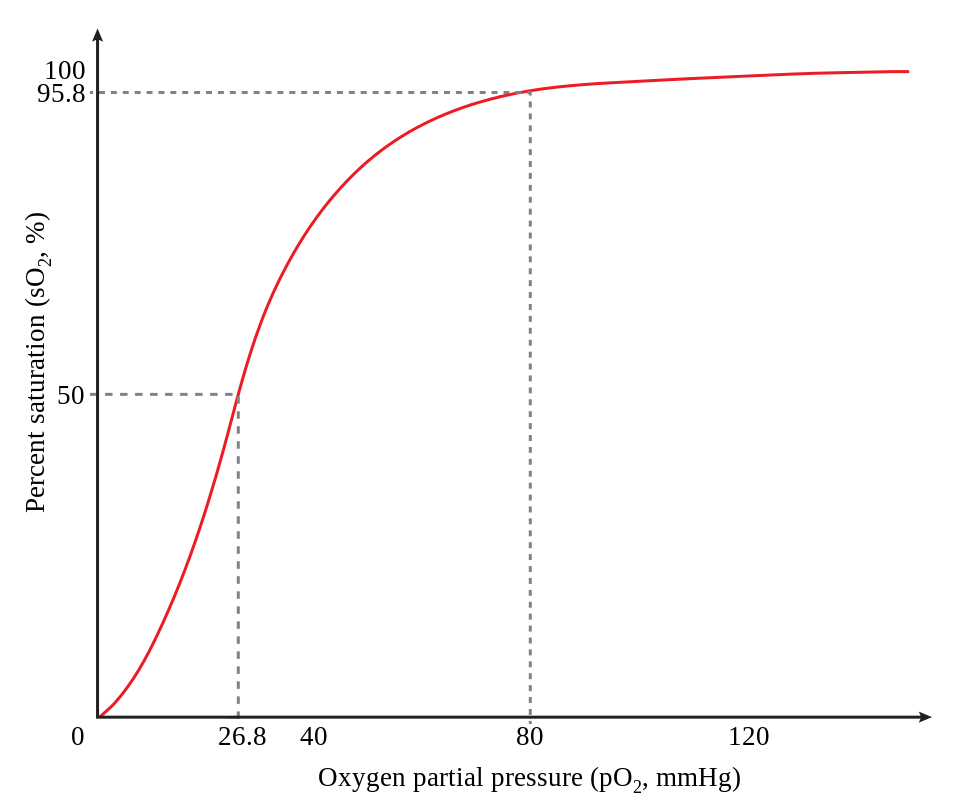
Oxygenation, the process of loading oxygen molecules onto hemoglobin in the bloodstream, is necessary for cellular function and survival. Physiologically, oxygen from inhaled air diffuses across the alveolar-capillary membrane in the lungs and binds to hemoglobin molecules within red blood cells. This process is driven by the partial pressure gradient of oxygen, moving from the higher concentration in the alveoli to the lower concentration in the blood. The amount of oxygen dissolved in the blood and other body fluids is directly related to the partial pressure of oxygen (PaO2). While this dissolved oxygen is essential, it represents only a small fraction of the total oxygen carried in the blood. The vast majority of oxygen is bound to hemoglobin, forming oxyhemoglobin, which is then transported throughout the body to tissues and cells. The percentage of hemoglobin saturated with oxygen is known as oxygen saturation (SpO2), a key clinical measurement.
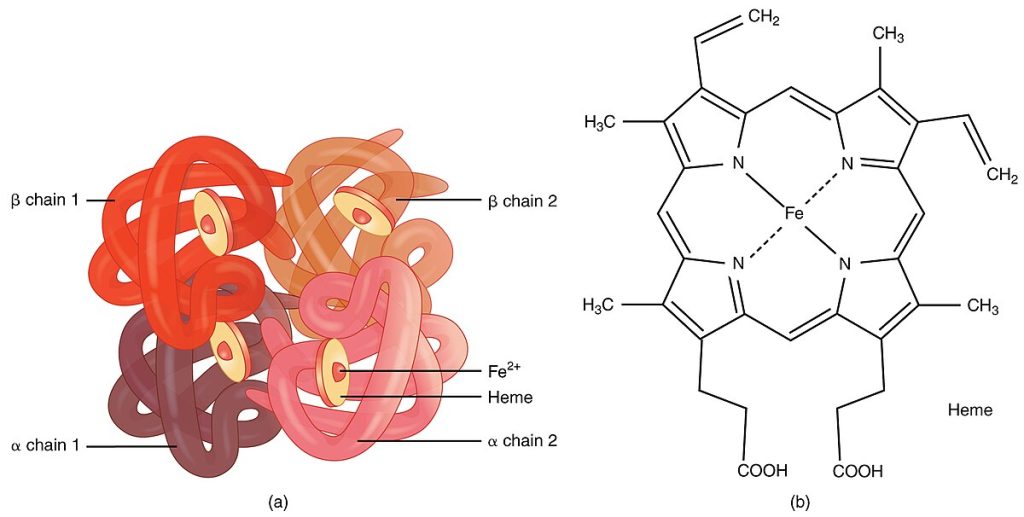
Each iron ion in the heme can bind to one oxygen molecule; therefore, each hemoglobin molecule can transport four oxygen molecules. An individual erythrocyte may contain about 300 million hemoglobin molecules and therefore can bind to and transport up to 1.2 billion oxygen molecules.
Well-oxygenated blood, often described as saturated with oxygen, is vital for maintaining aerobic metabolism. This means that cells have a sufficient supply of oxygen to efficiently produce energy through cellular respiration. Adequate oxygen delivery is essential for all organ systems, particularly the brain, which is highly sensitive to hypoxia (oxygen deficiency). Factors affecting oxygenation include the concentration of oxygen in the inhaled air, the efficiency of gas exchange in the lungs, the amount of hemoglobin available to carry oxygen, and the cardiac output, which determines how effectively oxygenated blood is delivered to the tissues. The oxygen-hemoglobin dissociation curve illustrates the relationship between PaO2 and SpO2, demonstrating how changes in PaO2 affect hemoglobin’s affinity for oxygen.
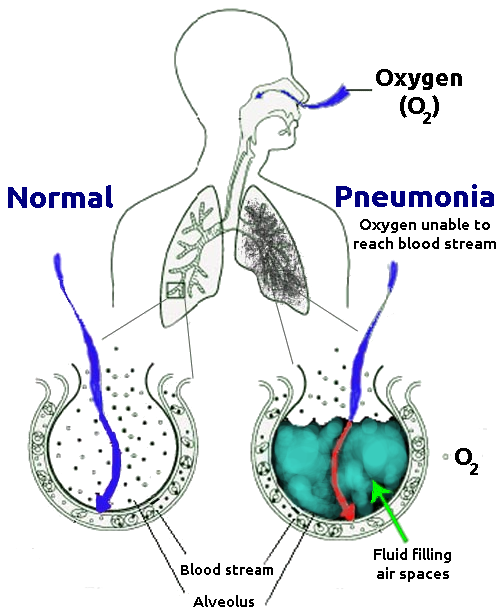
Disruptions in either ventilation (the movement of air into and out of the lungs) or respiration (the gas exchange process) can lead to decreased oxygenation, resulting in hypoxemia. Ventilation problems can arise from conditions such as airway obstruction, neuromuscular disorders affecting respiratory muscles, or chest wall injuries. These conditions impair the ability to bring fresh air into the alveoli, reducing the oxygen available for diffusion. Respiration issues can stem from diseases affecting the lung parenchyma, like pneumonia, pulmonary edema, or acute respiratory distress syndrome (ARDS). These conditions thicken the alveolar-capillary membrane or reduce the surface area available for gas exchange, hindering oxygen diffusion into the blood.
Hypoxemia can have severe consequences, ranging from mild symptoms like shortness of breath and fatigue to life-threatening complications such as organ damage, cardiac arrest, and death.
The body attempts to compensate for hypoxemia through various mechanisms, including increasing respiratory rate and depth, as well as increasing cardiac output to deliver more oxygen to tissues. However, these compensatory mechanisms can become overwhelmed in severe or prolonged hypoxemia. In clinical practice, supplemental oxygen therapy is often administered to increase the fraction of inspired oxygen (FiO2) and improve oxygenation. Monitoring SpO2 using pulse oximetry is a crucial tool for assessing oxygenation status and guiding treatment interventions.
Ventilation
Physiology and Pathophysiology of Ventilation
Ventilation is the movement of air in and out of the lungs. Maintaining a patent airway is necessary for effective ventilation. Obstructions at either the upper or lower airway can drastically reduce or even halt airflow. Upper airway patency can be compromised by various factors. Unconsciousness, often due to trauma, drug overdose, or medical conditions, leads to a loss of muscle tone, causing the tongue to fall back and obstruct the airway. FBAO, burns (which can cause swelling), trauma to the face or neck, and infections like epiglottitis can also impede airflow in the upper airway. These obstructions prevent air from reaching the lungs, thereby disrupting the critical gas exchange process.
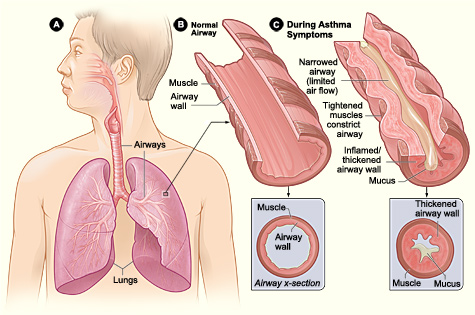
Lower airway patency is equally vital. Bronchoconstriction, the narrowing of the bronchial tubes, can significantly restrict airflow. This is a common occurrence in conditions like asthma and chronic obstructive pulmonary disease (COPD). Lung tissue diseases, such as pneumonia, where the alveoli become inflamed and filled with fluid, also hinder gas exchange. In these conditions, the vascular structures within the lungs may still be functional, but the ability of oxygen to diffuse into the bloodstream and carbon dioxide to diffuse out is severely compromised due to the diseased lung tissue.
The nervous system plays a crucial role in controlling ventilation. Disordered control of breathing can arise from various neurological insults. Drugs, particularly opioids, can depress the respiratory centers in the brain, leading to slow and shallow breathing or even apnea. Trauma to the head or brain, resulting in injury to these respiratory control centers, can also disrupt normal breathing patterns. Similarly, the postictal state following a seizure can temporarily impair respiratory drive. These neurological issues highlight the importance of the brain’s control over the vascular structures supporting respiration. Even if the lungs and blood vessels are healthy, the lack of proper neurological signals will prevent effective breathing.
Certain medical conditions can further complicate ventilation. Bronchoconstriction, as mentioned earlier, is a common problem in asthma and COPD, limiting airflow and impacting gas exchange. The production of excess mucus, often seen in respiratory infections and cystic fibrosis, can also obstruct the airways, reducing the effectiveness of ventilation.
Finally, structural damage to the thorax, or chest wall, can severely impair the mechanics of breathing. Injuries such as rib fractures, flail chest (multiple rib fractures), or pneumothorax (air in the pleural space) can restrict the expansion of the lungs, reducing tidal volume and impacting the ability to ventilate effectively. These injuries can also damage the underlying vascular structures, further compromising respiration. In these cases, the vascular network may be intact, but the chest wall’s inability to expand restricts the lungs’ ability to fill with air, thus preventing the necessary gas exchange.
Adequate Versus Inadequate Ventilation
Ventilation is the movement of air in and out of the lungs. Adequate ventilation ensures the body receives sufficient oxygen and eliminates carbon dioxide effectively. Adequate ventilation may be observed to have the appropriate rate for the patient’s age, normal effort, even chest expansion, clear breath sounds, normal skin color, and an oxygen saturation above 94% if pulse oximetry is available.
Normal Respiratory Rates
- Infants (Birth to 1 year):
- 30 to 60 breaths per minute, or once every 1 to 2 seconds
- Newborns may have even faster rates, sometimes up to 40-60 breaths per minute, which can slow down when they sleep.
- Toddlers (1 to 3 years):
- 24 to 40 breaths per minute, or once every 1.5-2.5 seconds
- Preschoolers (3 to 6 years):
- 22 to 34 breaths per minute, or once every 2-2.5 seconds
- School-Age Children (6 to 12 years):
- 18 to 30 breaths per minute, or once every 2 to 3 seconds
- Adolescents (12 to 18 years):
- 12 to 16 breaths per minute, or once every 3 to 4 seconds
- Adults:
- 12 to 20 breaths per minute, or once every 3 to 5 seconds
Adequate ventilation is achieved with minimal effort; there should be no signs of respiratory distress, such as accessory muscle use, nasal flaring, or abnormal positioning. The breathing rhythm should be regular, and the quality should be noise-free, meaning no abnormal or adventitious (abnormal breath sounds usually found using a stethoscope) sounds like gurgling (often due to fluid in the airway), stridor (a high-pitched sound indicating upper airway obstruction), or wheezing (a whistling sound associated with lower airway constriction) are present. Equal bilateral chest rise indicates that both lungs are expanding properly. Normal tidal volume, the amount of air inhaled or exhaled with each breath, ensures adequate oxygen delivery.
In contrast, inadequate ventilation signifies that the patient is not effectively exchanging gases. The respiratory rate might be outside the normal range, either too fast (tachypnea) or too slow (bradypnea) for the patient’s age. The rhythm may be irregular, indicating an underlying respiratory problem. The quality of breathing is often compromised, with noisy respirations such as gurgling, stridor, or wheezing. Chest wall movement may be unequal, indicating potential lung collapse or other thoracic issues, or paradoxical, where the chest moves inward during inhalation and outward during exhalation, a sign of serious respiratory compromise. Decreased tidal volume, resulting in shallow breathing, limits the amount of oxygen reaching the tissues.
Physical signs of respiratory distress become more prominent in inadequate ventilation. These include the use of accessory muscles in the neck, chest, or abdomen, nasal flaring, retractions (skin pulling between the ribs or above the clavicle), and posturing such as the tripod position (leaning forward with hands on knees) or other abnormal postures to maximize lung expansion.
As the condition worsens, more serious signs emerge: cyanosis (a bluish discoloration of the skin and lips), altered mental status, absent or gasping respirations, and unresponsiveness. These late findings signal that the body is failing to compensate and that immediate intervention is necessary.
Respiratory Distress, Failure, and Arrest
Respiratory compromise can be described as a continuum of progressively worsening conditions, beginning with respiratory distress, moving to failure, and potentially ending in arrest. Understanding this progression is critical for timely and appropriate interventions. These conditions are differentiated primarily by changes in ventilation, which encompasses the rate, rhythm, quality, and volume of breathing, as well as the body’s compensatory mechanisms.
Respiratory distress signifies a state where the patient is working harder than normal to breathe but is still effectively compensating. Changes in ventilation are evident, often reflecting either the body’s attempt to compensate for respiratory system dysfunction or the dysfunction itself. The ventilatory function is altered, with noticeable changes in the rate, rhythm, and quality of breathing. The respiratory rate is typically increased, often accompanied by an elevated pulse rate. Despite these changes, the patient usually maintains a normal mental status, and oxygen saturation (SpO2) remains within acceptable limits.
A patient in respiratory distress may present with obvious signs of increased work of breathing, such as nasal flaring, accessory muscle use, and retractions. However, their mentation remains appropriate for the patient, and their SpO2 is generally normal. Management at this stage focuses on supporting the patient’s breathing and addressing the underlying cause. Supportive oxygenation should be used to include devices such as a nasal cannula or non-rebreather mask. Rapid assessment and transport to a definitive care facility are also essential.
Respiratory failure occurs when the body’s compensatory mechanisms for respiratory distress begin to fail. This failure is marked by further deterioration in ventilatory function. While the respiratory rate may initially be high, it can become shallow and ineffective as the patient fatigues. The pulse rate may remain elevated or begin to decrease. A significant change is a decrease in the patient’s level of consciousness, ranging from confusion to lethargy. Oxygen saturation (SpO2) will begin to fall.
In respiratory failure, other signs may include diminished or absent lung sounds, indicating reduced airflow. Tidal volume, the amount of air inhaled and exhaled with each breath, also decreases. The patient’s presentation may include increased respiratory rate and pulse rate initially, but as failure progresses, these rates may decline. Decreased mentation is a key sign of respiratory failure. Management shifts to more aggressive interventions, including assisted positive-pressure ventilation using a BVM device.
Respiratory arrest represents the complete cessation of breathing. Ventilation is absent, and the patient is unresponsive or has an altered level of consciousness. Breathing is either absent or agonal (gasping). The pulse may be bradycardic (slow) or absent. Oxygen saturation (SpO2) plummets and capnometry will show a rapid decline. Lung sounds are typically absent.
Respiratory arrest is a life-threatening emergency requiring immediate intervention. The patient will be unresponsive or have an altered level of consciousness. Ventilations are absent or agonal. Bradycardia or an absent pulse is common. Oxygen saturation will be significantly decreased. Management requires immediate initiation of basic life support (BLS) protocols, including cardiopulmonary resuscitation (CPR) and ventilation with a BVM.
Recognizing the progression from respiratory distress to failure and arrest is essential. Early intervention in respiratory distress can often prevent progression to failure. Prompt recognition of respiratory failure and initiation of assisted ventilation can be life-saving. In respiratory arrest, immediate CPR and ventilatory support are essential for survival.
Managing Issues of Ventilation and Oxygenation
Once the airway is secured and patency confirmed, focus shifts to supporting ventilation and oxygenation. For patients who are ventilating and oxygenating adequately, the primary goal is to maintain stability. This involves ongoing assessment of respiratory rate and effort, checking for clear and equal breath sounds, and ensuring a normal oxygen saturation level. Pulse oximetry provides a non-invasive measure of oxygen saturation (SpO2), ideally maintained above 94% in most patients. Keeping the airway clear through suctioning or adjuncts may still be necessary.
When a patient presents with inadequate ventilation and oxygenation, immediate intervention is required. Positioning the patient in a position of comfort, often semi-Fowler’s or upright, can optimize chest expansion and improve breathing. Supplemental oxygen should be administered to all patients experiencing dyspnea, respiratory distress, respiratory failure, or respiratory arrest. The method of oxygen delivery will depend on the patient’s condition, ranging from nasal cannula for mild distress to non-rebreather masks for more significant hypoxia. High-flow oxygen may be considered in certain situations.
When necessary, assisting ventilation with a BVM must be done correctly to ensure a proper seal and deliver the appropriate volume and rate. Over-ventilating can be harmful, so careful attention to rate and tidal volume is necessary. If basic airway measures are not adequate and resources allow, advanced airway placement may be needed to secure the airway and ensure consistent ventilation.
Throughout care, EMS providers must reassess the patient’s status continuously. Changes in respiratory rate, mental status, or pulse oximetry should prompt an immediate re-evaluation of the airway and breathing interventions. Early communication with the receiving facility is also essential, as it ensures continuity of care and preparedness for more advanced treatment.
8.x Oxygen Therapy and Delivery Devices
Oxygen Safety Considerations
Oxygen, while essential for life, is also classified as a medication and must be treated with the same respect and caution as any other medication. It should only be administered when medically necessary. Unnecessary or inappropriate oxygen administration can have detrimental effects on patients, potentially leading to oxygen toxicity or other complications. Therefore, a thorough patient assessment and understanding of their respiratory status are crucial before initiating oxygen therapy. Dosage, delivery method, and duration of therapy should be carefully considered and regularly reassessed.
A critical safety consideration regarding oxygen is its ability to enhance combustion. While oxygen itself is not flammable, it acts as a powerful oxidizer, meaning it significantly accelerates the burning process. In the presence of oxygen, flames can quickly spread, posing a serious fire hazard. Therefore, it is imperative to avoid open flames, smoking, or any potential ignition sources when oxygen is in use. This includes ensuring that oxygen equipment is kept away from heat sources and that all electrical devices in the vicinity are properly grounded and functioning correctly.
Oxygen is stored and transported as a pressurized gas, typically in cylinders. These cylinders are under significant pressure, and any damage, such as a crack or break, can cause them to become dangerous projectiles. A ruptured cylinder can cause serious injury or even death. To prevent such incidents, oxygen cylinders should always be handled with care. They should never be dropped, dragged, or rolled. Furthermore, cylinders should be stored securely, in designated racks or secured with straps to prevent them from falling over. When transporting cylinders, ensure they are properly secured in a cart or vehicle to prevent movement during transport. Never stand an unsecured cylinder upright, as it could easily tip over and cause damage or injury.
Finally, petroleum-based products, such as grease, oil, and adhesive tapes, should never come into contact with oxygen cylinders, regulators, or other oxygen equipment. These substances can react violently with oxygen, creating a fire or explosion hazard. Specifically, petroleum products should never be used as lubricants or sealants on oxygen equipment. Instead, only oxygen-compatible lubricants and sealants, specifically designed for use with high-pressure oxygen, should be used. Similarly, adhesive tapes should not be used to secure or repair oxygen equipment, as they may contain petroleum-based adhesives. Regular inspection and maintenance of oxygen equipment are essential to ensure its integrity and prevent potential hazards.
To access and download a PDF checklist for safety considerations, visit the World Health Organization’s Oxygen Cylinder Safety webpage.
Parts of an Oxygen Cylinder
Oxygen cylinders are essential tools for EMS professionals. The cylinder itself is a high-pressure container designed to hold a specific volume of oxygen. In EMS, common sizes include the D cylinder, holding approximately 350 liters of oxygen, and the E cylinder, which contains around 635 liters. These sizes offer a balance between portability and sufficient oxygen supply for patient care. Understanding the capacity of each cylinder size is important to ensure an adequate supply throughout a patient care encounter.
Oxygen cylinders are considered full when the internal pressure reaches 2,000 pounds per square inch (psi). This high pressure is necessary to store a usable amount of oxygen in a relatively compact container. However, you should not allow a cylinder to get empty. A minimum safe residual level of 200 psi should be maintained. This ensures that there is always enough pressure to deliver oxygen to the patient and prevents potential issues with the cylinder itself.
Attached to the oxygen cylinder is the regulator, a device specifically designed for use with oxygen. It is vital to never attempt to force a regulator onto a tank it is not designed for, as this can cause damage or even serious injury. The primary function of the regulator is to reduce the high pressure of the oxygen within the cylinder to a safe level for patient administration. Without a regulator, the oxygen would be delivered at an extremely high pressure, potentially causing harm.
Connected to the regulator is the flow meter, which allows for precise control of the oxygen flow rate delivered to the patient. This is important, as different medical conditions require varying amounts of oxygen. The flow meter enables EMS personnel to adjust the oxygen flow in liters per minute (LPM), ensuring the patient receives the appropriate and prescribed amount of oxygen for their specific needs. This controlled delivery of oxygen is essential for effective respiratory support and patient safety.
Assembly and Use of a Portable Oxygen Cylinder
Portable oxygen cylinders are a crucial tool in EMS for providing supplemental oxygen to patients in need. Proper assembly and usage are necessary for patient safety and effective treatment. This process involves several key steps, beginning with preparing the oxygen tank for use.
The first step in preparing an oxygen tank is identification. Oxygen cylinders are typically identified by their green or green and silver color. The tank will be labeled as “Oxygen USP” marking on the cylinder to ensure it contains the correct medical-grade oxygen. Once identified, remove the protective cap or tape covering the cylinder valve. A quick “crack” of the cylinder valve (briefly opening and closing it) is next to remove any impurities that might have accumulated on the valve’s mating surfaces. Before attaching the regulator, ensure a gasket is present; this ensures a leak-proof seal.
With the gasket in place, carefully attach the regulator and flowmeter to the cylinder valve, ensuring a tight, leak-proof seal. Once attached, slowly turn on the cylinder valve and check the pressure gauge. The gauge should indicate adequate pressure, typically above 500 psi, to ensure sufficient oxygen supply.
The next phase involves oxygen administration. Attach the appropriate oxygen delivery device, such as a nasal cannula or mask, to the flowmeter. Adjust the flow control on the flowmeter to deliver the prescribed oxygen level, as determined by the patient’s condition and medical orders. Carefully place the delivery device on the patient, ensuring a proper fit and comfortable placement. Continuously monitor the patient and check the adequacy of the oxygen flow, observing for any signs of distress or changes in their respiratory status.
Discontinuing oxygen administration is as important as initiating it. Begin by removing the oxygen delivery device from the patient. Next, shut off the cylinder valve completely. Bleed the regulator of any remaining pressure by opening the flowmeter until the gauge reads zero. Finally, return the flowmeter control to the “off” position. This ensures the system is safely depressurized.
Cylinder discontinuance involves removing a cylinder from service when it reaches a certain pressure level, typically between 200 and 500 psi, or as dictated by local protocols. Before removal, ensure the cylinder valve is completely shut off and the regulator is free of any pressure. Only then should the regulator be carefully detached from the cylinder.
Proper securing and handling of oxygen cylinders are essential for safety. Cylinders should never be left freestanding, as they can easily tip over and cause injury. Standing cylinders must be secured with an appropriate base, secured to a stable structure, or secured to multiple other cylinders for stability. Smaller cylinders should be secured with a base or laid down during use to prevent them from falling.
Dropping oxygen cylinders is strictly prohibited. Dropping a cylinder can cause scratches or damage that weakens the integrity of the metal, potentially leading to a rupture. Furthermore, dropping a cylinder can damage the valve, potentially turning it into a dangerous projectile. Always handle cylinders with care and use appropriate equipment for transport.
Finally, remember that oxygen supports combustion. Keep oxygen cylinders away from open flames, sparks, and other sources of ignition. No smoking should be allowed near oxygen cylinders or during oxygen administration. Following these guidelines for assembly, use, discontinuance, handling, and securing oxygen cylinders ensures safe and effective oxygen therapy for patients in need.
Visit the following YouTube video and resources for more information on oxygen tank handling:
Replacing an empty oxygen tank
Oxygen Delivery Devices
Oxygen delivery devices are important tools in EMS for managing patients experiencing hypoxia, a condition characterized by insufficient oxygen reaching the body’s tissues. Different devices cater to varying levels of oxygen need, and EMS professionals must be proficient in selecting and utilizing the appropriate device for each patient. This requires a thorough understanding of each device’s purpose, indications, proper procedure, and limitations.
Oxygen Delivery Devices Overview
The values represent estimates of the fraction of inspired oxygen (FiO2). Room air FiO2 is 21%. Actual FiO2 delivered is dependent on multiple factors including oxygen supply quality, device style or fit, and the patient’s respiratory rate and effort. One general estimation rule is every 1 LPM of O2 contributes 3% FiO2 in addition to the baseline room air of 21%. For example nasal cannula oxygen at 5LPM provides about 36% FiO2..
| Device | Flow Rate (L/min) | FiO2 (%) | Indications | Limitations / Notes |
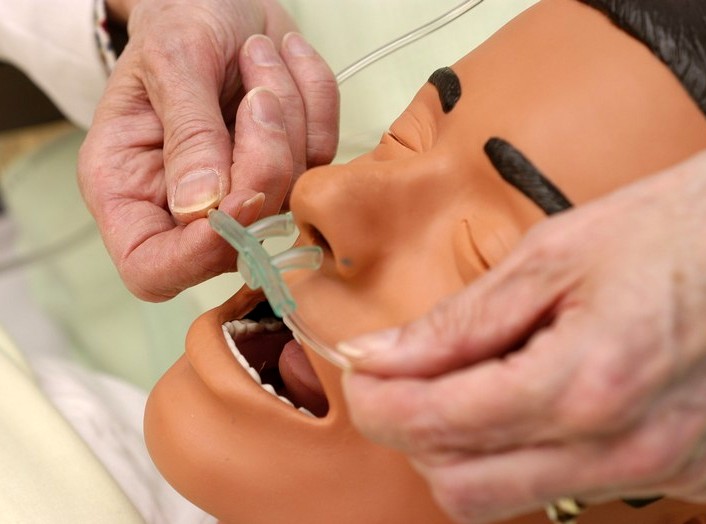
| Nasal Cannula | 1-6 | 24-40% | Mild hypoxia | >6 LPM may cause drying and nosebleeds |
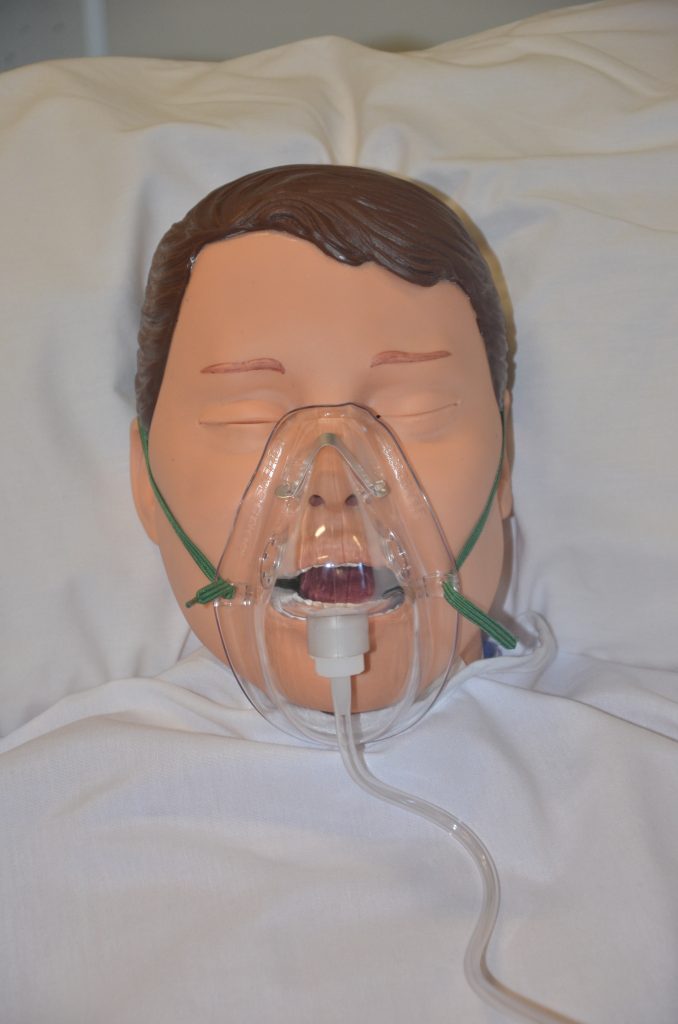
| Simple Mask | 6-10 | 35-50% | Moderate oxygen needs | Requires at least 6 LPM to prevent CO2 rebreathing |
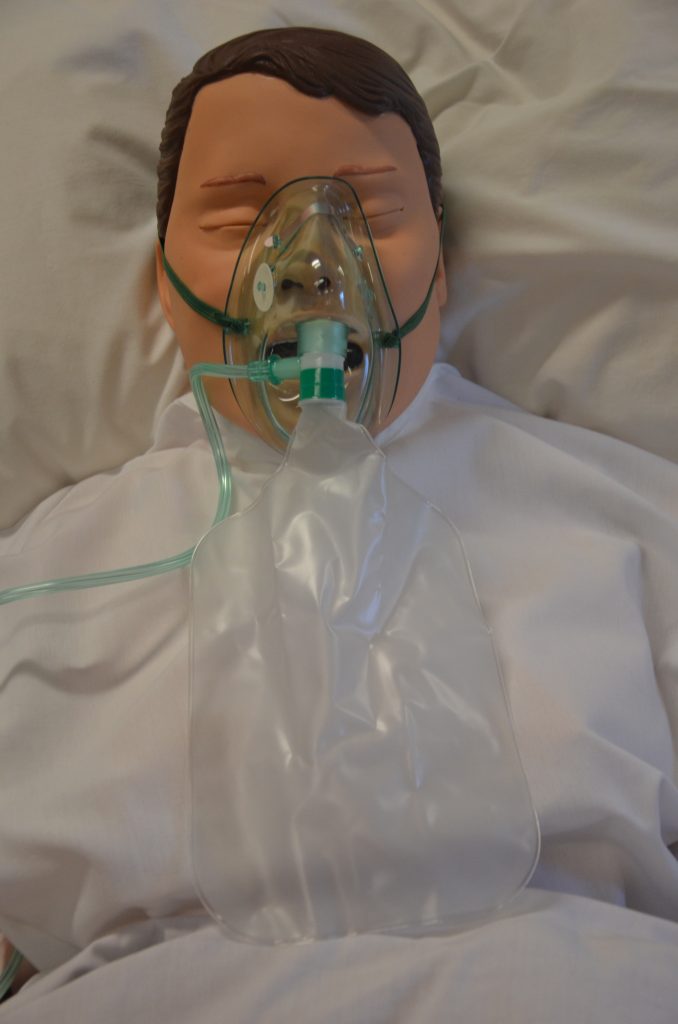
| Non-Rebreather Mask | 10-15 | 60-80% | Moderate to severe hypoxia | Reservoir bag must remain inflated |
| Bag-Valve-Mask (BVM) | 15 | ~100% | Apnea or inadequate respirations | Requires proper seal and ventilation rate |
| CPAP | Per device/order | Up to 100% | Respiratory distress, CHF, sleep apnea | Requires monitoring; may be contraindicated in trauma |
| Trach Mask | 10-15 | Variable | Patients with stoma or tracheostomy | Must fit over stoma properly |
| Nebulizer | 6-8 | Variable | Administering bronchodilators/humidified O2 | Medication prep must follow scope of practice |
Move each figure under the associated description section, and consider downsizing the image.
The nasal cannula is a common oxygen delivery device designed to provide low-concentration oxygen to patients. It is indicated for patients experiencing mild hypoxia, where supplemental oxygen can improve their condition without requiring high flow rates. The procedure for applying a nasal cannula involves attaching it to an oxygen regulator and setting the flowmeter between 1 and 6 liters per minute (LPM), with 2 LPM often used as a starting point. The nasal prongs are carefully placed in the patient’s nostrils, and the cannula is secured around the ears and under the chin. A key limitation of the nasal cannula is that administering oxygen at rates greater than 6 LPM can lead to the drying of the nasal membranes and potentially cause bleeding.
When a patient requires more oxygen than the cannula can provide, the simple face mask may be used. This device covers both the nose and mouth, delivering between 35 and 50 percent oxygen at flow rates of 6-10 LPM. Because the mask allows exhaled carbon dioxide to accumulate inside, a minimum of six liters per minute is always required to wash out this gas. The simple mask is effective for moderate oxygen needs but is not appropriate for patients who require precise or very high concentrations.
For patients requiring higher concentrations of oxygen, the nonrebreather mask is a more suitable option. This device is designed to deliver high-concentration oxygen and is indicated for patients with moderate hypoxia. The procedure for applying a nonrebreather mask includes attaching it to an oxygen regulator and setting the flowmeter to 12-15 LPM. It is essential to inflate the reservoir bag before placing the mask on the patient’s face, ensuring a readily available supply of oxygen. The mask is placed over the mouth and nose, and the strap is tightened to secure it in place. A critical limitation of the nonrebreather mask is the need to maintain a sufficiently high flow rate to keep the reservoir bag inflated, ensuring the patient receives the intended oxygen concentration.
Patients with a tracheostomy or stoma, a surgically created opening in the trachea, require specialized oxygen delivery. The trach mask is specifically designed for these individuals, providing oxygen directly to the airway. It is indicated for patients with mild to moderate hypoxia who have a tracheostomy or stoma. The procedure involves attaching the trach mask to an oxygen regulator and setting the flowmeter to 10-15 LPM. The mask is placed over the stoma, and the strap is tightened to secure it. While generally well-tolerated, the trach mask may require adjustments or alternative devices depending on the patient’s specific anatomy and needs.
The nebulizer is a versatile device used to provide humidified oxygen and administer bronchodilator medications. It is indicated for patients requiring humidified oxygen or those needing nebulized medications. The procedure involves attaching the nebulizer chamber to a T-connector or mask, depending on the chosen delivery method. Oxygen tubing is connected to the nebulizer chamber and the oxygen regulator. Saline or medication is placed in the chamber. The flowmeter is set to 6-8 LPM to create a mist. The use of this device varies with the scope of practice by state.
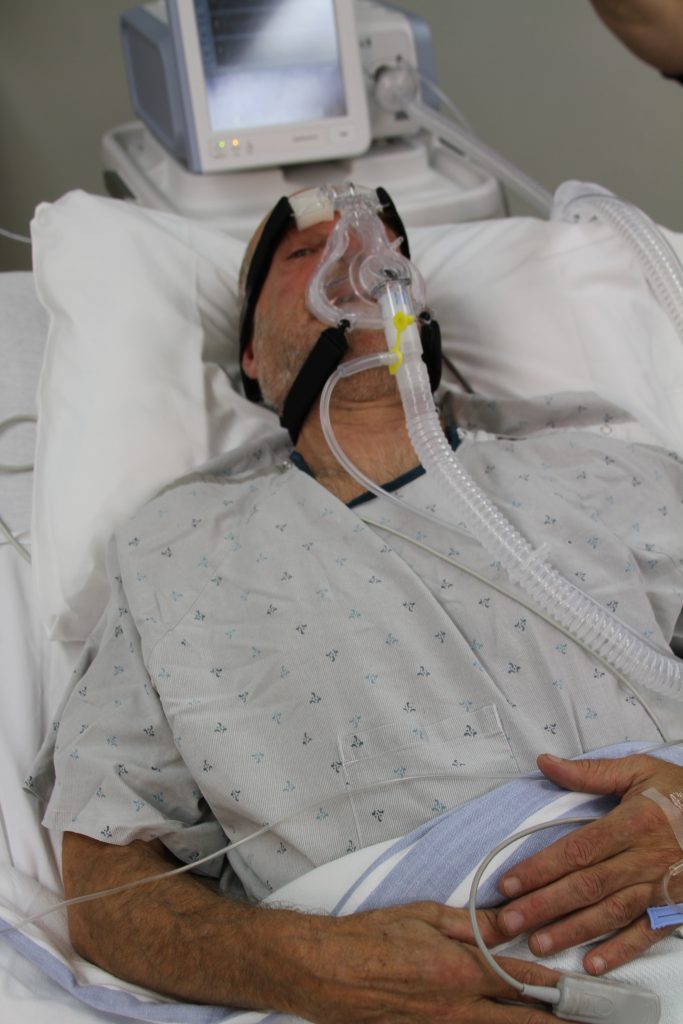
You may encounter a patient using a continuous positive airway pressure (CPAP) mask at home. These devices deliver a steady flow of oxygen under pressure, helping to keep the airways open and improving oxygenation in patients with conditions like congestive heart failure or sleep apnea. This is a form of non-invasive positive pressure ventilation (NPPV).
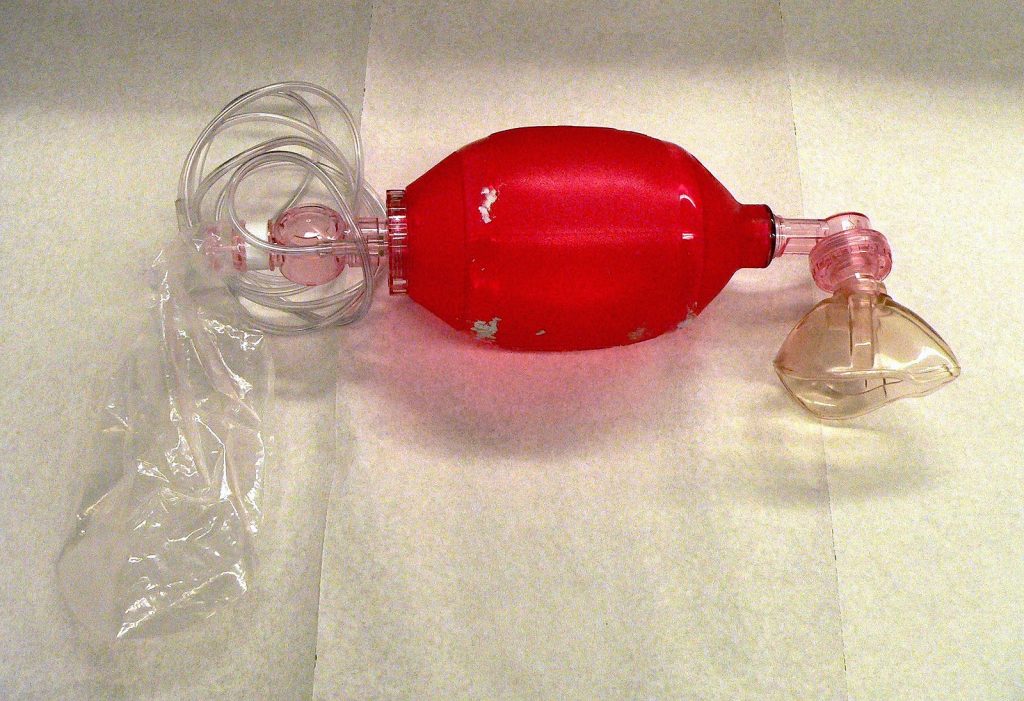
Positive pressure ventilation devices (PPVDs) help to manage patients with inadequate ventilation. Commonly used PPVDs in EMS include pocket masks and bag-valve-masks (BVMs). Their primary purpose is to provide ventilatory support, effectively moving air into and out of the lungs. Indications for PPVD use include inadequate ventilation, apnea, and cardiac arrest. When connected to supplemental oxygen at 15 LPM, the BVM can provide nearly 100 percent oxygen. Its effectiveness depends on obtaining a proper mask seal and squeezing the bag at the correct rate: once every five to six seconds for adults and once every three seconds for infants or children. Because it requires skill and practice, BVM ventilation is one of the most critical skills for an EMR to master. This can be challenging when treating patients with altered mental status or facial trauma. More details on use of PPVDs will be covered in the next section.
Understanding the differences between these oxygen-delivery devices is important. Accurate assessment of the patient’s oxygenation status, coupled with knowledge of the capabilities and limitations of each device, ensures the delivery of appropriate and effective oxygen therapy. This expertise is essential for optimizing patient outcomes and ensuring their safety during emergency medical situations.
8.9 Assisted Ventilation of a Patient
Effective ventilation is a critical skill for all EMS providers, especially when managing patients in respiratory arrest or failure. When a patient is not breathing adequately, the EMR must intervene quickly to provide artificial ventilation and support oxygenation. Two primary techniques are used at the EMR level: the mouth-to-barrier device method and the bag-valve-mask (BVM) device.
Note that a Do Not Resuscitate (DNR) bracelet or order is a contraindication to use assisted ventilations. Other airway support, suctioning, and applying oxygen are accepted interventions.
Mouth-to-Mouth Resuscitation with a Barrier Device: Find image
The mouth-to-barrier device, commonly a pocket mask or face shield with a one-way valve, allows the EMR to provide rescue breaths while minimizing direct contact. This technique is simple, portable, and often used when only one responder is available.
- Check for Responsiveness and Breathing: Gently tap the person on the shoulder and shout, “Are you okay?” If there is no response, check for pulse and breathing for no more than 10 seconds.
- Position the Person: Carefully place the person on their back on a firm, flat surface.
- Open the Airway: Use the head-tilt/chin-lift maneuver to open the airway. Place one hand on the forehead and gently tilt the head back. Place the fingers of your other hand under the chin and lift the chin forward.
- Give Rescue Breaths: If the person is not breathing normally, give two rescue breaths. Use a barrier device, such as a pocket mask or face shield, if available. Pinch the person’s nose shut and create a tight seal over their mouth with your mouth or the barrier device. Give each breath over 1 second, watching for chest rise. If no chest rise, reposition the airway and attempt another rescue breath.
- Check for a Pulse: Check for a pulse for no more than 10 seconds. If you cannot find a pulse, begin chest compressions.
- Rate of Rescue Breaths: Deliver breaths for an adult once every 5–6 seconds or children every 2–3 seconds.
Bag-Valve-Mask (BVM) Ventilation with Supplemental Oxygen:
The bag-valve-mask (BVM) device is a more advanced and effective method for delivering ventilations. It consists of a self-inflating bag, a one-way valve, and a face mask. A single provider can use a BVM, but maintaining a tight mask seal while simultaneously squeezing the bag can be difficult. For this reason, the two-provider BVM technique is preferred when possible.
Below are the proper techniques for operating a bag valve mask:
- Check for responsiveness and breathing as above.
- Select the appropriate size mask and bag for the patient (adult, child, or infant sizes).
- Connect the BVM to oxygen at a flow rate of 15 L/min. You may start ventilations without oxygen if not immediately available.
- If available, attach a filter to the exhaust port to reduce the spread of COVID and other airborne infectious diseases.
- Position Patient: Place the patient in the supine position on a firm surface.
- Align Yourself: Position yourself at their head with your shoulders square with the patient.
- Hold Mask: Place the mask in your nondominant hand.
- Apply Mask: Use your thumb and index finger in “C” technique (see Figure 2[3]). Be sure to keep your fingers on the hard plastic to create a good face seal. Place the nose of the mask on the bridge of the patient’s nose. Lower the mask over the patient’s mouth.
- Lift Jaw: Using the middle, ring, and pinky finger in the “E” technique, along the bottom of the jawbone, lock your elbow and lean back, bringing the patient’s face “up” into the mask (see Figure 3[4]).
- Hold Bag In your dominant hand, out to the side of the patient.
- Ventilate: With the head remaining tilted into the sniffing position, gently squeeze the bag until you see the chest rise. The goal is to deliver each breath over 1 second to minimize gastric distention or lung trauma. Deliver breaths for an adult once every 5–6 seconds or children every 2–3 seconds.
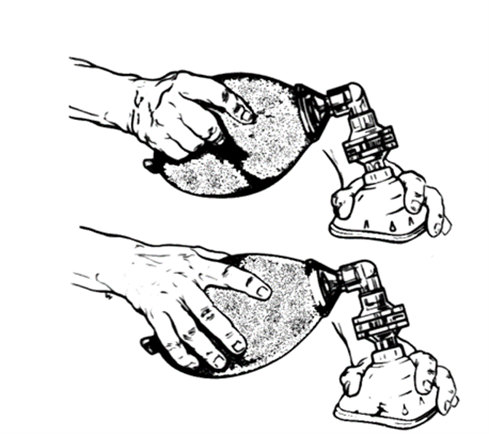
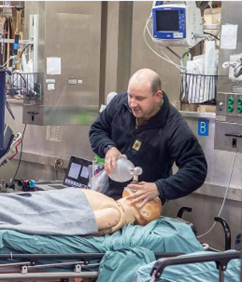
Figure 3. Self-inflating BVM technique.
FIND VIDEOS OF 1- AND 2-PERSON BVM TECHNIQUES
Two-Person Bag-Valve-Mask (BVM) Ventilation with Supplemental Oxygen:
Two-person BVM ventilation with supplemental oxygen is a technique used to provide assisted breathing to patients who are not breathing adequately on their own. It requires two rescuers: one to hold the mask and maintain a seal, and the other to squeeze the bag. This method is generally more effective than one-person BVM ventilation as it allows for a better mask seal and more consistent tidal volumes.
Difficulty may be encountered in patients with altered anatomy, dentures, facial hair or obesity. The mnemonic MOANS can help EMS providers predict which patients may be difficult to ventilate with BVM.
- Mask Seal (trauma, blood, beards)
- Obesity
- Age (>55)
- No teeth (leave dentures in)
- Stiff (lungs, neck)
The first rescuer, often referred to as the “mask holder,” is responsible for ensuring a proper mask seal. They position themselves at the head of the patient, placing the mask over the patient’s nose and mouth using the “E-C” technique. Maintaining a tight seal is crucial to prevent air leaks and ensure effective ventilation. They should also be monitoring the patient’s airway for blood or fluids.
The second rescuer, the “bag squeezer,” is positioned at the side of the patient. They should be observing the chest rise to ensure adequate ventilation. The breaths should be delivered over approximately 1 second. They also coordinate with the mask holder, ensuring the mask remains properly sealed throughout the procedure.
Effective two-person BVM ventilation requires coordination and communication between the two rescuers. They should communicate about the patient’s condition, the effectiveness of the ventilation, and any changes in the patient’s status. If the chest is not rising adequately, the mask seal should be checked and adjusted, and the airway patency should be re-evaluated. This technique is a critical skill for EMS professionals and requires regular practice to maintain proficiency.
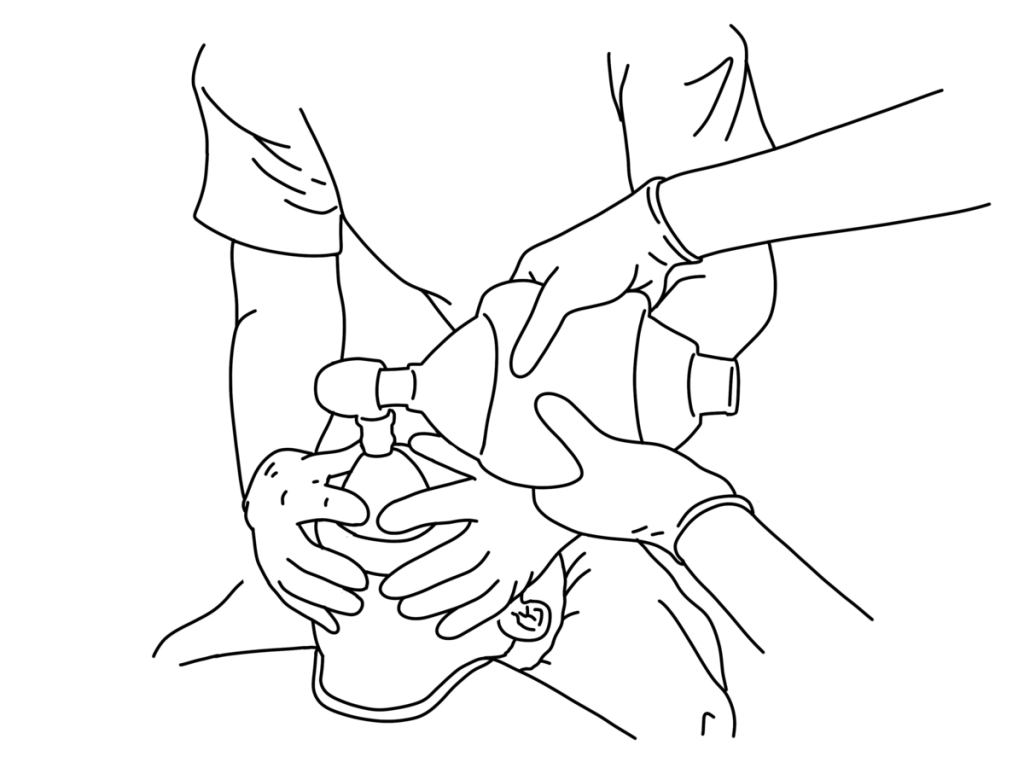
Considerations for Patients with a Tracheal Stoma
Ventilating a patient with a stoma requires a modified approach to BVM ventilation. Since the stoma provides a direct opening to the trachea, the usual method of ventilating through the mouth and nose is bypassed. The primary goal remains the same: to deliver adequate tidal volume and oxygenation, but the technique is adapted to the patient’s unique anatomy. A patient with a stoma may have a laryngectomy, meaning their upper airway is surgically separated from their lower airway. Therefore, ventilating through the mouth or nose will be ineffective.
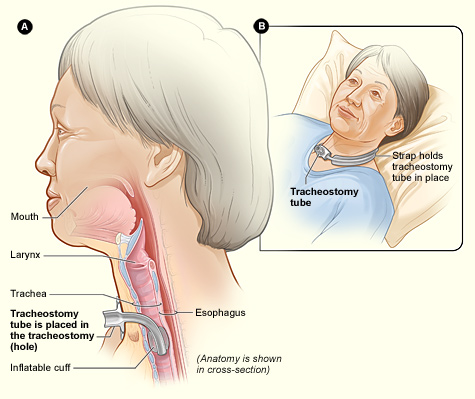
The procedure begins with confirming the stoma’s patency and ensuring it’s free of obstructions. Suctioning may be necessary to clear secretions or debris. Next, select a BVM mask that appropriately fits the stoma. A smaller mask, such as a pediatric or infant mask, may be necessary for some stomas. Secure the mask over the stoma, ensuring a tight seal to prevent air leaks. If a standard mask doesn’t fit well, a tracheostomy adapter or other specialized airway device may be required.
Once the mask is securely in place, connect the BVM to the mask and begin ventilations. The ventilation rate and volume remain similar to standard BVM ventilation. It’s essential to monitor the patient’s chest rise and lung sounds to ensure adequate ventilation. If breath sounds are absent or diminished, check the mask seal, the stoma’s patency, and consider alternative airway management techniques if necessary. Remember, the goal is to provide effective ventilation through the stoma, bypassing the upper airway entirely.
Pathophysiology of Normal Ventilation Versus Positive Pressure Ventilation
Normal ventilation and positive pressure ventilation (PPV) impact the body’s systems in distinctly different ways. Understanding these differences is crucial for effective patient care, especially in emergencies.
During normal ventilation, the body creates negative pressure within the chest cavity. This negative pressure “sucks” air into the lungs. Simultaneously, this process assists with venous return, meaning blood is “pulled” back towards the heart. This efficient exchange of gases and blood flow supports the body’s oxygenation needs. The esophagus, connecting the throat to the stomach, remains closed during normal breathing, preventing air from entering the stomach.
Positive pressure ventilation, on the other hand, uses external force to push air into the lungs, creating positive pressure within the chest. While this can be life-saving, it can also have unintended consequences. The increased pressure in the chest can impede venous return, reducing the amount of blood returning to the heart. This, in turn, can decrease the amount of blood the heart pumps out to the body, potentially leading to lower blood pressure.
Furthermore, when using a pocket mask or BVM for PPV, there’s a risk of air being pushed into the stomach, especially if the ventilation is too forceful or the airway isn’t properly sealed. This gastric insufflation can lead to vomiting during CPR. Excessive rates or depths of ventilation can also be harmful, contributing to low blood pressure, vomiting, and decreased blood flow during chest compressions.
8.5 Airway Adjuncts
Learning Objectives
- Contrast mechanical airway devices.
- Demonstrate insertion of airway adjunct devices.
Mechanical Airway Devices
Mechanical airway devices are tools used for managing a patient’s airway, ensuring adequate ventilation and oxygenation. These devices range from simple adjuncts like nasopharyngeal (NPA) and oropharyngeal (OPA) airways to more advanced techniques like endotracheal intubation. Each device serves a specific purpose, with its own set of indications, contraindications, complications, procedures, and limitations.
Examples of Airway Devices:
![Image taken from EMS Skills - Nasopharyngeal Airway Insertion [Video] by WCTCFire&EMS is licensed under CC BY 4.0. Various nasopharyngeal airway devices](https://wtcs.pressbooks.pub/app/uploads/sites/68/2025/04/Screenshot-2025-06-01-143024.png)
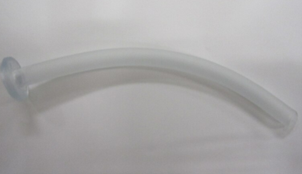
![Image taken from EMS Skills - Nasopharyngeal Airway Insertion [Video] by WCTCFire&EMS is licensed under CC BY 4.0. Various sized of oropharyngeal airways](https://wtcs.pressbooks.pub/app/uploads/sites/68/2025/04/Screenshot-2025-06-01-143127.png)
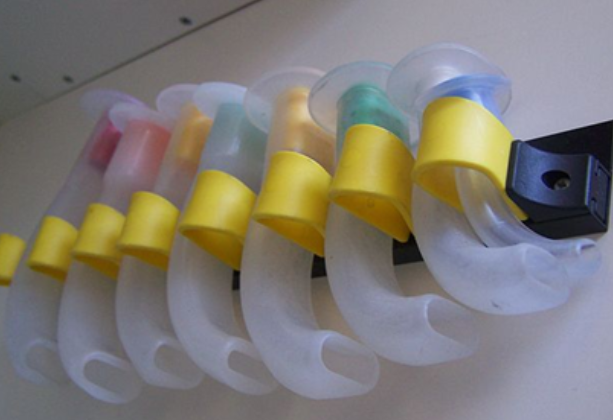
The nasopharyngeal airway adjunct is a soft, flexible tube inserted through the nostril into the nasopharynx. It is indicated for unconscious patients who retain a gag reflex, as it is generally better tolerated than an OPA in these patients. However, it is contraindicated in patients with a suspected basilar skull fracture (evidenced by severe facial trauma, with cerebrospinal fluid leakage from the ears or nose), epistaxis (nosebleed), or nasal trauma. Complications can include nasal ulcers, further nasal trauma or bleeding, and airway obstruction if improperly sized. The NPA is measured from the nasal septum to the angle of the jaw or from the nostril to the earlobe. It should be lubricated with a water-based lubricant before insertion, and the bevel should be directed towards the septum. If resistance is met, the other nostril should be attempted. A key limitation of the NPA is its unsuitability for patients with significant facial trauma, which may distort nasal anatomy and hinder insertion.
The oropharyngeal airway, also known as a Berman or Guedel airway, is a curved plastic device inserted into the mouth to prevent the tongue from obstructing the airway. It is indicated for unconscious patients without a gag reflex. It is strictly contraindicated in conscious patients or those with an intact gag reflex, as it can stimulate vomiting and laryngospasm. Other contraindications include patients with a foreign body airway obstruction. Complications can include inducing vomiting, laryngospasm (especially with improper sizing), oral trauma, and difficulty inserting due to lockjaw or excessive facial bleeding. The OPA is measured from the corner of the mouth to the angle of the jaw. It is inserted with the tip pointing towards the roof of the mouth, advanced past the uvula, and then rotated 180 degrees into the pharynx. Alternate insertion techniques involve anatomical placement with the aid of a tongue depressor. The flange should rest against the patient’s teeth. Like the NPA, the OPA has limitations, particularly in patients with significant facial trauma or bleeding, which can impede insertion and visualization.
While both NPA and OPA airways are valuable for basic airway management, they are considered adjuncts and do not provide a definitive airway. They are often used as a first step in airway management or in conjunction with other techniques. They are designed to maintain airway patency by preventing the tongue from falling back and obstructing the pharynx. However, they do not protect against aspiration, and they do not provide a means for delivering positive pressure ventilation.
The choice between an NPA and OPA depends primarily on the patient’s level of consciousness and the presence or absence of a gag reflex. The NPA is generally preferred for patients who retain a gag reflex, while the OPA is used for patients who are completely unconscious and have lost their gag reflex. It’s important to remember that these are general guidelines.
It is important to ensure proper sizing. An improperly sized airway can be ineffective or even cause harm. Too small an NPA may not reach the oropharynx, while too large an NPA can cause trauma. Similarly, an OPA that is too small may not effectively displace the tongue, while an OPA that is too large can impinge on the epiglottis and obstruct the airway.
Continued monitoring of the patient’s airway is necessary after any airway insertion. This includes monitoring for signs of airway obstruction, such as stridor, retractions, and cyanosis. It also includes ensuring that the airway device remains properly positioned and secured. Again, continuous monitoring is vital to ensure that the patient’s airway remains patent and that adequate ventilation and oxygenation are maintained.
Understanding the indications, contraindications, complications, procedures, and limitations of each airway device is essential for effective airway management. The choice of device depends on the patient’s condition, the available resources, and the skill level of the provider.
Insertion of Airway Adjunct Devices
View the following YouTube videos about oropharyngeal and nasopharyngeal airway insertion:
8.7 Non-Visualized Advanced Airway
Learning Objectives
- Explain anatomy as it relates to use of non-visualized airway.
- Identify components of non-visualized airways.
- Outline indications and contraindications for use.
- Demonstrate insertion and use of non-visualized airways.
- Demonstrate the removal of a non-visualized airway.
Airway Anatomy and Non-Visualized Airways
The airway as the pathway for gas exchange begins at the nose and mouth, leading to the pharynx, larynx, trachea, bronchi, and finally, the alveoli in the lungs. Understanding the anatomy of the airway is important to understanding the use of a non-visualized airway. The pharynx, divided into the nasopharynx, oropharynx, and laryngopharynx, is an intersection of both the respiratory and digestive tracts. The larynx, containing the vocal cords, marks the entrance to the trachea, which then branches into the bronchi and bronchioles within the lungs. This airway network culminates in the alveoli, where the exchange of oxygen and carbon dioxide takes place between the air and the bloodstream.
A key concept in airway management is dead space. This refers to the portion of the tidal volume (the volume of air inhaled or exhaled in a single breath) that does not participate in gas exchange. Consider it the amount of air left in the lungs after exhalation of a breath. Anatomical dead space includes the air residing in the conducting airways – the nasal and oral cavities, pharynx, larynx, trachea, bronchi, and bronchioles. This air fills these spaces but doesn’t reach the alveoli, so no gas exchange occurs. In essence, dead space is the air we breathe that doesn’t contribute to the body’s oxygenation.
When a non-visualized airway, such as a blind insertion device like a King LTD™, is placed, it can impact both dead space and tidal volume. These devices are designed to create a seal in the pharynx, directing airflow into the trachea. However, their placement can inadvertently increase dead space if the device isn’t properly positioned, as air can leak into the esophagus or other areas of the pharynx. This means that a larger portion of the delivered tidal volume may remain in the non-gas-exchanging areas, reducing the effective volume reaching the alveoli. Furthermore, the device itself can add to the anatomical dead space.
The importance of a non-visualized airway on ventilations is significant. Because these devices don’t provide a direct view of the glottic opening, confirming proper placement relies on observing chest rise, presence of CO2 exchange (colorimetric capnometry or capnography), and auscultation of breath sounds. If the device is malpositioned, effective ventilation can be compromised. This can lead to inadequate oxygen delivery and potentially life-threatening complications. Understanding the relationship between airway anatomy, dead space, tidal volume, and the use of non-visualized airways is important to understand.
Components and Accessories of Non-Visualized Airways
There are three popular non-visualized airways. These are the Combitube®, King Laryngeal Tube Suction-D™ (King LTS-D™), and i-gel® supraglottic airways. Let’s cover these three devices and understand their components are essential for effective and safe use.
Combitube®
The Combitube® is a double-lumen airway device designed for blind insertion. It features two lumens and two cuffs. The main blue lumen is used most often when inserted into the esophagus as intended. The alternate white lumen may be used if the device is placed into the trachea. There is a large pharyngeal cuff that creates a seal against the base of the tongue and the soft palate, and a smaller distal cuff that seals the esophagus (or the trachea in the rare occasion of tracheal placement). Each cuff has a corresponding pilot balloon to indicate inflation. The Combitube® kit typically includes syringes for cuff inflation and a water-soluble lubricant to facilitate insertion. A soft catheter may also be included for suctioning through either lumen.
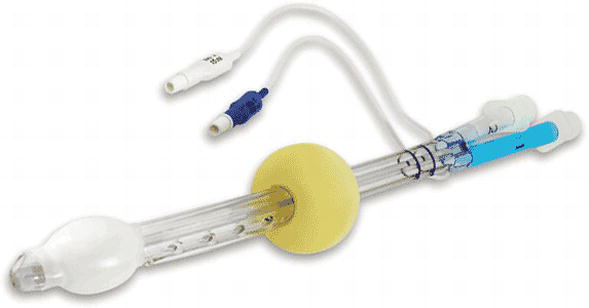
King LTS-D™
The King LTS-D™ is another extraglottic airway device. It has a single lumen and a combination of a large pharyngeal cuff and a small distal cuff. Like the Combitube®, the King LTS-D™ utilizes a pilot balloon to indicate cuff inflation status. The kit also includes a syringe for cuff inflation and water-soluble lubricant. A soft catheter may be included for suctioning secretions from the pharynx. Note that the the King LTS-D™ with a closed distal tip cannot be used for ventilation if accidentally placed into the trachea, unlike the Combitube®.
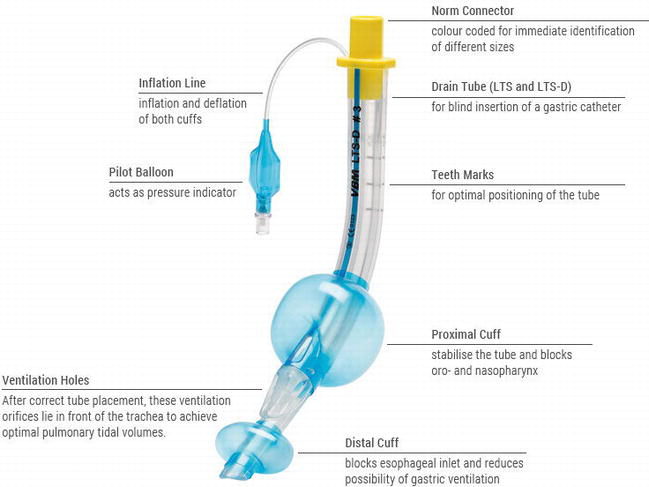
i-gel®
The i-gel® is a supraglottic airway device distinguished by its unique gel-like cuff. This cuff conforms to the patient’s anatomy, creating a seal without the need for inflation. The i-gel® consists of a single tube connected to the preformed cuff. Because it doesn’t require inflation, there are no pilot balloons or syringes associated with the device itself. However, lubricant is essential for insertion.
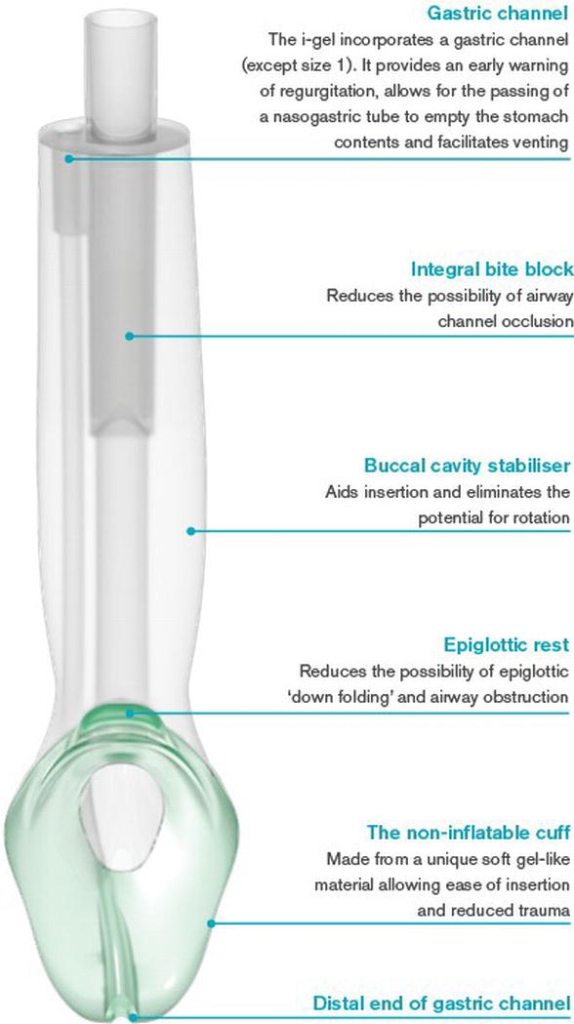
For all these devices, proper securing is vital. While the devices themselves provide some degree of stability, additional securing is necessary to prevent dislodgement. This can be achieved using adhesive tape, commercially available securing devices (like a Thomas clamp) or specialized manufacturer-provided securing mechanisms. The chosen method should be appropriate for the device and the clinical situation.
Water-soluble lubricant is also necessary for all these non-visualized airways. It reduces friction during insertion, minimizing the risk of trauma to the airway structures. Using a non-water-soluble lubricant is contraindicated, as it can be harmful to the tissues.
Soft catheters are often used in conjunction with these devices. They allow for suctioning of secretions from the pharynx or trachea, helping to maintain a clear airway. The catheter is typically passed through the lumen of the Combitube®, or through the gastric channels of the King LTS-D™ and the i-gel®.
Syringes are necessary for inflating the cuffs of the Combitube® and King LTS-D™. They should be appropriately sized for the cuff volumes specified by the manufacturer. Using the correct inflation volumes is crucial for achieving an effective seal and minimizing the risk of complications.
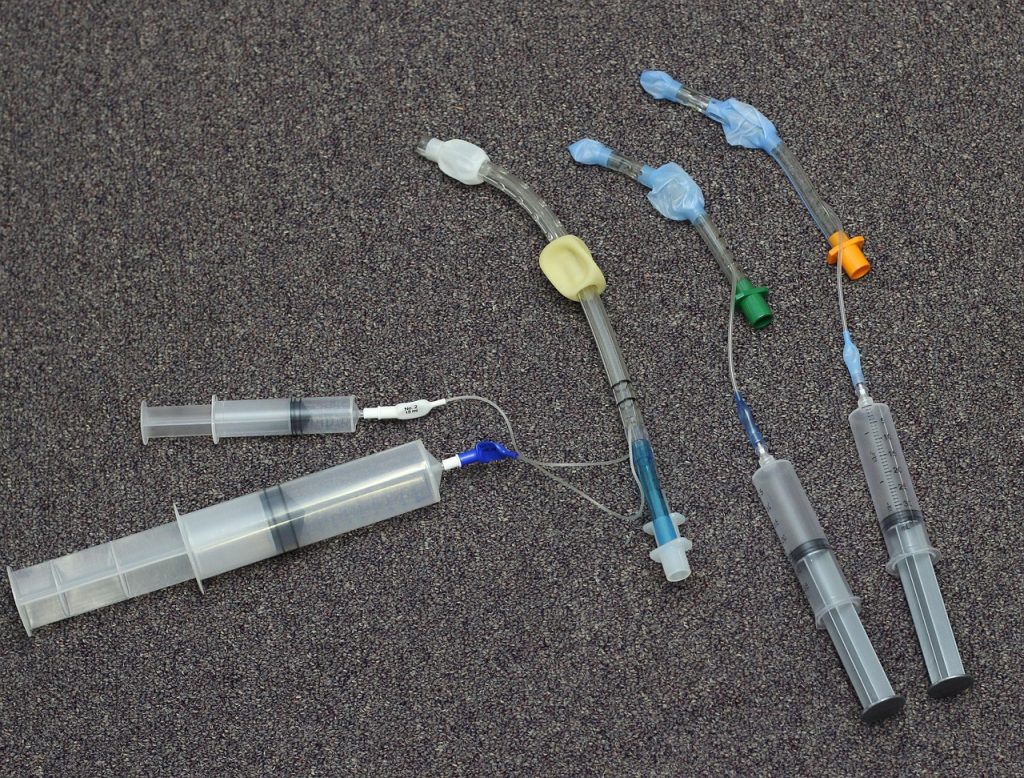
In summary, each of these non-visualized airway devices has specific components and accessories that contribute to its function. Understanding these components and their proper use is essential for EMS professionals to effectively manage patients’ airways in emergencies. Proper training and adherence to established protocols are crucial for safe and successful airway management.
To learn more about these devices and their part, visit the Second Generation Supraglottic Airway (SGA) Devices webpage.
Indications and Contraindications for the Use of Non-Visualized Airways
The primary indications for the use of non-visualized airway insertion center around situations where a patient is unable to maintain their own airway or is in respiratory arrest. Regardless of the underlying cause, respiratory insufficiency necessitates immediate airway management, making non-visualized airways an appropriate intervention. Similarly, respiratory arrest, often identified by the absence of spontaneous breathing, demands prompt action to secure the airway. In unconscious patients, particularly those without a gag reflex, inadequate respirations further emphasize the need for airway support, making these devices essential. The absence of a gag reflex is particularly important as it reduces the risk of aspiration during insertion.
Conversely, several contraindications exist that preclude the use of non-visualized airways. Patient size is a critical factor; the device must be appropriately sized to ensure a proper seal and avoid complications. Manufacturers provide sizing guidelines, and local protocols often specify minimum height or weight requirements. An active gag reflex is a strong contraindication, as it increases the risk of vomiting and aspiration during insertion. Ingestion of caustic substances is another contraindication, as these substances can damage the esophagus and airway, and insertion of an airway device could exacerbate the injury.
Pre-existing esophageal disease, whether known or suspected, represents a contraindication to non-visualized airway use. These conditions can make insertion difficult or increase the risk of complications like perforation. Similarly, any known or suspected obstruction of the larynx or trachea, such as from a foreign body or swelling, makes these devices inappropriate as they may worsen the obstruction. Attempting to force an airway past an obstruction can cause further injury and compromise the patient’s airway.
Finally, patients with a tracheostomy or laryngectomy present a unique situation. These patients typically breathe through the stoma in the neck, and inserting a non-visualized airway through the mouth or nose would bypass the established airway. In these cases, airway management should focus on the existing stoma. Recognizing these contraindications is as important as understanding the indications, as it ensures patient safety and optimizes the chances of successful airway management.

Insertion and Use of Non-Visualized Airways
The insertion and use of a non-visualized airway is an important skill for EMS providers managing patients requiring advanced airway management. Before any attempt at any airway insertion, appropriate PPE is essential. This includes gloves, eye protection, and a face shield to minimize the risk of exposure to bodily fluids. If required by local protocols or medical direction, permission must be obtained from medical control before proceeding with the procedure. The chosen supraglottic airway device (SGA) should then be prepared according to the manufacturer’s instructions, ensuring it is ready for immediate insertion.
Before inserting any SGA, the patient should be thoroughly preoxygenated using a bag-valve-mask (BVM) with high-concentration oxygen. This step maximizes the patient’s oxygen reserves, providing a safety buffer during the procedure. Effective preoxygenation involves ensuring a good mask seal and delivering adequate tidal volumes. Once the patient is adequately preoxygenated, the non-visualized airway can be inserted following the manufacturer’s recommended guidelines. These guidelines typically involve specific head positioning and insertion techniques to facilitate proper placement of the device.
Following insertion, primary confirmation of correct placement is essential. This involves observing for chest rise, confirming CO2 exchange, and auscultating for the presence of bilateral lung sounds, indicating that the device is correctly positioned and ventilation is reaching the lungs. Initially auscultating over the epigastrium (stomach) is crucial to confirm the absence of gurgling sounds, which would suggest esophageal placement. When lung sounds are present and epigastric sounds are absent, the device is likely in the correct position. The standard for advanced airway placement confirmation uses a colorimetric CO2 detector, capnometry, or capnography. These tools provide objective measures of exhaled carbon dioxide, confirming proper placement, and providing continuous monitoring of airway effectiveness during ventilation.
It is essential to ventilate the patient at an age-appropriate rate and tidal volume. Over-ventilation or under-ventilation can have detrimental effects on the patient.
Proper insertion technique maximizes effectiveness and minimizes complications. During resuscitation, gastric distention may occur. Gastric distention can fill the stomach causing expansion, reducing the ability of the lungs to expand fully during ventilation, and increasing the risk of regurgitation and aspiration.
The SGA must be secured according to the manufacturer’s recommendations. This typically involves using a securing device or tape to prevent dislodgement of the airway.
Continuous monitoring of the patient’s respiratory status, including chest rise, lung sounds, and capnography readings, is required to ensure that adequate ventilation and oxygenation are maintained throughout transport and further management.
View the following YouTube videos that demonstrate the use of each of the primary supraglottic airways:
i-gel® supraglottic airway from Intersurgical – training and guidance
Combitube®
Insertion Steps
- Don full PPE, including gloves, eye protection, and face shield.
- Select appropriate size by patient height.
- Prepare the Combitube® according to manufacturer instructions; check cuffs and lubricate the distal tip.
- Preoxygenate the patient with a BVM and 100% oxygen for at least 2 minutes.
- Position the patient’s head in a neutral or slightly extended position, unless spinal injury is suspected.
- Gently insert the Combitube® along the midline until the printed depth markers align with the patient’s teeth.
- Inflate both cuffs (larger blue #1 pharyngeal first, then smaller white #2) with the appropriate volume of air, using the labeled syringes.
- Start ventilation through the blue (#1) tube, as esophageal placement is most common.
Confirmation of Placement
- Assess chest rise, gastric sounds, lung sounds, and capnography.
- If ventilation is ineffective through the blue tube, switch to the white (#2) tube and reassess.
- Confirm absence of epigastric gurgling and presence of bilateral breath sounds.
Gastric Decompression
- If the Combitube® is in the esophagus (most common), insert a suction catheter into the white tube (#2).
- Connect suction and decompress the stomach to reduce aspiration risk and abdominal pressure on the diaphragm.
Removal Procedure
- Contact medical control if required by protocol.
- Assemble equipment: suction unit, BVM, oxygen, and alternative airway tools.
- Preoxygenate the patient again.
- Suction the oropharynx thoroughly.
- Deflate both cuffs (larger blue pharyngeal first, then smaller white esophageal) completely before removing the device.
- Gently withdraw the tube while suctioning, and reassess the patient’s airway.
- Provide supplemental oxygen and monitor respiratory effort.
King LTS-D™
Insertion Steps
- Wear full PPE and assess for airway obstruction or trauma.
- Select the correct King LTS-D™ size based on patient height.
- Check inflation balloon and lubricate the tip of the device.
- Preoxygenate with a BVM and 100% oxygen for several minutes.
- Position the patient’s head in a neutral position; open the mouth using the cross-finger technique.
- Insert tube along the tongue, starting at a 45-90 degree angle from the midline and moving to midline once behind the tongue.
- Advance the King LTS-D™ along the tongue’s curve until the base of the connector aligns with the teeth.
- Inflate the single cuff with the appropriate air volume.
- Slightly withdraw the device if needed to achieve a tight seal.
Confirmation of Placement
- Ventilate and observe for chest rise, lung sounds, and capnography confirmation.
- Confirm that there are no gastric sounds upon auscultation.
Gastric Decompression
- Insert a gastric tube through the King’s gastric port.
- Connect to a suction unit and decompress the stomach.
Removal Procedure
- Gather all needed supplies, including suction, BVM, oxygen, and backup airway device.
- Preoxygenate the patient with high-concentration oxygen.
- Suction the airway thoroughly.
- Deflate the cuff completely.
- Gently remove the device while suctioning continuously.
- Provide supplemental oxygen and monitor respiratory effectiveness.
i-gel®
Insertion Steps
- Don appropriate PPE.
- Select the correct i-gel® size based on the patient’s weight.
- Inspect and lubricate the back and sides of the device.
- Preoxygenate using a BVM with 100% oxygen.
- Place the patient’s head in a sniffing or neutral position.
- Gently slide the i-gel® into the oropharynx along the hard palate and advance until resistance is met.
- The i-gel® automatically seats itself over the glottic opening without the need to inflate a cuff.
Confirmation of Placement
- Begin ventilation and assess for visible chest rise and bilateral breath sounds.
- Use capnography or a colorimetric CO₂ detector to confirm airway placement.
- Listen for absence of epigastric gurgling.
Gastric Decompression
- Insert a nasogastric (NG) or suction catheter through the gastric channel.
- Connect to suction to remove air or fluid from the stomach.
Removal Procedure
- Prepare suction, oxygen source, BVM, and potential replacement airway.
- Preoxygenate the patient for several minutes.
- Thoroughly suction the oropharynx.
- Gently remove the i-gel® in a single, smooth motion while applying suction.
- Monitor respiratory effort, saturation, and consider replacing the airway if needed.
Comparative Summary Table
| Feature | Combitube® | King LTS-D™ | i-gel® |
| Insertion Type | Blind, dual-lumen | Blind, single-lumen | Blind, anatomical gel cuff |
| Cuffs Required | Yes – 2 cuffs | Yes – 1 cuff | No – conforms anatomically |
| Size Selection | Based on height | Based on height | Based on weight |
| CO₂ Confirmation | Yes – both lumens | Yes – via single lumen | Yes – single lumen |
| Gastric Decompression | Yes – via white tube | Yes – separate gastric port | Yes – gastric channel |
| Tracheal Ventilation Possible | Yes (rare, white tube) | No | No |
| Suction on Removal | Required | Required | Required |
| Insertion Complexity | Moderate | Simple | Simple |
Field Tips for EMRs
- Always perform adequate preoxygenation and gather all necessary supplies before insertion or removal.
- Capnography is the gold standard to verify placement and monitor airway effectiveness.
- Continue to reassess chest rise, breath sounds, capnography, and oxygen saturation throughout care.
- Prepare for gastric decompression to reduce aspiration risk during ventilation.
- If the patient regains consciousness or gag reflex, the device should be promptly removed to prevent vomiting.
Summary of Respiratory Assessment and Initial Management
Initial Assessment:
Upon arrival at the scene, EMS providers must immediately assess the patient’s airway, breathing, and circulation (ABCs). This involves evaluating the patient’s level of consciousness, respiratory rate, depth, and pattern. Look for signs of respiratory distress, such as nasal flaring, accessory muscle use, and retractions. Listen to confirm bilateral lung sounds are present. Assess the patient’s skin color and temperature.
Ventilation Assessment:
Ventilation refers to the movement of air into and out of the lungs. Assess the patient’s chest rise and fall, and determine if the chest expands symmetrically. Look for any signs of chest trauma or deformity that may impair ventilation. Evaluate the patient’s ability to speak or cough, as this can indicate the adequacy of their ventilation. Listen for abnormal breath sounds, such as wheezing, stridor, or crackles.
Respiration Assessment:
Respiration refers to the exchange of gases (oxygen and carbon dioxide) between the lungs and the blood. Assess the patient’s oxygen saturation level, and look for signs of cyanosis (bluish discoloration of the skin) which may indicate inadequate oxygenation. Consider the patient’s medical history and any potential causes of respiratory distress, such as asthma, pneumonia, or pulmonary embolism.
Management of Ventilation and Respiration Issues:
If the patient is not breathing or is breathing inadequately, EMS providers must immediately intervene. This may involve providing supplemental oxygen, assisting with ventilations using a BVM device, or securing the airway with an advanced airway.
Ongoing Monitoring:
Throughout the patient’s care, EMS providers must continuously monitor their ventilation and respiration status. This includes reassessing their respiratory rate, depth, and pattern, as well as their oxygen saturation level. Any changes in the patient’s condition should be promptly addressed, and appropriate interventions should be initiated as needed.
Documentation:
Accurate and thorough documentation of the patient’s ventilation and respiration assessment and management is necessary. This includes documenting the patient’s initial presentation, any interventions performed, and their response to treatment. This information ensures continuity of care and facilitates communication between EMS providers and other healthcare professionals.
Summary Table: Signs and Management of Respiratory States
| Condition | Signs | Management |
| Respiratory Distress | Increased RR, normal SpO₂, working harder to breathe | Oxygen therapy, monitor, rapid transport |
| Respiratory Failure | Decreased tidal volume, altered mental status, falling SpO₂ | BVM with oxygen, PPV, consider airway adjuncts |
| Respiratory Arrest | No breathing, cyanosis, unresponsive, absent SpO₂ | Immediate CPR, BVM, initiate BLS protocols |
8.10 Glossary
- Alveoli: tiny air sacs in the lungs where gas exchange takes place
- Apnea/Apneic: not breathing
- BIAD: blind insertion airway device
- Bronchi: hollow tubes branch off from the trachea
- Bronchioles: thinner, smaller tube branching off the bronchi and connect to the alveoli
- BVM: bag-valve-mask device
- Cricoid cartilage: a ring-shaped structure that forms the lower portion of the larynx
- Dead space: the portion of the tidal volume (the volume of air inhaled or exhaled in a single breath) that does not participate in gas exchange
- Epiglottis: leaf-shaped flap of cartilage, sits at the entrance to the larynx
- FBAO: foreign body airway obstruction
- Flail chest: multiple rib fractures causing chest wall instability
- Hemothorax: blood in the chest cavity
- Hypoxemia: low oxygen levels in your blood
- Hypoxia: low levels of oxygen in the tissues of your body
- Larynx: voice box
- LMA: laryngeal mask airway
- Mandible: lower jaw
- Maxilla: upper jaw
- NPA: nasopharyngeal airway
- OPA: oropharyngeal airway
- Oxygenation: presence of or delivery of oxygen to blood or tissues
- Pharynx: throat
- Pneumothorax: collapsed lung
- PPVD: positive pressure ventilation devices, including mouth-to-mouth with a barrier device, pocket masks, and bag-valve-masks (BVMs)
- Respiration: cellular exchange of oxygen and carbon dioxide at the cellular level, in the lungs (external) and in tissues (internal)
- SGA: supraglottic airway device
- Stoma: opening in neck to the trachea to allow breathing
- Stridor: a high-pitched whistling sound at the larynx and vocal cords, can indicate airway compromise
- Thyroid cartilage: protects the front of the larynx and forms the Adam’s apple
- Tidal volume: the volume of air inhaled or exhaled in a single breath
- Trachea: the windpipe
- Ventilation: exchange of oxygen and carbon dioxide with the environment; breathing
References
Ball, M. (2023). Anatomy, airway. StatPearls [Internet]. https://www.ncbi.nlm.nih.gov/books/NBK459258/
Boundless. (2024). 39.6: Gas exchange across respiratory surfaces – basic principles of gas exchange. Biology LibreTexts. https://bio.libretexts.org/Bookshelves/Introductory_and_General_Biology/General_Biology_(Boundless)/39%3A_The_Respiratory_System/39.06%3A_Gas_Exchange_across_Respiratory_Surfaces_-_Basic_Principles_of_Gas_Exchange
Boundless. (2024b). 39.8: Gas exchange across respiratory surfaces – gas exchange across the alveoli. Biology LibreTexts. https://bio.libretexts.org/Bookshelves/Introductory_and_General_Biology/General_Biology_(Boundless)/39%3A_The_Respiratory_System/39.08%3A_Gas_Exchange_across_Respiratory_Surfaces_-_Gas_Exchange_across_the_Alveoli#:~:text=The%20change%20in%20partial%20pressure,the%20tissue%20and%20the%20carbon
Bucher, J. T., Vashisht, R., Ladd, M., & Cooper, J. S. (2023). Bag-valve-mask ventilation. StatPearls [Internet]. https://www.ncbi.nlm.nih.gov/books/NBK441924/
Charbek, E. (2024). Normal vital signs. Medscape. https://emedicine.medscape.com/article/2172054-overview?form=fpf
Chourpiliadis, C., & Bhardwaj, A. (2022). Physiology, respiratory rate. StatPearls [Internet]. https://www.ncbi.nlm.nih.gov/books/NBK537306/
Cleveland Clinic. (2024). What are your airways? https://my.clevelandclinic.org/health/body/airway
Cleveland Clinic. (2025). Respiratory system. https://my.clevelandclinic.org/health/body/21205-respiratory-system
Cleveland Clinic. (2025a). A guide to your kid’s vital signs. https://health.clevelandclinic.org/pediatric-vital-signs
CPR Select. (n.d.). What is bag valve mask: When and how to use BVM ventilation. https://www.mycprcertificationonline.com/bag-valve-mask
CPR Select. (2024). How to perform the head tilt-chin lift maneuver. https://www.mycprcertificationonline.com/courses/bls/head-tilt-chin-lift#:~:text=The%20head%20tilt%20chin%20lift,open%20airway%20in%20unconscious%20individuals
Di Cicco, M., Kantar, A., Masini, B., Nuzzi, G., Ragazzo, V., & Peroni, D. (2020). Structural and functional development in airways throughout childhood: Children are not small adults. Pediatric Pulmonology, 56(1), 240–251. https://doi.org/10.1002/ppul.25169
Ernstmeyer, K., & Christman, E. (Eds.). (2023). Nursing skills 2e. Open RN. https://wtcs.pressbooks.pub/nursingskills/
Frysh, P. (2025). Stridor. WebMD. https://www.webmd.com/lung/what-is-stridor#:~:text=4%20min%20read-,What%20Is%20Stridor%3F,narrow%20or%20partly%20blocked%20airway
Habrat, D. (2022). How to do bag-valve-mask (BVM) ventilation. Merck Manual Professional Edition. https://www.merckmanuals.com/professional/critical-care-medicine/how-to-do-basic-airway-procedures/how-to-do-bag-valve-mask-bvm-ventilation#:~:text=Bag%2Dvalve%2Dmask%20(BVM)%20ventilation%20is%20the%20standard,apnea%20or%20severe%20ventilatory%20failure
Mayo Foundation for Medical Education and Research. (2016). Critical airway management in kids. Mayo Clinic. https://www.mayoclinic.org/medical-professionals/trauma/news/critical-airway-management-in-kids/mac-20429698#:~:text=Jaw%20thrust%20and%20suction&text=This%20opens%20the%20airway%20by,blood%2C%20vomit%20and%20other%20secretions
Mayo Foundation for Medical Education and Research. (2024). Cardiopulmonary resuscitation (CPR): First aid. Mayo Clinic. https://www.mayoclinic.org/first-aid/first-aid-cpr/basics/art-20056600#:~:text=chin%2Dlift%20maneuver.-,Pinch%20the%20nostrils%20shut%20for%20mouth%2Dto%2Dmouth%20breathing%20and,to%20give%20two%20rescue%20breaths
Potchileev, I. (2023). Positive pressure ventilation. StatPearls [Internet]. https://www.ncbi.nlm.nih.gov/books/NBK560916/
Rhodes, C. E. (2022). Physiology, oxygen transport. StatPearls [Internet]. https://www.ncbi.nlm.nih.gov/books/NBK538336/#:~:text=Most%20oxygen%20in%20the%20blood,physically%20dissolved%20in%20the%20plasma.&text=Approximately%2098%25%20of%20total%20oxygen,is%20dissolved%20directly%20in%20plasma
Singh, K. (2020). Second generation supraglottic airway (SGA) devices. IntechOpen. https://www.intechopen.com/chapters/73593
Department of Health & Human Services, Victoria. (2014). Intern manual (4th edition) – Immediate management of surgical emergencies. https://www.health.vic.gov.au/publications/intern-manual-4th-edition-immediate-management-of-surgical-emergencies
The Royal Children’s Hospital Melbourne. (n.d.). How are children different? https://www.rch.org.au/trauma-service/manual/how-are-children-different/
Thim, T., Krarup, N. H. V., Grove, E. L., Rohde, C. V., & Lofgren, B. (2012). Initial assessment and treatment with the airway, breathing, circulation, disability, exposure (ABCDE) approach. International Journal of General Medicine, (5), 117–121. https://doi.org/10.2147/ijgm.s28478
U.S. Department of Health and Human Services. (2022). What breathing does for the body. National Heart Lung and Blood Institute. https://www.nhlbi.nih.gov/health/lungs/breathing-benefits#:~:text=Breathing%20in,-When%20you%20breathe&The%20muscles%20between%20your%20ribs,and%20outward%20when%20you%20inhale
U.S. National Library of Medicine. (2024). Aging changes in the lungs. MedlinePlus [Internet]. https://medlineplus.gov/ency/article/004011.htm
Whited, L. (2023). Abnormal respirations. StatPearls [Internet]. https://www.ncbi.nlm.nih.gov/books/NBK470309/#:~:text=Respiratory%20disorders%20can%20significantly%20impact,a%20buildup%20of%20carbon%20dioxide
Images:
Figure 8.1: ”2301_Major_Respiratory_Organs” by OpenStax College is licensed under CC BY 3.0
Figure 8.2:“2309 The Respiratory Zone.jpg” by OpenStax College is licensed under CC BY 3.0.
Figure 8.3: ”Adult_and_pediatric_airway_anatomy” by Open Critical Care & World Health Organization is licensed under CC BY 4.0
Figure 8.4: ”Head-tilt-chin-lift-maneuver” by Another-anon-artist-234 is licensed under CC0, Public Domain
Figure 8.5: ”Jaw_thrust_maneuver” by Randhillon is licensed under CC BY-SA 4.0
Figure 8.6: Image modified from EMS Skills – Nasopharyngeal Airway Insertion [Video] by WCTCFire&EMS is licensed under CC BY 4.0
Figure 8.7: “Nasopharyngeal_Airway_2” by ICUnurses is licensed under CC BY-SA 4.0
Figure 8.8: Image modified from EMS Skills – Oropharyngeal Airway Insertion [Video] by WCTCFire&EMS is licensed under CC BY 4.0
Figure 8.9: “Oropharyngeal_Airways” by Hospital is licensed under CC BY-SA 3.0
Figure 8.10: ”F15” by unknown author is licensed under CC BY 3.0. Access for free at https://www.intechopen.com/chapters/73593
Figure 8.11 :”F17” by unknown author is licensed under CC BY 3.0. Access for free at https://www.intechopen.com/chapters/73593
Figure 8.12: ”F14” by unknown author is licensed under CC BY 3.0. Access for free at https://www.intechopen.com/chapters/73593
Figure 8.13: “biad-king-airway-combitube-1936581” by kkirkemtp via Pixabay is licensed under CC0
Figure 8.14: “Tracheostomy NIH.jpg” by National Heart Lung and Blood Institute is in the Public Domain.
Figure 8.15: Alveolus” by Prina123 is licensed under CC BY-SA 3.0
Figure 8.16: “Dual System of the Human Blood Circulation” by OpenStax College is licensed under CC By 4.0
Figure 8.17: ”Asthma_attack-illustration_NIH” by United States-National Institute of Health: National Heart, Lung, Blood Institute is in the Public Domain
Figure 8.18:”New_Pneumonia_cartoon” by Gambo7 is licensed under CC BY-SA 3.0
Figure 8.19:”Cellular_respiration_EN” by Zlir’a is licensed under CC BY-SA 4.0
Figure 8.20: ”1904_Hemoglobin” by OpenStax College is licensed under CC BY 3.0
Figure 8.21: “Hemoglobin_saturation_curve” by Rehua is in the Public Domain.
Figure 8.22: “Cynosis.JPG” by James Heilman, MD is licensed under CC BY-SA 3.0
Figure 8.23: “Image00011.jpg” by British Columbia Institute of Technology is licensed under CC BY 4.0. Access for free at https://opentextbc.ca/clinicalskills/chapter/5-5-oxygen-therapy-systems
Figure 8.24: “DSC_2086.jpg” by British Columbia Institute of Technology is licensed under CC BY 4.0. Access for free at https://opentextbc.ca/clinicalskills/chapter/5-5-oxygen-therapy-systems/
Figure 8.25: “DSC_2083.jpg” by British Columbia Institute of Technology is licensed under CC BY 4.0. Access for free at https://opentextbc.ca/clinicalskills/chapter/5-5-oxygen-therapy-systems/
Figure 8.26: “Ballon ventilation 1.jpg” by Rama is licensed under CC BY-SA 2.0 FR
Figure 8.27: “Simulated patient wearing a BiPAP mask” by Chippewa Valley Technical College is licensed under CC BY 4.0
Figure 8.28: ”Bvm-with-two-medics” by Baedr-9439 is licensed under CC0, Public Domain
Videos:
Medzcool. (2018, June 27). Lung and breath sounds playlist [Video]. YouTube. All rights reserved. https://www.youtube.com/playlist?list=PL3n8cHP87ijAalXtLG2YbDpuwjxuJRR-A
WCTSFire&EMS. (2013, July 30). EMS Skills – Manual Airway Techniques [Video]. YouTube. CC BY 4.0. https://www.youtube.com/watch?v=vLNzHcKNPtY
WCTSFire&EMS. (2013, July 30). EMS Skills – Oropharyngeal Airway Insertion [Video]. YouTube. All rights reserved. https://www.youtube.com/watch?v=vgqOrmBskaw
WCTSFire&EMS. (2013, July 30). EMS Skills – Nasopharyngeal Airway Insertion [Video]. YouTube. All rights reserved. https://www.youtube.com/watch?v=uALM3HqtTnI
American Red Cross. (2024, August 12). What to do when an adult is choking (responsive) [Video]. YouTube. All rights reserved. https://www.youtube.com/watch?v=8R3RWC-xx1I
American Red Cross. (2024, August 12). What to do when an adult is choking (Unresponsive) [Video]. YouTube. All rights reserved. https://www.youtube.com/watch?v=9pTnepZd5as
ProCPR. (2009, November 24). Conscious adult choking [Video]. YouTube. All rights reserved. https://www.youtube.com/watch?v=XOTbjDGZ7wg
American Red Cross. (2024, August 12). What to do when an infant is choking (Responsive) [Video]. YouTube. All rights reserved. https://www.youtube.com/watch?v=ShaNuST_58A
ProCPR. (2016, April 8). Conscious child choking [Video]. YouTube. All rights reserved. https://www.youtube.com/watch?v=ZjmbD7aIaf0&t=9s
American Red Cross. (2024, August 12). What to do when an infant is choking (Unresponsive) [Video]. YouTube. All rights reserved. https://www.youtube.com/watch?v=NF9oSpXt19c
WCTSFire&EMS. (2013, July 30). EMS Skills – Pharyngeal Suctioning (Flexible Tip) [Video]. YouTube. All rights reserved. https://www.youtube.com/watch?v=l_qL_tYVUMk
WCTSFire&EMS. (2013, July 30). EMS Skills – Pharyngeal Suctioning – Rigid Tip [Video]. YouTube. All rights reserved. https://www.youtube.com/watch?v=uALM3HqtTnI
LTC EMS Program. (2019, August 18). Combi Tube [Video]. YouTube. All rights reserved. https://www.youtube.com/watch?v=VL_Ux5Luxx8
LTC EMS Program. (2019, August 18). King LTS-D [Video]. YouTube. All rights reserved. https://www.youtube.com/watch?v=86OGtNofIUE
intersurgical. (2017, December 7). i-gel® supraglottic airway from Intersurgical – training and guidance [Video]. YouTube. All rights reserved. https://www.youtube.com/watch?v=Z0962B8axAY
A.D.A.M. (2024, July 15). Breathing [Video]. MedlinePlus. All rights reserved. https://medlineplus.gov/ency/anatomyvideos/000018.htm#:~:text=When%20the%20lungs%20exhale%2C%20the,the%20pressure%20within%20it%20increases.
NHLBI. (2019, September 17). Airways and gas exchange [Video]. YouTube. All rights reserved. https://www.youtube.com/watch?v=Y7KsJ-wHRQI&t=6s
DrBruce Forciea. (2015, May 13). Respiratory System Anatomy (v2.0) [Video]. YouTube. All rights reserved. https://www.youtube.com/watch?v=aqTwrdMS6CE
DrBruce Forciea. (2015, May 12). Anatomy and Physiology: Respiratory System: Breathing Mechanics (v2.0) [Video]. YouTube. All rights reserved. https://www.youtube.com/watch?v=X-J5Xgg3l6s

